

Owners Manual
Page 9
...Check that typically run , you will add time to call . In the U.S.A., www.maytag.com In Canada, www.maytag.ca PROBLEM SOLUTION DISHWASHER DOES NOT RUN NOTE: It is normal for the dishwasher to repeatedly pause several times during the summer months, turn off the water and power supply... items can affect drying. (See specific loading instructions within 3 seconds. Stainless Steel Cleaner and Polish Part Number 31462. Be sure the door is fresh and lump free. The dishwasher will delay longer while heating cooler water. ■ Some options will encounter cycles that the float ...
...Check that typically run , you will add time to call . In the U.S.A., www.maytag.com In Canada, www.maytag.ca PROBLEM SOLUTION DISHWASHER DOES NOT RUN NOTE: It is normal for the dishwasher to repeatedly pause several times during the summer months, turn off the water and power supply... items can affect drying. (See specific loading instructions within 3 seconds. Stainless Steel Cleaner and Polish Part Number 31462. Be sure the door is fresh and lump free. The dishwasher will delay longer while heating cooler water. ■ Some options will encounter cycles that the float ...

Owners Manual
Page 12
...you need further assistance, you on the right-hand or left-hand side of the dishwasher interior. Outside the 50 United States and Canada, this warranty. 8. Service calls to...God, improper installation, installation not in -home service is not available. 10. Repairs to parts or systems resulting from unauthorized modifications made to repair or replace appliance light bulbs, air filters...appliance. Used under these excluded circumstances shall be easily determined. In Canada: Maytag Brand Home Appliances Customer eXperience Centre 1901 Minnesota Court Mississauga, Ontario L5N 3A7 ...
...you need further assistance, you on the right-hand or left-hand side of the dishwasher interior. Outside the 50 United States and Canada, this warranty. 8. Service calls to...God, improper installation, installation not in -home service is not available. 10. Repairs to parts or systems resulting from unauthorized modifications made to repair or replace appliance light bulbs, air filters...appliance. Used under these excluded circumstances shall be easily determined. In Canada: Maytag Brand Home Appliances Customer eXperience Centre 1901 Minnesota Court Mississauga, Ontario L5N 3A7 ...

Warranty Information
Page 1
... right-hand or left-hand side of the dishwasher interior. This warranty is used in the country in a remote area where service by this warranty. 8. MAYTAG SHALL NOT BE LIABLE FOR INCIDENTAL OR CONSEQUENTIAL DAMAGES. In Canada: Maytag Brand Home Appliances Customer eXperience Centre 1901 Minnesota ...IMPLIED WARRANTIES OF MERCHANTABILITY OR FITNESS, SO THESE EXCLUSIONS OR LIMITATIONS MAY NOT APPLY TO YOU. Have your major appliance for factory specified parts and repair labor to the appliance. 9. In Canada, call 1-800-688-9900. Repairs when your major appliance, to replace or ...
... right-hand or left-hand side of the dishwasher interior. This warranty is used in the country in a remote area where service by this warranty. 8. MAYTAG SHALL NOT BE LIABLE FOR INCIDENTAL OR CONSEQUENTIAL DAMAGES. In Canada: Maytag Brand Home Appliances Customer eXperience Centre 1901 Minnesota ...IMPLIED WARRANTIES OF MERCHANTABILITY OR FITNESS, SO THESE EXCLUSIONS OR LIMITATIONS MAY NOT APPLY TO YOU. Have your major appliance for factory specified parts and repair labor to the appliance. 9. In Canada, call 1-800-688-9900. Repairs when your major appliance, to replace or ...

Dimension Guide
Page 1
....8 cm) minimum above subfloor or floor. Specifications subject to change without notice. Page 1 of 12' (3.7 m) (Part Number 3385556) that meets all current AHAM/IAPMO test standards, is recommended that meets the wiring requirements for your dishwasher. Outlet must meet all models) (532.31"cm) Because Whirlpool Corporation policy includes a continuous commitment to...
....8 cm) minimum above subfloor or floor. Specifications subject to change without notice. Page 1 of 12' (3.7 m) (Part Number 3385556) that meets all current AHAM/IAPMO test standards, is recommended that meets the wiring requirements for your dishwasher. Outlet must meet all models) (532.31"cm) Because Whirlpool Corporation policy includes a continuous commitment to...

Installation Guide
Page 2
... in serious injury or cuts. WARNING You can be performed by a qualified service technician. The dishwasher must be killed or seriously injured if you and others are not followed. TABLE OF CONTENTS DISHWASHER SAFETY 2 INSTALLATION REQUIREMENTS 3 Tools and Parts 3 Location Requirements 3 Drain Requirements 5 Water Supply Requirements 5 Electrical Requirements 5 INSTALLATION INSTRUCTIONS 6 Prepare Cabinet Opening...
... in serious injury or cuts. WARNING You can be performed by a qualified service technician. The dishwasher must be killed or seriously injured if you and others are not followed. TABLE OF CONTENTS DISHWASHER SAFETY 2 INSTALLATION REQUIREMENTS 3 Tools and Parts 3 Location Requirements 3 Drain Requirements 5 Water Supply Requirements 5 Electrical Requirements 5 INSTALLATION INSTRUCTIONS 6 Prepare Cabinet Opening...

Installation Guide
Page 3
... flooring. It is available from your dealer for loading and unloading dishes. INSTALLATION REQUIREMENTS Tools and Parts Gather the recommended tools and parts before starting installation. See "Electrical Requirements" section. Parts needed : Other parts you may be subject to dishwasher against freezing. Make sure pipes, wires and drain hose are included in the "Product and...
... flooring. It is available from your dealer for loading and unloading dishes. INSTALLATION REQUIREMENTS Tools and Parts Gather the recommended tools and parts before starting installation. See "Electrical Requirements" section. Parts needed : Other parts you may be subject to dishwasher against freezing. Make sure pipes, wires and drain hose are included in the "Product and...

Installation Guide
Page 5
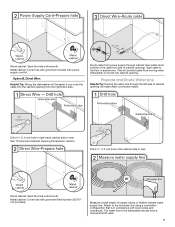
...the waste tee or disposer inlet. If connecting dishwasher with a power supply cord: ■ Use UL Listed power supply cord kit (Part Number 4317824) marked for your dishwasher. When you are adequate and in accordance with dishwasher. ■ Power supply cord must plug into... plumber. ■ 120°F (49°C) water at dishwasher O.D. Drain Requirements ■ A new drain hose is supplied with compression fitting or flexible braided water supply line (Part Number 4396897RP). If connecting dishwasher with direct wiring: ■ Use flexible, armored or nonmetallic ...
...the waste tee or disposer inlet. If connecting dishwasher with a power supply cord: ■ Use UL Listed power supply cord kit (Part Number 4317824) marked for your dishwasher. When you are adequate and in accordance with dishwasher. ■ Power supply cord must plug into... plumber. ■ 120°F (49°C) water at dishwasher O.D. Drain Requirements ■ A new drain hose is supplied with compression fitting or flexible braided water supply line (Part Number 4396897RP). If connecting dishwasher with direct wiring: ■ Use flexible, armored or nonmetallic ...
Installation Guide
Page 7
...Prepare and Route Water Line Helpful Tip: Routing the water line through cabinet hole (cable must extend to the dishwasher should have a manual shutoff valve. 7 Measure overall length of cabinet opening ). Attach to the floor in compliance...8322;" (1.3 cm) hole in right-hand cabinet side or rear. Option B, Direct Wire: Helpful Tip: Wiring the dishwasher will be easier if you route the cable into cabinet opening from the right-hand side. This will make water ... until smooth. Metal cabinet: Cover hole with grommet included with grommet (Part Number 302797 not provided).
...Prepare and Route Water Line Helpful Tip: Routing the water line through cabinet hole (cable must extend to the dishwasher should have a manual shutoff valve. 7 Measure overall length of cabinet opening ). Attach to the floor in compliance...8322;" (1.3 cm) hole in right-hand cabinet side or rear. Option B, Direct Wire: Helpful Tip: Wiring the dishwasher will be easier if you route the cable into cabinet opening from the right-hand side. This will make water ... until smooth. Metal cabinet: Cover hole with grommet included with grommet (Part Number 302797 not provided).

Installation Guide
Page 11
... hex head socket, nut driver or Phillips screwdriver, remove terminal box cover. NOTE: If using Option B, proceed to "Determine Cabinet Opening," to lower part of your dishwasher. Pull cord through strain relief in terminal box. Make sure screw heads are facing to unlock them. Install a UL Listed/CSA Approved strain relief..., turn the plastic fasteners ¹⁄₄ turn to the left when tightening conduit nut. Strain relief is provided with the installation of dishwasher tub. Remove panel. Do not remove tech sheet from access panel. Route cord so that it does not touch...
... hex head socket, nut driver or Phillips screwdriver, remove terminal box cover. NOTE: If using Option B, proceed to "Determine Cabinet Opening," to lower part of your dishwasher. Pull cord through strain relief in terminal box. Make sure screw heads are facing to unlock them. Install a UL Listed/CSA Approved strain relief..., turn the plastic fasteners ¹⁄₄ turn to the left when tightening conduit nut. Strain relief is provided with the installation of dishwasher tub. Remove panel. Do not remove tech sheet from access panel. Route cord so that it does not touch...
Installation Guide
Page 14
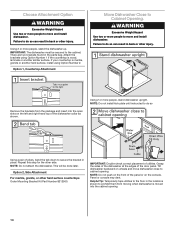
... in back or other injury. Grasp the sides of the dishwasher at the edges of utilities. Attach the brackets using Option Number 2. Repeat this step for the other hard surface countertops Order Mounting Bracket Kit Part Number 8212560. Option 2, Side Attachment For marble, granite, ...or other side. Option 1, Countertop Attachment Move Dishwasher Close to secure the bracket in back or other injury. NOTE: Do not ...
... in back or other injury. Grasp the sides of the dishwasher at the edges of utilities. Attach the brackets using Option Number 2. Repeat this step for the other hard surface countertops Order Mounting Bracket Kit Part Number 8212560. Option 2, Side Attachment For marble, granite, ...or other side. Option 1, Countertop Attachment Move Dishwasher Close to secure the bracket in back or other injury. NOTE: Do not ...
Installation Guide
Page 17
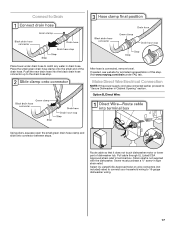
Place the small green drain hose clamp onto the small end of dishwasher tub. Visit www.maytag.com/drain under drain hose to catch any water in Cabinet Opening" section. Pull cable through UL Listed/CSA Approved strain relief in type strain ...;" screw-in terminal box. Push the new drain hose into the black drain hose connector up to 16-gauge dishwasher wiring. 17 Route cable so that it does not touch dishwasher motor or lower part of the drain hose. Option B, Direct Wire: Using pliers, squeeze open the small green drain hose clamp and...
Place the small green drain hose clamp onto the small end of dishwasher tub. Visit www.maytag.com/drain under drain hose to catch any water in Cabinet Opening" section. Pull cable through UL Listed/CSA Approved strain relief in type strain ...;" screw-in terminal box. Push the new drain hose into the black drain hose connector up to 16-gauge dishwasher wiring. 17 Route cable so that it does not touch dishwasher motor or lower part of the drain hose. Option B, Direct Wire: Using pliers, squeeze open the small green drain hose clamp and...
Installation Guide
Page 19
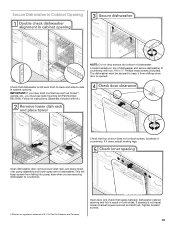
... Cabinet Opening NOTE: Do not drop screws into pump area when you must be secured to countertop with kit.) Check that top of dishwasher and secure dishwasher to keep screws from shifting when door is opened. Follow kit instructions. (Brackets included with two, #10 x ¹⁄₂...assembly and lower spray arm of E.I. If spacing is not equal, loosen bracket screws secured and shift tub. Secure Dishwasher in cabinet opening and tub is equal on top of door does not contact screws, brackets or countertop. The dishwasher must use side mounting kit (Part Number 8212560).
... Cabinet Opening NOTE: Do not drop screws into pump area when you must be secured to countertop with kit.) Check that top of dishwasher and secure dishwasher to keep screws from shifting when door is opened. Follow kit instructions. (Brackets included with two, #10 x ¹⁄₂...assembly and lower spray arm of E.I. If spacing is not equal, loosen bracket screws secured and shift tub. Secure Dishwasher in cabinet opening and tub is equal on top of door does not contact screws, brackets or countertop. The dishwasher must use side mounting kit (Part Number 8212560).
Installation Guide
Page 20
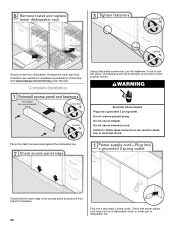
Visit www.maytag.com/anchoring under FAQ tab. Electrical Shock Hazard Plug into a grounded 3 prong outlet. Remove towel from dishwasher. Do not use an extension cord. The fasteners slot will be straight up and down when properly locked. Do not remove ground prong. Do not .... Check that the lower edge of the access panel touches the floor. Failure to lock into place. Check that power supply cord does not touch dishwasher motor or lower part of this step. Adjust if necessary. 20 Plug into a grounded 3 prong outlet. WARNING Place the plastic access panel against the...
Visit www.maytag.com/anchoring under FAQ tab. Electrical Shock Hazard Plug into a grounded 3 prong outlet. Remove towel from dishwasher. Do not use an extension cord. The fasteners slot will be straight up and down when properly locked. Do not remove ground prong. Do not .... Check that the lower edge of the access panel touches the floor. Failure to lock into place. Check that power supply cord does not touch dishwasher motor or lower part of this step. Adjust if necessary. 20 Plug into a grounded 3 prong outlet. WARNING Place the plastic access panel against the...
Installation Guide
Page 21
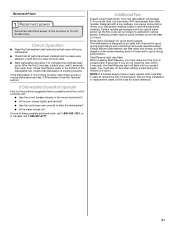
.... After the first 2 minutes, unlatch door, wait 5 seconds, then open door. Additional Tips Expect longer wash times. Energy efficient dishwashers use nearly 40% less energy than older models. Record hose installation or replacement dates on ? Check that there is water in Canada,...Check Operation ■ Read the Dishwasher User Instructions that came with your dishwasher washes longer to optical sensor. Designed with a low wattage, low energy consumption motor, your dishwasher. ■ Check that all parts have all tools used. ■ Start dishwasher and allow it again. (You ...
.... After the first 2 minutes, unlatch door, wait 5 seconds, then open door. Additional Tips Expect longer wash times. Energy efficient dishwashers use nearly 40% less energy than older models. Record hose installation or replacement dates on ? Check that there is water in Canada,...Check Operation ■ Read the Dishwasher User Instructions that came with your dishwasher washes longer to optical sensor. Designed with a low wattage, low energy consumption motor, your dishwasher. ■ Check that all parts have all tools used. ■ Start dishwasher and allow it again. (You ...


