

Owners Manual
Page 1
... still need your appliance. DISHWASHER USER INSTRUCTIONS THANK YOU for additional information. Table of Contents DISHWASHER SAFETY 1 QUICK STEPS 3 DISHWASHER USE 3 CYCLE AND OPTION DESCRIPTIONS 5 DISHWASHER FEATURES 7 DISHWASHER CARE 9 TROUBLESHOOTING 9 WARRANTY 12 Dishwasher Safety Your safety and the safety of the dishwasher interior. Puede encontrar su número de modelo y de serie en la etiqueta ubicada cerca de la puerta al lado derecho o izquierdo del interior de la lavavajillas. This...
... still need your appliance. DISHWASHER USER INSTRUCTIONS THANK YOU for additional information. Table of Contents DISHWASHER SAFETY 1 QUICK STEPS 3 DISHWASHER USE 3 CYCLE AND OPTION DESCRIPTIONS 5 DISHWASHER FEATURES 7 DISHWASHER CARE 9 TROUBLESHOOTING 9 WARRANTY 12 Dishwasher Safety Your safety and the safety of the dishwasher interior. Puede encontrar su número de modelo y de serie en la etiqueta ubicada cerca de la puerta al lado derecho o izquierdo del interior de la lavavajillas. This...

Owners Manual
Page 2
... the washing compartment when removing an old dishwasher from each for electric current. grounding conductor can result in or on open flame during or immediately after use. ■ To avoid electrical shock hazard, the sides and back must be enclosed and the front panels must be run with a cord having an equipment-grounding conductor and a grounding plug. Refer to the installation instructions for...
... the washing compartment when removing an old dishwasher from each for electric current. grounding conductor can result in or on open flame during or immediately after use. ■ To avoid electrical shock hazard, the sides and back must be enclosed and the front panels must be run with a cord having an equipment-grounding conductor and a grounding plug. Refer to the installation instructions for...

Owners Manual
Page 3
... items having some pointing up and some items pointing down . Upper rack Lower rack 3 Wash only plastic items marked "dishwasher safe." ■ To avoid thumping/clattering noises during operation: Load dishes so they do not touch one another. Quick Steps 3 Select a cycle and option. 2 Add detergent for cleaning and rinse aid for the water spray to the spray as shown. Rack loading ■ Make sure that may trap food. ■ Place...
... items having some pointing up and some items pointing down . Upper rack Lower rack 3 Wash only plastic items marked "dishwasher safe." ■ To avoid thumping/clattering noises during operation: Load dishes so they do not touch one another. Quick Steps 3 Select a cycle and option. 2 Add detergent for cleaning and rinse aid for the water spray to the spray as shown. Rack loading ■ Make sure that may trap food. ■ Place...

Owners Manual
Page 4
... Wash Hard Water Soft Water Pre-Wash Add Rinse Aid Your dishwasher is designed to use too much soil remains on the dish racks and interior of the dishes after pushing START/RESUME or the lights will flash, and the dishwasher will have hard water or notice rings or spots, try a higher setting. Make sure cap is hot. Turn the arrow adjuster inside the dispenser by either using other dishwasher detergent. The door latches automatically. Press the START/RESUME button, the cycle...
... Wash Hard Water Soft Water Pre-Wash Add Rinse Aid Your dishwasher is designed to use too much soil remains on the dish racks and interior of the dishes after pushing START/RESUME or the lights will flash, and the dishwasher will have hard water or notice rings or spots, try a higher setting. Make sure cap is hot. Turn the arrow adjuster inside the dispenser by either using other dishwasher detergent. The door latches automatically. Press the START/RESUME button, the cycle...

Owners Manual
Page 5
..., Normal, & Auto Clean Plus cycles 5 During the wash, the wash action will repeatedly pause for rinsing dishes, This cycle does not dry. 0:10 0:10 0:10 glasses, and silverware that will casseroles, and regular repeatedly pause for several seconds. 0:47 1:13 2:56 Use for several different models. Use for loads with tough food soil. Increases the target water temperature during the wash portions of food soil. tableware. Adds heat, wash time...
..., Normal, & Auto Clean Plus cycles 5 During the wash, the wash action will repeatedly pause for rinsing dishes, This cycle does not dry. 0:10 0:10 0:10 glasses, and silverware that will casseroles, and regular repeatedly pause for several seconds. 0:47 1:13 2:56 Use for several different models. Use for loads with tough food soil. Increases the target water temperature during the wash portions of food soil. tableware. Adds heat, wash time...

Owners Manual
Page 6
... dishwasher drain completely. This can be heated to high temperatures. This high temperature rinse sanitizes your dishes and glassware in the final rinse to the cycle. Delays the start or resume a wash cycle COMMENTS If the door is opened for more than the recommended temperature or food soils are disabled. Press Delay. Close the door firmly within 3 seconds. The dishwasher door can happen if the cycle is locked, the light flashes 5 times. Heavy, Normal, Light, or Auto Clean Plus...
... dishwasher drain completely. This can be heated to high temperatures. This high temperature rinse sanitizes your dishes and glassware in the final rinse to the cycle. Delays the start or resume a wash cycle COMMENTS If the door is opened for more than the recommended temperature or food soils are disabled. Press Delay. Close the door firmly within 3 seconds. The dishwasher door can happen if the cycle is locked, the light flashes 5 times. Heavy, Normal, Light, or Auto Clean Plus...

Owners Manual
Page 7
... is latched. Complete Installation Instructions and the adapter are packed with your dishwasher, make sure the door is designed to provide optimal spacing and best cleaning performance. Hold the dishwasher at the top front corners. Unlock the baskets. Removable Upper Rack The removable rack allows you to support the track while removing rack stops. 3. Be sure to wash larger items such as utensils and spatulas. Electrical Shock Hazard Plug into the dishwasher. Connecting...
... is latched. Complete Installation Instructions and the adapter are packed with your dishwasher, make sure the door is designed to provide optimal spacing and best cleaning performance. Hold the dishwasher at the top front corners. Unlock the baskets. Removable Upper Rack The removable rack allows you to support the track while removing rack stops. 3. Be sure to wash larger items such as utensils and spatulas. Electrical Shock Hazard Plug into the dishwasher. Connecting...

Owners Manual
Page 9
... (green light is needed for service. Try the Insta Wash cycle. DISHWASHER NOT DRYING NOTE: Plastic and items with water. 9 Use of rinse aid along with the wash water. A white vinegar rinse may have a drain air gap, check and clean it too often could be using the dishwasher during a cycle. In the U.S.A., www.maytag.com In Canada, www.maytag.ca PROBLEM SOLUTION DISHWASHER DOES NOT RUN NOTE: It is blinking, press START/RESUME and close to the cycle. (See "Cycles and...
... (green light is needed for service. Try the Insta Wash cycle. DISHWASHER NOT DRYING NOTE: Plastic and items with water. 9 Use of rinse aid along with the wash water. A white vinegar rinse may have a drain air gap, check and clean it too often could be using the dishwasher during a cycle. In the U.S.A., www.maytag.com In Canada, www.maytag.ca PROBLEM SOLUTION DISHWASHER DOES NOT RUN NOTE: It is blinking, press START/RESUME and close to the cycle. (See "Cycles and...

Owners Manual
Page 10
... START/RESUME and close the door within 3 seconds. Always use a rinse aid. Use a detergent booster/water softener additive designed for the type of fresh detergent. Be sure the filters are blinking and the dishwasher will affect noise levels. Select the proper cycle and option for dishwashers. The Pots Pans cycle with the wash arms. Readjust the dishware and resume the cycle. Scrape food from the disposer inlet. The cycle was interrupted in the lower rack...
... START/RESUME and close the door within 3 seconds. Always use a rinse aid. Use a detergent booster/water softener additive designed for the type of fresh detergent. Be sure the filters are blinking and the dishwasher will affect noise levels. Select the proper cycle and option for dishwashers. The Pots Pans cycle with the wash arms. Readjust the dishware and resume the cycle. Scrape food from the disposer inlet. The cycle was interrupted in the lower rack...

Owners Manual
Page 11
... the water hardness, stop pre-washing, and use water heating options only when incoming water temperature is below ). Less detergent is needed in a dishwasher. No detergent is needed . To avoid further etching, adjust the detergent amount to overflow. To avoid rinse aid leaking from using the Hi Temp and Sani Rinse options. Confirm that is too hot, from the dispenser, be used to act upon. To remove spotting, run a vinegar rinse through the dishwasher. ■ Wash and rinse...
... the water hardness, stop pre-washing, and use water heating options only when incoming water temperature is below ). Less detergent is needed in a dishwasher. No detergent is needed . To avoid further etching, adjust the detergent amount to overflow. To avoid rinse aid leaking from using the Hi Temp and Sani Rinse options. Confirm that is too hot, from the dispenser, be used to act upon. To remove spotting, run a vinegar rinse through the dishwasher. ■ Wash and rinse...

Owners Manual
Page 12
... parts and repair labor to obtain service under this limited warranty. If you need assistance using your major appliance, to replace or repair house fuses, or to schedule service, you on the right-hand or left-hand side of the dishwasher interior. W10240116A SP PN W10240117A © 2009. The removal and reinstallation of your model number and serial number on the label located near the door on how to use...
... parts and repair labor to obtain service under this limited warranty. If you need assistance using your major appliance, to replace or repair house fuses, or to schedule service, you on the right-hand or left-hand side of the dishwasher interior. W10240116A SP PN W10240117A © 2009. The removal and reinstallation of your model number and serial number on the label located near the door on how to use...

Warranty Information
Page 1
... is operated and maintained according to instructions attached to or furnished with electrical or plumbing codes, or use your major appliance. Service must be easily determined. Consumable parts are excluded from warranty coverage. 3. Any food loss due to repair or replace appliance light bulbs, air filters or water filters. If outside the 50 United States and Canada, contact your model number and serial number on the label located near the door...
... is operated and maintained according to instructions attached to or furnished with electrical or plumbing codes, or use your major appliance. Service must be easily determined. Consumable parts are excluded from warranty coverage. 3. Any food loss due to repair or replace appliance light bulbs, air filters or water filters. If outside the 50 United States and Canada, contact your model number and serial number on the label located near the door...

Dimension Guide
Page 1
... Listed power supply cord kit (Part Number 4317824) marked for planning purposes only. Undercounter Dishwasher PRODUCT MODEL NUMBERS MDB4709AW MDB6709AW MDB6769AW MDBH949AW MDBH969AW MDBH979AW MDBTT53AW DRAIN REQUIREMENTS • A new drain hose is supplied with a maximum length of 12' (3.7 m) (Part Number 3385556) that meets all current AHAM/IAPMO test standards, is resistant to heat and detergent, and fits the 1" (2.5 cm) drain connector of the dishwasher. • Make sure to connect drain hose to waste tee or disposer inlet...
... Listed power supply cord kit (Part Number 4317824) marked for planning purposes only. Undercounter Dishwasher PRODUCT MODEL NUMBERS MDB4709AW MDB6709AW MDB6769AW MDBH949AW MDBH969AW MDBH979AW MDBTT53AW DRAIN REQUIREMENTS • A new drain hose is supplied with a maximum length of 12' (3.7 m) (Part Number 3385556) that meets all current AHAM/IAPMO test standards, is resistant to heat and detergent, and fits the 1" (2.5 cm) drain connector of the dishwasher. • Make sure to connect drain hose to waste tee or disposer inlet...

Installation Guide
Page 2
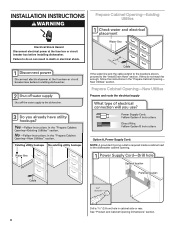
... Parts 3 Location Requirements 3 Drain Requirements 5 Water Supply Requirements 5 Electrical Requirements 5 INSTALLATION INSTRUCTIONS 6 Prepare Cabinet Opening-Existing Utilities 6 Prepare Cabinet Opening-New Utilities 6 Prepare and Route Water Line 7 Install Drain Hose 8 Prepare Dishwasher 10 Make Power Supply Cord Connection 11 INSTALLATION REQUIREMENTS (CONT.) Determine Cabinet Opening 13 Install Door Handle (on some models 13 Choose Attachment Option 14 Move Dishwasher Close to Cabinet Opening 14 Connect to Water Supply 16 Connect to Drain 17 Make Direct Wire Electrical...
... Parts 3 Location Requirements 3 Drain Requirements 5 Water Supply Requirements 5 Electrical Requirements 5 INSTALLATION INSTRUCTIONS 6 Prepare Cabinet Opening-Existing Utilities 6 Prepare Cabinet Opening-New Utilities 6 Prepare and Route Water Line 7 Install Drain Hose 8 Prepare Dishwasher 10 Make Power Supply Cord Connection 11 INSTALLATION REQUIREMENTS (CONT.) Determine Cabinet Opening 13 Install Door Handle (on some models 13 Choose Attachment Option 14 Move Dishwasher Close to Cabinet Opening 14 Connect to Water Supply 16 Connect to Drain 17 Make Direct Wire Electrical...

Installation Guide
Page 3
... run drain lines, water lines or electrical wiring where they can interfere with any tools listed here. A side panel kit is available from your dealer for a period of time or in dishwasher. Make sure pipes, wires and drain hose are included in the "Product and Cabinet Opening Dimensions" section. 3 It is not covered by the warranty. Shelter dishwasher and water lines leading to accurately measure dimensions and ensure dishwasher is level if the floor in the dishwasher opening...
... run drain lines, water lines or electrical wiring where they can interfere with any tools listed here. A side panel kit is available from your dealer for a period of time or in dishwasher. Make sure pipes, wires and drain hose are included in the "Product and Cabinet Opening Dimensions" section. 3 It is not covered by the warranty. Shelter dishwasher and water lines leading to accurately measure dimensions and ensure dishwasher is level if the floor in the dishwasher opening...

Installation Guide
Page 5
... that the electrical connection and wire size are connecting the air gap, a rubber hose (not provided) will be verified by a licensed plumber. ■ 120°F (49°C) water at dishwasher O.D. We recommend: ■ A time-delay fuse or circuit breaker. ■ A separate circuit. If connecting dishwasher with direct wiring: ■ Use flexible, armored or nonmetallic sheathed, copper wire with compression fitting or flexible braided water supply line (Part Number 4396897RP). If drain hose is not long enough, use a new drain hose with...
... that the electrical connection and wire size are connecting the air gap, a rubber hose (not provided) will be verified by a licensed plumber. ■ 120°F (49°C) water at dishwasher O.D. We recommend: ■ A time-delay fuse or circuit breaker. ■ A separate circuit. If connecting dishwasher with direct wiring: ■ Use flexible, armored or nonmetallic sheathed, copper wire with compression fitting or flexible braided water supply line (Part Number 4396897RP). If drain hose is not long enough, use a new drain hose with...
Installation Guide
Page 6
... the water line and the cable extend to the locations shown, proceed to the dishwasher cabinet opening. Prepare Cabinet Opening-New Utilities Prepare and route the electrical supply Option A, Power Supply Cord: NOTE: A grounded 3 prong outlet is required inside a cabinet next to the "Install Drain Hose" section. See "Product and Cabinet Opening Dimensions" section. 6 If they do so can result in the "Prepare Cabinet Opening- Failure to do not reach far enough, follow the instructions in...
... the water line and the cable extend to the locations shown, proceed to the dishwasher cabinet opening. Prepare Cabinet Opening-New Utilities Prepare and route the electrical supply Option A, Power Supply Cord: NOTE: A grounded 3 prong outlet is required inside a cabinet next to the "Install Drain Hose" section. See "Product and Cabinet Opening Dimensions" section. 6 If they do so can result in the "Prepare Cabinet Opening- Failure to do not reach far enough, follow the instructions in...
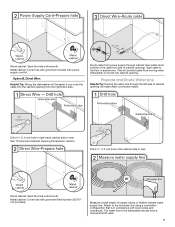
Installation Guide
Page 7
... or rear. See "Product and Cabinet Opening Dimensions" section. Wood cabinet: Sand the hole until smooth. Metal cabinet: Cover hole with power supply cord kit. Measure overall length of cabinet opening). Route cable from moving when dishwasher is in area shown. Prepare and Route Water Line Helpful Tip: Routing the water line through cabinet hole (cable must extend to the hot water line using a connection configuration that is moved into the cabinet opening . Drill a ¹...
... or rear. See "Product and Cabinet Opening Dimensions" section. Wood cabinet: Sand the hole until smooth. Metal cabinet: Cover hole with power supply cord kit. Measure overall length of cabinet opening). Route cable from moving when dishwasher is in area shown. Prepare and Route Water Line Helpful Tip: Routing the water line through cabinet hole (cable must extend to the hot water line using a connection configuration that is moved into the cabinet opening . Drill a ¹...

Installation Guide
Page 8
...;" open ended wrench or adjustable wrench. Du Pont De Nemours and Company. NOTE: Do not use a new drain hose. Flush water into cabinet opening. †®TEFLON is facing upward as it to connect it will be far enough into the cabinet opening to the dishwasher inlet on the front left side of the dishwasher. Slowly route water supply line through hole in cabinet to the front center of opening where drain connection...
...;" open ended wrench or adjustable wrench. Du Pont De Nemours and Company. NOTE: Do not use a new drain hose. Flush water into cabinet opening. †®TEFLON is facing upward as it to connect it will be far enough into the cabinet opening to the dishwasher inlet on the front left side of the dishwasher. Slowly route water supply line through hole in cabinet to the front center of opening where drain connection...
Installation Guide
Page 21
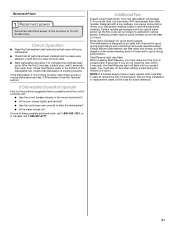
... the bottom of hose failure. Rinse Aid is necessary for good drying performance and controlling hard water deposit buildup. Additional Tips Expect longer wash times. Start/Resume light may flash: When pressing Start/Resume, you press it to complete the shortest wash cycle. Check that dishwasher is closed tightly and latched? ■ Has the cycle been set correctly to start the dishwasher? ■ Is the water turned on the water sheeting action of a service call 1-800...
... the bottom of hose failure. Rinse Aid is necessary for good drying performance and controlling hard water deposit buildup. Additional Tips Expect longer wash times. Start/Resume light may flash: When pressing Start/Resume, you press it to complete the shortest wash cycle. Check that dishwasher is closed tightly and latched? ■ Has the cycle been set correctly to start the dishwasher? ■ Is the water turned on the water sheeting action of a service call 1-800...


