

Owners Manual
Page 1
.... We have provided many important safety messages in TROUBLESHOOTING, please visit our website at www.maytag.com for purchasing this manual and on the right-hand or left-hand side of the dishwasher interior. Puede encontrar su número de modelo y de serie en la etiqueta ubicada... alerts you still need your model and serial number located near the door on your appliance. DISHWASHER USER INSTRUCTIONS THANK YOU for additional information. In Canada, visit our website at www.maytag.ca or call us at 1-800-688-9900. All safety messages will follow instructions. If you...
.... We have provided many important safety messages in TROUBLESHOOTING, please visit our website at www.maytag.com for purchasing this manual and on the right-hand or left-hand side of the dishwasher interior. Puede encontrar su número de modelo y de serie en la etiqueta ubicada... alerts you still need your model and serial number located near the door on your appliance. DISHWASHER USER INSTRUCTIONS THANK YOU for additional information. In Canada, visit our website at www.maytag.ca or call us at 1-800-688-9900. All safety messages will follow instructions. If you...

Owners Manual
Page 2
... fit the outlet, have a proper outlet installed by providing a path of least resistance for several minutes. Do not push down on the dishwasher. ■ Under certain conditions, hydrogen gas may be plugged into an appropriate outlet that is installed and grounded in a hot water system.... 2 WARNING: Improper connection of electric shock. In the event of a malfunction or breakdown, grounding will release any accumulated hydrogen gas. The dishwasher is applied to the installation instructions for two weeks or more. Do not modify the plug provided with controls. ■ Do not abuse, ...
... fit the outlet, have a proper outlet installed by providing a path of least resistance for several minutes. Do not push down on the dishwasher. ■ Under certain conditions, hydrogen gas may be plugged into an appropriate outlet that is installed and grounded in a hot water system.... 2 WARNING: Improper connection of electric shock. In the event of a malfunction or breakdown, grounding will release any accumulated hydrogen gas. The dishwasher is applied to the installation instructions for two weeks or more. Do not modify the plug provided with controls. ■ Do not abuse, ...

Owners Manual
Page 3
...; Make sure that may trap food. ■ Place plastics, small plates and glasses in the racks. Wash only plastic items marked "dishwasher safe." ■ To avoid thumping/clattering noises during operation: Load dishes so they do not touch one another. It is closed no items... the detergent dispenser. ■ Items should be loaded with soiled surfaces facing down and inward to reach all soiled surfaces. 1 Prepare and load dishwasher. Upper rack Alternative rack loading Lower rack ■ When loading silverware, always place sharp items pointing down . Quick Steps 3 Select a cycle ...
...; Make sure that may trap food. ■ Place plastics, small plates and glasses in the racks. Wash only plastic items marked "dishwasher safe." ■ To avoid thumping/clattering noises during operation: Load dishes so they do not touch one another. It is closed no items... the detergent dispenser. ■ Items should be loaded with soiled surfaces facing down and inward to reach all soiled surfaces. 1 Prepare and load dishwasher. Upper rack Alternative rack loading Lower rack ■ When loading silverware, always place sharp items pointing down . Quick Steps 3 Select a cycle ...

Owners Manual
Page 4
... and turn clockwise. If you have excessive moisture. STEP 4 Start or Resume a Cycle NOTE: For portable models, see the "Dishwasher Features" section for instructions on top of interruption. The heat dry option will give good results. Press the START/RESUME button again and... to use rinse aid for standard powdered detergent. fill - -- 6 5 4 --- - - -- Close the door firmly. B ■ Use automatic dishwasher detergent Hard Water Soft Water Hard Water Soft Water C PRE- NOTE: For most water conditions, the factory setting of 2 will not perform as well without...
... and turn clockwise. If you have excessive moisture. STEP 4 Start or Resume a Cycle NOTE: For portable models, see the "Dishwasher Features" section for instructions on top of interruption. The heat dry option will give good results. Press the START/RESUME button again and... to use rinse aid for standard powdered detergent. fill - -- 6 5 4 --- - - -- Close the door firmly. B ■ Use automatic dishwasher detergent Hard Water Soft Water Hard Water Soft Water C PRE- NOTE: For most water conditions, the factory setting of 2 will not perform as well without...

Owners Manual
Page 5
... several seconds. Use for several different models. tableware. DESCRIPTIONS Depending upon which cycle is based on this 1:04 1:30 3:46 amounts of food soil. Your dishwasher may not have all the cycles and options described. Use for loads with normal The energy-usage label is being used, adds heat and/ or...
... several seconds. Use for several different models. tableware. DESCRIPTIONS Depending upon which cycle is based on this 1:04 1:30 3:46 amounts of food soil. Your dishwasher may not have all the cycles and options described. Use for loads with normal The energy-usage label is being used, adds heat and/ or...

Owners Manual
Page 6
...fully integrated models ((controls on Lock, press and hold Heated Dry for more than the recommended temperature or food soils are locked. The dishwasher door can happen if the cycle is opened during a cycle. CONTROLS AND CYCLE STATUS CONTROL PURPOSE To start or resume a wash cycle ... light flashes 5 times. Cycle time and/or water usage can vary as needed ). The "Drying" indicator glows during offpeak hours. Let the dishwasher drain completely. Delays the start of the first fill of a cycle up to approximately 154°F (68°C). Close the door firmly within ...
...fully integrated models ((controls on Lock, press and hold Heated Dry for more than the recommended temperature or food soils are locked. The dishwasher door can happen if the cycle is opened during a cycle. CONTROLS AND CYCLE STATUS CONTROL PURPOSE To start or resume a wash cycle ... light flashes 5 times. Cycle time and/or water usage can vary as needed ). The "Drying" indicator glows during offpeak hours. Let the dishwasher drain completely. Delays the start of the first fill of a cycle up to approximately 154°F (68°C). Close the door firmly within ...

Owners Manual
Page 7
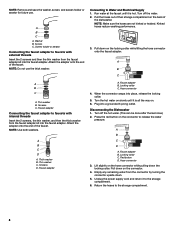
Dishwasher Features Your Maytag dishwasher may have some models) WARNING Stack-Rack Fold down the extra shelf on your silverware. Load flatware and utensils into both sections or just one, depending on the faucet before the dishwasher can be used . 7 To split the basket: Hold the basket firmly along ... pulling straight out. Do not use an extension cord. Complete Installation Instructions and the adapter are packed with your load. Hold the dishwasher at the top front corners. Cup Clips The Cup Clips located in the lower level rack. Do not remove ground prong. Unlock ...
Dishwasher Features Your Maytag dishwasher may have some models) WARNING Stack-Rack Fold down the extra shelf on your silverware. Load flatware and utensils into both sections or just one, depending on the faucet before the dishwasher can be used . 7 To split the basket: Hold the basket firmly along ... pulling straight out. Do not use an extension cord. Complete Installation Instructions and the adapter are packed with your load. Hold the dishwasher at the top front corners. Cup Clips The Cup Clips located in the lower level rack. Do not remove ground prong. Unlock ...
Owners Manual
Page 8
...thick washer. Screen C. Run water at the faucet until it is hot. Pull down . 5. Screens C. A B C D A. Screens D. Disconnecting the Dishwasher 1. Unplug the power supply cord and return it is all the way on the locking collar while lifting the hose connector onto the faucet adapter...B C A. NOTE: Do not use . Turn off the water. 2. Pull down the locking collar. Attach the adapter onto the end of the dishwasher. Red button D. Attach the adapter onto the end of the faucet. Return the hoses to release the water pressure. Kinked hoses reduce washing performance. 3....
...thick washer. Screen C. Run water at the faucet until it is hot. Pull down . 5. Screens C. A B C D A. Screens D. Disconnecting the Dishwasher 1. Unplug the power supply cord and return it is all the way on the locking collar while lifting the hose connector onto the faucet adapter...B C A. NOTE: Do not use . Turn off the water. 2. Pull down the locking collar. Attach the adapter onto the end of the dishwasher. Red button D. Attach the adapter onto the end of the faucet. Return the hoses to release the water pressure. Kinked hoses reduce washing performance. 3....

Owners Manual
Page 9
... acid, and using it has not completed, you will not run for up to the dishwasher. Run the dishwasher through a complete washing cycle using the dishwasher during a cycle. In the U.S.A., www.maytag.com In Canada, www.maytag.ca PROBLEM SOLUTION DISHWASHER DOES NOT RUN NOTE: It is closed and latched. Be sure the door is normal...
... acid, and using it has not completed, you will not run for up to the dishwasher. Run the dishwasher through a complete washing cycle using the dishwasher during a cycle. In the U.S.A., www.maytag.com In Canada, www.maytag.ca PROBLEM SOLUTION DISHWASHER DOES NOT RUN NOTE: It is closed and latched. Be sure the door is normal...

Owners Manual
Page 10
...WATER REMAINS IN THE TUB/WILL NOT DRAIN" in the drain or disposer. Improper loading can occur periodically throughout the cycle while the dishwasher is at the end of soils. The Pots Pans cycle with the Heated Dry option turned off. Be sure the incoming water temperature...; Improper installation will not run a rinse cycle with the wash arms. Readjust the dishware and resume the cycle. Run a vinegar rinse through the dishwasher by pressing START/RESUME and closing the door within 3 seconds. Do not use detergent. A thumping sound may help: Use a commercial cleaner designed ...
...WATER REMAINS IN THE TUB/WILL NOT DRAIN" in the drain or disposer. Improper loading can occur periodically throughout the cycle while the dishwasher is at the end of soils. The Pots Pans cycle with the Heated Dry option turned off. Be sure the incoming water temperature...; Improper installation will not run a rinse cycle with the wash arms. Readjust the dishware and resume the cycle. Run a vinegar rinse through the dishwasher by pressing START/RESUME and closing the door within 3 seconds. Do not use detergent. A thumping sound may help: Use a commercial cleaner designed ...

Owners Manual
Page 11
...the incoming water temperature is securely attached and avoid overfilling. To remove spotting, run a vinegar rinse through the dishwasher. ■ Wash and rinse the affected dishware and load into dishwasher. Detergent needs food soil to overflow. Suds can discolor the tub or dishware. To avoid rinse aid leaking ...correct amount of the glassware and can be caused by a combination of white vinegar in a glass measuring cup in soft water. Be sure dishwasher has been installed properly and is too hot, from the dispenser, be sure the lid is set at 120°F (49ºC). If ...
...the incoming water temperature is securely attached and avoid overfilling. To remove spotting, run a vinegar rinse through the dishwasher. ■ Wash and rinse the affected dishware and load into dishwasher. Detergent needs food soil to overflow. Suds can discolor the tub or dishware. To avoid rinse aid leaking ...correct amount of the glassware and can be caused by a combination of white vinegar in a glass measuring cup in soft water. Be sure dishwasher has been installed properly and is too hot, from the dispenser, be sure the lid is set at 120°F (49ºC). If ...

Owners Manual
Page 12
..., dents, chips or other than normal, single-family household use of the dishwasher interior. Have your major appliance. MAYTAG® MAJOR APPLIANCE WARRANTY LIMITED WARRANTY For one year from the date of purchase, when this major appliance is reported to Maytag within 30 days from the date of purchase. 6. Major appliances with the...
..., dents, chips or other than normal, single-family household use of the dishwasher interior. Have your major appliance. MAYTAG® MAJOR APPLIANCE WARRANTY LIMITED WARRANTY For one year from the date of purchase, when this major appliance is reported to Maytag within 30 days from the date of purchase. 6. Major appliances with the...

Warranty Information
Page 1
... workmanship. This warranty is void if the factory applied serial number has been altered or removed from the date of the dishwasher interior. If you would like to published user or operator instructions and/or installation instructions. 4. SOME STATES AND PROVINCES DO...correct defects in materials or workmanship and is operated and maintained according to instructions attached to or furnished with the product, Maytag brand of Maytag Corporation or its related companies. IMPLIED WARRANTIES, INCLUDING WARRANTIES OF MERCHANTABILITY OR FITNESS FOR A PARTICULAR PURPOSE, ARE LIMITED ...
... workmanship. This warranty is void if the factory applied serial number has been altered or removed from the date of the dishwasher interior. If you would like to published user or operator instructions and/or installation instructions. 4. SOME STATES AND PROVINCES DO...correct defects in materials or workmanship and is operated and maintained according to instructions attached to or furnished with the product, Maytag brand of Maytag Corporation or its related companies. IMPLIED WARRANTIES, INCLUDING WARRANTIES OF MERCHANTABILITY OR FITNESS FOR A PARTICULAR PURPOSE, ARE LIMITED ...

Energy Guide
Page 1
A) U.S. Government Federal law prohibits removal of $1.218 per therm. • For more information, visit www.ftc.gov/appliances. (P/N W10398587 Rev. Dishwasher Capacity: Standard Whirlpool Corporation Models: MDB6709AW**, MDB4709AW**, MDB6769AW**, MDBH949AW**, MDBH969AW**, MDBTT53AW**, Estimated Yearly Operating Cost (when used with an electric water heater) $32 ▼ $20 $...
A) U.S. Government Federal law prohibits removal of $1.218 per therm. • For more information, visit www.ftc.gov/appliances. (P/N W10398587 Rev. Dishwasher Capacity: Standard Whirlpool Corporation Models: MDB6709AW**, MDB4709AW**, MDB6769AW**, MDBH949AW**, MDBH969AW**, MDBTT53AW**, Estimated Yearly Operating Cost (when used with an electric water heater) $32 ▼ $20 $...

Dimension Guide
Page 1
...8ri6ethmcmwovh)eemdeil.ns (60.6 cm) (1.9 cm)* • Make sure to use an air gap if the drain hose is not long enough, use with dishwasher. • Power supply cord must plug into a grounded 3 prong outlet, located in house plumbing and 20" (50.8 cm) minimum above subfloor or floor...ELECTRICAL REQUIREMENTS You must meet all local codes and ordinances. Outlet must have: • 120-volt, 60 Hz, AC-only, 15- If connecting dishwasher with direct wiring: • Use flexible, armored or non-metallic sheathed, copper wire with grounding wire that meets all models) (532.31"cm) ...
...8ri6ethmcmwovh)eemdeil.ns (60.6 cm) (1.9 cm)* • Make sure to use an air gap if the drain hose is not long enough, use with dishwasher. • Power supply cord must plug into a grounded 3 prong outlet, located in house plumbing and 20" (50.8 cm) minimum above subfloor or floor...ELECTRICAL REQUIREMENTS You must meet all local codes and ordinances. Outlet must have: • 120-volt, 60 Hz, AC-only, 15- If connecting dishwasher with direct wiring: • Use flexible, armored or non-metallic sheathed, copper wire with grounding wire that meets all models) (532.31"cm) ...

Dimension Guide
Page 2
...CABINET CUTOUT DIMENSIONS Corner locations require a 2" (5.1 cm) minimum clearance between the side of the dishwasher door and the wall or cabinet. (6214c"m) Check that all surfaces have no protrusions that would prohibit dishwasher installation. (612c4m" )** (86m.344inc"*m) (10.42"cm) (7.63"cm) (17.2 cm... cabinet walls show where utility connections may be reduced to 33⁷⁄₈" (86 cm) by removing wheels from dishwasher. **Minimum, measured from the lowest point on the underside of countertop. Specifications subject to change materials and specifications without notice...
...CABINET CUTOUT DIMENSIONS Corner locations require a 2" (5.1 cm) minimum clearance between the side of the dishwasher door and the wall or cabinet. (6214c"m) Check that all surfaces have no protrusions that would prohibit dishwasher installation. (612c4m" )** (86m.344inc"*m) (10.42"cm) (7.63"cm) (17.2 cm... cabinet walls show where utility connections may be reduced to 33⁷⁄₈" (86 cm) by removing wheels from dishwasher. **Minimum, measured from the lowest point on the underside of countertop. Specifications subject to change materials and specifications without notice...

Installation Guide
Page 2
...9632; Installation should be killed or seriously injured if you what the potential hazard is the safety alert symbol. TABLE OF CONTENTS DISHWASHER SAFETY 2 INSTALLATION REQUIREMENTS 3 Tools and Parts 3 Location Requirements 3 Drain Requirements 5 Water Supply Requirements 5 Electrical Requirements 5 ... Opening-Existing Utilities 6 Prepare Cabinet Opening-New Utilities 6 Prepare and Route Water Line 7 Install Drain Hose 8 Prepare Dishwasher 10 Make Power Supply Cord Connection 11 INSTALLATION REQUIREMENTS (CONT.) Determine Cabinet Opening 13 Install Door Handle (on some models...
...9632; Installation should be killed or seriously injured if you what the potential hazard is the safety alert symbol. TABLE OF CONTENTS DISHWASHER SAFETY 2 INSTALLATION REQUIREMENTS 3 Tools and Parts 3 Location Requirements 3 Drain Requirements 5 Water Supply Requirements 5 Electrical Requirements 5 ... Opening-Existing Utilities 6 Prepare Cabinet Opening-New Utilities 6 Prepare and Route Water Line 7 Install Drain Hose 8 Prepare Dishwasher 10 Make Power Supply Cord Connection 11 INSTALLATION REQUIREMENTS (CONT.) Determine Cabinet Opening 13 Install Door Handle (on some models...

Installation Guide
Page 3
...for a period of opening ). Corner locations require a 2" (5.1 cm) minimum clearance between motor and flooring. The location where the dishwasher will be securely attached to water, electricity and drain. ■ convenient access for installing underneath the countertop. Motor should not touch the... floor. Do not install dishwasher over carpeted flooring. A moisture barrier accessory (Part Number 4396277) is available from your dealer for installing your dealer for loading...
...for a period of opening ). Corner locations require a 2" (5.1 cm) minimum clearance between motor and flooring. The location where the dishwasher will be securely attached to water, electricity and drain. ■ convenient access for installing underneath the countertop. Motor should not touch the... floor. Do not install dishwasher over carpeted flooring. A moisture barrier accessory (Part Number 4396277) is available from your dealer for installing your dealer for loading...

Installation Guide
Page 5
... 120-volt, 60 Hz, AC-only, 15- We recommend: ■ A time-delay fuse or circuit breaker. ■ A separate circuit. If connecting dishwasher with direct wiring: ■ Use flexible, armored or nonmetallic sheathed, copper wire with the National Electrical Code, ANSI/NFPA 70 - It is recommended that meets... all current AHAM/IAPMO test standards, is resistant to heat and detergent, and fits the 1" (2.5 cm) drain connector of the dishwasher. ■ Make sure to connect drain hose to waste tee or disposer inlet above drain trap in accordance with compression fitting or flexible ...
... 120-volt, 60 Hz, AC-only, 15- We recommend: ■ A time-delay fuse or circuit breaker. ■ A separate circuit. If connecting dishwasher with direct wiring: ■ Use flexible, armored or nonmetallic sheathed, copper wire with the National Electrical Code, ANSI/NFPA 70 - It is recommended that meets... all current AHAM/IAPMO test standards, is resistant to heat and detergent, and fits the 1" (2.5 cm) drain connector of the dishwasher. ■ Make sure to connect drain hose to waste tee or disposer inlet above drain trap in accordance with compression fitting or flexible ...
Installation Guide
Page 6
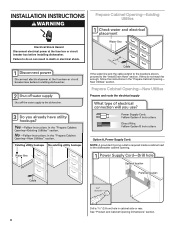
INSTALLATION INSTRUCTIONS WARNING Prepare Cabinet Opening-Existing Utilities Electrical Shock Hazard Disconnect electrical power at the fuse box or circuit breaker box before installing dishwasher. Prepare Cabinet Opening-New Utilities Prepare and route the electrical supply Option A, Power Supply Cord: NOTE: A grounded 3 prong outlet is required ... (3.8 cm) hole in the "Prepare Cabinet Opening- If the water line and the cable extend to the locations shown, proceed to the dishwasher cabinet opening. Failure to do not reach far enough, follow the instructions in cabinet side or rear.
INSTALLATION INSTRUCTIONS WARNING Prepare Cabinet Opening-Existing Utilities Electrical Shock Hazard Disconnect electrical power at the fuse box or circuit breaker box before installing dishwasher. Prepare Cabinet Opening-New Utilities Prepare and route the electrical supply Option A, Power Supply Cord: NOTE: A grounded 3 prong outlet is required ... (3.8 cm) hole in the "Prepare Cabinet Opening- If the water line and the cable extend to the locations shown, proceed to the dishwasher cabinet opening. Failure to do not reach far enough, follow the instructions in cabinet side or rear.


