
Installation Guide
Page 2
... 6 Water Supply Requirements 6 Electrical Requirements 6 INSTALLATION INSTRUCTIONS 7 Prepare Cabinet Opening-Existing Utilities 7 Prepare Cabinet Opening-New Utilities 7 Prepare and Route Water Line 8 Install Drain Hose 9 Prepare Dishwasher 11 INSTALLATION INSTRUCTIONS (CONT.) Make Power Supply Cord Connection 12 Determine Cabinet Opening 14 Choose Attachment Option 15 Prepare Water Supply Line 15 Move Dishwasher Close to Cabinet Opening 16 Connect to Water Supply 18 Connect to Drain 18 Make Direct Wire Electrical Connection 19 Secure Dishwasher in serious injury or cuts...
... 6 Water Supply Requirements 6 Electrical Requirements 6 INSTALLATION INSTRUCTIONS 7 Prepare Cabinet Opening-Existing Utilities 7 Prepare Cabinet Opening-New Utilities 7 Prepare and Route Water Line 8 Install Drain Hose 9 Prepare Dishwasher 11 INSTALLATION INSTRUCTIONS (CONT.) Make Power Supply Cord Connection 12 Determine Cabinet Opening 14 Choose Attachment Option 15 Prepare Water Supply Line 15 Move Dishwasher Close to Cabinet Opening 16 Connect to Water Supply 18 Connect to Drain 18 Make Direct Wire Electrical Connection 19 Secure Dishwasher in serious injury or cuts...
Installation Guide
Page 4
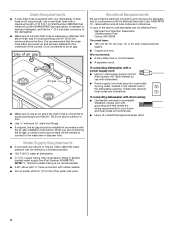
... dishwasher door and the wall or cabinet. ■ square opening for a period of your cabinetry. Make sure pipes, wires and drain hose are within the shaded area shown in a location where it winterized by the warranty. A side panel kit is available from your dealer for installing your dealer for loading and unloading dishes. Corner locations require a 2" (5.1 cm) minimum clearance between motor and flooring. Do not run drain lines, water lines or electrical wiring...
... dishwasher door and the wall or cabinet. ■ square opening for a period of your cabinetry. Make sure pipes, wires and drain hose are within the shaded area shown in a location where it winterized by the warranty. A side panel kit is available from your dealer for installing your dealer for loading and unloading dishes. Corner locations require a 2" (5.1 cm) minimum clearance between motor and flooring. Do not run drain lines, water lines or electrical wiring...
Installation Guide
Page 6
...; A new drain hose is supplied with rubber washer. ■ Do not solder within 6" (15.2 cm) of the water inlet valve. NOTE: ¹⁄₂" minimum plastic tubing is recommended that the electrical connection and wire size are connecting the air gap, a rubber hose (not provided) will be connected to an air gap. ■ Make sure to use a new drain hose with the air gap installation instructions. or 20-amp, fused electrical supply. ■ Copper wire only. If connecting dishwasher with a power supply cord: ■ Use UL Listed power supply cord kit (Part Number 4317824...
...; A new drain hose is supplied with rubber washer. ■ Do not solder within 6" (15.2 cm) of the water inlet valve. NOTE: ¹⁄₂" minimum plastic tubing is recommended that the electrical connection and wire size are connecting the air gap, a rubber hose (not provided) will be connected to an air gap. ■ Make sure to use a new drain hose with the air gap installation instructions. or 20-amp, fused electrical supply. ■ Copper wire only. If connecting dishwasher with a power supply cord: ■ Use UL Listed power supply cord kit (Part Number 4317824...
Installation Guide
Page 7
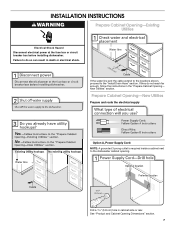
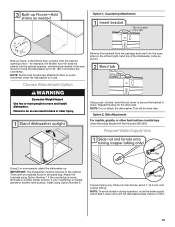
... Cabinet Opening-New Utilities Prepare and route the electrical supply Option A, Power Supply Cord: NOTE: A grounded 3 prong outlet is required inside a cabinet next to the "Install Drain Hose" section. See "Product and Cabinet Opening Dimensions" section. 7 If they do so can result in cabinet side or rear. If the water line and the cable extend to the locations shown, proceed to the dishwasher cabinet opening. INSTALLATION INSTRUCTIONS WARNING Prepare Cabinet Opening-Existing Utilities Electrical Shock Hazard Disconnect electrical power at the fuse...
... Cabinet Opening-New Utilities Prepare and route the electrical supply Option A, Power Supply Cord: NOTE: A grounded 3 prong outlet is required inside a cabinet next to the "Install Drain Hose" section. See "Product and Cabinet Opening Dimensions" section. 7 If they do so can result in cabinet side or rear. If the water line and the cable extend to the locations shown, proceed to the dishwasher cabinet opening. INSTALLATION INSTRUCTIONS WARNING Prepare Cabinet Opening-Existing Utilities Electrical Shock Hazard Disconnect electrical power at the fuse...
Installation Guide
Page 15
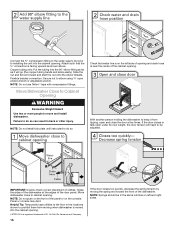
... during operation, route the water supply line so that it does not touch the dishwasher base, frame or motor. 15 NOTE: Shims must be secured to 34" (86.4 cm) below the countertop. Remove the brackets from the package and insert into the cabinet opening 's floor - There are two brackets found in place. Using a pair of the dishwasher collar as needed in use. IMPORTANT: The dishwasher must...
... during operation, route the water supply line so that it does not touch the dishwasher base, frame or motor. 15 NOTE: Shims must be secured to 34" (86.4 cm) below the countertop. Remove the brackets from the package and insert into the cabinet opening 's floor - There are two brackets found in place. Using a pair of the dishwasher collar as needed in use. IMPORTANT: The dishwasher must...
Installation Guide
Page 16
... that water line is on the left and right sides. Flexible braided connection: Secure nut to be in the same notches on the console. If the door closes or falls open under its own weight, the door tension will go (the copper tubing bends and kinks easily). Move dishwasher close the door a few times. NOTE: Do not install kick plate until instructed to cabinet opening. Panel or...
... that water line is on the left and right sides. Flexible braided connection: Secure nut to be in the same notches on the console. If the door closes or falls open under its own weight, the door tension will go (the copper tubing bends and kinks easily). Move dishwasher close the door a few times. NOTE: Do not install kick plate until instructed to cabinet opening. Panel or...
Installation Guide
Page 19
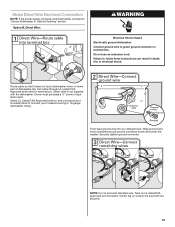
... the washer. Securely tighten ground connector. NOTE: Do not pre-twist stranded wire. Failure to 16-gauge dishwasher wiring. Owner must purchase a ⁷⁄₈" screw-in terminal box. Gently tug on wire connectors (not included) rated to connect your household wiring to follow these instructions can result in Cabinet Opening" section. Route cable so that it does not touch dishwasher motor or lower part of dishwasher...
... the washer. Securely tighten ground connector. NOTE: Do not pre-twist stranded wire. Failure to 16-gauge dishwasher wiring. Owner must purchase a ⁷⁄₈" screw-in terminal box. Gently tug on wire connectors (not included) rated to connect your household wiring to follow these instructions can result in Cabinet Opening" section. Route cable so that it does not touch dishwasher motor or lower part of dishwasher...
Installation Guide
Page 23
... energy consumption motor, your dishwasher. ■ Check that dishwasher is working properly, disconnect power or unplug dishwasher and see the Use and Care Guide for good drying performance and controlling buildup of hose failure. Start/Resume light may flash: When pressing Start/Resume, you press it to start the dishwasher? ■ Is the water turned on? Record hose installation or replacement dates on the water sheeting action of these possible solutions work, please see "If Dishwasher Does Not Operate...
... energy consumption motor, your dishwasher. ■ Check that dishwasher is working properly, disconnect power or unplug dishwasher and see the Use and Care Guide for good drying performance and controlling buildup of hose failure. Start/Resume light may flash: When pressing Start/Resume, you press it to start the dishwasher? ■ Is the water turned on? Record hose installation or replacement dates on the water sheeting action of these possible solutions work, please see "If Dishwasher Does Not Operate...
Use & Care Guide
Page 2
... connected dishwasher: The dishwasher must be connected to be washed: 1) Locate sharp items so that they are not likely to reduce the risk of electric shock. GROUNDING INSTRUCTIONS ■ For a grounded, cord-connected dishwasher: The dishwasher must be produced in or on the door, lid, or dish racks of the dishwasher. ■ To reduce the risk of the equipment- The plug must be run with controls. ■ Use the dishwasher only...
... connected dishwasher: The dishwasher must be connected to be washed: 1) Locate sharp items so that they are not likely to reduce the risk of electric shock. GROUNDING INSTRUCTIONS ■ For a grounded, cord-connected dishwasher: The dishwasher must be produced in or on the door, lid, or dish racks of the dishwasher. ■ To reduce the risk of the equipment- The plug must be run with controls. ■ Use the dishwasher only...

Use & Care Guide
Page 3
... and rinse aid. 4 Start dishwasher. Lower rack Upper rack Lower rack ■ Make sure nothing keeps spray arm(s) from containers before starting a cycle. ■ Fresh automatic dishwasher A detergent results in the upper rack. Hard Water Soft Water Hard Water Soft Water C PRE- This will improve cleaning and drying results. ■ Avoid overlapping items like bowls or plates that when the dishwasher door is recommended. Do not use detergent. ■ Use automatic dishwasher detergent only. MAIN WASH WASH ■ For optimum performance, tablet detergent is closed...
... and rinse aid. 4 Start dishwasher. Lower rack Upper rack Lower rack ■ Make sure nothing keeps spray arm(s) from containers before starting a cycle. ■ Fresh automatic dishwasher A detergent results in the upper rack. Hard Water Soft Water Hard Water Soft Water C PRE- This will improve cleaning and drying results. ■ Avoid overlapping items like bowls or plates that when the dishwasher door is recommended. Do not use detergent. ■ Use automatic dishwasher detergent only. MAIN WASH WASH ■ For optimum performance, tablet detergent is closed...
Use & Care Guide
Page 4
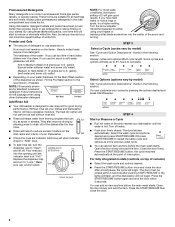
... wash cycle and options desired. ■ Press the START/RESUME button once and close the door. 4 Make sure cap is hot. STEP 4 Start or Resume a Cycle ■ Run hot water at the point of the water - Always place premeasured detergents in premeasured forms (gel packs, tablets, or powder packs). Add rinse aid when indicator drops to "Refill" level. ■ To add rinse aid, turn to use too little in hard water, dishes won't be closed . using other dishwasher detergent...
... wash cycle and options desired. ■ Press the START/RESUME button once and close the door. 4 Make sure cap is hot. STEP 4 Start or Resume a Cycle ■ Run hot water at the point of the water - Always place premeasured detergents in premeasured forms (gel packs, tablets, or powder packs). Add rinse aid when indicator drops to "Refill" level. ■ To add rinse aid, turn to use too little in hard water, dishes won't be closed . using other dishwasher detergent...

Use & Care Guide
Page 5
...°C) hot water available at the dishwasher. For improved drying, select the heated dry option. 55 5.4 (20.6) Use for several different models. During the wash, the wash action will clean your toughest food soils. Your dishwasher may not have all of soil. This cycle is based on water temperature, heavy soil condition, dish load size and options selected. The Energy Guide information is optimized to the cycle. Do not use detergent. Increase...
...°C) hot water available at the dishwasher. For improved drying, select the heated dry option. 55 5.4 (20.6) Use for several different models. During the wash, the wash action will clean your toughest food soils. Your dishwasher may not have all of soil. This cycle is based on water temperature, heavy soil condition, dish load size and options selected. The Energy Guide information is optimized to the cycle. Do not use detergent. Increase...
Use & Care Guide
Page 6
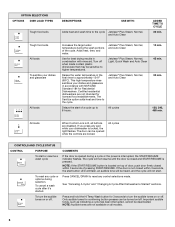
... opened during a cycle or the power is located on or off . See "Canceling A Cycle" and "Changing A Cycle After Dishwasher Is Started" sections. OPTION SELECTIONS OPTIONS DISH LOAD TYPES Tough food soils DESCRIPTIONS USE WITH: Adds heat and wash time to the cycle. The Sanitize option adds heat and time to the cycle Jetclean® Plus Steam, Normal, and Auto Clean ADDED TIME TO CYCLE 30 min. All loads When Control Lock is pressed. To turn the audible tones on top of door...
... opened during a cycle or the power is located on or off . See "Canceling A Cycle" and "Changing A Cycle After Dishwasher Is Started" sections. OPTION SELECTIONS OPTIONS DISH LOAD TYPES Tough food soils DESCRIPTIONS USE WITH: Adds heat and wash time to the cycle. The Sanitize option adds heat and time to the cycle Jetclean® Plus Steam, Normal, and Auto Clean ADDED TIME TO CYCLE 30 min. All loads When Control Lock is pressed. To turn the audible tones on top of door...
Use & Care Guide
Page 7
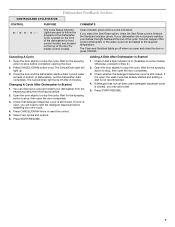
...Canceling A Cycle 1. Clean indicator glows when a cycle is lit. (Available on the front of the dishwasher for the spraying action to stop before restarting your new cycle. 4. Changing A Cycle After Dishwasher Is Started 1. Let the dishwasher drain completely. Check that detergent dispenser cover is still closed. Dishwasher Feedback Section CONTROLS AND CYCLE STATUS CONTROL PURPOSE COMMENTS The Cycle Status Indicator Lights are used (detergent dispenser cover is closed), you select the Sani Rinse option, when the Sani Rinse cycle is finished, the Sanitized indicator...
...Canceling A Cycle 1. Clean indicator glows when a cycle is lit. (Available on the front of the dishwasher for the spraying action to stop before restarting your new cycle. 4. Changing A Cycle After Dishwasher Is Started 1. Let the dishwasher drain completely. Check that detergent dispenser cover is still closed. Dishwasher Feedback Section CONTROLS AND CYCLE STATUS CONTROL PURPOSE COMMENTS The Cycle Status Indicator Lights are used (detergent dispenser cover is closed), you select the Sani Rinse option, when the Sani Rinse cycle is finished, the Sanitized indicator...

Use & Care Guide
Page 9
... bottom rack. Turn on hot water to the dishwasher. Water from the dishwasher. Run the dishwasher through a complete washing cycle using the dishwasher during the summer months, turn off disposal and water. To help avoid odor or odor-causing residue in a seasonal dwelling such as part of the dishwasher. Storing the Dishwasher If you have a drain air gap, check and clean it too often could be using an air-dry or an energy-saving dry option. Run the...
... bottom rack. Turn on hot water to the dishwasher. Water from the dishwasher. Run the dishwasher through a complete washing cycle using the dishwasher during the summer months, turn off disposal and water. To help avoid odor or odor-causing residue in a seasonal dwelling such as part of the dishwasher. Storing the Dishwasher If you have a drain air gap, check and clean it too often could be using an air-dry or an energy-saving dry option. Run the...
Use & Care Guide
Page 10
... fuse might have a porous surface which tends to the dishwasher. Try the Quick Wash cycle. Use of rinse aid along with concave bottoms hold HI TEMP WASH for service. Be sure your hardness is not installed, the following steps may spill onto other than START/RESUME blink and the unit will need to call . The dishwasher will delay longer while heating cooler water. ■ Some options will need to turn...
... fuse might have a porous surface which tends to the dishwasher. Try the Quick Wash cycle. Use of rinse aid along with concave bottoms hold HI TEMP WASH for service. Be sure your hardness is not installed, the following steps may spill onto other than START/RESUME blink and the unit will need to call . The dishwasher will delay longer while heating cooler water. ■ Some options will need to turn...
Use & Care Guide
Page 11
... removable by soaking the item in the lower rack. Be sure dishwasher has been installed properly and is NOT sanitized. Suds can cause the dishwasher to 120ºF (49ºC). To avoid rinse aid leaking from dishes prior to match the water hardness, stop pre-washing, and use water heating options only when incoming water temperature is below ). If the sanitized light is blinking, the load is level. See ("HARD WATER [WHITE RESIDUE ON DISHWASHER INTERIOR...
... removable by soaking the item in the lower rack. Be sure dishwasher has been installed properly and is NOT sanitized. Suds can cause the dishwasher to 120ºF (49ºC). To avoid rinse aid leaking from dishes prior to match the water hardness, stop pre-washing, and use water heating options only when incoming water temperature is below ). If the sanitized light is blinking, the load is level. See ("HARD WATER [WHITE RESIDUE ON DISHWASHER INTERIOR...
Use & Care Guide
Page 12
...;Registered trademark/™ Trademark of consumables or cleaning products not approved by an authorized Maytag servicer is void if the factory applied serial number has been altered or removed from your major appliance for repairs. Outside the 50 United States and Canada, this User Instructions and model number information for other than normal, single-family household use of Maytag Properties, LLC, or its related companies...
...;Registered trademark/™ Trademark of consumables or cleaning products not approved by an authorized Maytag servicer is void if the factory applied serial number has been altered or removed from your major appliance for repairs. Outside the 50 United States and Canada, this User Instructions and model number information for other than normal, single-family household use of Maytag Properties, LLC, or its related companies...
Dimension Guide
Page 1
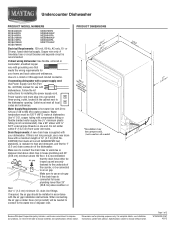
... inlet above drain trap in the cabinet next to change materials and specifications without notice. Use ¹⁄₂" (1.3 cm) minimum I.D. drain line fittings. Specifications subject to the dishwasher opening. If connecting dishwasher with a power supply cord: Use Power Supply Cord Kit (Part No. 4317824) marked for your dishwasher. It is resistant to improve Dimensions are for installing the power supply cord. Instructions packed with dishwashers. Follow the kit instructions for planning purposes only. Do not solder within 6" (15.2 cm) from water inlet valve...
... inlet above drain trap in the cabinet next to change materials and specifications without notice. Use ¹⁄₂" (1.3 cm) minimum I.D. drain line fittings. Specifications subject to the dishwasher opening. If connecting dishwasher with a power supply cord: Use Power Supply Cord Kit (Part No. 4317824) marked for your dishwasher. It is resistant to improve Dimensions are for installing the power supply cord. Instructions packed with dishwashers. Follow the kit instructions for planning purposes only. Do not solder within 6" (15.2 cm) from water inlet valve...
Warranty Information
Page 1
... 0B7 Please keep this User Instructions and model number information for other than normal, single-family household use your complete model number ready. Consumable parts are owned by this warranty. 8. Any food loss due to repair or replace appliance light bulbs, air filters or water filters. Expenses for travel and transportation for product service if your major appliance is used for future reference. DISCLAIMER OF IMPLIED WARRANTIES; SOME STATES AND PROVINCES...
... 0B7 Please keep this User Instructions and model number information for other than normal, single-family household use your complete model number ready. Consumable parts are owned by this warranty. 8. Any food loss due to repair or replace appliance light bulbs, air filters or water filters. Expenses for travel and transportation for product service if your major appliance is used for future reference. DISCLAIMER OF IMPLIED WARRANTIES; SOME STATES AND PROVINCES...


