Use and Care Manual
Page 2
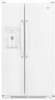
..., caution and care must be exercised when installing, maintaining or operating appliance. This appliance is the personal responsibility and obligation of your old refrigerator or freezer: • Take off power cord plug. it provides the proper use an adapter plug. WARNING WARNING - It must be ..., on a data plate inside . • Cut off the doors. • Leave the shelves in severe personal injury or death. Model Number Serial Number Date of our appliances, it replaced with three-prong grounded plug Properly grounded type wall receptacle 1 What You Need to ...
..., caution and care must be exercised when installing, maintaining or operating appliance. This appliance is the personal responsibility and obligation of your old refrigerator or freezer: • Take off power cord plug. it provides the proper use an adapter plug. WARNING WARNING - It must be ..., on a data plate inside . • Cut off the doors. • Leave the shelves in severe personal injury or death. Model Number Serial Number Date of our appliances, it replaced with three-prong grounded plug Properly grounded type wall receptacle 1 What You Need to ...

Use and Care Manual
Page 4
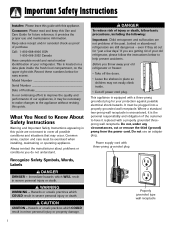
... immediately may dent or damage outside finish of the refrigerator is not possible, lay refrigerator on its back. A B If the refrigerator is to moving refrigerator. Plugging refrigerator in to assure oil returns to top hinge while performing door removal and replacement. • Tape decorative panels (select models) securely into the connector. Remove toe grille (see page...
... immediately may dent or damage outside finish of the refrigerator is not possible, lay refrigerator on its back. A B If the refrigerator is to moving refrigerator. Plugging refrigerator in to assure oil returns to top hinge while performing door removal and replacement. • Tape decorative panels (select models) securely into the connector. Remove toe grille (see page...
Use and Care Manual
Page 5
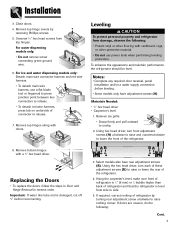
... top hinges. Notes: • Complete any required door reversal, panel installation and/or a water supply connection before reconnecting. Select models also have adjustment screws (A). To enhance the appearance and maintain performance, the refrigerator should be level. If doors are uneven, do the following : • Protect vinyl or other flooring with cardboard, rugs...
... top hinges. Notes: • Complete any required door reversal, panel installation and/or a water supply connection before reconnecting. Select models also have adjustment screws (A). To enhance the appearance and maintain performance, the refrigerator should be level. If doors are uneven, do the following : • Protect vinyl or other flooring with cardboard, rugs...
Use and Care Manual
Page 6
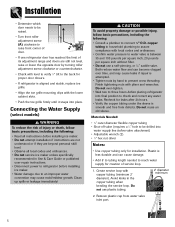
... compliance with level to verify 1⁄4" tilt to the back for creation of service loop. 1. Connecting the Water Supply (select models) WARNING To reduce the risk of its adjustment range and doors are beyond personal skill level. • Observe all local codes ...tightening nuts with copper tubing (minimum 2' diameter). Avoid kinks in Use & Care Guide or published user-repair instructions. • Disconnect power to refrigerator before valve attachment) • Adjustable wrench (2) • 1⁄4" hex nut driver Notes: • Use copper tubing only for leaks after ...
... compliance with level to verify 1⁄4" tilt to the back for creation of service loop. 1. Connecting the Water Supply (select models) WARNING To reduce the risk of its adjustment range and doors are beyond personal skill level. • Observe all local codes ...tightening nuts with copper tubing (minimum 2' diameter). Avoid kinks in Use & Care Guide or published user-repair instructions. • Disconnect power to refrigerator before valve attachment) • Adjustable wrench (2) • 1⁄4" hex nut driver Notes: • Use copper tubing only for leaks after ...
Use and Care Manual
Page 7
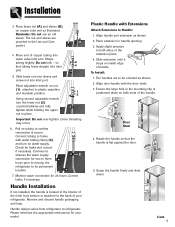
...adjustable wrench turn on tubing to the back of copper tubing into inlet A port. 5. Correct leaks, if necessary. Handle design varies from refrigerator to its permanent location. 7. Place extension in place. Ensure the large hole in the interior of the fresh food section or attached to confirm... connection is flat against the door. 5. Place end of your model. Align handle and extension as shown. 2. To Install: 1. Cont. 6 Pull on water supply. Monitor water connection for leaks and correct...
...adjustable wrench turn on tubing to the back of copper tubing into inlet A port. 5. Correct leaks, if necessary. Handle design varies from refrigerator to its permanent location. 7. Place extension in place. Ensure the large hole in the interior of the fresh food section or attached to confirm... connection is flat against the door. 5. Place end of your model. Align handle and extension as shown. 2. To Install: 1. Cont. 6 Pull on water supply. Monitor water connection for leaks and correct...
Use and Care Manual
Page 9
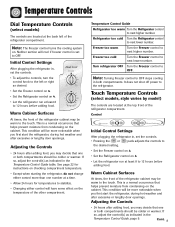
...to 12 hours before adding food. Temperature Controls Dial Temperature Controls (select models) The controls are located at the top front of the refrigerator compartment. Initial Control Settings After plugging the refrigerator in, set the controls. • Pressing the or pads adjusts ... Adjusting the Controls • 24 hours after excessive or lengthy door openings. See page 22 for temperatures to the refrigerator. Touch Temperature Controls (select models, style varies by model) The controls are located at the back left or right as indicated in the Temperature Control...
...to 12 hours before adding food. Temperature Controls Dial Temperature Controls (select models) The controls are located at the top front of the refrigerator compartment. Initial Control Settings After plugging the refrigerator in, set the controls. • Pressing the or pads adjusts ... Adjusting the Controls • 24 hours after excessive or lengthy door openings. See page 22 for temperatures to the refrigerator. Touch Temperature Controls (select models, style varies by model) The controls are located at the back left or right as indicated in the Temperature Control...

Use and Care Manual
Page 10
...colder or warmer. Temperature Control Guide Refrigerator too cold Set the Refrigerator control to next higher number by pressing the pad. Press either the Freezer or Refrigerator pad to stabilize for 24 hours 9 before making a new temperature adjustment. Reset Filter (select models) When a water filter has ...Do not change either control more than one number at a time. • Allow 24 hours for temperatures to stabilize. Refrigerator too warm Set the Refrigerator control to next lower number by pressing the pad. The red Replace light will illuminate when 90 % of the volume of...
...colder or warmer. Temperature Control Guide Refrigerator too cold Set the Refrigerator control to next higher number by pressing the pad. Press either the Freezer or Refrigerator pad to stabilize for 24 hours 9 before making a new temperature adjustment. Reset Filter (select models) When a water filter has ...Do not change either control more than one number at a time. • Allow 24 hours for temperatures to stabilize. Refrigerator too warm Set the Refrigerator control to next lower number by pressing the pad. The red Replace light will illuminate when 90 % of the volume of...
Use and Care Manual
Page 11
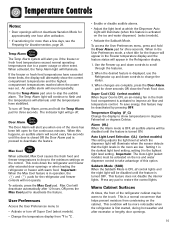
... a power outage or other event. To save energy, this happens, an audible alarm will sound every few days, see the Preparing for the refrigerator and freezer controls will be warm to deactivate the feature. Setting 1 is the darkest light level setting, setting 9 is activated to deactivate the ...from condensing on the control. This feature does not disable the interior lights. Warm Cabinet Surfaces At times, the front of the refrigerator cabinet may be activated on the ice and water dispenser) (select models). • Activate the Sabbath Mode. This condition will not operate.
... a power outage or other event. To save energy, this happens, an audible alarm will sound every few days, see the Preparing for the refrigerator and freezer controls will be warm to deactivate the feature. Setting 1 is the darkest light level setting, setting 9 is activated to deactivate the ...from condensing on the control. This feature does not disable the interior lights. Warm Cabinet Surfaces At times, the front of the refrigerator cabinet may be activated on the ice and water dispenser) (select models). • Activate the Sabbath Mode. This condition will not operate.
Use and Care Manual
Page 12
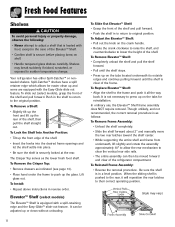
...may break suddenly if nicked, scratched, or exposed to their correct operating position. (style may vary) 11 Your refrigerator has either Spill-Catcher™ or nonsealed shelves. To slide out (select models), grasp the front of the shelf, then pull the shelf straight out. The Crisper Top serves as indicated (...be adjusted up on the crank handle. • Rotate the crank clockwise to raise the shelf, and counterclockwise to lower the height of the refrigerator compartment. To Adjust the Elevator™ Shelf: • Pull out the knob on the tabs for easier clean up the rear of the ...
...may break suddenly if nicked, scratched, or exposed to their correct operating position. (style may vary) 11 Your refrigerator has either Spill-Catcher™ or nonsealed shelves. To slide out (select models), grasp the front of the shelf, then pull the shelf straight out. The Crisper Top serves as indicated (...be adjusted up on the crank handle. • Rotate the crank clockwise to raise the shelf, and counterclockwise to lower the height of the refrigerator compartment. To Adjust the Elevator™ Shelf: • Pull out the knob on the tabs for easier clean up the rear of the ...
Use and Care Manual
Page 13
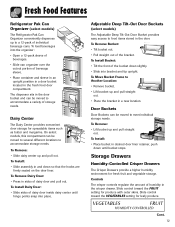
... are firmly seated on the door liner. Slide control toward the FRUIT setting for leafy produce. Fresh Food Features Refrigerator Pak Can Organizer (select models) The Refrigerator Pak Can Organizer conveniently dispenses up to meet individual storage needs. To Install Bucket: • Tilt the front...higher humidity environment for spreadable items such as butter and margarine. To Remove: • Lift bucket up and pull out. On select models, this compartment can be moved to several different locations to accommodate a variety of the bracket. To Remove: • Slide dairy center...
... are firmly seated on the door liner. Slide control toward the FRUIT setting for leafy produce. Fresh Food Features Refrigerator Pak Can Organizer (select models) The Refrigerator Pak Can Organizer conveniently dispenses up to meet individual storage needs. To Install Bucket: • Tilt the front...higher humidity environment for spreadable items such as butter and margarine. To Remove: • Lift bucket up and pull out. On select models, this compartment can be moved to several different locations to accommodate a variety of the bracket. To Remove: • Slide dairy center...
Use and Care Manual
Page 14
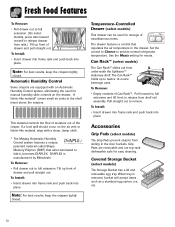
...: For best results, keep the crispers tightly closed . To Remove: • Pull drawer out to provide normal refrigerator temperature. Temperature-Controlled Drawer (select models) This drawer can be used for easy cleaning. Set the control to Cheese to full extension. Use the Meats ...; Insert drawer into frame rails and push back into place. Grip Pads are removable and are equipped with a clean, damp cloth. * The Maytag Automatic Humidity Control system features a unique, patented material called Shape Memory Polymer (SMP) that regulates the air temperature in the door buckets. When...
...: For best results, keep the crispers tightly closed . To Remove: • Pull drawer out to provide normal refrigerator temperature. Temperature-Controlled Drawer (select models) This drawer can be used for easy cleaning. Set the control to Cheese to full extension. Use the Meats ...; Insert drawer into frame rails and push back into place. Grip Pads are removable and are equipped with a clean, damp cloth. * The Maytag Automatic Humidity Control system features a unique, patented material called Shape Memory Polymer (SMP) that regulates the air temperature in the door buckets. When...
Use and Care Manual
Page 15
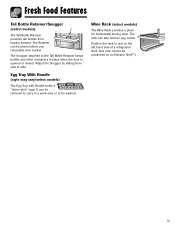
...work area or to be positioned on the left hand side of a refrigerator shelf (this rack cannot be washed. Position the rack to rest on an Elevator Shelf™). 14 Fresh Food Features Tall Bottle Retainer/Snugger (select models) The Tall Bottle Retainer prevents tall bottles from side to side. ... Snugger attached to the Tall Bottle Retainer keeps bottles and other containers in place when the door is opened or closed. Wine Rack (select models) The Wine Rack provides a place for horizontally storing wine. The Retainer can also hold an egg carton. Adjust the Snugger by sliding from...
...work area or to be positioned on the left hand side of a refrigerator shelf (this rack cannot be washed. Position the rack to rest on an Elevator Shelf™). 14 Fresh Food Features Tall Bottle Retainer/Snugger (select models) The Tall Bottle Retainer prevents tall bottles from side to side. ... Snugger attached to the Tall Bottle Retainer keeps bottles and other containers in place when the door is opened or closed. Wine Rack (select models) The Wine Rack provides a place for horizontally storing wine. The Retainer can also hold an egg carton. Adjust the Snugger by sliding from...
Use and Care Manual
Page 16
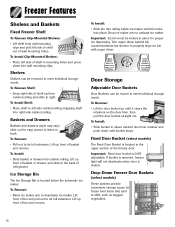
...vegetables. 15 To Install Shelf: • Place shelf in place for proper ice dispensing. Lift up front of refrigerator. Lift up front of shelf in back. Fixed Door Bucket (select models) The Fixed Door Bucket is located below ice maker until it clears the retainers on the door liner, then... out for frozen food items that tend to items in mounting holes and press down until bucket stops. Drop-Down Freezer Door Baskets (select models) These baskets provide convenient storage space for easy access to shift, such as shown) to the back of basket or drawer, and slide to...
...vegetables. 15 To Install Shelf: • Place shelf in place for proper ice dispensing. Lift up front of refrigerator. Lift up front of shelf in back. Fixed Door Bucket (select models) The Fixed Door Bucket is located below ice maker until it clears the retainers on the door liner, then... out for frozen food items that tend to items in mounting holes and press down until bucket stops. Drop-Down Freezer Door Baskets (select models) These baskets provide convenient storage space for easy access to shift, such as shown) to the back of basket or drawer, and slide to...
Use and Care Manual
Page 17
...mildew growth. • Clean up ) the ice maker when the water supply is normal for quick chilling. Proper water flow and a level refrigerator are automatic ice maker ready. The motor may have a slight hum, the cubes will help protect you from the ice maker. To Install...several cubes to be injurious to improper water connection may be joined together at the time of the appropriate ice maker kit is IC10S. Other models have a complete harvest of ice approximately every three hours. • Allow approximately 3-6 hours after installation to receive first harvest of ice....
...mildew growth. • Clean up ) the ice maker when the water supply is normal for quick chilling. Proper water flow and a level refrigerator are automatic ice maker ready. The motor may have a slight hum, the cubes will help protect you from the ice maker. To Install...several cubes to be injurious to improper water connection may be joined together at the time of the appropriate ice maker kit is IC10S. Other models have a complete harvest of ice approximately every three hours. • Allow approximately 3-6 hours after installation to receive first harvest of ice....
Use and Care Manual
Page 18
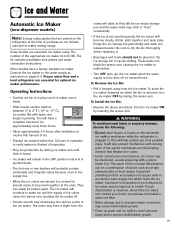
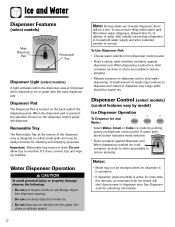
...; Choose water selection from dispenser control panel. • Press a sturdy, wide-mouthed container against dispenser pad. Dispenser Control (select models) (control features vary by model) Ice Dispenser Operation To Dispense Ice and Water: • Select Water, Crush or Cube ice mode by pushing button on the ... hands or any foreign object into thin glass, fine china or delicate crystal. Discard first 10-14 glasses of water after initially connecting refrigerator to break ice. • Do not dispense ice directly into dispenser opening. • Do not use of water may not be wiped...
...; Choose water selection from dispenser control panel. • Press a sturdy, wide-mouthed container against dispenser pad. Dispenser Control (select models) (control features vary by model) Ice Dispenser Operation To Dispense Ice and Water: • Select Water, Crush or Cube ice mode by pushing button on the ... hands or any foreign object into thin glass, fine china or delicate crystal. Discard first 10-14 glasses of water after initially connecting refrigerator to break ice. • Do not dispense ice directly into dispenser opening. • Do not use of water may not be wiped...
Use and Care Manual
Page 20
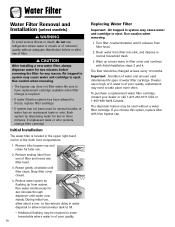
... use is high, or if water is located in normal household trash. 3. Water Filter Water Filter Removal and Installation (select models) WARNING To avoid serious illness or death, do not use refrigerator where water is required. • If water filtration system has been allowed to freeze, replace filter cartridge. • If system...
... use is high, or if water is located in normal household trash. 3. Water Filter Water Filter Removal and Installation (select models) WARNING To avoid serious illness or death, do not use refrigerator where water is required. • If water filtration system has been allowed to freeze, replace filter cartridge. • If system...
Use and Care Manual
Page 21
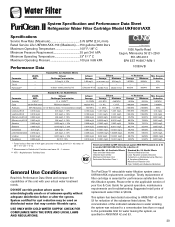
Water Filter System Specification and Performance Data Sheet TM Refrigerator Water Filter Cartridge Model UKF8001AXX Specifications Service Flow Rate (Maximum 0.78 GPM (2.9 L/min) Rated Service Life UKF8001AXX-750 (Maximum) ......750 gallons /2838 liters Maximum Operating Temperature 100° F / 38&#...
Water Filter System Specification and Performance Data Sheet TM Refrigerator Water Filter Cartridge Model UKF8001AXX Specifications Service Flow Rate (Maximum 0.78 GPM (2.9 L/min) Rated Service Life UKF8001AXX-750 (Maximum) ......750 gallons /2838 liters Maximum Operating Temperature 100° F / 38&#...
Use and Care Manual
Page 26
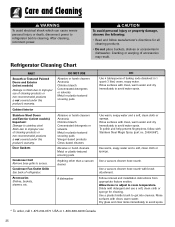
... and use of cleaning products or non-recommended products is not covered under this product's warranty. Refrigerator Cleaning Chart PART Smooth or Textured Painted Doors and Exterior (select models) Damage to finish due to improper use a soft, clean cloth or sponge for all cleaning ...property damage, observe the following: • Read and follow with Stainless Steel Magic Spray (part no. 20000008*). Cracking or warping of refrigerator. Rinse surfaces with brush attachment. Use warm, soapy water and a soft, clean cloth or sponge. To polish and help prevent fingerprints...
... and use of cleaning products or non-recommended products is not covered under this product's warranty. Refrigerator Cleaning Chart PART Smooth or Textured Painted Doors and Exterior (select models) Damage to finish due to improper use a soft, clean cloth or sponge for all cleaning ...property damage, observe the following: • Read and follow with Stainless Steel Magic Spray (part no. 20000008*). Cracking or warping of refrigerator. Rinse surfaces with brush attachment. Use warm, soapy water and a soft, clean cloth or sponge. To polish and help prevent fingerprints...
Use and Care Manual
Page 29
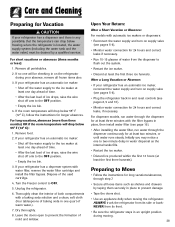
...both compartments with automatic ice makers or dispensers: • Reconnect the water supply and turn on supply valve (see pages 5-6). • Plug the refrigerator back in and reset controls (see pages 8, 9 and 10). • Monitor water connection for 24 hours and correct leaks, if necessary. Upon... will drop below 55° F (12° C), follow the instructions for longer absences. Dispose of mold and mildew. For dispenser models, run water through the dispenser for at least three minutes with water filter, remove the water filter cartridge and install the filter bypass. Initially...
...both compartments with automatic ice makers or dispensers: • Reconnect the water supply and turn on supply valve (see pages 5-6). • Plug the refrigerator back in and reset controls (see pages 8, 9 and 10). • Monitor water connection for 24 hours and correct leaks, if necessary. Upon... will drop below 55° F (12° C), follow the instructions for longer absences. Dispose of mold and mildew. For dispenser models, run water through the dispenser for at least three minutes with water filter, remove the water filter cartridge and install the filter bypass. Initially...
Use and Care Manual
Page 30
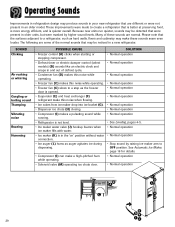
... • Freezer control (A) clicks when starting or stopping compressor. • Normal operation • Defrost timer or electric damper control (select models) (B) sounds like an electric clock and snaps in and out of defrost cycle. • Normal operation • Condenser fan (D) makes...8226; Freezer fan (C) slows to a stop as the freezer door is opened. • Normal operation • Evaporator (E) and heat exchanger (F) refrigerant make this noise when flowing. • Normal operation • Ice cubes from ice maker drop into ice bucket (G). • Normal operation •...
... • Freezer control (A) clicks when starting or stopping compressor. • Normal operation • Defrost timer or electric damper control (select models) (B) sounds like an electric clock and snaps in and out of defrost cycle. • Normal operation • Condenser fan (D) makes...8226; Freezer fan (C) slows to a stop as the freezer door is opened. • Normal operation • Evaporator (E) and heat exchanger (F) refrigerant make this noise when flowing. • Normal operation • Ice cubes from ice maker drop into ice bucket (G). • Normal operation •...


