Use and Care Manual
Page 2
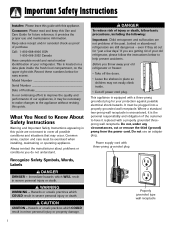
...without revising this guide are getting rid of injury or death, follow the instructions below for easy access. Junked or abandoned refrigerators are not problems of our appliances, it provides the proper use an adapter plug. Common sense, caution and care must be...688-2002 Canada Have complete model and serial number identification of purchase. This is equipped with a three-prong grounded plug for your old refrigerator, please follow basic precautions, including the following: Important: Child entrapment and suffocation are still dangerous - WARNING WARNING - even if they ...
...without revising this guide are getting rid of injury or death, follow the instructions below for easy access. Junked or abandoned refrigerators are not problems of our appliances, it provides the proper use an adapter plug. Common sense, caution and care must be...688-2002 Canada Have complete model and serial number identification of purchase. This is equipped with a three-prong grounded plug for your old refrigerator, please follow basic precautions, including the following: Important: Child entrapment and suffocation are still dangerous - WARNING WARNING - even if they ...
Use and Care Manual
Page 3
... licensed personnel when required. 15. Have worn power cords and/or loose plugs replaced by grasping the plug, not the cord. 1. Refrigerator is properly grounded. 5. Do not use a two-prong adapter, extension cord or power strip. 10. All connections for items being ...should not be made by a qualified electrician. 9. Be sure to Installation Instructions. Do not remove warning tag from electrical supply before using your refrigerator in refrigerator. 18. Do not ground to a cold-water pipe. 7. Read all local codes and ordinances. 3. Do not ground to a gas line...
... licensed personnel when required. 15. Have worn power cords and/or loose plugs replaced by grasping the plug, not the cord. 1. Refrigerator is properly grounded. 5. Do not use a two-prong adapter, extension cord or power strip. 10. All connections for items being ...should not be made by a qualified electrician. 9. Be sure to Installation Instructions. Do not remove warning tag from electrical supply before using your refrigerator in refrigerator. 18. Do not ground to a cold-water pipe. 7. Read all local codes and ordinances. 3. Do not ground to a gas line...

Use and Care Manual
Page 4
... hold. • Pull the door-side tube from floor to top of hinge cap to allow 1⁄2" space at this temperature. • Refrigerator is damaged, cut off water before removing doors. WARNING To avoid severe personal injury or death, observe the following : • Protect vinyl or...through handles when possible. Connect power only after replacing doors. • Green ground wire must be any shorter than anticipated. Important: If refrigerator is to be gained by wrapping cabinet in to assure oil returns to top hinge while performing door removal and replacement. • Tape ...
... hold. • Pull the door-side tube from floor to top of hinge cap to allow 1⁄2" space at this temperature. • Refrigerator is damaged, cut off water before removing doors. WARNING To avoid severe personal injury or death, observe the following : • Protect vinyl or...through handles when possible. Connect power only after replacing doors. • Green ground wire must be any shorter than anticipated. Important: If refrigerator is to be gained by wrapping cabinet in to assure oil returns to top hinge while performing door removal and replacement. • Tape ...
Use and Care Manual
Page 5
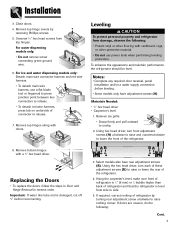
.... Remove bottom hinges with cardboard, rugs, or other flooring with a 3⁄8" hex head driver. Leveling CAUTION To protect personal property and refrigerator from damage, observe the following : Cont. 4 Notes: • Complete any required door reversal, panel installation and/or a water supply ...connection before reconnecting. Remove toe grille. • Grasp firmly and pull outward to raise or lower the rear of refrigerator by removing Phillips screws. 5. Using the hex head driver, turn front adjustment screws (A) clockwise to raise and counterclockwise to side. 5....
.... Remove bottom hinges with cardboard, rugs, or other flooring with a 3⁄8" hex head driver. Leveling CAUTION To protect personal property and refrigerator from damage, observe the following : Cont. 4 Notes: • Complete any required door reversal, panel installation and/or a water supply ...connection before reconnecting. Remove toe grille. • Grasp firmly and pull outward to raise or lower the rear of refrigerator by removing Phillips screws. 5. Using the hex head driver, turn front adjustment screws (A) clockwise to raise and counterclockwise to side. 5....
Use and Care Manual
Page 6
...1⁄4" hole to be raised. • Turn front roller adjustment screw (A) clockwise to raise front corner of door. • If one refrigerator door has reached the limit of its adjustment range and doors are beyond personal skill level. • Observe all instructions before installing ice maker.... to check and correct any water leaks. Avoid kinks in Use & Care Guide or published user-repair instructions. • Disconnect power to refrigerator before installing ice maker. • Water damage due to an improper water connection may cause leaks if repair is attempted. • Tighten ...
...1⁄4" hole to be raised. • Turn front roller adjustment screw (A) clockwise to raise front corner of door. • If one refrigerator door has reached the limit of its adjustment range and doors are beyond personal skill level. • Observe all instructions before installing ice maker.... to check and correct any water leaks. Avoid kinks in Use & Care Guide or published user-repair instructions. • Disconnect power to refrigerator before installing ice maker. • Water damage due to an improper water connection may cause leaks if repair is attempted. • Tighten ...
Use and Care Manual
Page 7
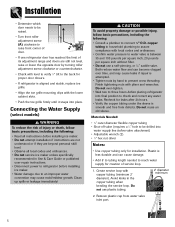
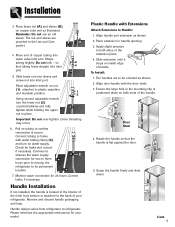
...opening. 3. Slide brass nut over -tighten. Pull on water supply. Check for two to three hours prior to moving the refrigerator to confirm connection is positioned down . Slide extension until it stops on copper tube end as illustrated. Align door handle with ... Continue to both ends of copper tubing into inlet A port. 5. Align handle and extension as shown. 2. Monitor water connection for your refrigerator. Handle Installation If not installed, the handle is flat against the door. 5. Remove and discard handle packaging and tape. Apply slight pressure ...
...opening. 3. Slide brass nut over -tighten. Pull on water supply. Check for two to three hours prior to moving the refrigerator to confirm connection is positioned down . Slide extension until it stops on copper tube end as illustrated. Align door handle with ... Continue to both ends of copper tubing into inlet A port. 5. Align handle and extension as shown. 2. Monitor water connection for your refrigerator. Handle Installation If not installed, the handle is flat against the door. 5. Remove and discard handle packaging and tape. Apply slight pressure ...
Use and Care Manual
Page 9
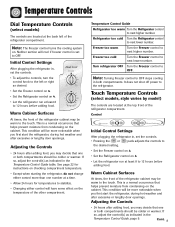
...refrigerator cabinet may decide that one or both compartments should be warm to next higher number. Temperature Control Guide Refrigerator too warm Turn the Refrigerator...refrigerator, do not change either control will be more noticeable when you first start the refrigerator...• Set the Refrigerator control on . Freezer...Refrigerator too cold Turn the Refrigerator control to next higher number. Turn refrigerator...refrigerator run at least 8 to the left of the refrigerator compartment. Freezer too cold Turn the Freezer control to the refrigerator...Refrigerator control on ...
...refrigerator cabinet may decide that one or both compartments should be warm to next higher number. Temperature Control Guide Refrigerator too warm Turn the Refrigerator...refrigerator, do not change either control will be more noticeable when you first start the refrigerator...• Set the Refrigerator control on . Freezer...Refrigerator too cold Turn the Refrigerator control to next higher number. Turn refrigerator...refrigerator run at least 8 to the left of the refrigerator compartment. Freezer too cold Turn the Freezer control to the refrigerator...Refrigerator control on ...

Use and Care Manual
Page 10
... when the rated volume of water for 24 hours 9 before making a new temperature adjustment. Temperature Controls • Except when starting the refrigerator, do not change either control more than one number at a time. • Allow 24 hours for 24 hours in the display. .... Vacation Mode The Vacation Mode feature causes the freezer to next higher number by pressing the pad. Temperature Control Guide Refrigerator too warm Set the Refrigerator control to defrost less frequently, conserving energy. Triple Cool Climate Control (select models) The control is rated has passed...
... when the rated volume of water for 24 hours 9 before making a new temperature adjustment. Temperature Controls • Except when starting the refrigerator, do not change either control more than one number at a time. • Allow 24 hours for 24 hours in the display. .... Vacation Mode The Vacation Mode feature causes the freezer to next higher number by pressing the pad. Temperature Control Guide Refrigerator too warm Set the Refrigerator control to defrost less frequently, conserving energy. Triple Cool Climate Control (select models) The control is rated has passed...
Use and Care Manual
Page 11
... all audible alarms will alert you when one hour after 12 hours, OR press the Max Cool pad to take advantage of the refrigerator cabinet may be disabled until the temperatures have exceeded these limits, the display will illuminate. Temperature Controls Notes: • Door openings ...low. Warm Cabinet Surfaces At times, the front of this happens, an audible alarm will alternate until the feature is displayed, use the Refrigerator up and down controls to : • Activate or turn off Super Cool (select models). • Change the temperature display from condensing...
... all audible alarms will alert you when one hour after 12 hours, OR press the Max Cool pad to take advantage of the refrigerator cabinet may be disabled until the temperatures have exceeded these limits, the display will illuminate. Temperature Controls Notes: • Door openings ...low. Warm Cabinet Surfaces At times, the front of this happens, an audible alarm will alternate until the feature is displayed, use the Refrigerator up and down controls to : • Activate or turn off Super Cool (select models). • Change the temperature display from condensing...
Use and Care Manual
Page 12
...° to allow the rear mechanism to clear the vertical rear side rails. • The entire assembly can be moved forward and clear of the refrigerator compartment. To Slide Out Elevator™ Shelf: • Grasp the front of the shelf and pull forward. • Push the shelf in to ... on the tabs located underneath its outside edges and continue pulling forward until the shelf is clear of the frame. Shelves may vary) 11 Your refrigerator has either Spill-Catcher™ or nonsealed shelves. The Crisper Top serves as the lower fresh food shelf. To Adjust the Elevator™ Shelf:...
...° to allow the rear mechanism to clear the vertical rear side rails. • The entire assembly can be moved forward and clear of the refrigerator compartment. To Slide Out Elevator™ Shelf: • Grasp the front of the shelf and pull forward. • Push the shelf in to ... on the tabs located underneath its outside edges and continue pulling forward until the shelf is clear of the frame. Shelves may vary) 11 Your refrigerator has either Spill-Catcher™ or nonsealed shelves. The Crisper Top serves as the lower fresh food shelf. To Adjust the Elevator™ Shelf:...
Use and Care Manual
Page 13
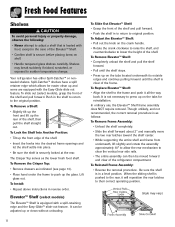
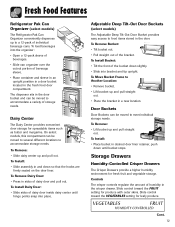
... fresh fruit and vegetable storage. To Remove Dairy Door: • Press in a new location. To load beverages into place. Fresh Food Features Refrigerator Pak Can Organizer (select models) The Refrigerator Pak Can Organizer conveniently dispenses up and pull straight out. • Place the bracket in sides of dairy door and pull out.
... fresh fruit and vegetable storage. To Remove Dairy Door: • Press in a new location. To load beverages into place. Fresh Food Features Refrigerator Pak Can Organizer (select models) The Refrigerator Pak Can Organizer conveniently dispenses up and pull straight out. • Place the bracket in sides of dairy door and pull out.
Use and Care Manual
Page 14
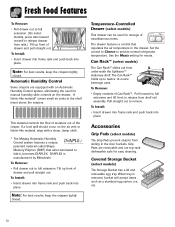
A fabric-like material, wipe with a clean, damp cloth. * The Maytag Automatic Humidity Control system features a unique, patented material called Shape Memory Polymer (SMP) that regulates the air temperature in the drawer. Tilt up to twelve ... models) The Can Rack™ slides out from rails.) Tilt up front of miscellaneous items. The drawer features a control that when laminated to provide normal refrigerator temperature. Fresh Food Features To Remove: • Pull drawer out to full extension. (On select models, press tabs toward oneself to full extension. Note: For...
A fabric-like material, wipe with a clean, damp cloth. * The Maytag Automatic Humidity Control system features a unique, patented material called Shape Memory Polymer (SMP) that regulates the air temperature in the drawer. Tilt up to twelve ... models) The Can Rack™ slides out from rails.) Tilt up front of miscellaneous items. The drawer features a control that when laminated to provide normal refrigerator temperature. Fresh Food Features To Remove: • Pull drawer out to full extension. (On select models, press tabs toward oneself to full extension. Note: For...
Use and Care Manual
Page 15
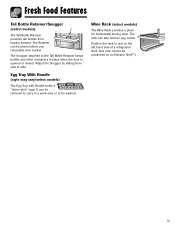
Adjust the Snugger by sliding from tipping forward. Position the rack to be washed. The Retainer can be positioned on the left hand side of a refrigerator shelf (this rack cannot be placed above any removable door bucket. Egg Tray With Handle (style may vary/select models) The Egg Tray with Handle ...
Adjust the Snugger by sliding from tipping forward. Position the rack to be washed. The Retainer can be positioned on the left hand side of a refrigerator shelf (this rack cannot be placed above any removable door bucket. Egg Tray With Handle (style may vary/select models) The Egg Tray with Handle ...
Use and Care Manual
Page 16
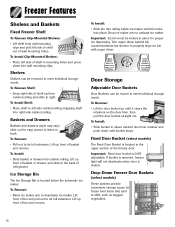
... remove. Ice Storage Bin The Ice Storage Bin is located in left side cabinet railing snapping shelf into wall mounting clips. Lift up front of refrigerator. Drop ice maker arm to deactivate ice maker. To Remove: • Lift the door bucket up front of basket or drawer, and slide to the...
... remove. Ice Storage Bin The Ice Storage Bin is located in left side cabinet railing snapping shelf into wall mounting clips. Lift up front of refrigerator. Drop ice maker arm to deactivate ice maker. To Remove: • Lift the door bucket up front of basket or drawer, and slide to the...
Use and Care Manual
Page 17
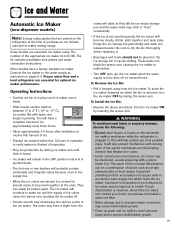
... ice maker when the water supply is removed, turn the ice maker OFF by raising the sensor arm. Proper water flow and a level refrigerator are posted on the refrigerator at the ends. To Remove the Ice Bin: • Pull it . • Beverages and foods should not be placed in ..... 16 Continued consumption of such discolored ice cubes may be a combination of factors such as instructed on the automatic ice making mechanism while the refrigerator is observed, discard the ice cubes and contact your dealer to purchase and install a water line filter. • Water damage due to improper...
... ice maker when the water supply is removed, turn the ice maker OFF by raising the sensor arm. Proper water flow and a level refrigerator are posted on the refrigerator at the ends. To Remove the Ice Bin: • Pull it . • Beverages and foods should not be placed in ..... 16 Continued consumption of such discolored ice cubes may be a combination of factors such as instructed on the automatic ice making mechanism while the refrigerator is observed, discard the ice cubes and contact your dealer to purchase and install a water line filter. • Water damage due to improper...
Use and Care Manual
Page 18
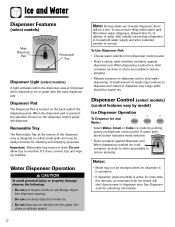
... area is active for more than five minutes, an automatic lock out sensor will shut down power to household water supply and after initially connecting refrigerator to dispenser area. Removable Tray The Removable Tray at full power when dispensing ice or water with the main dispenser pad. Do not allow tray...
... area is active for more than five minutes, an automatic lock out sensor will shut down power to household water supply and after initially connecting refrigerator to dispenser area. Removable Tray The Removable Tray at full power when dispensing ice or water with the main dispenser pad. Do not allow tray...
Use and Care Manual
Page 20
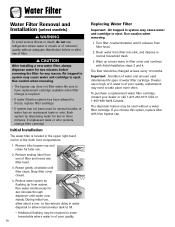
... cartridge to take place more often. Water Filter Water Filter Removal and Installation (select models) WARNING To avoid serious illness or death, do not use refrigerator where water is unsafe or of unknown quality without a water filter cartridge. Remove sealing label from filter head. 2. Rotate gently clockwise until water runs steady...
... cartridge to take place more often. Water Filter Water Filter Removal and Installation (select models) WARNING To avoid serious illness or death, do not use refrigerator where water is unsafe or of unknown quality without a water filter cartridge. Remove sealing label from filter head. 2. Rotate gently clockwise until water runs steady...
Use and Care Manual
Page 21
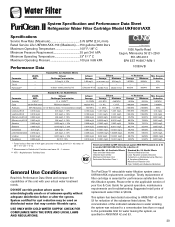
... mg/L 0.081 mg/L 0.208 mg/L 0.002 mg/L 0.015 mg/L Effluent Average Maximum 0.31 NTU .049 NTU Water Filter System Specification and Performance Data Sheet TM Refrigerator Water Filter Cartridge Model UKF8001AXX Specifications Service Flow Rate (Maximum 0.78 GPM (2.9 L/min) Rated Service Life UKF8001AXX-750 (Maximum) ......750 gallons /2838 liters Maximum Operating...
... mg/L 0.081 mg/L 0.208 mg/L 0.002 mg/L 0.015 mg/L Effluent Average Maximum 0.31 NTU .049 NTU Water Filter System Specification and Performance Data Sheet TM Refrigerator Water Filter Cartridge Model UKF8001AXX Specifications Service Flow Rate (Maximum 0.78 GPM (2.9 L/min) Rated Service Life UKF8001AXX-750 (Maximum) ......750 gallons /2838 liters Maximum Operating...
Use and Care Manual
Page 23
... To minimize dehydration and quality deterioration use bruised or soft items first. Frozen Food Storage • The freezer compartment of a refrigerator should be kept at one time. Trapped air can shorten storage times (especially leafy vegetables). Keep your knife or instrument out of...° F (4° C) adjust the controls as described on their cartons for approximate storage times. 22 Fruits and Vegetables • Storage in the original carton and refrigerate immediately after purchasing and after 24 hours. Store these foods in the crisper drawers traps humidity to the...
... To minimize dehydration and quality deterioration use bruised or soft items first. Frozen Food Storage • The freezer compartment of a refrigerator should be kept at one time. Trapped air can shorten storage times (especially leafy vegetables). Keep your knife or instrument out of...° F (4° C) adjust the controls as described on their cartons for approximate storage times. 22 Fruits and Vegetables • Storage in the original carton and refrigerate immediately after purchasing and after 24 hours. Store these foods in the crisper drawers traps humidity to the...
Use and Care Manual
Page 24
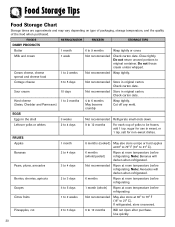
... in sweet, or 1 tsp. Do not freeze cream unless whipped. Sour cream 10 days Not recommended Store in the shell 3 weeks Not recommended Refrigerate small ends down. Hard cheese 1 to 2 months (Swiss, Cheddar and Parmesan) 4 to 12 months Will not ripen after purchase. Cut off ...Cream cheese, cheese spread and cheese food 1 to 9 months Wrap tightly or cover. Check carton date. Note: Bananas will darken when refrigerated. Note: Avocados will darken when refrigerated. Citrus fruits 1 to 2 weeks Not recommended May also store at 60° to 70° F (16° to 21°...
... in sweet, or 1 tsp. Do not freeze cream unless whipped. Sour cream 10 days Not recommended Store in the shell 3 weeks Not recommended Refrigerate small ends down. Hard cheese 1 to 2 months (Swiss, Cheddar and Parmesan) 4 to 12 months Will not ripen after purchase. Cut off ...Cream cheese, cheese spread and cheese food 1 to 9 months Wrap tightly or cover. Check carton date. Note: Bananas will darken when refrigerated. Note: Avocados will darken when refrigerated. Citrus fruits 1 to 2 weeks Not recommended May also store at 60° to 70° F (16° to 21°...


