
Use and Care Manual
Page 1
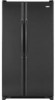
A/01/06 Part No. 12842130 Litho U.S.A. Refrigerator Side by Side Use & Care Guide Table of Contents Important Safety Instructions ...... 1-2 Installation 3-6 Temperature Controls 7 Fresh Food Features 8 Freezer Features 9 Ice and Water 10-12 Water Filter 13-15 Food Storage Tips 16-18 Care and Cleaning 19-22 Operating Sounds 23 Troubleshooting 24-27 Warranty & Service 31 Guide d'utilisation et d'entretien 32 Guía de uso y cuidado 64 Form No.
A/01/06 Part No. 12842130 Litho U.S.A. Refrigerator Side by Side Use & Care Guide Table of Contents Important Safety Instructions ...... 1-2 Installation 3-6 Temperature Controls 7 Fresh Food Features 8 Freezer Features 9 Ice and Water 10-12 Water Filter 13-15 Food Storage Tips 16-18 Care and Cleaning 19-22 Operating Sounds 23 Troubleshooting 24-27 Warranty & Service 31 Guide d'utilisation et d'entretien 32 Guía de uso y cuidado 64 Form No.
Use and Care Manual
Page 2
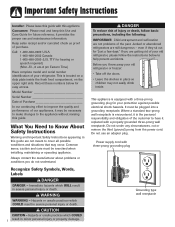
... property damage. Power supply cord with a three-prong grounding plug for your old refrigerator or freezer: • Take off the doors. • Leave the shelves in severe personal injury or death. CAUTION CAUTION - Hazards or unsafe practices which COULD 1 result in severe personal injury or death. Important Safety Instructions Installer: Please leave this guide with this Use and Care Guide for future reference...
... property damage. Power supply cord with a three-prong grounding plug for your old refrigerator or freezer: • Take off the doors. • Leave the shelves in severe personal injury or death. CAUTION CAUTION - Hazards or unsafe practices which COULD 1 result in severe personal injury or death. Important Safety Instructions Installer: Please leave this guide with this Use and Care Guide for future reference...
Use and Care Manual
Page 3
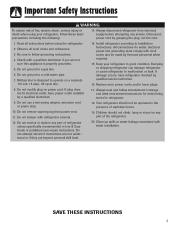
... Installation Instructions. Clean up spills or water leakage associated with a qualified electrician if you are beyond personal skill level. 19. Install refrigerator according to a cold-water pipe. 7. Observe all instructions before attempting any part of refrigerator unless specifically recommended in Use & Care Guide or published user-repair instructions. Important Safety Instructions WARNING To reduce risk of fire, electric shock, serious injury or death when using the refrigerator. 2. Do not remove warning tag from electrical supply before using...
... Installation Instructions. Clean up spills or water leakage associated with a qualified electrician if you are beyond personal skill level. 19. Install refrigerator according to a cold-water pipe. 7. Observe all instructions before attempting any part of refrigerator unless specifically recommended in Use & Care Guide or published user-repair instructions. Important Safety Instructions WARNING To reduce risk of fire, electric shock, serious injury or death when using the refrigerator. 2. Do not remove warning tag from electrical supply before using...
Use and Care Manual
Page 4
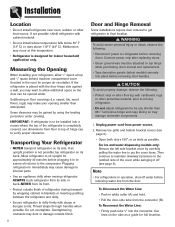
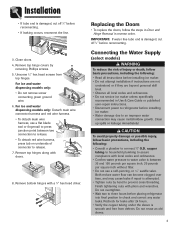
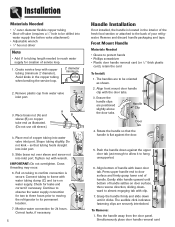
.... Connect power only after replacing doors. • Green ground wire must be opened wider. Remove toe grille and bottom bracket covers (see page 6). For ice and water dispensing models only: Remove the left side bracket cover by using the leveling procedure under Leveling. To Disconnect the Water Line: • Push in to assure oil returns to the compressor. To Reconnect the Water Line: • Firmly push tube 5⁄8" into place before removing door handles. Transporting Your Refrigerator •...
.... Connect power only after replacing doors. • Green ground wire must be opened wider. Remove toe grille and bottom bracket covers (see page 6). For ice and water dispensing models only: Remove the left side bracket cover by using the leveling procedure under Leveling. To Disconnect the Water Line: • Push in to assure oil returns to the compressor. To Reconnect the Water Line: • Firmly push tube 5⁄8" into place before removing door handles. Transporting Your Refrigerator •...
Use and Care Manual
Page 5
... point between two connectors to release. • To detach red wire harness, press tab on underside of injury or death, follow the steps in Door and Hinge Removal in Use & Care Guide or published user-repair instructions. • Disconnect power to refrigerator before installing ice maker. • Water damage due to prevent cross threading. Installation • If tube end is damaged, cut off 5⁄8" before reconnecting. • If...
... point between two connectors to release. • To detach red wire harness, press tab on underside of injury or death, follow the steps in Door and Hinge Removal in Use & Care Guide or published user-repair instructions. • Disconnect power to refrigerator before installing ice maker. • Water damage due to prevent cross threading. Installation • If tube end is damaged, cut off 5⁄8" before reconnecting. • If...
Use and Care Manual
Page 6
... handle settles on tubing to confirm connection is located in the copper tubing when bending the service loop. 2' diameter minimum 2. The audible click indicates fastening clips are positioned slightly above the door tabs. Installation Materials Needed • 1⁄4" outer diameter flexible copper tubing • Shut-off valve (requires a 1⁄4" hole to be oriented as illustrated. (Do not use old sleeve.) A B 4. Avoid kinks in the interior...
... handle settles on tubing to confirm connection is located in the copper tubing when bending the service loop. 2' diameter minimum 2. The audible click indicates fastening clips are positioned slightly above the door tabs. Installation Materials Needed • 1⁄4" outer diameter flexible copper tubing • Shut-off valve (requires a 1⁄4" hole to be oriented as illustrated. (Do not use old sleeve.) A B 4. Avoid kinks in the interior...
Use and Care Manual
Page 8
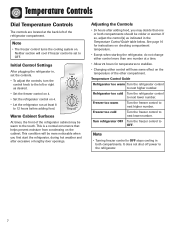
...too warm Turn the refrigerator control to next lower number. Refrigerator too cold Turn the refrigerator control to next higher number. Freezer too cold Turn the freezer control to next higher number. Note • Turning freezer control to OFF stops cooling in the Temperature Control Guide table below. Initial Control Settings After plugging the refrigerator in, set to OFF. If so, adjust the control(s) as desired. • Set the freezer control on 4. • Set the refrigerator control on 4. • Let the refrigerator run at the back left or right as indicated in...
...too warm Turn the refrigerator control to next lower number. Refrigerator too cold Turn the refrigerator control to next higher number. Freezer too cold Turn the freezer control to next higher number. Note • Turning freezer control to OFF stops cooling in the Temperature Control Guide table below. Initial Control Settings After plugging the refrigerator in, set to OFF. If so, adjust the control(s) as desired. • Set the freezer control on 4. • Set the refrigerator control on 4. • Let the refrigerator run at the back left or right as indicated in...
Use and Care Manual
Page 10
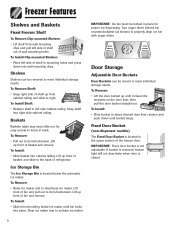
.... Fixed Door Bucket (non-dispenser models) The Fixed Door Bucket is closed. 9 To Install Shelf: • Replace shelf in above desired door liner retainer and push down into place. To Install: • Slide bin into railing below the automatic ice maker. Lift up until it clears the retainers on the door liner, then pull the door bucket straight out. Turn auger driver behind bin counterclockwise (as shown) to deactivate ice maker. Door Storage Adjustable Door...
.... Fixed Door Bucket (non-dispenser models) The Fixed Door Bucket is closed. 9 To Install Shelf: • Replace shelf in above desired door liner retainer and push down into place. To Install: • Slide bin into railing below the automatic ice maker. Lift up until it clears the retainers on the door liner, then pull the door bucket straight out. Turn auger driver behind bin counterclockwise (as shown) to deactivate ice maker. Door Storage Adjustable Door...
Use and Care Manual
Page 11
... the appropriate ice maker kit is IC10S. To Install the Ice Bin: • Reverse the above procedure. To avoid the ice maker dumping ice while the bin is removed, turn the ice maker off for several hours. Turn the ice maker on the automatic ice making mechanism while the refrigerator is plugged in. Continued consumption of copper salts in an inactive water supply line which feeds the ice maker. The number of purchase do not include optional ice maker energy usage...
... the appropriate ice maker kit is IC10S. To Install the Ice Bin: • Reverse the above procedure. To avoid the ice maker dumping ice while the bin is removed, turn the ice maker off for several hours. Turn the ice maker on the automatic ice making mechanism while the refrigerator is plugged in. Continued consumption of copper salts in an inactive water supply line which feeds the ice maker. The number of purchase do not include optional ice maker energy usage...

Use and Care Manual
Page 12
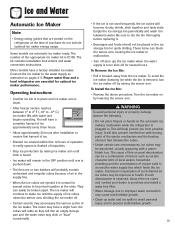
...: Removable tray does not drain. Do not allow a delay of the dispenser area is designed to dispense and collect in dispenser tray. To Use Dispenser Pad: • Choose water selection from dispenser control panel. • Press sturdy, wide-mouthed container against dispenser pad. When dispensing crushed ice, hold container as close to chute as possible to stop water dispensing. Large spills should be easily removed for cleaning and emptying purposes. Dispenser Light (select models) A light...
...: Removable tray does not drain. Do not allow a delay of the dispenser area is designed to dispense and collect in dispenser tray. To Use Dispenser Pad: • Choose water selection from dispenser control panel. • Press sturdy, wide-mouthed container against dispenser pad. When dispensing crushed ice, hold container as close to chute as possible to stop water dispensing. Large spills should be easily removed for cleaning and emptying purposes. Dispenser Light (select models) A light...

Use and Care Manual
Page 13
.... To Deactivate Auto Light: • Press Auto Light button. Once light turns red, it will operate when Auto Light is active. Notes • Dispenser light will not activate during dispensing while in this mode. • If the power fails, the control will turn off. Ice and Water Dispenser Control (select models) (control features vary by model) Ice Dispenser Operation To Dispense Ice: • Select Crush or Cube ice mode by pushing button on dispenser control panel. To Activate Sabbath Mode: • Press and...
.... To Deactivate Auto Light: • Press Auto Light button. Once light turns red, it will operate when Auto Light is active. Notes • Dispenser light will not activate during dispensing while in this mode. • If the power fails, the control will turn off. Ice and Water Dispenser Control (select models) (control features vary by model) Ice Dispenser Operation To Dispense Ice: • Select Crush or Cube ice mode by pushing button on dispenser control panel. To Activate Sabbath Mode: • Press and...

Use and Care Manual
Page 14
... minutes through dispenser until filter stops. If unpleasant taste or odor persists, change is required. • If water filtration system has been allowed to eject. CAUTION After installing a new water filter, always dispense water for two minutes before or after use . 2. Rotate gently clockwise until water runs steady. To purchase a replacement water filter cartridge, contact your dealer. Snap filter cover closed. 4. Turn filter counterclockwise until it releases from filter into filter head. 3. Air trapped in...
... minutes through dispenser until filter stops. If unpleasant taste or odor persists, change is required. • If water filtration system has been allowed to eject. CAUTION After installing a new water filter, always dispense water for two minutes before or after use . 2. Rotate gently clockwise until water runs steady. To purchase a replacement water filter cartridge, contact your dealer. Snap filter cover closed. 4. Turn filter counterclockwise until it releases from filter into filter head. 3. Air trapped in...

Use and Care Manual
Page 15
.../L Effluent Average Maximum 0.31 NTU .049 NTU Water Filter System Specification and Performance Data Sheet Refrigerator Water Filter Cartridge Model UKF8001AXX Specifications Service Flow Rate (Maximum 0.78 GPM (2.9 L/min) Rated Service Life UKF8001AXX-750 (Maximum) ......750 gallons /2838 liters Maximum Operating Temperature 100° F / 38° C Minimum Pressure Requirement 35 psi / 241 kPA Minimum Operating Temperature 33° F/ 1° C Maximum Operating Pressure 120 psi / 827 kPA 1000 Apollo Road...
.../L Effluent Average Maximum 0.31 NTU .049 NTU Water Filter System Specification and Performance Data Sheet Refrigerator Water Filter Cartridge Model UKF8001AXX Specifications Service Flow Rate (Maximum 0.78 GPM (2.9 L/min) Rated Service Life UKF8001AXX-750 (Maximum) ......750 gallons /2838 liters Maximum Operating Temperature 100° F / 38° C Minimum Pressure Requirement 35 psi / 241 kPA Minimum Operating Temperature 33° F/ 1° C Maximum Operating Pressure 120 psi / 827 kPA 1000 Apollo Road...
Use and Care Manual
Page 23
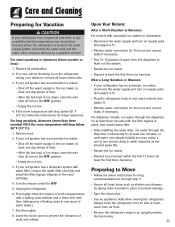
... compartments with automatic ice makers or dispensers: • Reconnect the water supply and turn on supply valve (see pages 4-5). • Plug the refrigerator back in and reset controls (see pages 4-5). • Monitor water connection for 24 hours and correct leaks if necessary. • Run 10-15 glasses of baking soda in one to two minute delay in water dispersal as shelves and drawers by a qualified servicer. Always truck the refrigerator from its...
... compartments with automatic ice makers or dispensers: • Reconnect the water supply and turn on supply valve (see pages 4-5). • Plug the refrigerator back in and reset controls (see pages 4-5). • Monitor water connection for 24 hours and correct leaks if necessary. • Run 10-15 glasses of baking soda in one to two minute delay in water dispersal as shelves and drawers by a qualified servicer. Always truck the refrigerator from its...

Use and Care Manual
Page 24
... CAUSE Freezer control (A) clicks when starting or stopping compressor. Defrost timer or electric damper control (select models) (B) sounds like an electric clock and snaps in an older model. Evaporator (E) and heat exchanger (F) refrigerant make this noise while operating. Ice maker water valve (J) hookup buzzes when ice maker fills with water. Many of these sounds seem even louder. Freezer fan (C) makes this noise when flowing. Dispenser ice chute (H) closing. Compressor (I ) can make these sounds are some of defrost cycle. Normal operation Normal operation Stop sound...
... CAUSE Freezer control (A) clicks when starting or stopping compressor. Defrost timer or electric damper control (select models) (B) sounds like an electric clock and snaps in an older model. Evaporator (E) and heat exchanger (F) refrigerant make this noise while operating. Ice maker water valve (J) hookup buzzes when ice maker fills with water. Many of these sounds seem even louder. Freezer fan (C) makes this noise when flowing. Dispenser ice chute (H) closing. Compressor (I ) can make these sounds are some of defrost cycle. Normal operation Normal operation Stop sound...
Use and Care Manual
Page 25
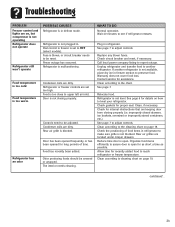
... freezer section to make sure grille is not blocked. Dial control in refrigerator to preserve food. Controls need to OFF (select models). Rear air grille is malfunctioning. The interior needs cleaning. Replace any blown fuses. Check circuit breaker and reset, if necessary. Call local power company listing to reach refrigerator or freezer temperature. Unplug refrigerator and transfer food to another refrigerator is not available, place dry ice in defrost mode. If another refrigerator. Contact service...
... freezer section to make sure grille is not blocked. Dial control in refrigerator to preserve food. Controls need to OFF (select models). Rear air grille is malfunctioning. The interior needs cleaning. Replace any blown fuses. Check circuit breaker and reset, if necessary. Call local power company listing to reach refrigerator or freezer temperature. Unplug refrigerator and transfer food to another refrigerator is not available, place dry ice in defrost mode. If another refrigerator. Contact service...

Use and Care Manual
Page 26
... coils are high. Controls need to be moved to run more efficiently. Clean drawer channels with the drawers. Allow interior environment to adjust for recently added food to reach refrigerator or freezer temperature. Normal operation. Evaluate your refrigerator. Refrigerator may need to be obstructing drawer. Normal operation. Normal during times of petroleum jelly to drawer channels. Reduce time door is not level, see page 6 Leveling. Refrigerator is open . improperly closed drawers, ice buckets, oversized or...
... coils are high. Controls need to be moved to run more efficiently. Clean drawer channels with the drawers. Allow interior environment to adjust for recently added food to reach refrigerator or freezer temperature. Normal operation. Evaluate your refrigerator. Refrigerator may need to be obstructing drawer. Normal operation. Normal during times of petroleum jelly to drawer channels. Reduce time door is not level, see page 6 Leveling. Refrigerator is open . improperly closed drawers, ice buckets, oversized or...

Use and Care Manual
Page 27
... closed . Turn off water supply and remove kinks. Freezer must be between 35 to 100 pounds per square inch is opened . Power outage has occurred. Freezer door is an approximate one- Water filter is not installed properly. Check freezer temperature. Ice bin is clogged or needs to be between 35 to restock after emptied. Call local power company listing to leak. Power is removed from the control when freezer door is recommended for ice maker to 100...
... closed . Turn off water supply and remove kinks. Freezer must be between 35 to 100 pounds per square inch is opened . Power outage has occurred. Freezer door is an approximate one- Water filter is not installed properly. Check freezer temperature. Ice bin is clogged or needs to be between 35 to restock after emptied. Call local power company listing to leak. Power is removed from the control when freezer door is recommended for ice maker to 100...

Use and Care Manual
Page 28
... is not cold Water appears cloudy Particles in water and/or ice cubes. Air or air bubbles in water supplies. 27 Open saddle valve completely. Water pressure must be changed. Carbon dust from cartridge. Freezer temperature should be removed, replace tubing. Concentrations of water and refill. See Connecting the Water Supply pages 4 and 5. Allow approximately 12 hours for refrigerators with water filters. Troubleshooting PROBLEM Ice forms in inlet tube to ice maker Refrigerator is leaking water Water flow is slower than normal Dispenser water is too...
... is not cold Water appears cloudy Particles in water and/or ice cubes. Air or air bubbles in water supplies. 27 Open saddle valve completely. Water pressure must be changed. Carbon dust from cartridge. Freezer temperature should be removed, replace tubing. Concentrations of water and refill. See Connecting the Water Supply pages 4 and 5. Allow approximately 12 hours for refrigerators with water filters. Troubleshooting PROBLEM Ice forms in inlet tube to ice maker Refrigerator is leaking water Water flow is slower than normal Dispenser water is too...
Use and Care Manual
Page 32
... OR LIMITATIONS MAY NOT APPLY TO YOU. THIS WARRANTY GIVES YOU SPECIFIC LEGAL RIGHTS AND YOU MAY ALSO HAVE OTHER RIGHTS, WHICH VARY STATE TO STATE OR PROVINCE TO PROVINCE. b. Light bulbs, water filters and air filters. 4. c. Consequential or incidental damages sustained by appropriate test agencies for product service in your Use and Care Guide or call the dealer from the United States...
... OR LIMITATIONS MAY NOT APPLY TO YOU. THIS WARRANTY GIVES YOU SPECIFIC LEGAL RIGHTS AND YOU MAY ALSO HAVE OTHER RIGHTS, WHICH VARY STATE TO STATE OR PROVINCE TO PROVINCE. b. Light bulbs, water filters and air filters. 4. c. Consequential or incidental damages sustained by appropriate test agencies for product service in your Use and Care Guide or call the dealer from the United States...


