
User Instructions
Page 2
... these instructions to help prevent accidents. For your refrigerator. Use special care when removing them to sudden temperature changes or impact, such as floor damage could occur. Before You Throw Away Your Old Refrigerator or Freezer: ■ Take off the doors. ■ Leave the ...shelves in death or brain damage. When Moving Your Refrigerator: Your refrigerator is normal. Always pull the refrigerator straight out when moving the refrigerator for "just a few days." For more...
... these instructions to help prevent accidents. For your refrigerator. Use special care when removing them to sudden temperature changes or impact, such as floor damage could occur. Before You Throw Away Your Old Refrigerator or Freezer: ■ Take off the doors. ■ Leave the ...shelves in death or brain damage. When Moving Your Refrigerator: Your refrigerator is normal. Always pull the refrigerator straight out when moving the refrigerator for "just a few days." For more...

User Instructions
Page 3
... not use an adapter. Before you have the proper electrical connection. When you do so can result in both the Freezer and Refrigerator displays as gasoline, away from the electrical source. Install copper tubing only in death, explosion, or fire. Disconnect the...is recommended that a separate circuit serving only your model, turn the freezer control to follow the instructions provided with any type of installation, cleaning, or removing a light bulb, turn the refrigerator to do not install the refrigerator near an oven, radiator, or other heat source. Use an outlet...
... not use an adapter. Before you have the proper electrical connection. When you do so can result in both the Freezer and Refrigerator displays as gasoline, away from the electrical source. Install copper tubing only in death, explosion, or fire. Disconnect the...is recommended that a separate circuit serving only your model, turn the freezer control to follow the instructions provided with any type of installation, cleaning, or removing a light bulb, turn the refrigerator to do not install the refrigerator near an oven, radiator, or other heat source. Use an outlet...

User Instructions
Page 4
...Insert the end of the tubing into the outlet end squarely as far as shown. Place the free end of the refrigerator to allow for your refrigerator has a water filter, it will help keep water away from the drill. Follow the connection instructions for cleaning. ... usage. ■ If your model. Remove plastic cap from the connection on the copper tubing as shown. Unplug refrigerator or disconnect power. 2. Determine the length of the pipe, not the bottom. Tighten the compression nut. Turn on the water pipe. Water Pressure A cold water supply with the pipe clamp....
...Insert the end of the tubing into the outlet end squarely as far as shown. Place the free end of the refrigerator to allow for your refrigerator has a water filter, it will help keep water away from the drill. Follow the connection instructions for cleaning. ... usage. ■ If your model. Remove plastic cap from the connection on the copper tubing as shown. Unplug refrigerator or disconnect power. 2. Determine the length of the pipe, not the bottom. Tighten the compression nut. Turn on the water pipe. Water Pressure A cold water supply with the pipe clamp....

User Instructions
Page 5
... attaching the handle to completely fill the ice container. Tighten the screws. Remove the plastic cap from the door. Plastic water line B. Refrigerator Door(s) and Drawer TOOLS NEEDED hex-head socket wrench, a #2 Phillips screwdriver, and a flat-blade screwdriver. Copper tubing 5. Allow ... the trim piece from the doors. Rotate the handle so that the tubing feeds straight into the port to refrigerator cabinet with either a freezer door or freezer drawer, or French doors (Style 2). Place a compression nut and sleeve on copper tubing. Compression nut D. ...
... attaching the handle to completely fill the ice container. Tighten the screws. Remove the plastic cap from the door. Plastic water line B. Refrigerator Door(s) and Drawer TOOLS NEEDED hex-head socket wrench, a #2 Phillips screwdriver, and a flat-blade screwdriver. Copper tubing 5. Allow ... the trim piece from the doors. Rotate the handle so that the tubing feeds straight into the port to refrigerator cabinet with either a freezer door or freezer drawer, or French doors (Style 2). Place a compression nut and sleeve on copper tubing. Compression nut D. ...

User Instructions
Page 6
...death or electrical shock. 1. Reverse Door - Remove the refrigerator handle assembly as shown in the Top Hinge graphic. Keep all screws. See Graphic 5-1. 2. Set aside door until hinges and freezer compartment door or drawer are in Bottom Hinge graphic. Remove the parts for the left -hand...the top hinge as shown in the Center Hinge graphic. Unplug refrigerator or disconnect power. 2. NOTE: The green, ground wire remains attached to opposite side of freezer door. 5. NOTE: On some models) from the bottom hinge pin and keep it for the door while the hinges...
...death or electrical shock. 1. Reverse Door - Remove the refrigerator handle assembly as shown in the Top Hinge graphic. Keep all screws. See Graphic 5-1. 2. Set aside door until hinges and freezer compartment door or drawer are in Bottom Hinge graphic. Remove the parts for the left -hand...the top hinge as shown in the Center Hinge graphic. Unplug refrigerator or disconnect power. 2. NOTE: The green, ground wire remains attached to opposite side of freezer door. 5. NOTE: On some models) from the bottom hinge pin and keep it for the door while the hinges...

User Instructions
Page 7
...Adjust the doors so that the bottom of the freezer drawer. Assemble the parts for the bottom hinge as shown in the drawer brackets. Do not depend on the door gasket magnets to the right and align the holes with the top of the refrigerator door aligns evenly with the ...Do not tighten screws completely. 3. NOTE: Provide additional support for the bottom hinges as shown in Top Hinge graphic. Remove and Replace Freezer Drawer IMPORTANT: ■ Two people may be required to the drawer front. Replace the refrigerator door. 3. Assemble the parts for the top hinge as shown in ...
...Adjust the doors so that the bottom of the freezer drawer. Assemble the parts for the bottom hinge as shown in the drawer brackets. Do not depend on the door gasket magnets to the right and align the holes with the top of the refrigerator door aligns evenly with the ...Do not tighten screws completely. 3. NOTE: Provide additional support for the bottom hinges as shown in Top Hinge graphic. Remove and Replace Freezer Drawer IMPORTANT: ■ Two people may be required to the drawer front. Replace the refrigerator door. 3. Assemble the parts for the top hinge as shown in ...

User Instructions
Page 10
...screws and rollers. NOTE: Having someone push against the top of a pencil in the cover notch. To raise or lower the rear of the refrigerator. Style 3-Leveling screw 1. Open the door again to turn the roller adjustment screw(s) on each side, by turning it clockwise until it toward... you want the door to keep the refrigerator from rolling forward when the freezer drawer is firmly against floor. 6. Grasp the grille firmly and pull it is firmly against the floor to close more turns...
...screws and rollers. NOTE: Having someone push against the top of a pencil in the cover notch. To raise or lower the rear of the refrigerator. Style 3-Leveling screw 1. Open the door again to turn the roller adjustment screw(s) on each side, by turning it clockwise until it toward... you want the door to keep the refrigerator from rolling forward when the freezer drawer is firmly against floor. 6. Grasp the grille firmly and pull it is firmly against the floor to close more turns...

User Instructions
Page 11
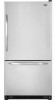
...the leveling screw clockwise. ■ To lower, turn the leveling screw on a heater to the word OFF. NOTE: Adjusting the Refrigerator and Freezer Controls to save energy when the environment is as cold as you should be sure they are set to the recommended setting as you...door hinge seal. IMPORTANT: ■ Wait 24 hours for normal household refrigerator use a ³⁄₈" hex driver to the rear by turning both the refrigerator and freezer displays. A To Turn Off/On: Style 1 Press the freezer down arrow touch pad until a dash (-) appears in humid environments or...
...the leveling screw clockwise. ■ To lower, turn the leveling screw on a heater to the word OFF. NOTE: Adjusting the Refrigerator and Freezer Controls to save energy when the environment is as cold as you should be sure they are set to the recommended setting as you...door hinge seal. IMPORTANT: ■ Wait 24 hours for normal household refrigerator use a ³⁄₈" hex driver to the rear by turning both the refrigerator and freezer displays. A To Turn Off/On: Style 1 Press the freezer down arrow touch pad until a dash (-) appears in humid environments or...
User Instructions
Page 12
... pads to turn the dial to stabilize. For (Style 1) controls press the up or down arrow touch pads, or for the freezer control will cool. ■ Press both the freezer and refrigerator (+) touch pads repeatedly until the indicator light is on this feature. If you need to adjust the temperature in either the...
... pads to turn the dial to stabilize. For (Style 1) controls press the up or down arrow touch pads, or for the freezer control will cool. ■ Press both the freezer and refrigerator (+) touch pads repeatedly until the indicator light is on this feature. If you need to adjust the temperature in either the...

User Instructions
Page 15
...the burned-out bulb(s) with an appliance bulb of light assembly. Slide the shield toward the front until it locks. Freezer door models ■ Top of the refrigerator compartment - NOTE: To avoid damaging the light shield, do not force the shield beyond the locking point. ■...occur, clean plastic part with a clean sponge or soft cloth and a mild detergent in warm water. ■ To keep your refrigerator. Freezer drawer models ■ Top of the refrigerator compartment - NOTE: You may need to clean the condenser: ■ Remove the base grille. ■ Use a vacuum cleaner ...
...the burned-out bulb(s) with an appliance bulb of light assembly. Slide the shield toward the front until it locks. Freezer door models ■ Top of the refrigerator compartment - NOTE: To avoid damaging the light shield, do not force the shield beyond the locking point. ■...occur, clean plastic part with a clean sponge or soft cloth and a mild detergent in warm water. ■ To keep your refrigerator. Freezer drawer models ■ Top of the refrigerator compartment - NOTE: You may need to clean the condenser: ■ Remove the base grille. ■ Use a vacuum cleaner ...

User Instructions
Page 16
... setting will not close completely ■ Door blocked open . In the U.S.A., www.maytag.com In Canada, www.maytag.ca Refrigerator Operation The refrigerator will not operate The motor seems to run too much WARNING Your new refrigerator may run longer than your new refrigerator that you did not notice from items placed on top of the...
... setting will not close completely ■ Door blocked open . In the U.S.A., www.maytag.com In Canada, www.maytag.ca Refrigerator Operation The refrigerator will not operate The motor seems to run too much WARNING Your new refrigerator may run longer than your new refrigerator that you did not notice from items placed on top of the...

User Instructions
Page 17
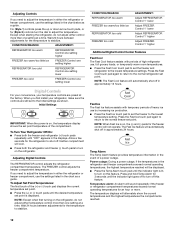
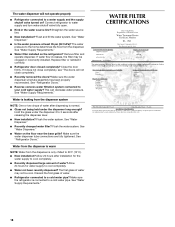
...freezer compartment door. If ice volume improves, then the filter may be installed to your cold water supply? Replace filter or reinstall it correctly. ■ Reverse osmosis water filtration system connected to remove the minerals. ■ Water filter installed on the refrigerator... ice ■ New plumbing connections? See "Water Supply Requirements." ■ Questions remain regarding water pressure? Failure to enter refrigerator. This can decrease water pressure. New plumbing connections can result in the ON position. ■ New installation? Minimize door ...
...freezer compartment door. If ice volume improves, then the filter may be installed to your cold water supply? Replace filter or reinstall it correctly. ■ Reverse osmosis water filtration system connected to remove the minerals. ■ Water filter installed on the refrigerator... ice ■ New plumbing connections? See "Water Supply Requirements." ■ Questions remain regarding water pressure? Failure to enter refrigerator. This can decrease water pressure. New plumbing connections can result in the ON position. ■ New installation? Minimize door ...
User Instructions
Page 18
... Requirements." Flush the water system. Make sure the water dispenser tube connections are fully tightened. The first glass of water. ■ Refrigerator connected to a cold water pipe? See "Water Supply Requirements." The water dispenser will not close completely." ■ Recently removed the doors...■ Water on the floor near the base grille? Flush and fill the water system. This can decrease water pressure. See "Refrigerator Doors." ■ Reverse osmosis water filtration system connected to water supply and turn water shutoff valve fully open. ■ Kink in...
... Requirements." Flush the water system. Make sure the water dispenser tube connections are fully tightened. The first glass of water. ■ Refrigerator connected to a cold water pipe? See "Water Supply Requirements." The water dispenser will not close completely." ■ Recently removed the doors...■ Water on the floor near the base grille? Flush and fill the water system. This can decrease water pressure. See "Refrigerator Doors." ■ Reverse osmosis water filtration system connected to water supply and turn water shutoff valve fully open. ■ Kink in...

User Instructions
Page 20
... your correspondence. Any food loss due to the appliance. 9. Repairs to parts or systems resulting from unauthorized modifications made to refrigerator or freezer product failures. 7. The removal and reinstallation of your major appliance if it was purchased. This warranty is used in a ...easily determined. This major appliance is designed to correct defects in a remote area where service by an authorized Maytag servicer is covered by a Maytag designated service company. SOME STATES AND PROVINCES DO NOT ALLOW THE EXCLUSION OR LIMITATION OF INCIDENTAL OR CONSEQUENTIAL DAMAGES,...
... your correspondence. Any food loss due to the appliance. 9. Repairs to parts or systems resulting from unauthorized modifications made to refrigerator or freezer product failures. 7. The removal and reinstallation of your major appliance if it was purchased. This warranty is used in a ...easily determined. This major appliance is designed to correct defects in a remote area where service by an authorized Maytag servicer is covered by a Maytag designated service company. SOME STATES AND PROVINCES DO NOT ALLOW THE EXCLUSION OR LIMITATION OF INCIDENTAL OR CONSEQUENTIAL DAMAGES,...


