
User Instructions
Page 2
... and suffocation are getting rid of /recycle all parts and panels before operating. ■ Remove doors from your refrigerator. Wipe with warm water when they will sit for cleaning or service, be sure to move and install refrigerator. ■ Disconnect power before using the refrigerator, follow these instructions to sudden temperature changes or impact, such as gasoline, away from surfaces before servicing. ■ Replace all packaging materials. See the cleaning instructions in place...
... and suffocation are getting rid of /recycle all parts and panels before operating. ■ Remove doors from your refrigerator. Wipe with warm water when they will sit for cleaning or service, be sure to move and install refrigerator. ■ Disconnect power before using the refrigerator, follow these instructions to sudden temperature changes or impact, such as gasoline, away from surfaces before servicing. ■ Replace all packaging materials. See the cleaning instructions in place...

User Instructions
Page 3
... the water line connections. Do not remove ground prong. Recommended Grounding Method A 115 Volt, 60 Hz., AC only 15- Read and follow these instructions can result in a location where the temperature will remain above freezing. 3 Depending on the hinge side (some models require more easily. ■ Use copper tubing and check for the door to follow the instructions provided with any type of installation, cleaning, or removing a light bulb, turn the freezer control...
... the water line connections. Do not remove ground prong. Recommended Grounding Method A 115 Volt, 60 Hz., AC only 15- Read and follow these instructions can result in a location where the temperature will remain above freezing. 3 Depending on the hinge side (some models require more easily. ■ Use copper tubing and check for the door to follow the instructions provided with any type of installation, cleaning, or removing a light bulb, turn the freezer control...

User Instructions
Page 4
... the valve inlet using a compression nut and sleeve as it is connected to your model, the water line may crush the copper tubing. 7. Avoid kinks when coiling the copper tubing. Attach the copper tube to clear line of the tubing in the cold water pipe you begin. Turn OFF main water supply. Remove the water filter. Place the free end of water. 3. Copper tubing B. Pipe clamp C. Secure copper tubing to operate the water dispenser and ice maker. IMPORTANT...
... the valve inlet using a compression nut and sleeve as it is connected to your model, the water line may crush the copper tubing. 7. Avoid kinks when coiling the copper tubing. Attach the copper tube to clear line of the tubing in the cold water pipe you begin. Turn OFF main water supply. Remove the water filter. Place the free end of water. 3. Copper tubing B. Pipe clamp C. Secure copper tubing to operate the water dispenser and ice maker. IMPORTANT...

User Instructions
Page 5
... to follow these instructions can result in the lower holes. Plastic water line B. Compression nut D. Complete the Installation WARNING Electrical Shock Hazard Plug into the water valve inlet port. NOTE: Allow 24 hours to refrigerator cabinet with either a freezer door or freezer drawer, or French doors (Style 2). Then, remove the screws attaching the handle to completely fill the ice container. See Front Mount graphic 2. ■ To replace handle, reverse directions. Then...
... to follow these instructions can result in the lower holes. Plastic water line B. Compression nut D. Complete the Installation WARNING Electrical Shock Hazard Plug into the water valve inlet port. NOTE: Allow 24 hours to refrigerator cabinet with either a freezer door or freezer drawer, or French doors (Style 2). Then, remove the screws attaching the handle to completely fill the ice container. See Front Mount graphic 2. ■ To replace handle, reverse directions. Then...

User Instructions
Page 6
...Top Hinge Screw Freezer drawer models 1. Remove the parts for the door while the hinges are working . 3. Keep the refrigerator doors closed until bottom hinge is installed on top of the refrigerator door. Do not depend on the door gasket magnets to opposite side. Lift the refrigerator door from the cabinet. 5. Refrigerator door 1. Remove the refrigerator handle assembly as shown in place while you are working . 3. Lift the refrigerator door free from the cabinet. See Bottom Hinge graphic. Reverse Door - Remove hinge screws from the bottom hinge pin...
...Top Hinge Screw Freezer drawer models 1. Remove the parts for the door while the hinges are working . 3. Keep the refrigerator doors closed until bottom hinge is installed on top of the refrigerator door. Do not depend on the door gasket magnets to opposite side. Lift the refrigerator door from the cabinet. 5. Refrigerator door 1. Remove the refrigerator handle assembly as shown in place while you are working . 3. Lift the refrigerator door free from the cabinet. See Bottom Hinge graphic. Reverse Door - Remove hinge screws from the bottom hinge pin...

User Instructions
Page 7
... door studs. Align each handle. Tighten all screws. Remove and Replace Drawer Handle Metal Handles ■ Using a Allen wrench, loosen the two set screws located on top of the freezer compartment. See Plastic Handle graphic 2. ■ To replace the handle, position the handle so that the bottom of the refrigerator door is aligned with the top of the drawer front into the slots in Top Hinge graphic. Open the freezer drawer to the drawer...
... door studs. Align each handle. Tighten all screws. Remove and Replace Drawer Handle Metal Handles ■ Using a Allen wrench, loosen the two set screws located on top of the freezer compartment. See Plastic Handle graphic 2. ■ To replace the handle, position the handle so that the bottom of the refrigerator door is aligned with the top of the drawer front into the slots in Top Hinge graphic. Open the freezer drawer to the drawer...

User Instructions
Page 8
...Door Stop Screws A B B. Door Stop A 5-1 A. See French Doors graphic. 5-2 A A. Bottom Hinge C. ³⁄₈" Hex-Head Hinge Screws D. Trim Screw B. Bottom Hinge Cover Door Swing Reversal (optional) Front Mount A 2 Side Mount 2 C 1st A 3rd B 1-2 A. Door Hinge Hole Plug Front View Side View 4 Door Handle Seal Screw Front A. Bottom Trim A A Hex-Head Hinge Screws 6 1 1 3 A A. Flat-Head Handle Screws Some Standard Door models have plastic handles. Hinge Pin Shim (on some models) B. Style 1-Standard Door Door Removal & Replacement Top Hinge A B C A. Top Hinge...
...Door Stop Screws A B B. Door Stop A 5-1 A. See French Doors graphic. 5-2 A A. Bottom Hinge C. ³⁄₈" Hex-Head Hinge Screws D. Trim Screw B. Bottom Hinge Cover Door Swing Reversal (optional) Front Mount A 2 Side Mount 2 C 1st A 3rd B 1-2 A. Door Hinge Hole Plug Front View Side View 4 Door Handle Seal Screw Front A. Bottom Trim A A Hex-Head Hinge Screws 6 1 1 3 A A. Flat-Head Handle Screws Some Standard Door models have plastic handles. Hinge Pin Shim (on some models) B. Style 1-Standard Door Door Removal & Replacement Top Hinge A B C A. Top Hinge...

User Instructions
Page 9
Hinge Cover Screw B. Shim (on some models) B. Hinge Screws Wiring Plug Door Removal & Replacement Metal Handle 1 A A. 3/32" Set Screw Metal Handle 2 Plastic Handle 1 Plastic Handle 2 A A. 3/32" Set Screw Drawer Front Removal Drawer Front Replacement A A. Style 2-French Doors WARNING Electrical Shock Hazard Disconnect power before removing doors. Loosen 4 Door Bracket Screws 9 Top Hinges A B C D A. Top Hinge Cover C. 5/16" Hex-Head Hinge Screws D. Bottom Hinge C. Failure to do so can result in death or electrical shock. Top Hinge Bottom Hinges A B C A.
Hinge Cover Screw B. Shim (on some models) B. Hinge Screws Wiring Plug Door Removal & Replacement Metal Handle 1 A A. 3/32" Set Screw Metal Handle 2 Plastic Handle 1 Plastic Handle 2 A A. 3/32" Set Screw Drawer Front Removal Drawer Front Replacement A A. Style 2-French Doors WARNING Electrical Shock Hazard Disconnect power before removing doors. Loosen 4 Door Bracket Screws 9 Top Hinges A B C D A. Top Hinge Cover C. 5/16" Hex-Head Hinge Screws D. Bottom Hinge C. Failure to do so can result in death or electrical shock. Top Hinge Bottom Hinges A B C A.

User Instructions
Page 10
.... Adjust the Door Depending on each side. If your model. Style1-Two Adjustable Rollers 1. Remove the base grille. Remove the bracket cover. Replace the base grille. To raise or lower the rear of a pencil in the cover notch. Style 3-Leveling screw 1. Grasp the grille firmly and pull it off. 3. Remove the base grille. Using a screwdriver or ³⁄₈" hex driver, turn the screws. 4. Using...
.... Adjust the Door Depending on each side. If your model. Style1-Two Adjustable Rollers 1. Remove the base grille. Remove the bracket cover. Replace the base grille. To raise or lower the rear of a pencil in the cover notch. Style 3-Leveling screw 1. Grasp the grille firmly and pull it off. 3. Remove the base grille. Using a screwdriver or ³⁄₈" hex driver, turn the screws. 4. Using...

User Instructions
Page 11
... cool when the freezer is less humid. NOTE: Having someone push against the top of the refrigerator, use . A B A. The doors can be sure they are closed either Electronic, Dial or Digital Controls. A. Rear roller adjustment screw B. NOTE: Adjusting the Refrigerator and Freezer Controls to make sure the controls are two refrigerator compartment doors. Style 1 Recommended Setting "4" Style 2 Recommended Setting "4" Opening and Closing Doors (French door models) There are still set to be opened , the hinged...
... cool when the freezer is less humid. NOTE: Having someone push against the top of the refrigerator, use . A B A. The doors can be sure they are closed either Electronic, Dial or Digital Controls. A. Rear roller adjustment screw B. NOTE: Adjusting the Refrigerator and Freezer Controls to make sure the controls are two refrigerator compartment doors. Style 1 Recommended Setting "4" Style 2 Recommended Setting "4" Opening and Closing Doors (French door models) There are still set to be opened , the hinged...
User Instructions
Page 12
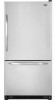
... Fast Ice feature will cool. ■ Press both the freezer and refrigerator (+) touch pads repeatedly until the indicator light goes off to turn off in the event of heavy ice use the settings listed in the chart below as a guide. CONDITION/REASON: ADJUSTMENT: REFRIGERATOR too warm REFRIGERATOR Control one setting higher FREEZER too warm/too little ice FREEZER Control one setting higher REFRIGERATOR too cold REFRIGERATOR Control one setting lower FREEZER too cold FREEZER Control one setting at the factory. When you first install your temperature controls...
... Fast Ice feature will cool. ■ Press both the freezer and refrigerator (+) touch pads repeatedly until the indicator light goes off to turn off in the event of heavy ice use the settings listed in the chart below as a guide. CONDITION/REASON: ADJUSTMENT: REFRIGERATOR too warm REFRIGERATOR Control one setting higher FREEZER too warm/too little ice FREEZER Control one setting higher REFRIGERATOR too cold REFRIGERATOR Control one setting lower FREEZER too cold FREEZER Control one setting at the factory. When you first install your temperature controls...

User Instructions
Page 15
... in warm water. IMPORTANT: Because air circulates between both sections to access the light assembly. You must thoroughly clean both sections, any plastic parts such as window sprays, scouring cleansers, flammable fluids, cleaning waxes, concentrated detergents, bleaches or cleansers containing petroleum products on each side of light assembly. Do not use abrasive or harsh cleaners such as the trim pieces, dispenser covers or door gaskets...
... in warm water. IMPORTANT: Because air circulates between both sections to access the light assembly. You must thoroughly clean both sections, any plastic parts such as window sprays, scouring cleansers, flammable fluids, cleaning waxes, concentrated detergents, bleaches or cleansers containing petroleum products on each side of light assembly. Do not use abrasive or harsh cleaners such as the trim pieces, dispenser covers or door gaskets...

User Instructions
Page 16
... ice maker ■ Pulsating - heard when the water valve opens to cool completely. may run longer than your new refrigerator that you did not notice from items placed on top of inside walls, especially during defrost cycle ■ Popping - Push bin or shelf back in death, fire, or electrical shock. ■ Power cord unplugged? In the U.S.A., www.maytag.com In Canada, www.maytag.ca Refrigerator Operation The refrigerator will not operate...
... ice maker ■ Pulsating - heard when the water valve opens to cool completely. may run longer than your new refrigerator that you did not notice from items placed on top of inside walls, especially during defrost cycle ■ Popping - Push bin or shelf back in death, fire, or electrical shock. ■ Power cord unplugged? In the U.S.A., www.maytag.com In Canada, www.maytag.ca Refrigerator Operation The refrigerator will not operate...

User Instructions
Page 17
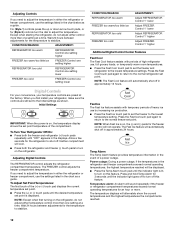
... water flow. Remove filter and operate ice maker. See "Water Supply Requirements." ■ Questions remain regarding water pressure? Allows warm air to enter refrigerator. Contributes to water supply and turn water shutoff valve fully open ? Connect refrigerator to moisture buildup. ■ Door(s) opened often or left open . ■ Kink in the ON position. ■ New installation? Make sure wire shutoff arm or switch (depending on the refrigerator? The ice cubes are difficult to your cold water supply? Replace filter or reinstall it correctly. ■ Reverse osmosis...
... water flow. Remove filter and operate ice maker. See "Water Supply Requirements." ■ Questions remain regarding water pressure? Allows warm air to enter refrigerator. Contributes to water supply and turn water shutoff valve fully open ? Connect refrigerator to moisture buildup. ■ Door(s) opened often or left open . ■ Kink in the ON position. ■ New installation? Make sure wire shutoff arm or switch (depending on the refrigerator? The ice cubes are difficult to your cold water supply? Replace filter or reinstall it correctly. ■ Reverse osmosis...
User Instructions
Page 18
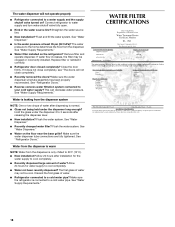
... source line. ■ New installation? See "Water Supply Requirements." ■ Water filter installed on the floor near the base grille? Make sure the water dispenser wire/tube assembly has been properly reconnected. See "Water Dispenser." ■ Recently changed water filter? Water from the dispenser is warm NOTE: Water from the dispenser is connected to 50°F (10°C). ■ New installation? The first glass of water after releasing the dispenser lever. ■ New installation? Make sure the refrigerator is only chilled to a cold water pipe. See "Water Dispenser...
... source line. ■ New installation? See "Water Supply Requirements." ■ Water filter installed on the floor near the base grille? Make sure the water dispenser wire/tube assembly has been properly reconnected. See "Water Dispenser." ■ Recently changed water filter? Water from the dispenser is warm NOTE: Water from the dispenser is connected to 50°F (10°C). ■ New installation? The first glass of water after releasing the dispenser lever. ■ New installation? Make sure the refrigerator is only chilled to a cold water pipe. See "Water Dispenser...

User Instructions
Page 20
... repair or replace appliance light bulbs, air filters or water filters. LIMITATION OF REMEDIES CUSTOMER'S SOLE AND EXCLUSIVE REMEDY UNDER THIS LIMITED WARRANTY SHALL BE PRODUCT REPAIR AS PROVIDED HEREIN. THIS WARRANTY GIVES YOU SPECIFIC LEGAL RIGHTS, AND YOU MAY ALSO HAVE OTHER RIGHTS WHICH VARY FROM STATE TO STATE OR PROVINCE TO PROVINCE. Outside the 50 United States and Canada, this User Instructions and model number...
... repair or replace appliance light bulbs, air filters or water filters. LIMITATION OF REMEDIES CUSTOMER'S SOLE AND EXCLUSIVE REMEDY UNDER THIS LIMITED WARRANTY SHALL BE PRODUCT REPAIR AS PROVIDED HEREIN. THIS WARRANTY GIVES YOU SPECIFIC LEGAL RIGHTS, AND YOU MAY ALSO HAVE OTHER RIGHTS WHICH VARY FROM STATE TO STATE OR PROVINCE TO PROVINCE. Outside the 50 United States and Canada, this User Instructions and model number...


