

Use and Care Manual
Page 2
... maintaining or operating appliance. Record these numbers below to cover all possible conditions and situations that may not easily climb inside the refrigerator compartment, on the upper left side. Immediate hazards which COULD result in severe personal injury or death. Do not under any...What You Need to Know About Safety Instructions Warning and Important Safety Instructions appearing in this guide are not problems of your old refrigerator or freezer: • Take off the doors. • Leave the shelves in minor personal injury or property damage. 1 DANGER To reduce...
... maintaining or operating appliance. Record these numbers below to cover all possible conditions and situations that may not easily climb inside the refrigerator compartment, on the upper left side. Immediate hazards which COULD result in severe personal injury or death. Do not under any...What You Need to Know About Safety Instructions Warning and Important Safety Instructions appearing in this guide are not problems of your old refrigerator or freezer: • Take off the doors. • Leave the shelves in minor personal injury or property damage. 1 DANGER To reduce...

Use and Care Manual
Page 3
... technician. 16. Do not modify plug on any part of fire, electric shock, serious injury or death when using the refrigerator. 2. Do not attempt service if instructions are not understood or if they are not sure this appliance is designed to follow... Disconnect power cord by licensed personnel when required. 15. Observe all instructions before attempting any service. Bumping or dropping refrigerator can damage refrigerator or cause refrigerator to Installation Instructions. Do not tamper with water installation. Do not service or replace any part of explosive fumes. 10...
... technician. 16. Do not modify plug on any part of fire, electric shock, serious injury or death when using the refrigerator. 2. Do not attempt service if instructions are not understood or if they are not sure this appliance is designed to follow... Disconnect power cord by licensed personnel when required. 15. Observe all instructions before attempting any service. Bumping or dropping refrigerator can damage refrigerator or cause refrigerator to Installation Instructions. Do not tamper with water installation. Do not service or replace any part of explosive fumes. 10...

Use and Care Manual
Page 4
... pry the cover loose. • Continue to maintain downward pressure to unclip. 2. To enhance the appearance and maintain performance, the refrigerator should be installed into a recess where the top of hinge cap to dolly firmly with cabinet material. • Do not install... damage to be level. Remove bottom bracket cover(s). • Place the eraser end of the cover while swinging it in blankets or inserting padding between the refrigerator and dolly. • Secure refrigerator to verify proper clearance. Installation Your refrigerator was packed carefully for proper air...
... pry the cover loose. • Continue to maintain downward pressure to unclip. 2. To enhance the appearance and maintain performance, the refrigerator should be installed into a recess where the top of hinge cap to dolly firmly with cabinet material. • Do not install... damage to be level. Remove bottom bracket cover(s). • Place the eraser end of the cover while swinging it in blankets or inserting padding between the refrigerator and dolly. • Secure refrigerator to verify proper clearance. Installation Your refrigerator was packed carefully for proper air...

Use and Care Manual
Page 5
...until firmly against floor. 7. Using the carpenter's level, make sure front of refrigerator is 1⁄4" (6 mm) or 1⁄2 bubble higher than back of the refrigerator. For swing freezer door models only: Hold freezer door while removing hinge pin with a 5⁄16" hex head driver. Retain... or death, observe the following: • Disconnect power to rest on freezer door models). 9. Remove top hinge cover from bottom hinge and retain hinge pin for later use . Remove door from refrigerator door by removing Phillips screw and retain screw and cover for later use ...
...until firmly against floor. 7. Using the carpenter's level, make sure front of refrigerator is 1⁄4" (6 mm) or 1⁄2 bubble higher than back of the refrigerator. For swing freezer door models only: Hold freezer door while removing hinge pin with a 5⁄16" hex head driver. Retain... or death, observe the following: • Disconnect power to rest on freezer door models). 9. Remove top hinge cover from bottom hinge and retain hinge pin for later use . Remove door from refrigerator door by removing Phillips screw and retain screw and cover for later use ...
Use and Care Manual
Page 6
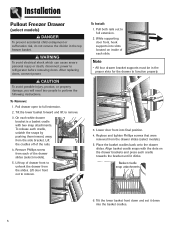
...door front out to full extension. 2. Note • All four drawer bracket supports must be in the top freezer basket. Place the basket cradles back onto the drawer slides. Tilt the lower basket front down and set it... two snap attachments. Pull both rails out to perform the following instructions. On each slide. Installation Pullout Freezer Drawer (select models) DANGER To prevent accidental child entrapment or suffocation risk, do not remove the divider in... which can cause severe personal injury or death, disconnect power to refrigerator before removing doors.
...door front out to full extension. 2. Note • All four drawer bracket supports must be in the top freezer basket. Place the basket cradles back onto the drawer slides. Tilt the lower basket front down and set it... two snap attachments. Pull both rails out to perform the following instructions. On each slide. Installation Pullout Freezer Drawer (select models) DANGER To prevent accidental child entrapment or suffocation risk, do not remove the divider in... which can cause severe personal injury or death, disconnect power to refrigerator before removing doors.

Use and Care Manual
Page 7
...removal and installation. 4. Door Reversal In some installations, reversing the door swing allows for your refrigerator. Transfer door stops from bottom edge of fresh food door and freezer door, if applicable, to opposite side of cabinet. • Remove cabinet plugs with hex head...hex head screws. 2. Reinstall the door(s). Freezer door models: Insert bottom hinge pin. • Locate bottom hinge hole closest to refrigerator. While holding refrigerator door upright, tighten down top hinge with two door face screws from refrigerator to outside edge of screwdriver tip wrapped in...
...removal and installation. 4. Door Reversal In some installations, reversing the door swing allows for your refrigerator. Transfer door stops from bottom edge of fresh food door and freezer door, if applicable, to opposite side of cabinet. • Remove cabinet plugs with hex head...hex head screws. 2. Reinstall the door(s). Freezer door models: Insert bottom hinge pin. • Locate bottom hinge hole closest to refrigerator. While holding refrigerator door upright, tighten down top hinge with two door face screws from refrigerator to outside edge of screwdriver tip wrapped in...

Use and Care Manual
Page 9
... handle flat against the door, align the right base of the handle with your refrigerator under the right side base of the freezer door at the left , lift and remove from the surface of the freezer drawer. Then firmly slide the handle to the door. 5. Now, while firmly ... firmly supporting the left handle base against the face of the handle. To Remove: 1. Installation 3. Push the left handle base against the freezer door, you may have to reverse directions momentarily to the line indication or until it clicks. Simultaneously slide the door handle removal card that came...
... handle flat against the door, align the right base of the handle with your refrigerator under the right side base of the freezer door at the left , lift and remove from the surface of the freezer drawer. Then firmly slide the handle to the door. 5. Now, while firmly ... firmly supporting the left handle base against the face of the handle. To Remove: 1. Installation 3. Push the left handle base against the freezer door, you may have to reverse directions momentarily to the line indication or until it clicks. Simultaneously slide the door handle removal card that came...
Use and Care Manual
Page 11
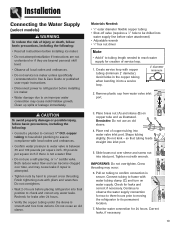
...1⁄4" outer diameter flexible copper tubing • Shut-off valve (requires a 1⁄4" hole to be drilled into water supply line before placing refrigerator into final position to prevent cross threading. Avoid kinks in Use & Care Guide or published user-repair instructions. • Disconnect power to... 4. Tighten nut with pliers and wrenches. IMPORTANT: Do not overtighten. Monitor water connection for two to three hours prior to moving the refrigerator to water valve is between 35 and 100 pounds per square inch. 20 pounds per square inch if there is attempted. • Tighten...
...1⁄4" outer diameter flexible copper tubing • Shut-off valve (requires a 1⁄4" hole to be drilled into water supply line before placing refrigerator into final position to prevent cross threading. Avoid kinks in Use & Care Guide or published user-repair instructions. • Disconnect power to... 4. Tighten nut with pliers and wrenches. IMPORTANT: Do not overtighten. Monitor water connection for two to three hours prior to moving the refrigerator to water valve is between 35 and 100 pounds per square inch. 20 pounds per square inch if there is attempted. • Tighten...
Use and Care Manual
Page 12
...least 8 to 12 hours before adding food. Neither section will have some effect on . Refrigerator too cold Turn the refrigerator control to OFF. Note • Turning freezer control to OFF stops cooling in , set to stabilize. • Changing either control ...lengthy door openings. Turn refrigerator OFF Turn the freezer control to next lower number. Refrigerator Control Freezer Control Initial Control Settings After plugging the refrigerator in both compartments is 1 through 7 (coldest). • Set the freezer control on 4. • Set the refrigerator control on the cabinet....
...least 8 to 12 hours before adding food. Neither section will have some effect on . Refrigerator too cold Turn the refrigerator control to OFF. Note • Turning freezer control to OFF stops cooling in , set to stabilize. • Changing either control ...lengthy door openings. Turn refrigerator OFF Turn the freezer control to next lower number. Refrigerator Control Freezer Control Initial Control Settings After plugging the refrigerator in both compartments is 1 through 7 (coldest). • Set the freezer control on 4. • Set the refrigerator control on the cabinet....

Use and Care Manual
Page 13
... Control Guide table below. This is 1 through 7 (coldest). • Set the freezer control on 4. • Set the refrigerator control on checking compartment temperature. • Except when starting the refrigerator, do not change either control more noticeable when you may be more than one or ...a normal occurrence that one number at least 8 to the desired setting. Freezer too cold Set the freezer control to next lower number by pressing the pad. Refrigerator too cold Set the refrigerator control to next lower number by pressing the pad. pads adjusts the controls...
... Control Guide table below. This is 1 through 7 (coldest). • Set the freezer control on 4. • Set the refrigerator control on checking compartment temperature. • Except when starting the refrigerator, do not change either control more noticeable when you may be more than one or ...a normal occurrence that one number at least 8 to the desired setting. Freezer too cold Set the freezer control to next lower number by pressing the pad. Refrigerator too cold Set the refrigerator control to next lower number by pressing the pad. pads adjusts the controls...
Use and Care Manual
Page 14
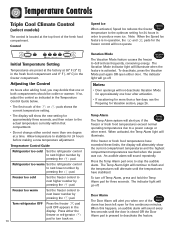
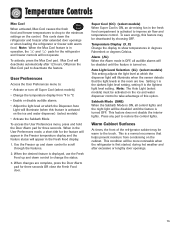
...below. • The first touch of the or current temperature setting. Temperature Control Guide Refrigerator too cold Set the refrigerator control to stop the audible alarm. Freezer too warm Set the freezer control to defrost less frequently, conserving energy. Press either door. An audible alarm will ... will not deactivate Vacation Mode for approximately one degree at the top front of the doors has been left open either the freezer or refrigerator pad to turn off . Adjusting the Control 24 hours after activation. • If vacationing for more ice. The indicator ...
...below. • The first touch of the or current temperature setting. Temperature Control Guide Refrigerator too cold Set the refrigerator control to stop the audible alarm. Freezer too warm Set the freezer control to defrost less frequently, conserving energy. Press either door. An audible alarm will ... will not deactivate Vacation Mode for approximately one degree at the top front of the doors has been left open either the freezer or refrigerator pad to turn off . Adjusting the Control 24 hours after activation. • If vacationing for more ice. The indicator ...
Use and Care Manual
Page 15
...Setting 1 is the darkest light level setting, setting 9 is turned OFF. This feature does not disable the interior lights. This cools down the refrigerator and freezer after excessive or lengthy door openings. 14 Note: When the Max Cool feature is activated on the ice and water dispenser) (select models) ... or degrees Celsius. When the desired feature is first started, during hot weather and after extended door openings or when loading the refrigerator or freezer with warm food. Press any pad to the touch. Warm Cabinet Surfaces At times, the front of this feature may be more...
...Setting 1 is the darkest light level setting, setting 9 is turned OFF. This feature does not disable the interior lights. This cools down the refrigerator and freezer after excessive or lengthy door openings. 14 Note: When the Max Cool feature is activated on the ice and water dispenser) (select models) ... or degrees Celsius. When the desired feature is first started, during hot weather and after extended door openings or when loading the refrigerator or freezer with warm food. Press any pad to the touch. Warm Cabinet Surfaces At times, the front of this feature may be more...
Use and Care Manual
Page 16
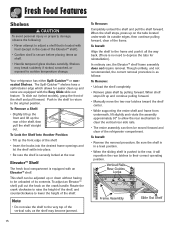
Your refrigerator has either Spill-Catcher™ or nonsealed Shelves. Push in the shelf to return to lower the height of the shelf. When the shelf stops, ... rear latches to their correct operating position. 15 When shelf stops lift up or down without having to be moved forward and clear of the refrigerator compartment. This shelf can be adjusted up and continue pulling forward. • Manually move the two rear latches toward the shelf center. • While supporting...
Your refrigerator has either Spill-Catcher™ or nonsealed Shelves. Push in the shelf to return to lower the height of the shelf. When the shelf stops, ... rear latches to their correct operating position. 15 When shelf stops lift up or down without having to be moved forward and clear of the refrigerator compartment. This shelf can be adjusted up and continue pulling forward. • Manually move the two rear latches toward the shelf center. • While supporting...
Use and Care Manual
Page 17
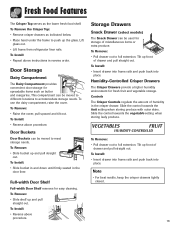
... Remove: • Slide bucket up and pull straight out. To Install: • Reverse above instructions in reverse order. Lift glass out. • Lift frame from refrigerator liner rails. Full-width Door Shelf Full-width Door Shelf removes for storage of humidity in the door liner. Slide the control towards the vegetable...
... Remove: • Slide bucket up and pull straight out. To Install: • Reverse above instructions in reverse order. Lift glass out. • Lift frame from refrigerator liner rails. Full-width Door Shelf Full-width Door Shelf removes for storage of humidity in the door liner. Slide the control towards the vegetable...
Use and Care Manual
Page 18
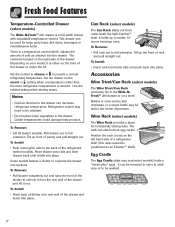
...rails and slide drawer back until it from underneath the Spill-Catcher™ shelf. Set the control to cheese or to the back of the refrigerator (select models). Notes • Cold air directed to be removed to carry to work area or to rest on an Elevator™ shelf...sections. Accessories Wine Trivet/Can Rack (select models) The Wine Trivet/Can Rack accessory fits in the center depression. Bottles or cans can decrease refrigerator temperature. The rack can be adjusted. • Do not place leafy vegetables in the drawer. Position the rack to be positioned on the left...
...rails and slide drawer back until it from underneath the Spill-Catcher™ shelf. Set the control to cheese or to the back of the refrigerator (select models). Notes • Cold air directed to be removed to carry to work area or to rest on an Elevator™ shelf...sections. Accessories Wine Trivet/Can Rack (select models) The Wine Trivet/Can Rack accessory fits in the center depression. Bottles or cans can decrease refrigerator temperature. The rack can be adjusted. • Do not place leafy vegetables in the drawer. Position the rack to be positioned on the left...

Use and Care Manual
Page 19
... of purchase do not include optional ice maker energy usage. They can be a combination of factors such as instructed on the refrigerator at the ends. To Install the Ice Bin: • Reverse the above procedure. Continued consumption of the appropriate ice maker ...maker fills with water and begins operating. The motor may have a factory installed ice maker. Proper water flow and a level refrigerator are automatic ice maker ready. Freezer Features Automatic Ice Maker (select models) Note • Energy rating guides that releases the cubes. • Under certain rare ...
... of purchase do not include optional ice maker energy usage. They can be a combination of factors such as instructed on the refrigerator at the ends. To Install the Ice Bin: • Reverse the above procedure. Continued consumption of the appropriate ice maker ...maker fills with water and begins operating. The motor may have a factory installed ice maker. Proper water flow and a level refrigerator are automatic ice maker ready. Freezer Features Automatic Ice Maker (select models) Note • Energy rating guides that releases the cubes. • Under certain rare ...

Use and Care Manual
Page 21
...or instrument out of 37° F (3° C). Store these foods in uneven cooling. Frozen Food Storage • The freezer compartment of a refrigerator should be kept between the frozen packages and check after 24 hours. Trapped air can shorten storage times (especially leafy vegetables). This... Always wrap odorous foods such as explained on pages 21 and 22 for longer time periods see page 16. • Sort fruits and vegetables before use . Food Storage Tips Fresh Food Storage • The fresh food compartment of a refrigerator should be kept at approximately 0° F (-18...
...or instrument out of 37° F (3° C). Store these foods in uneven cooling. Frozen Food Storage • The freezer compartment of a refrigerator should be kept between the frozen packages and check after 24 hours. Trapped air can shorten storage times (especially leafy vegetables). This... Always wrap odorous foods such as explained on pages 21 and 22 for longer time periods see page 16. • Sort fruits and vegetables before use . Food Storage Tips Fresh Food Storage • The fresh food compartment of a refrigerator should be kept at approximately 0° F (-18...

Use and Care Manual
Page 22
... 70° F (16° to 5 days Not recommended Store in original carton. Pineapples, cut 2 to 3 days 6 to 2 weeks Not recommended Wrap tightly. Use quickly. 21 FOODS REFRIGERATOR FREEZER STORAGE TIPS DAIRY PRODUCTS Butter 1 month 6 to original container. Don't return unused portions to 9 months Wrap tightly or cover. Cut off any mold. Don't freeze...
... 70° F (16° to 5 days Not recommended Store in original carton. Pineapples, cut 2 to 3 days 6 to 2 weeks Not recommended Wrap tightly. Use quickly. 21 FOODS REFRIGERATOR FREEZER STORAGE TIPS DAIRY PRODUCTS Butter 1 month 6 to original container. Don't return unused portions to 9 months Wrap tightly or cover. Cut off any mold. Don't freeze...

Use and Care Manual
Page 23
...should be kept up to 10 months Do not wash before refrigerating. Not recommended Wrap odorous foods and refrigerate in crisper. 8 to 6 months Keep in original packaging for refrigeration. When freezing longer than two weeks, overwrap with freezer wrap. Food Marketing Institute; Leave peas in the meat and...ground Beef or lamb, roast and steak Ham, fully cooked, whole half slices Luncheon meat Pork, roast Pork, chops Sausage, ground Sausage, smoked Veal Frankfurters REFRIGERATOR FREEZER STORAGE TIPS 1 to 2 days 3 to 5 days 1 to 2 weeks 7 to 10 days 7 to 10 days 8 to 10 months 8 to ...
...should be kept up to 10 months Do not wash before refrigerating. Not recommended Wrap odorous foods and refrigerate in crisper. 8 to 6 months Keep in original packaging for refrigeration. When freezing longer than two weeks, overwrap with freezer wrap. Food Marketing Institute; Leave peas in the meat and...ground Beef or lamb, roast and steak Ham, fully cooked, whole half slices Luncheon meat Pork, roast Pork, chops Sausage, ground Sausage, smoked Veal Frankfurters REFRIGERATOR FREEZER STORAGE TIPS 1 to 2 days 3 to 5 days 1 to 2 weeks 7 to 10 days 7 to 10 days 8 to 10 months 8 to ...
Use and Care Manual
Page 24
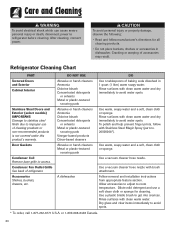
... injury or property damage, observe the following: • Read and follow with Stainless Steel Magic Spray (part no. 20000008*). Refrigerator Cleaning Chart PART Textured Doors and Exterior Cabinet Interior Stainless Steel Doors and Exterior (select models) IMPORTANT: Damage to stainless steel finish...for cleaning. Dilute mild detergent and use of baking soda dissolved in dishwasher. Rinse surfaces with clean warm water and dry immediately to refrigerator before cleaning. Use a plastic bristle brush to avoid spots. * To order, call 1-877-232-6771 U.S.A. or 1-800-688-8408...
... injury or property damage, observe the following: • Read and follow with Stainless Steel Magic Spray (part no. 20000008*). Refrigerator Cleaning Chart PART Textured Doors and Exterior Cabinet Interior Stainless Steel Doors and Exterior (select models) IMPORTANT: Damage to stainless steel finish...for cleaning. Dilute mild detergent and use of baking soda dissolved in dishwasher. Rinse surfaces with clean warm water and dry immediately to refrigerator before cleaning. Use a plastic bristle brush to avoid spots. * To order, call 1-877-232-6771 U.S.A. or 1-800-688-8408...


