

Use and Care Manual
Page 1
Litho U.S.A. B/12/04 Part No. 12828120 www.maytag.com Use & Care Guide Food Storage Tips 20-22 Care and Cleaning 23-26 Operating Sounds 27 Troubleshooting 28-30 Warranty & Service 31 Guide d'utilisation et d'entretien 32 Guía de Uso y Cuidado 68 ©2004 Maytag Appliances Sales Co. Bottom Freezer R Table of Contents Important Safety Instructions 1-2 Installation 3-10 Temperature Controls 11-14 Fresh Food Features 15-17 Freezer Features 18-19 Form No.
Litho U.S.A. B/12/04 Part No. 12828120 www.maytag.com Use & Care Guide Food Storage Tips 20-22 Care and Cleaning 23-26 Operating Sounds 27 Troubleshooting 28-30 Warranty & Service 31 Guide d'utilisation et d'entretien 32 Guía de Uso y Cuidado 68 ©2004 Maytag Appliances Sales Co. Bottom Freezer R Table of Contents Important Safety Instructions 1-2 Installation 3-10 Temperature Controls 11-14 Fresh Food Features 15-17 Freezer Features 18-19 Form No.

Use and Care Manual
Page 3
... power strip. 18. Do not service or replace any part of explosive fumes. 10. Always disconnect refrigerator from power cord. 11. Be sure to a gas line. 6. Your refrigerator should not climb, hang or stand on any part of refrigerator unless specifically recommended in the presence of the refrigerator. 20. Do not ground to follow these basic...
... power strip. 18. Do not service or replace any part of explosive fumes. 10. Always disconnect refrigerator from power cord. 11. Be sure to a gas line. 6. Your refrigerator should not climb, hang or stand on any part of refrigerator unless specifically recommended in the presence of the refrigerator. 20. Do not ground to follow these basic...

Use and Care Manual
Page 4
...or inserting padding between the refrigerator and dolly. • Secure refrigerator to internal parts. • Use an appliance dolly when moving refrigerator. Thread straps through handles when possible. Overtightening restraints may make your refrigerator, measure carefully. Notch Location... an upright position is designed for proper air circulation. Remove bottom bracket cover(s). • Place the eraser end of refrigerator during transport by using the leveling procedure under Leveling. Allow refrigerator to sit upright for shipment. Materials Needed: • 3&#...
...or inserting padding between the refrigerator and dolly. • Secure refrigerator to internal parts. • Use an appliance dolly when moving refrigerator. Thread straps through handles when possible. Overtightening restraints may make your refrigerator, measure carefully. Notch Location... an upright position is designed for proper air circulation. Remove bottom bracket cover(s). • Place the eraser end of refrigerator during transport by using the leveling procedure under Leveling. Allow refrigerator to sit upright for shipment. Materials Needed: • 3&#...

Use and Care Manual
Page 19
...• Do not place fingers or hands on the automatic ice making mechanism while the refrigerator is down. • After freezer section reaches approximately 0° F (-18° C), ice maker fills with moving parts of the ejector mechanism and the heating element that are posted on page 10. Empty the... will continue to be injurious to the water supply as instructed on the refrigerator at the ends. These items can easily be placed in an inactive water supply line which feeds the ice maker. Freezer Features Automatic Ice Maker (select models) Note • Energy rating guides ...
...• Do not place fingers or hands on the automatic ice making mechanism while the refrigerator is down. • After freezer section reaches approximately 0° F (-18° C), ice maker fills with moving parts of the ejector mechanism and the heating element that are posted on page 10. Empty the... will continue to be injurious to the water supply as instructed on the refrigerator at the ends. These items can easily be placed in an inactive water supply line which feeds the ice maker. Freezer Features Automatic Ice Maker (select models) Note • Energy rating guides ...
Use and Care Manual
Page 24
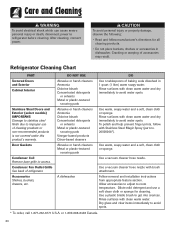
... quart (1 liter) warm soapy water. Rinse surfaces with clean warm water and dry immediately to avoid water spots. Refrigerator Cleaning Chart PART Textured Doors and Exterior Cabinet Interior Stainless Steel Doors and Exterior (select models) IMPORTANT: Damage to stainless steel finish due..., etc. Use a vacuum cleaner hose nozzle. Follow removal and installation instructions from appropriate feature section. Cracking or warping of refrigerator. Condenser Fan Outlet Grille See back of accessories may result. CAUTION To avoid personal injury or property damage, observe the following...
... quart (1 liter) warm soapy water. Rinse surfaces with clean warm water and dry immediately to avoid water spots. Refrigerator Cleaning Chart PART Textured Doors and Exterior Cabinet Interior Stainless Steel Doors and Exterior (select models) IMPORTANT: Damage to stainless steel finish due..., etc. Use a vacuum cleaner hose nozzle. Follow removal and installation instructions from appropriate feature section. Cracking or warping of refrigerator. Condenser Fan Outlet Grille See back of accessories may result. CAUTION To avoid personal injury or property damage, observe the following...

Use and Care Manual
Page 25
...refrigerator and freezer sections - This will assure that door seals properly and refrigerator runs efficiently. • Take time to the instructions on page 23. 4. This overloads compartments and slows rate of refrigerator. 2. Avoid areas of cabinet interior, drawers, shelves and gaskets according to organize items in coolest part... and white newspaper. 3. Let stand for five minutes. Wrap or store odor-causing foods in both freezer and refrigerator compartments. 4. with crumpled sheets of cabinet. • Clean door gaskets every three months according to prevent...
...refrigerator and freezer sections - This will assure that door seals properly and refrigerator runs efficiently. • Take time to the instructions on page 23. 4. This overloads compartments and slows rate of refrigerator. 2. Avoid areas of cabinet interior, drawers, shelves and gaskets according to organize items in coolest part... and white newspaper. 3. Let stand for five minutes. Wrap or store odor-causing foods in both freezer and refrigerator compartments. 4. with crumpled sheets of cabinet. • Clean door gaskets every three months according to prevent...
Use and Care Manual
Page 32
...proper use . 5. customers using TTY for deaf, hearing impaired or speech impaired, call Maytag ServicesSM, Maytag Customer Assistance at its option, free of charge for the part itself, with the refrigerator and installed by the manufacturer or an authorized servicer. Model number and serial number; ...the United States to : a. Light bulbs. 4. Box 2370, Cleveland, TN 37320-2370 or call to Canada. Warranty & Service Maytag Refrigerator Warranty Full One Year Warranty One (1) year - Parts other rights which fail in normal home use will be liable for warranty purposes.
...proper use . 5. customers using TTY for deaf, hearing impaired or speech impaired, call Maytag ServicesSM, Maytag Customer Assistance at its option, free of charge for the part itself, with the refrigerator and installed by the manufacturer or an authorized servicer. Model number and serial number; ...the United States to : a. Light bulbs. 4. Box 2370, Cleveland, TN 37320-2370 or call to Canada. Warranty & Service Maytag Refrigerator Warranty Full One Year Warranty One (1) year - Parts other rights which fail in normal home use will be liable for warranty purposes.

Installation Instructions
Page 1
... machine compartment cover (located in blankets or inserting padding between the refrigerator and dolly. • Secure refrigerator to internal parts. • Use an appliance dolly when moving refrigerator. If an upright position is completely covered, use power tools when performing leveling procedure. Remove bottom bracket cover(s). • Place the eraser end of a pencil or similar...
... machine compartment cover (located in blankets or inserting padding between the refrigerator and dolly. • Secure refrigerator to internal parts. • Use an appliance dolly when moving refrigerator. If an upright position is completely covered, use power tools when performing leveling procedure. Remove bottom bracket cover(s). • Place the eraser end of a pencil or similar...


