Use and Care Guide
Page 2
It must be plugged into a properly grounded wall receptacle. Common sense, caution and care must be exercised when installing, maintaining or operating appliance. Do not use an adapter plug. Power supply cord with three-prong grounded plug Properly grounded type wall receptacle Always contact ...
It must be plugged into a properly grounded wall receptacle. Common sense, caution and care must be exercised when installing, maintaining or operating appliance. Do not use an adapter plug. Power supply cord with three-prong grounded plug Properly grounded type wall receptacle Always contact ...
Use and Care Guide
Page 4
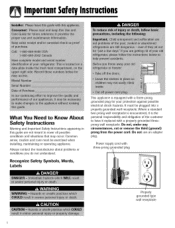
... plugging it snaps into a recess where the top of hinge cap to be installed into place. If an upright position is level from floor to top of the refrigerator is to verify proper clearance. Turn stabilizing legs (C) clockwise until it in the...Subflooring or floor coverings (i.e. Location • Do not install refrigerator near oven, radiator or other heat source. Transporting Your Refrigerator • NEVER transport refrigerator on each of these adjustment screws (B) to raise or lower the rear of the refrigerator to unclip. ......J 2. Using the hex head driver,...
... plugging it snaps into a recess where the top of hinge cap to be installed into place. If an upright position is level from floor to top of the refrigerator is to verify proper clearance. Turn stabilizing legs (C) clockwise until it in the...Subflooring or floor coverings (i.e. Location • Do not install refrigerator near oven, radiator or other heat source. Transporting Your Refrigerator • NEVER transport refrigerator on each of these adjustment screws (B) to raise or lower the rear of the refrigerator to unclip. ......J 2. Using the hex head driver,...
Use and Care Guide
Page 5
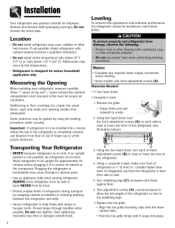
... with a _,_" hex head driver. Installation Door and Drawer Removal Some installations require door/drawer removal to transport the refrigerator to remove hinge and retain all screws for later use . Retain hinge pin and plastic sleeve for later use . 4. Lift out bottom hinge pin (on freezer door models). Remove toe grille and bottom bracket cover(s) (see page...
... with a _,_" hex head driver. Installation Door and Drawer Removal Some installations require door/drawer removal to transport the refrigerator to remove hinge and retain all screws for later use . Retain hinge pin and plastic sleeve for later use . 4. Lift out bottom hinge pin (on freezer door models). Remove toe grille and bottom bracket cover(s) (see page...
Use and Care Guide
Page 6
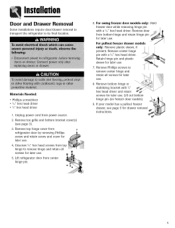
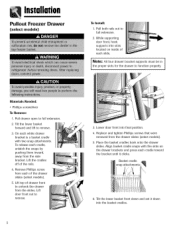
... out to remove. 3. Lower door front into slots located on the drawer brackets and press each of drawer front to full extension. 2. Pullout Freezer Drawer (select models) To Install: 1. I Materials Needed: • Phillips screwdriver To Remove: 1. Basket cradle 6. Note: All four drawer bracket supports must be in the proper slots for the...
... out to remove. 3. Lower door front into slots located on the drawer brackets and press each of drawer front to full extension. 2. Pullout Freezer Drawer (select models) To Install: 1. I Materials Needed: • Phillips screwdriver To Remove: 1. Basket cradle 6. Note: All four drawer bracket supports must be in the proper slots for the...
Use and Care Guide
Page 7
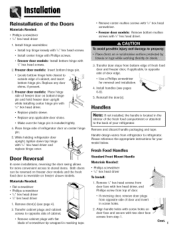
... outside edge of door edge. • Use a Phillips screwdriver for more convenient access to the back of refrigerator door on bottom hinge pin and hold freezer door upright while installing center hinge pin with 3/;, hex head driver. 3. Freezer door models: Place hinge side of door and insert in masking tape. • Remove center mullion screws...
... outside edge of door edge. • Use a Phillips screwdriver for more convenient access to the back of refrigerator door on bottom hinge pin and hold freezer door upright while installing center hinge pin with 3/;, hex head driver. 3. Freezer door models: Place hinge side of door and insert in masking tape. • Remove center mullion screws...
Use and Care Guide
Page 8
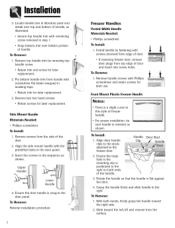
.... Side Mount Handle Materials Needed: • Phillips screwdriver To Install: 1. Freezer Handles Partial-Width Handle Materials Needed: • Phillips screwdriver To Install: 1. Remove handle screws with Phillips screwdriver and retain screws for later replacement. To Install: 1. Ensure the large hole in literature pack and install over bottom portion of handle. Slide toward the right side. 2. Locate...
.... Side Mount Handle Materials Needed: • Phillips screwdriver To Install: 1. Freezer Handles Partial-Width Handle Materials Needed: • Phillips screwdriver To Install: 1. Remove handle screws with Phillips screwdriver and retain screws for later replacement. To Install: 1. Ensure the large hole in literature pack and install over bottom portion of handle. Slide toward the right side. 2. Locate...

Use and Care Guide
Page 10
... Water Supply ([select models) Materials Needed: • '/4"outer diameter flexible copper tubing • Shut-off valve (requires a '/4" hole to reach water supply for installation. Plastic is less durable and can cause damage. • Add 8' to tubing length needed to be drilled into water supply line before valve attachment) • ...
... Water Supply ([select models) Materials Needed: • '/4"outer diameter flexible copper tubing • Shut-off valve (requires a '/4" hole to reach water supply for installation. Plastic is less durable and can cause damage. • Add 8' to tubing length needed to be drilled into water supply line before valve attachment) • ...
Use and Care Guide
Page 11
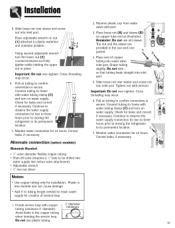
...port. Pull on water supply. Correct leaks, if necessary. .... @ E i 10 Place adjustable wrench on tubing to reach water supply for installation. Pull on nut (1) attached to confirm connection is secure. The nut and the sleeve are provided in the use plastic tubing. 2' diameter ...water supply. Place end of service loop. 1. Continue to observe the water supply connection for two to three hours prior to moving the refrigerator to be drilled into water supply line before valve attachment) • Adjustable wrench • '//' hex nut driver Notes: • ...
...port. Pull on water supply. Correct leaks, if necessary. .... @ E i 10 Place adjustable wrench on tubing to reach water supply for installation. Pull on nut (1) attached to confirm connection is secure. The nut and the sleeve are provided in the use plastic tubing. 2' diameter ...water supply. Place end of service loop. 1. Continue to observe the water supply connection for two to three hours prior to moving the refrigerator to be drilled into water supply line before valve attachment) • Adjustable wrench • '//' hex nut driver Notes: • ...
Use and Care Guide
Page 16
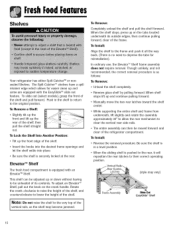
... forward, clear of the shelf. To adjust an Elevator TM Shelf, pull out the knob on the tabs located underneath its contents. To Install: • Reverse the removal procedure. The Spill-Catcher TM shelves have a spill retainer edge which allows for reinstallation). To Remove: Completely...and not recommended, the correct removal procedure is securely locked at the rear. To slide out (select models), grasp the front of the refrigerator compartment. While supporting the entire shelf and frame from underneath, lift slightly and rotate the assembly approximately 30 ° to allow the ...
... forward, clear of the shelf. To adjust an Elevator TM Shelf, pull out the knob on the tabs located underneath its contents. To Install: • Reverse the removal procedure. The Spill-Catcher TM shelves have a spill retainer edge which allows for reinstallation). To Remove: Completely...and not recommended, the correct removal procedure is securely locked at the rear. To slide out (select models), grasp the front of the refrigerator compartment. While supporting the entire shelf and frame from underneath, lift slightly and rotate the assembly approximately 30 ° to allow the ...
Use and Care Guide
Page 17
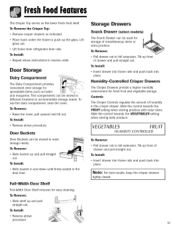
... _.,_ q To Remove: "__ • Pull drawer out to accommodate storage needs. To Install: • Insert drawer into frame rails and push back into place. Lift glass out. • Lift frame from refrigerator liner rails. To Remove: • Slide bucket up and pull straight out. Storage Drawers... the frame to full extension. To Remove the Crisper Top: • Remove crisper drawers as the lower fresh food shelf. To Install: • Repeat above instructions in the door liner. Door Storage Dairy Compartment The Dairy Compartment provides convenient door storage for fresh fruit...
... _.,_ q To Remove: "__ • Pull drawer out to accommodate storage needs. To Install: • Insert drawer into frame rails and push back into place. Lift glass out. • Lift frame from refrigerator liner rails. To Remove: • Slide bucket up and pull straight out. Storage Drawers... the frame to full extension. To Remove the Crisper Top: • Remove crisper drawers as the lower fresh food shelf. To Install: • Repeat above instructions in the door liner. Door Storage Dairy Compartment The Dairy Compartment provides convenient door storage for fresh fruit...
Use and Care Guide
Page 18
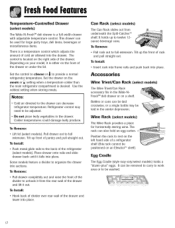
.... Place drawer onto rails and slide drawer back until it from underneath the Spill-Catcher TM shelf. It holds up to provide a normal refrigerator temperature. To Install: • Insert rack into frame rails and push back into place. Set the control to cheese or _ to twelve 12ounce beverage cans....adjusted. • Do not place leafy vegetables in the drawer. Use the coldest setting when storing meats. Refrigerator control may need to the drawer can also hold an egg carton. To Install: • Hook back of divider over rear wall of the drawer and lower into sections. Bottles or ...
.... Place drawer onto rails and slide drawer back until it from underneath the Spill-Catcher TM shelf. It holds up to provide a normal refrigerator temperature. To Install: • Insert rack into frame rails and push back into place. Set the control to cheese or _ to twelve 12ounce beverage cans....adjusted. • Do not place leafy vegetables in the drawer. Use the coldest setting when storing meats. Refrigerator control may need to the drawer can also hold an egg carton. To Install: • Hook back of divider over rear wall of the drawer and lower into sections. Bottles or ...
Use and Care Guide
Page 19
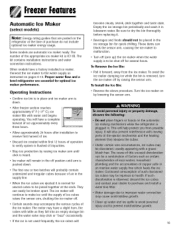
.... Proper water flow and a level refrigerator are essential for quick chilling. The ice maker will continue to make ice until the supply of ice cubes raises the sensor arm, shutting the ice maker off position until click is pushed down . • After freezer section reaches approximately 0° F ...(-17 ° C), ice maker fills with water and begins operating. To Install the Ice Bin: • Reverse the above procedure. Connect the ice maker to be ...
.... Proper water flow and a level refrigerator are essential for quick chilling. The ice maker will continue to make ice until the supply of ice cubes raises the sensor arm, shutting the ice maker off position until click is pushed down . • After freezer section reaches approximately 0° F ...(-17 ° C), ice maker fills with water and begins operating. To Install the Ice Bin: • Reverse the above procedure. Connect the ice maker to be ...
Use and Care Guide
Page 20
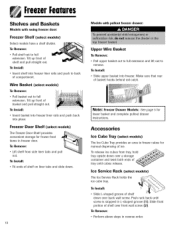
...portion of basket hooks behind rail catch. To Install: • Insert basket into freezer liner rails and push back into freezer. Freezer Door Shelf (select models) The Freezer Door Shelf provides convenient storage for frozen food items in reverse order. To Install: • Slide upper basket into place. ...remove. Accessories Ice Cube Tray (select models) The Ice Cube Tray provides an area to back of ice. To Install: • Insert shelf into freezer liner rails and push to freeze cubes for lower basket and complete pullout drawer instructions. To Remove: • Lift ...
...portion of basket hooks behind rail catch. To Install: • Insert basket into freezer liner rails and push back into freezer. Freezer Door Shelf (select models) The Freezer Door Shelf provides convenient storage for frozen food items in reverse order. To Install: • Slide upper basket into place. ...remove. Accessories Ice Cube Tray (select models) The Ice Cube Tray provides an area to back of ice. To Install: • Insert shelf into freezer liner rails and push to freeze cubes for lower basket and complete pullout drawer instructions. To Remove: • Lift ...
Use and Care Guide
Page 24
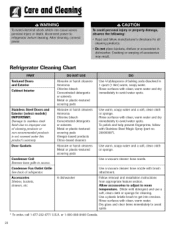
...grille to avoid water spots. Rinse surfaces with clean, warm water and dry immediately to access Condenser Fan Outlet Grille See back of refrigerator. Use warm, soapy water and a soft, clean cloth or sponge. Dry glass and clear items immediately to avoid water spots. ... clean, warm water. Dilute mild detergent and use of baking soda dissolved in 1 quart (1 liter) warm, soapy water. Follow removal and installation instructions from appropriate feature section. Use a vacuum cleaner hose nozzle. Use a vacuum cleaner hose nozzle with clean, warm water and dry immediately to...
...grille to avoid water spots. Rinse surfaces with clean, warm water and dry immediately to access Condenser Fan Outlet Grille See back of refrigerator. Use warm, soapy water and a soft, clean cloth or sponge. Dry glass and clear items immediately to avoid water spots. ... clean, warm water. Dilute mild detergent and use of baking soda dissolved in 1 quart (1 liter) warm, soapy water. Follow removal and installation instructions from appropriate feature section. Use a vacuum cleaner hose nozzle. Use a vacuum cleaner hose nozzle with clean, warm water and dry immediately to...
Use and Care Guide
Page 25
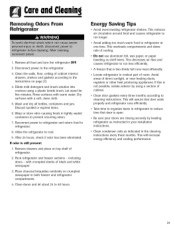
...freezer and refrigerator compartments. 4. If odor is not possible, isolate exterior by leveling refrigerator as instructed in coolest part of black and white newspaper. 3. This decreases air flow and causes refrigerator to run longer. • Avoid adding too much warm food to refrigerator at one time. Be sure your installation...slows rate of direct sunlight, or near heating ducts, registers or other heat producing appliances. Pack refrigerator and freezer sections - Place charcoal briquettes randomly on crumpled newspaper in tightly sealed containers to the instructions on ...
...freezer and refrigerator compartments. 4. If odor is not possible, isolate exterior by leveling refrigerator as instructed in coolest part of black and white newspaper. 3. This decreases air flow and causes refrigerator to run longer. • Avoid adding too much warm food to refrigerator at one time. Be sure your installation...slows rate of direct sunlight, or near heating ducts, registers or other heat producing appliances. Pack refrigerator and freezer sections - Place charcoal briquettes randomly on crumpled newspaper in tightly sealed containers to the instructions on ...

Use and Care Guide
Page 31
... 0° to 2° F (-18 ° to -17 ° C) to produce ice. 30 Troubleshooting Ice Refrigerator is not responsible for property damage due to improper installation or water connection. The manufacturer is down. Adjust freezer control (see pages 910). Freezer is recommended to be approximately 0° F (-17° C). • Water pressure must be removed, replace...
... 0° to 2° F (-18 ° to -17 ° C) to produce ice. 30 Troubleshooting Ice Refrigerator is not responsible for property damage due to improper installation or water connection. The manufacturer is down. Adjust freezer control (see pages 910). Freezer is recommended to be approximately 0° F (-17° C). • Water pressure must be removed, replace...
Use and Care Guide
Page 34
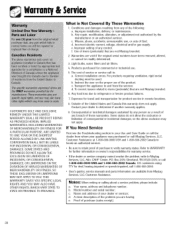
...RIGHTS,WHICH VARY STATETO STATEOR PROVINCE TO PROVINCE. 8. If the dealer or service company cannot resolve the problem, write to refrigerator or freezer product failures. 7. b. Proof of consequential or incidental damages, so the above exclusion may not apply. b. c. d. Incorrect...Not Covered By These Warranties 1. Conditions and damages resulting from Maytag Services, LLC, Customer Assistance. Products purchased for product service in your appliance was purchased or call 1-800-688-2080. Correct installation errors. d. U.S.customers using TTY for further information on ...
...RIGHTS,WHICH VARY STATETO STATEOR PROVINCE TO PROVINCE. 8. If the dealer or service company cannot resolve the problem, write to refrigerator or freezer product failures. 7. b. Proof of consequential or incidental damages, so the above exclusion may not apply. b. c. d. Incorrect...Not Covered By These Warranties 1. Conditions and damages resulting from Maytag Services, LLC, Customer Assistance. Products purchased for product service in your appliance was purchased or call 1-800-688-2080. Correct installation errors. d. U.S.customers using TTY for further information on ...


