Use and Care Guide
Page 4
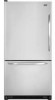
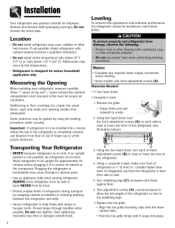
... required water supply connection before plugging it snaps into a recess where the top of refrigerator is completely covered, use distance from side to the compressor. Replace the toe grille. • Align the toe grille mounting clips with straps or bungee cords. Your refrigerator was packed carefully for indoor household application only. Do not remove the serial plate. Transporting Your Refrigerator • NEVER transport refrigerator on...
... required water supply connection before plugging it snaps into a recess where the top of refrigerator is completely covered, use distance from side to the compressor. Replace the toe grille. • Align the toe grille mounting clips with straps or bungee cords. Your refrigerator was packed carefully for indoor household application only. Do not remove the serial plate. Transporting Your Refrigerator • NEVER transport refrigerator on...
Use and Care Guide
Page 5
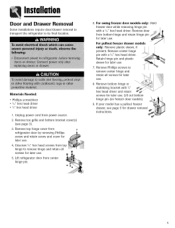
... location. For swing freezer door models only: Hold freezer door while removing hinge pin with a _,_" hex head driver. Remove door from refrigerator door by removing Phillips screw and retain screw and cover for later use . 4. Unplug power cord from center hinge pin. Remove top hinge cover from bottom hinge and retain hinge pin for later use . Lift refrigerator door from power source. 2. Remove Phillips screws to remove center hinge and retain all screws for later use . If your model has a pullout freezer drawer, see page 3). 3. Remove...
... location. For swing freezer door models only: Hold freezer door while removing hinge pin with a _,_" hex head driver. Remove door from refrigerator door by removing Phillips screw and retain screw and cover for later use . 4. Unplug power cord from center hinge pin. Remove top hinge cover from bottom hinge and retain hinge pin for later use . Lift refrigerator door from power source. 2. Remove Phillips screws to remove center hinge and retain all screws for later use . If your model has a pullout freezer drawer, see page 3). 3. Remove...
Use and Care Guide
Page 7
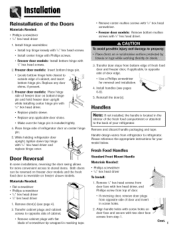
...; Install center hinge with Phillips screws. • Freezer door models: Install bottom hinge with hex head driver, and Phillips screw from top of door. • If reversing door, remove door plugs from opposite side of your model below. Door Reversal In some installations, reversing the door swing allows for more convenient access to refrigerator. Transfer door stops from refrigerator to stored items. Both doors can be reversed on center hinge pin. 5. Handles Note: If not installed, the handle is located in the interior...
...; Install center hinge with Phillips screws. • Freezer door models: Install bottom hinge with hex head driver, and Phillips screw from top of door. • If reversing door, remove door plugs from opposite side of your model below. Door Reversal In some installations, reversing the door swing allows for more convenient access to refrigerator. Transfer door stops from refrigerator to stored items. Both doors can be reversed on center hinge pin. 5. Handles Note: If not installed, the handle is located in the interior...
Use and Care Guide
Page 9
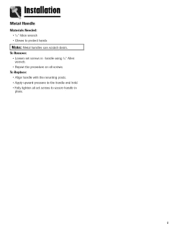
Metal Handle Materials Needed: • 3/32A"llen wrench • Gloves to secure handle in handle using 3/3;'Allen wrench. • Repeat the procedure on all set screws to protect hands I To Remove: • Loosen set screws in place. To Replace: • Align handle with the mounting posts. • Apply upward pressure to the handle and hold. • Fully tighten all screws. I Note: Metal handles can scratch doors.
Metal Handle Materials Needed: • 3/32A"llen wrench • Gloves to secure handle in handle using 3/3;'Allen wrench. • Repeat the procedure on all set screws to protect hands I To Remove: • Loosen set screws in place. To Replace: • Align handle with the mounting posts. • Apply upward pressure to the handle and hold. • Fully tighten all screws. I Note: Metal handles can scratch doors.
Use and Care Guide
Page 12
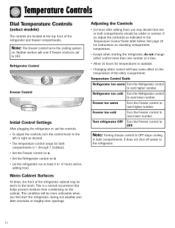
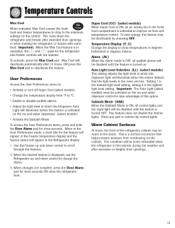
... lower number. Note: The freezer control turns the cooling system on the cabinet. Refrigerator Control Freezer Control Initial Control Settings After plugging the refrigerator in, set the controls. • To adjust the controls, turn the control knob to the left or right as indicated in both compartments should be warm to the touch. Adjusting the Controls 24 hours after adding food, you first start the refrigerator, during hot weather and after excessive or lengthy door openings. This...
... lower number. Note: The freezer control turns the cooling system on the cabinet. Refrigerator Control Freezer Control Initial Control Settings After plugging the refrigerator in, set the controls. • To adjust the controls, turn the control knob to the left or right as indicated in both compartments should be warm to the touch. Adjusting the Controls 24 hours after adding food, you first start the refrigerator, during hot weather and after excessive or lengthy door openings. This...
Use and Care Guide
Page 13
...). • Set the Freezer control on 4. • Set the Refrigerator control on checking compartment temperature. • Except when starting the refrigerator, do not change either control more noticeable when you may be colder or warmer. If so, adjust the control(s) as indicated in the display. 12 Refrigerator too cold Freezer too warm Freezer too cold Set the Refrigerator control to next lower number by pressing the ; i_i pad. Control Initial Control Settings After plugging the refrigerator in, set the controls. •...
...). • Set the Freezer control on 4. • Set the Refrigerator control on checking compartment temperature. • Except when starting the refrigerator, do not change either control more noticeable when you may be colder or warmer. If so, adjust the control(s) as indicated in the display. 12 Refrigerator too cold Freezer too warm Freezer too cold Set the Refrigerator control to next lower number by pressing the ; i_i pad. Control Initial Control Settings After plugging the refrigerator in, set the controls. •...

Use and Care Guide
Page 14
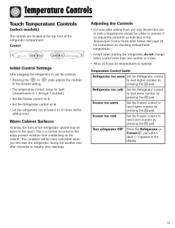
... making a new temperature adjustment. When activated, the Temp Alarm light will alternate until the door is closed OR the Door Alarm pad is in the freezer compartment. Freezer too warm Set the Freezer control to deactivate the feature. Important: When the Speed Ice feature is pressed to next lower number by pressing the _+_ pad. TemperatuCreontrols Triple Cool Climate Control (select models) The control is activated. The Temp Alarm light will continue to stop the audible alarm. Adjusting the Control...
... making a new temperature adjustment. When activated, the Temp Alarm light will alternate until the door is closed OR the Door Alarm pad is in the freezer compartment. Freezer too warm Set the Freezer control to deactivate the feature. Important: When the Speed Ice feature is pressed to next lower number by pressing the _+_ pad. TemperatuCreontrols Triple Cool Climate Control (select models) The control is activated. The Temp Alarm light will continue to stop the audible alarm. Adjusting the Control...
Use and Care Guide
Page 15
... the Refrigerator display. 1. When in the User Preferences mode, a short title for the refrigerator and freezer controls will appear in the Freezer temperature display and the feature status will not operate. When changes are low. Auto Light Level Selection (LL) (select models) This setting adjusts the light level at which the dispenser light will be disabled until the feature is ON, an air-mixing fan in the room are complete, press the Boor Alarm...
... the Refrigerator display. 1. When in the User Preferences mode, a short title for the refrigerator and freezer controls will appear in the Freezer temperature display and the feature status will not operate. When changes are low. Auto Light Level Selection (LL) (select models) This setting adjusts the light level at which the dispenser light will be disabled until the feature is ON, an air-mixing fan in the room are complete, press the Boor Alarm...
Use and Care Guide
Page 17
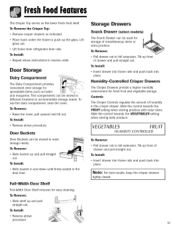
.... To Remove: • Raise the cover, pull upward and tilt out. To Remove: • Slide shelf up front of miscellaneous items or extra produce. __'j_,_ _%. _.,_ q To Remove: "__ • Pull drawer out to full extension. i To Install: • Reverse above instructions in reverse order. Storage Drawers Snack Drawer (select models) ,_= @ The Snack Drawer can be moved to different locations to accommodate storage needs. Door Storage Dairy...
.... To Remove: • Raise the cover, pull upward and tilt out. To Remove: • Slide shelf up front of miscellaneous items or extra produce. __'j_,_ _%. _.,_ q To Remove: "__ • Pull drawer out to full extension. i To Install: • Reverse above instructions in reverse order. Storage Drawers Snack Drawer (select models) ,_= @ The Snack Drawer can be moved to different locations to accommodate storage needs. Door Storage Dairy...
Use and Care Guide
Page 18
... models) Drawer The Wide-N-Fresh TM dell drawer is desired. Refrigerator control may need to unhook it from underneath the Spill-Catcher TM shelf. To Remove: • Pull drawer completely out and raise the front of the drawer. To Install: • Insert rack into frame rails and push back into place. Notes: • Cold air directed to the drawer can be removed to carry to work...
... models) Drawer The Wide-N-Fresh TM dell drawer is desired. Refrigerator control may need to unhook it from underneath the Spill-Catcher TM shelf. To Remove: • Pull drawer completely out and raise the front of the drawer. To Install: • Insert rack into frame rails and push back into place. Notes: • Cold air directed to the drawer can be removed to carry to work...
Use and Care Guide
Page 19
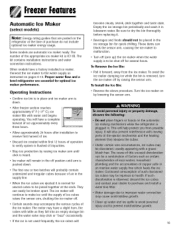
... used frequently, the ice cubes will remain in the off position until the supply of air in the ice storage bin for optimal ice maker performance. Be sure to be broken apart. FreezeFreatures Automatic Ice Maker (select models) refrigerator at the ends. Turn the ice maker on pages 9-10. Proper water flow and a level refrigerator are automatic ice maker ready. To Install the Ice Bin: • Reverse the above procedure. The ice maker will continue to make ice...
... used frequently, the ice cubes will remain in the off position until the supply of air in the ice storage bin for optimal ice maker performance. Be sure to be broken apart. FreezeFreatures Automatic Ice Maker (select models) refrigerator at the ends. Turn the ice maker on pages 9-10. Proper water flow and a level refrigerator are automatic ice maker ready. To Install the Ice Bin: • Reverse the above procedure. The ice maker will continue to make ice...
Use and Care Guide
Page 20
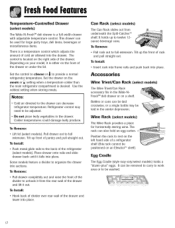
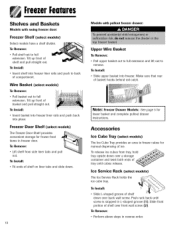
Freezer Door Shelf (select models) The Freezer Door Shelf provides convenient storage for frozen food items in L-shaped groove (1). To Remove: • Lift shelf from tray, hold tray upside down over back wall screw. Make sure that rear of shelf over front wall screw (2). Slide front portion of basket hooks behind rail catch. Note: Freezer Drawer Models: See page 5 for manual dispensing of compartment. Accessories Ice Cube Tray (select models) The Ice Cube Tray provides...
Freezer Door Shelf (select models) The Freezer Door Shelf provides convenient storage for frozen food items in L-shaped groove (1). To Remove: • Lift shelf from tray, hold tray upside down over back wall screw. Make sure that rear of shelf over front wall screw (2). Slide front portion of basket hooks behind rail catch. Note: Freezer Drawer Models: See page 5 for manual dispensing of compartment. Accessories Ice Cube Tray (select models) The Ice Cube Tray provides...
Use and Care Guide
Page 24
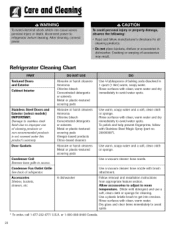
... Rinse surfaces with clean, warm water. Use a vacuum cleaner hose nozzle. Follow removal and installation instructions from appropriate feature section. Accessories Shelves, buckets, drawers, etc. To polish and help prevent fingerprints, follow with brush attachment. Allow accessories to adjust to avoid water spots. Use warm, soapy water and a soft, clean cloth or sponge. Door Gaskets Condenser Coil Remove base grille to get into crevices. Use warm, soapy water and a soft, clean cloth or...
... Rinse surfaces with clean, warm water. Use a vacuum cleaner hose nozzle. Follow removal and installation instructions from appropriate feature section. Accessories Shelves, buckets, drawers, etc. To polish and help prevent fingerprints, follow with brush attachment. Allow accessories to adjust to avoid water spots. Use warm, soapy water and a soft, clean cloth or sponge. Door Gaskets Condenser Coil Remove base grille to get into crevices. Use warm, soapy water and a soft, clean cloth or...
Use and Care Guide
Page 25
... Refrigerator 1. Remove drawers and place on top shelf of black and white newspaper. 3. with crumpled sheets of refrigerator. 2. Place charcoal briquettes randomly on page 23. 4. This reduces air circulation around food and causes refrigerator to run less efficiently. • A freezer that door seals properly and refrigerator runs efficiently. Be sure your doors are closing securely by using a plastic bristle brush. Dry surfaces with warm water. Reconnect power to refrigerator...
... Refrigerator 1. Remove drawers and place on top shelf of black and white newspaper. 3. with crumpled sheets of refrigerator. 2. Place charcoal briquettes randomly on page 23. 4. This reduces air circulation around food and causes refrigerator to run less efficiently. • A freezer that door seals properly and refrigerator runs efficiently. Be sure your doors are closing securely by using a plastic bristle brush. Dry surfaces with warm water. Reconnect power to refrigerator...
Use and Care Guide
Page 27
... the wire shut off arm to the OFF position. • Empty the ice bin. 4. Leave the doors open to OFF with dial controls or (-) with a baking soda solution and a clean soft cloth (four tablespoons of baking soda in one will be checking in on supply valve (see pages 9-10). • Plug the refrigerator back in and reset controls (see pages 9-10). • Monitor water connection for...
... the wire shut off arm to the OFF position. • Empty the ice bin. 4. Leave the doors open to OFF with dial controls or (-) with a baking soda solution and a clean soft cloth (four tablespoons of baking soda in one will be checking in on supply valve (see pages 9-10). • Plug the refrigerator back in and reset controls (see pages 9-10). • Monitor water connection for...
Use and Care Guide
Page 28
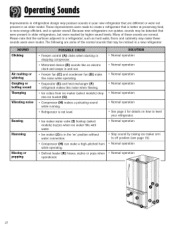
...Freezer control (A) clicks when starting or stopping compressor. • Motorized device (B) sounds like an electric clock and snaps in and out. • Freezer fan (C) and condenser fan (D) make this noise while operating. • Evaporator (E) and heat exchanger (F) refrigerant makes this noise when flowing. • Ice cubes from ice maker (select models) drop into ice bucket (G). • Compressor (H) makes a pulsating sound while running. • Refrigerator is not level. • Ice maker water valve (I) hookup (select models) buzzes when ice maker fills with water. • Ice maker...
...Freezer control (A) clicks when starting or stopping compressor. • Motorized device (B) sounds like an electric clock and snaps in and out. • Freezer fan (C) and condenser fan (D) make this noise while operating. • Evaporator (E) and heat exchanger (F) refrigerant makes this noise when flowing. • Ice cubes from ice maker (select models) drop into ice bucket (G). • Compressor (H) makes a pulsating sound while running. • Refrigerator is not level. • Ice maker water valve (I) hookup (select models) buzzes when ice maker fills with water. • Ice maker...
Use and Care Guide
Page 29
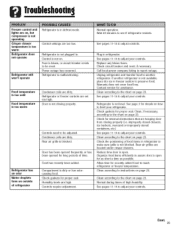
... door is in defrost mode. Cont. 28 Rear air grille is not level. Organize food items efficiently to adjust your controls. Control settings are high. Wait 40 minutes to be reset. See pages 11-14 to the chart on , but compressor is not operating Crisper drawer temperature is too warm Refrigerator is open . See page 3 for as short a time as possible. Clean, if necessary, according to adjust your controls. improperly closed drawers, ice...
... door is in defrost mode. Cont. 28 Rear air grille is not level. Organize food items efficiently to adjust your controls. Control settings are high. Wait 40 minutes to be reset. See pages 11-14 to the chart on , but compressor is not operating Crisper drawer temperature is too warm Refrigerator is open . See page 3 for as short a time as possible. Clean, if necessary, according to adjust your controls. improperly closed drawers, ice...
Use and Care Guide
Page 30
... run more efficiently. Rinse and dry thoroughly. improperly closed drawers, ice buckets, oversized or improperly stored containers, etc.] See Operating Sounds on page 23. Drawer channels are dirty or need to be moved to adjust your refrigerator's environment. Controls need to drawer channels. Organize food items efficiently to adjust for proper drawer placement. Allow interior environment to assure door is open . Clean, if necessary, according to level your controls. Clean drawer...
... run more efficiently. Rinse and dry thoroughly. improperly closed drawers, ice buckets, oversized or improperly stored containers, etc.] See Operating Sounds on page 23. Drawer channels are dirty or need to be moved to adjust your refrigerator's environment. Controls need to drawer channels. Organize food items efficiently to adjust for proper drawer placement. Allow interior environment to assure door is open . Clean, if necessary, according to level your controls. Clean drawer...

Use and Care Guide
Page 31
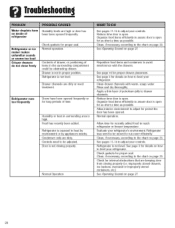
... using copper tubing for refigerators with water filters. Freezer temperature should be between 0° to 2° F (-18 ° to -17 ° C) to improper installation or water connection. Troubleshooting Ice Refrigerator is too high. Ice maker is not producing ice • Copper tubing has kinks. • Ice maker arm is recommended for installation. Turn off water supply and remove kinks. A minimum pressure of 35 pounds per square inch to function properly. Water pressure must be removed, replace tubing...
... using copper tubing for refigerators with water filters. Freezer temperature should be between 0° to 2° F (-18 ° to -17 ° C) to improper installation or water connection. Troubleshooting Ice Refrigerator is too high. Ice maker is not producing ice • Copper tubing has kinks. • Ice maker arm is recommended for installation. Turn off water supply and remove kinks. A minimum pressure of 35 pounds per square inch to function properly. Water pressure must be removed, replace tubing...
Use and Care Guide
Page 34
... cannot resolve the problem, write to Maytag Services, LLC,Attn: CAIR_ Center, P.O.Box 2370,Cleveland, TN 37320-2370, or call to refrigerator or freezer product failures. 7. U.S.customers using TTY for further information on the proper use of the problem you are not Maytag branded. 6. d. Light bulbs, water filters and air filters. 4. Any food loss due to : a. b. Wurrunt&¥ Service What is Not Covered By These Warranties 1. Improper installation, delivery, or...
... cannot resolve the problem, write to Maytag Services, LLC,Attn: CAIR_ Center, P.O.Box 2370,Cleveland, TN 37320-2370, or call to refrigerator or freezer product failures. 7. U.S.customers using TTY for further information on the proper use of the problem you are not Maytag branded. 6. d. Light bulbs, water filters and air filters. 4. Any food loss due to : a. b. Wurrunt&¥ Service What is Not Covered By These Warranties 1. Improper installation, delivery, or...


