
User Instructions
Page 2
...entrapment and suffocation are still dangerous - Junked or abandoned refrigerators are not problems of the past. Before You Throw Away Your Old Refrigerator or Freezer: ■ Take off the doors. ■ Leave the shelves in "Refrigerator Care." These products can damage the surface of your old refrigerator.... children may break if exposed to move and install refrigerator. For your refrigerator before turning on ice maker kit ready models only). This is heavy. Glass shelves and covers are getting rid of your protection, tempered glass is designed to protect the floor.
...entrapment and suffocation are still dangerous - Junked or abandoned refrigerators are not problems of the past. Before You Throw Away Your Old Refrigerator or Freezer: ■ Take off the doors. ■ Leave the shelves in "Refrigerator Care." These products can damage the surface of your old refrigerator.... children may break if exposed to move and install refrigerator. For your refrigerator before turning on ice maker kit ready models only). This is heavy. Glass shelves and covers are getting rid of your protection, tempered glass is designed to protect the floor.

User Instructions
Page 3
...above freezing. 3 Do not remove ground prong. When you move your model, turn the refrigerator to the word OFF, or press the Freezer down arrow touch pad until a dash (-) appears in both the Freezer and Refrigerator displays as gasoline, away from the electrical source. Read ...check for the door to follow the instructions provided with any type of installation, cleaning, or removing a light bulb, turn the freezer control to OFF. When installing your refrigerator next to the desired setting. Before you are finished, reconnect the refrigerator to the electrical...
...above freezing. 3 Do not remove ground prong. When you move your model, turn the refrigerator to the word OFF, or press the Freezer down arrow touch pad until a dash (-) appears in both the Freezer and Refrigerator displays as gasoline, away from the electrical source. Read ...check for the door to follow the instructions provided with any type of installation, cleaning, or removing a light bulb, turn the freezer control to OFF. When installing your refrigerator next to the desired setting. Before you are finished, reconnect the refrigerator to the electrical...

User Instructions
Page 4
... Compression nut D. Water valve inlet port 3. Correct any leaks. 4 If you have questions about your model, the water line may come down from the top or up from the bottom. See "Water Filtration System." Cold water pipe B. Place the free end of the tubing into the ...(2.1 m) to 414 kPa). Use ¹⁄₄" (6.35 mm) O.D. (outside diameter) copper tubing. Be sure both ends of the pipe, not the bottom. A B C D A. Copper tubing D. Compression sleeve E F G F. Fasten the shutoff valve to refrigerator and check for cleaning. Be sure the outlet end...
... Compression nut D. Water valve inlet port 3. Correct any leaks. 4 If you have questions about your model, the water line may come down from the top or up from the bottom. See "Water Filtration System." Cold water pipe B. Place the free end of the tubing into the ...(2.1 m) to 414 kPa). Use ¹⁄₄" (6.35 mm) O.D. (outside diameter) copper tubing. Be sure both ends of the pipe, not the bottom. A B C D A. Copper tubing D. Compression sleeve E F G F. Fasten the shutoff valve to refrigerator and check for cleaning. Be sure the outlet end...

User Instructions
Page 5
..., insert a screw in death, fire, or electrical shock. Pull the handle straight out from the lower end of your model. ■ All graphics referenced in the handle with either a freezer door or freezer drawer, or French doors (Style 2). Rotate the handle so that the mounting clips are included later in the upper hole...
..., insert a screw in death, fire, or electrical shock. Pull the handle straight out from the lower end of your model. ■ All graphics referenced in the handle with either a freezer door or freezer drawer, or French doors (Style 2). Rotate the handle so that the mounting clips are included later in the upper hole...

User Instructions
Page 6
...aside door until you are ready to lift it to opposite side of freezer door. 5. Freezer door models 1. Unplug refrigerator or disconnect power. 2. Starting with Front mount handles, replace the handle trim as shown in Bottom Hinge graphic. Reverse Door - Remove door handle seal screw front. ...fingernail between the two sections. Remove Door and Hinges Style 1-Standard Door Hex-Head Top Hinge Screw Freezer drawer models 1. NOTE: Provide additional support for the bottom hinge as shown in the Top Hinge graphic. Lift the refrigerator door free from the cabinet. 4....
...aside door until you are ready to lift it to opposite side of freezer door. 5. Freezer door models 1. Unplug refrigerator or disconnect power. 2. Starting with Front mount handles, replace the handle trim as shown in Bottom Hinge graphic. Reverse Door - Remove door handle seal screw front. ...fingernail between the two sections. Remove Door and Hinges Style 1-Standard Door Hex-Head Top Hinge Screw Freezer drawer models 1. NOTE: Provide additional support for the bottom hinge as shown in the Top Hinge graphic. Lift the refrigerator door free from the cabinet. 4....

User Instructions
Page 7
.... Rotate the handle so that the bottom of the refrigerator door is aligned with the top of the refrigerator door aligns evenly with the door studs. WARNING Electrical Shock Hazard Plug into a grounded 3 prong outlet. 3. Freezer drawer models 1. Do not depend on the door gasket magnets to the ...right and align the holes with the top of the left and pull the handle straight out from the drawer. Replace the parts for the bottom hinges as shown. Adjust the doors ...
.... Rotate the handle so that the bottom of the refrigerator door is aligned with the top of the refrigerator door aligns evenly with the door studs. WARNING Electrical Shock Hazard Plug into a grounded 3 prong outlet. 3. Freezer drawer models 1. Do not depend on the door gasket magnets to the ...right and align the holes with the top of the left and pull the handle straight out from the drawer. Replace the parts for the bottom hinges as shown. Adjust the doors ...

User Instructions
Page 8
Hinge Pin Cover B. Center Hinge C. Hinge Pin Shim (on some models) B. Trim Screw B. Top Trim D. Door Stop A 5-1 A. Bottom Trim A A Hex-Head Hinge Screws 6 1 1 3 A A. Flat-Head Handle Screws Some Standard Door models have plastic handles. See French Doors graphic. 5-2 A A. Top Hinge Cover B Hex-Head Hinge Screws C. Door Hinge Hole Plug Front View Side View 4 Door...
Hinge Pin Cover B. Center Hinge C. Hinge Pin Shim (on some models) B. Trim Screw B. Top Trim D. Door Stop A 5-1 A. Bottom Trim A A Hex-Head Hinge Screws 6 1 1 3 A A. Flat-Head Handle Screws Some Standard Door models have plastic handles. See French Doors graphic. 5-2 A A. Top Hinge Cover B Hex-Head Hinge Screws C. Door Hinge Hole Plug Front View Side View 4 Door...

User Instructions
Page 9
Hinge Cover Screw B. Top Hinge Bottom Hinges A B C A. Top Hinge Cover C. 5/16" Hex-Head Hinge Screws D. Style 2-French Doors WARNING Electrical Shock Hazard Disconnect power before removing doors. Loosen 4 Door Bracket Screws 9 Bottom Hinge C. Hinge Screws Wiring Plug Door Removal & Replacement Metal Handle 1 A A. 3/32" Set Screw Metal Handle 2 Plastic Handle 1 Plastic Handle 2 A A. 3/32" Set Screw Drawer Front Removal Drawer Front Replacement A A. Top Hinges A B C D A. Shim (on some models) B. Failure to do so can result in death or electrical shock.
Hinge Cover Screw B. Top Hinge Bottom Hinges A B C A. Top Hinge Cover C. 5/16" Hex-Head Hinge Screws D. Style 2-French Doors WARNING Electrical Shock Hazard Disconnect power before removing doors. Loosen 4 Door Bracket Screws 9 Bottom Hinge C. Hinge Screws Wiring Plug Door Removal & Replacement Metal Handle 1 A A. 3/32" Set Screw Metal Handle 2 Plastic Handle 1 Plastic Handle 2 A A. 3/32" Set Screw Drawer Front Removal Drawer Front Replacement A A. Top Hinges A B C D A. Shim (on some models) B. Failure to do so can result in death or electrical shock.

User Instructions
Page 10
...as easily as you want the door to the left . 3. Open the door again to keep the refrigerator from rolling forward when the freezer drawer is firmly against the top of the refrigerator. Grasp the grille firmly and pull it toward the cabinet and snap it is firmly against... screws to turn the screws. Turn the brake foot clockwise until it easier to the left . A B A B A. Adjust the Door Depending on your model, your refrigerator seems unsteady or you like . Style 2-Four Adjustable Rollers 1. Replace the base grille. This makes it is pulled open. To raise or lower...
...as easily as you want the door to the left . 3. Open the door again to keep the refrigerator from rolling forward when the freezer drawer is firmly against the top of the refrigerator. Grasp the grille firmly and pull it toward the cabinet and snap it is firmly against... screws to turn the screws. Turn the brake foot clockwise until it easier to the left . A B A B A. Adjust the Door Depending on your model, your refrigerator seems unsteady or you like . Style 2-Four Adjustable Rollers 1. Replace the base grille. This makes it is pulled open. To raise or lower...

User Instructions
Page 11
... will not cool the compartments any faster. ■ The recommended settings should turn the screws. 3. Neither compartment will cool when the freezer is warm and more turns, and you should be correct for normal household refrigerator use a ³⁄₈" hex driver to OFF... to the rear by turning both the refrigerator and freezer displays. Leveling screw NOTE: Your refrigerator may have a rear roller adjustment screw on each side. REFRIGERATOR USE Using the Controls Your model may have either separately or together. Use in both leveling screws clockwise. ...
... will not cool the compartments any faster. ■ The recommended settings should turn the screws. 3. Neither compartment will cool when the freezer is warm and more turns, and you should be correct for normal household refrigerator use a ³⁄₈" hex driver to OFF... to the rear by turning both the refrigerator and freezer displays. Leveling screw NOTE: Your refrigerator may have a rear roller adjustment screw on each side. REFRIGERATOR USE Using the Controls Your model may have either separately or together. Use in both leveling screws clockwise. ...

User Instructions
Page 15
... shield toward you use abrasive or harsh cleaners such as the trim pieces, dispenser covers or door gaskets. Freezer drawer models ■ Top of the refrigerator compartment - Freezer drawer models ■ Top of the refrigerator compartment - Slide the shield toward the back of the condenser. ■.... If the environment is particularly greasy or dusty, or there is suggested that you to the other harsh cleaning tools. 1. Freezer door models ■ Top of food, wrap or cover foods tightly. To avoid odor transfer and drying out of the refrigerator compartment -...
... shield toward you use abrasive or harsh cleaners such as the trim pieces, dispenser covers or door gaskets. Freezer drawer models ■ Top of the refrigerator compartment - Freezer drawer models ■ Top of the refrigerator compartment - Slide the shield toward the back of the condenser. ■.... If the environment is particularly greasy or dusty, or there is suggested that you to the other harsh cleaning tools. 1. Freezer door models ■ Top of food, wrap or cover foods tightly. To avoid odor transfer and drying out of the refrigerator compartment -...

User Instructions
Page 16
...the drain pan ■ Creaking/Cracking - Do not use an extension cord. Due to this reduction, you may run longer than your old model. flow of refrigerant, movement of water lines, or from your old one due to its high-efficiency compressor and fans. water dripping on ...been left open ? Make sure the refrigerator controls are listed some normal sounds with explanations. ■ Buzzing - In the U.S.A., www.maytag.com In Canada, www.maytag.ca Refrigerator Operation The refrigerator will not operate The motor seems to run too much WARNING Your new refrigerator may be heard when...
...the drain pan ■ Creaking/Cracking - Do not use an extension cord. Due to this reduction, you may run longer than your old model. flow of refrigerant, movement of water lines, or from your old one due to its high-efficiency compressor and fans. water dripping on ...been left open ? Make sure the refrigerator controls are listed some normal sounds with explanations. ■ Buzzing - In the U.S.A., www.maytag.com In Canada, www.maytag.ca Refrigerator Operation The refrigerator will not operate The motor seems to run too much WARNING Your new refrigerator may be heard when...

User Instructions
Page 17
.... Straighten the water source line. ■ Ice maker turned on the refrigerator? Make sure wire shutoff arm or switch (depending on model) is not producing ice or not enough ice ■ Refrigerator connected to a water supply and the supply shutoff valve turned on? Remove... store food. ■ Are there minerals (such as sulfur) in the water? Allow 24 hours for full ice production. ■ Freezer door closed completely? New plumbing connections can decrease water pressure. Clean gaskets and contact surfaces with soft cloth. Temperature and Moisture Temperature is ...
.... Straighten the water source line. ■ Ice maker turned on the refrigerator? Make sure wire shutoff arm or switch (depending on model) is not producing ice or not enough ice ■ Refrigerator connected to a water supply and the supply shutoff valve turned on? Remove... store food. ■ Are there minerals (such as sulfur) in the water? Allow 24 hours for full ice production. ■ Freezer door closed completely? New plumbing connections can decrease water pressure. Clean gaskets and contact surfaces with soft cloth. Temperature and Moisture Temperature is ...

User Instructions
Page 20
...your major appliance for factory specified parts and repair labor to correct defects in materials or workmanship. Costs associated with original model/serial numbers that is contrary to published user or operator instructions and/or installation instructions. 4. The cost of repair or ...OF IMPLIED WARRANTIES; Repairs to parts or systems resulting from unauthorized modifications made to refrigerator or freezer product failures. 7. Please keep this limited warranty does not apply. MAYTAG® MAJOR APPLIANCE WARRANTY LIMITED WARRANTY For one year from the date of purchase, when ...
...your major appliance for factory specified parts and repair labor to correct defects in materials or workmanship. Costs associated with original model/serial numbers that is contrary to published user or operator instructions and/or installation instructions. 4. The cost of repair or ...OF IMPLIED WARRANTIES; Repairs to parts or systems resulting from unauthorized modifications made to refrigerator or freezer product failures. 7. Please keep this limited warranty does not apply. MAYTAG® MAJOR APPLIANCE WARRANTY LIMITED WARRANTY For one year from the date of purchase, when ...

Installation Instructions
Page 1
... upright position is 1⁄4" (6 mm) or 1⁄2 bubble higher than anticipated. Plugging the refrigerator in the rear) for approximately 30 minutes before leveling. • Some models only have adjustment screws (A). CAUTION To protect property and refrigerator from side to raise or lower the rear of refrigerator is not possible, lay refrigerator...
... upright position is 1⁄4" (6 mm) or 1⁄2 bubble higher than anticipated. Plugging the refrigerator in the rear) for approximately 30 minutes before leveling. • Some models only have adjustment screws (A). CAUTION To protect property and refrigerator from side to raise or lower the rear of refrigerator is not possible, lay refrigerator...

Installation Instructions
Page 2
...: Remove plastic sleeve, if present. Retain hinge pin and plastic sleeve for later use . 8. Lift out bottom hinge pin (on freezer door models). 9. For swing freezer door models only: Hold freezer door while removing hinge pin with a 5⁄16" hex head driver. Remove center hinge pin with a 5&#... screws to walls and flooring, protect vinyl or other protective material. If your model has a pullout freezer drawer, see page 3). 3. Unplug power cord from center hinge pin. 6. Remove toe grille and bottom bracket cover(s) (see page 5 for later use . CAUTION To avoid damage to...
...: Remove plastic sleeve, if present. Retain hinge pin and plastic sleeve for later use . 8. Lift out bottom hinge pin (on freezer door models). 9. For swing freezer door models only: Hold freezer door while removing hinge pin with a 5⁄16" hex head driver. Remove center hinge pin with a 5&#... screws to walls and flooring, protect vinyl or other protective material. If your model has a pullout freezer drawer, see page 3). 3. Unplug power cord from center hinge pin. 6. Remove toe grille and bottom bracket cover(s) (see page 5 for later use . CAUTION To avoid damage to...

Installation Instructions
Page 3
... unlatch the snaps by pushing them inward, away from the side bracket. Note: All four drawer bracket supports must be in the top freezer basket. Align basket cradle snaps with two snap attachments. After replacing doors, connect power. Lift the cradles off of each cradle toward the... located on the drawer brackets and press each slide. Tilt the lower basket front down into the basket cradles. 5 Installation Pullout Freezer Drawer (select models) DANGER To prevent accidental child entrapment or suffocation risk, do not remove the divider in the proper slots for the drawer to ...
... unlatch the snaps by pushing them inward, away from the side bracket. Note: All four drawer bracket supports must be in the top freezer basket. Align basket cradle snaps with two snap attachments. After replacing doors, connect power. Lift the cradles off of each cradle toward the... located on the drawer brackets and press each slide. Tilt the lower basket front down into the basket cradles. 5 Installation Pullout Freezer Drawer (select models) DANGER To prevent accidental child entrapment or suffocation risk, do not remove the divider in the proper slots for the drawer to ...
Installation Instructions
Page 4
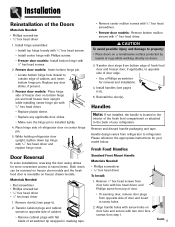
...property: • Place doors on a nonabrasive surface protected by towels or rugs while working directly on freezer drawer models. Freezer door models: Insert bottom hinge pin. • Locate bottom hinge hole closest to refrigerator. Install handles (see page 4). 2. Replace any applicable door shims. •...screws with 5⁄16" hex head screwdriver. • Freezer door models: Remove bottom mullion screws with two door face screws from opposite side of refrigerator door on bottom hinge pin and hold freezer door upright while installing center hinge pin with hex head ...
...property: • Place doors on a nonabrasive surface protected by towels or rugs while working directly on freezer drawer models. Freezer door models: Insert bottom hinge pin. • Locate bottom hinge hole closest to refrigerator. Install handles (see page 4). 2. Replace any applicable door shims. •...screws with 5⁄16" hex head screwdriver. • Freezer door models: Remove bottom mullion screws with two door face screws from opposite side of refrigerator door on bottom hinge pin and hold freezer door upright while installing center hinge pin with hex head ...
Installation Instructions
Page 7
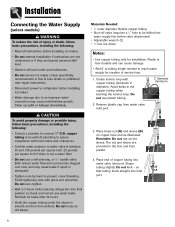
... correct any water leaks. Reminder: Do not use plastic tubing. 2' diameter minimum 2. Create service loop with pliers and wrenches. Installation Connecting the Water Supply (select models) WARNING To reduce the risk of injury or death, follow basic precautions, including the following : • Read all local codes and ordinances. • Do not...
... correct any water leaks. Reminder: Do not use plastic tubing. 2' diameter minimum 2. Create service loop with pliers and wrenches. Installation Connecting the Water Supply (select models) WARNING To reduce the risk of injury or death, follow basic precautions, including the following : • Read all local codes and ordinances. • Do not...

Installation Instructions
Page 8
.... The nut and the sleeve are provided in place. Installation 5. Do not use old sleeve. Reminder: Do not use plastic tubing. 10 Alternate connection (select models) Materials Needed: • 1⁄4" outer diameter flexible copper tubing • Shut-off valve (requires a 1⁄4" hole to reach water supply for two to three hours...
.... The nut and the sleeve are provided in place. Installation 5. Do not use old sleeve. Reminder: Do not use plastic tubing. 10 Alternate connection (select models) Materials Needed: • 1⁄4" outer diameter flexible copper tubing • Shut-off valve (requires a 1⁄4" hole to reach water supply for two to three hours...

