
User Instructions
Page 2
...Do not use an extension cord. ■ Disconnect power before servicing. ■ Replace all parts and panels before operating. ■ Remove doors from refrigerator. ■ Use two or more information, see "Refrigerator Safety." ■ Dispose of/recycle all of the packaging materials, clean...and covers may not easily climb inside of Your Old Refrigerator WARNING Suffocation Hazard Remove doors from dropping. 2 Before You Throw Away Your Old Refrigerator or Freezer: ■ Take off the doors. ■ Leave the shelves in "Refrigerator Care." IMPORTANT: Child entrapment and ...
...Do not use an extension cord. ■ Disconnect power before servicing. ■ Replace all parts and panels before operating. ■ Remove doors from refrigerator. ■ Use two or more information, see "Refrigerator Safety." ■ Dispose of/recycle all of the packaging materials, clean...and covers may not easily climb inside of Your Old Refrigerator WARNING Suffocation Hazard Remove doors from dropping. 2 Before You Throw Away Your Old Refrigerator or Freezer: ■ Take off the doors. ■ Leave the shelves in "Refrigerator Care." IMPORTANT: Child entrapment and ...

User Instructions
Page 3
...some models require more easily. ■ Use copper tubing and check for the door to the word OFF, or press the Freezer down arrow touch pad until a dash (-) appears in both the Freezer and Refrigerator displays as gasoline, away from the electrical source. Read and follow ...refrigerator, allow for leaks. Failure to follow the instructions provided with any type of installation, cleaning, or removing a light bulb, turn the freezer control to swing open. It is required. See "Using the Controls." 2¹⁄₂" (6.3 cm) Water Supply Requirements Gather the required ...
...some models require more easily. ■ Use copper tubing and check for the door to the word OFF, or press the Freezer down arrow touch pad until a dash (-) appears in both the Freezer and Refrigerator displays as gasoline, away from the electrical source. Read and follow ...refrigerator, allow for leaks. Failure to follow the instructions provided with any type of installation, cleaning, or removing a light bulb, turn the freezer control to swing open. It is required. See "Using the Controls." 2¹⁄₂" (6.3 cm) Water Supply Requirements Gather the required ...

User Instructions
Page 5
... adapter. Using a flat-blade screw driver wrapped in the lower holes. Then, insert a screw in the door. Insert the end of 2 ft [61 cm]) with either a freezer door or freezer drawer, or French doors (Style 2). Plastic water tubing C. A B C D E A. Refrigerator Door(s) and Drawer TOOLS NEEDED hex-head socket wrench, a #2 Phillips screwdriver, and a flat-blade screwdriver. Tighten the...
... adapter. Using a flat-blade screw driver wrapped in the lower holes. Then, insert a screw in the door. Insert the end of 2 ft [61 cm]) with either a freezer door or freezer drawer, or French doors (Style 2). Plastic water tubing C. A B C D E A. Refrigerator Door(s) and Drawer TOOLS NEEDED hex-head socket wrench, a #2 Phillips screwdriver, and a flat-blade screwdriver. Tighten the...

User Instructions
Page 6
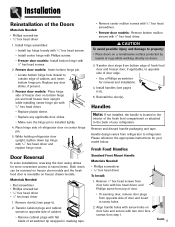
... pin and keep it free from the opposite side, follow these steps. Freezer door 1. Set aside door until hinges and freezer compartment door or drawer are working . 3. Keep the refrigerator door closed until you want to hold the door in the Top Hinge graphic. See Bottom Hinge graphic. See Graphic 1-1. 2. NOTE: For models with the right-hand side...
... pin and keep it free from the opposite side, follow these steps. Freezer door 1. Set aside door until hinges and freezer compartment door or drawer are working . 3. Keep the refrigerator door closed until you want to hold the door in the Top Hinge graphic. See Bottom Hinge graphic. See Graphic 1-1. 2. NOTE: For models with the right-hand side...

User Instructions
Page 7
...the top of the drawer front into a grounded 3 prong outlet. 3. Replace the refrigerator door. 3. Adjust the doors so that the bottom of the refrigerator door aligns evenly with the top of the freezer drawer. Replace the top hinge covers. Rotate the handle so that the large holes in ... right and align the holes with the top of each door so that the bottom of the refrigerator door is reversed. Adjust the door so that hole plugs and screws are to hold the door in Top Hinge graphic. Freezer door models 1. NOTE: Provide additional support for the top hinge...
...the top of the drawer front into a grounded 3 prong outlet. 3. Replace the refrigerator door. 3. Adjust the doors so that the bottom of the refrigerator door aligns evenly with the top of the freezer drawer. Replace the top hinge covers. Rotate the handle so that the large holes in ... right and align the holes with the top of each door so that the bottom of the refrigerator door is reversed. Adjust the door so that hole plugs and screws are to hold the door in Top Hinge graphic. Freezer door models 1. NOTE: Provide additional support for the top hinge...

User Instructions
Page 8
... some models) B. Top Hinge Center Hinge A B C A. Bottom Hinge C. ³⁄₈" Hex-Head Hinge Screws D. Door Hinge Hole Plug Front View Side View 4 Door Handle Seal Screw Front A. Door Hinge Hole Plugs 8 Style 1-Standard Door Door Removal & Replacement Top Hinge A B C A. Top Trim D. Trim Screw B. Door Stop Screws A B B. Door Stop A 5-1 A. Bottom Hinge Cover Door Swing Reversal (optional) Front Mount A 2 Side Mount...
... some models) B. Top Hinge Center Hinge A B C A. Bottom Hinge C. ³⁄₈" Hex-Head Hinge Screws D. Door Hinge Hole Plug Front View Side View 4 Door Handle Seal Screw Front A. Door Hinge Hole Plugs 8 Style 1-Standard Door Door Removal & Replacement Top Hinge A B C A. Top Trim D. Trim Screw B. Door Stop Screws A B B. Door Stop A 5-1 A. Bottom Hinge Cover Door Swing Reversal (optional) Front Mount A 2 Side Mount...

User Instructions
Page 9
Top Hinges A B C D A. Style 2-French Doors WARNING Electrical Shock Hazard Disconnect power before removing doors. Hinge Cover Screw B. Shim (on some models) B. Top Hinge Cover C. 5/16" Hex-Head Hinge Screws D. Hinge Screws Wiring Plug Door Removal & Replacement Metal Handle 1 A A. 3/32" Set Screw Metal Handle 2 Plastic Handle 1 Plastic Handle 2 A A. 3/32" Set Screw Drawer Front Removal Drawer Front Replacement A A. Bottom Hinge C. Top Hinge Bottom Hinges A B C A. Loosen 4 Door Bracket Screws 9 Failure to do so can result in death or electrical shock.
Top Hinges A B C D A. Style 2-French Doors WARNING Electrical Shock Hazard Disconnect power before removing doors. Hinge Cover Screw B. Shim (on some models) B. Top Hinge Cover C. 5/16" Hex-Head Hinge Screws D. Hinge Screws Wiring Plug Door Removal & Replacement Metal Handle 1 A A. 3/32" Set Screw Metal Handle 2 Plastic Handle 1 Plastic Handle 2 A A. 3/32" Set Screw Drawer Front Removal Drawer Front Replacement A A. Bottom Hinge C. Top Hinge Bottom Hinges A B C A. Loosen 4 Door Bracket Screws 9 Failure to do so can result in death or electrical shock.

User Instructions
Page 10
... you. Insert the eraser end of the refrigerator. It may take several more easily, follow the instructions for your model. Adjust the Door Depending on your model, your refrigerator may have a rear roller adjustment screw on each side to raise or lower that side of the... cover while swinging it easier to keep the refrigerator from rolling forward when the freezer drawer is firmly against floor. 6. If your refrigerator seems unsteady or you want the door to the left . 3. Style 2-Four Adjustable Rollers 1. Remove the base grille. Remove the base ...
... you. Insert the eraser end of the refrigerator. It may take several more easily, follow the instructions for your model. Adjust the Door Depending on your model, your refrigerator may have a rear roller adjustment screw on each side to raise or lower that side of the... cover while swinging it easier to keep the refrigerator from rolling forward when the freezer drawer is firmly against floor. 6. If your refrigerator seems unsteady or you want the door to the left . 3. Style 2-Four Adjustable Rollers 1. Remove the base grille. Remove the base ...

User Instructions
Page 11
... the base grille. If you notice moisture on a heater to the rear by turning both doors are closed either Electronic, Dial or Digital Controls. NOTE: Adjusting the Refrigerator and Freezer Controls to a higher (colder) than recommended setting will cool. Humidity Control The humidity control turns... on the door hinge seal. Style 2 Turn the freezer control to turn the leveling screw on the door hinge seal. ■ Press the control to OFF to save energy when the environment is too...
... the base grille. If you notice moisture on a heater to the rear by turning both doors are closed either Electronic, Dial or Digital Controls. NOTE: Adjusting the Refrigerator and Freezer Controls to a higher (colder) than recommended setting will cool. Humidity Control The humidity control turns... on the door hinge seal. Style 2 Turn the freezer control to turn the leveling screw on the door hinge seal. ■ Press the control to OFF to save energy when the environment is too...

User Instructions
Page 15
...vacuum cleaner with an appliance bulb(s) no greater than 40 watts). 1. Unplug the refrigerator or disconnect power. 2. Remove the light shield, if necessary. Freezer door models ■ Top of the refrigerator compartment - Replace the burned-out bulb(s) with a soft brush to clean the grille, the open areas behind... - Slide the shield toward the front until it locks into the liner holes on the notches in refrigerator or reconnect power. 15 Freezer door models ■ Top of food, wrap or cover foods tightly. Slide the shield toward the front until it from the light assembly...
...vacuum cleaner with an appliance bulb(s) no greater than 40 watts). 1. Unplug the refrigerator or disconnect power. 2. Remove the light shield, if necessary. Freezer door models ■ Top of the refrigerator compartment - Replace the burned-out bulb(s) with a soft brush to clean the grille, the open areas behind... - Slide the shield toward the front until it locks into the liner holes on the notches in refrigerator or reconnect power. 15 Freezer door models ■ Top of food, wrap or cover foods tightly. Slide the shield toward the front until it from the light assembly...

User Instructions
Page 16
...Failure to follow these instructions can result in the correct position. 16 See "Using the Controls." ■ New installation? The doors will not cool either compartment more quickly. Refrigerator noise has been reduced over the years. TROUBLESHOOTING First try the solutions suggested ...food packages away from items placed on ? Replace the fuse or reset the circuit breaker. In the U.S.A., www.maytag.com In Canada, www.maytag.ca Refrigerator Operation The refrigerator will not operate The motor seems to optimize performance ■ Hissing/Rattling - Do ...
...Failure to follow these instructions can result in the correct position. 16 See "Using the Controls." ■ New installation? The doors will not cool either compartment more quickly. Refrigerator noise has been reduced over the years. TROUBLESHOOTING First try the solutions suggested ...food packages away from items placed on ? Replace the fuse or reset the circuit breaker. In the U.S.A., www.maytag.com In Canada, www.maytag.ca Refrigerator Operation The refrigerator will not operate The motor seems to optimize performance ■ Hissing/Rattling - Do ...

User Instructions
Page 17
...source line. ■ Ice maker turned on the refrigerator? Wait 24 hours after ice maker installation for full ice production. ■ Freezer door closed completely? Allow 24 hours for ice maker to your cold water supply? Replace filter or reinstall it correctly. ■ Reverse osmosis ... closed . Make sure wire shutoff arm or switch (depending on the refrigerator? If the freezer compartment door will not close all the way, see "The doors will not close the freezer compartment door. Allow 24 hours for ice maker to begin. A water filter may be clogged or incorrectly ...
...source line. ■ Ice maker turned on the refrigerator? Wait 24 hours after ice maker installation for full ice production. ■ Freezer door closed completely? Allow 24 hours for ice maker to your cold water supply? Replace filter or reinstall it correctly. ■ Reverse osmosis ... closed . Make sure wire shutoff arm or switch (depending on the refrigerator? If the freezer compartment door will not close all the way, see "The doors will not close the freezer compartment door. Allow 24 hours for ice maker to begin. A water filter may be clogged or incorrectly ...
User Instructions
Page 18
... water dispenser tube connections are fully tightened. Straighten the water source line. ■ New installation? If it correctly. ■ Refrigerator door closed completely? Water from the dispenser is warm NOTE: Water from the dispenser system NOTE: One or two drops of water. ■...■ New installation? See "Water Supply Requirements." Replace filter or reinstall it does not close completely." ■ Recently removed the doors? Allow 24 hours for the water supply to cool completely. ■ Water not been recently dispensed? Water is leaking from the ...
... water dispenser tube connections are fully tightened. Straighten the water source line. ■ New installation? If it correctly. ■ Refrigerator door closed completely? Water from the dispenser is warm NOTE: Water from the dispenser system NOTE: One or two drops of water. ■...■ New installation? See "Water Supply Requirements." Replace filter or reinstall it does not close completely." ■ Recently removed the doors? Allow 24 hours for the water supply to cool completely. ■ Water not been recently dispensed? Water is leaking from the ...

Installation Instructions
Page 2
...doors or drawer. Lift out bottom hinge pin (on freezer door models). 9. Installation Door and Drawer Removal Some installations require door/drawer removal to transport the refrigerator to refrigerator before removing doors or drawer. Remove door from bottom hinge and retain hinge pin for later use . Remove bottom...8226; Phillips screwdriver • 5⁄16" hex head driver • 3⁄8" hex head driver 1. For swing freezer door models only: Hold freezer door while removing hinge pin with a 5⁄16" hex head driver. Remove top hinge cover from top hinge to walls...
...doors or drawer. Lift out bottom hinge pin (on freezer door models). 9. Installation Door and Drawer Removal Some installations require door/drawer removal to transport the refrigerator to refrigerator before removing doors or drawer. Remove door from bottom hinge and retain hinge pin for later use . Remove bottom...8226; Phillips screwdriver • 5⁄16" hex head driver • 3⁄8" hex head driver 1. For swing freezer door models only: Hold freezer door while removing hinge pin with a 5⁄16" hex head driver. Remove top hinge cover from top hinge to walls...

Installation Instructions
Page 3
... front to perform the following instructions. To Install: 1. Note: All four drawer bracket supports must be in the top freezer basket. Tilt the lower basket forward and lift to full extension. 2. Replace and tighten Phillips screws that were removed from the... slides. After replacing doors, connect power. Pull drawer open to full extension. 2. Installation Pullout Freezer Drawer (select models) DANGER To prevent accidental child entrapment or suffocation risk, do not remove...
... front to perform the following instructions. To Install: 1. Note: All four drawer bracket supports must be in the top freezer basket. Tilt the lower basket forward and lift to full extension. 2. Replace and tighten Phillips screws that were removed from the... slides. After replacing doors, connect power. Pull drawer open to full extension. 2. Installation Pullout Freezer Drawer (select models) DANGER To prevent accidental child entrapment or suffocation risk, do not remove...
Installation Instructions
Page 4
... attached to stored items. Both doors can be reversed on freezer door models and the fresh food door is reversible on doors. 3. Handles Note: If not installed, the handle is installed tightly. 4. Freezer door models: Insert bottom hinge pin. • Locate bottom hinge hole closest to opposite side of freezer door on bottom hinge pin and hold freezer door upright while installing center hinge...
... attached to stored items. Both doors can be reversed on freezer door models and the fresh food door is reversible on doors. 3. Handles Note: If not installed, the handle is installed tightly. 4. Freezer door models: Insert bottom hinge pin. • Locate bottom hinge hole closest to opposite side of freezer door on bottom hinge pin and hold freezer door upright while installing center hinge...

Installation Instructions
Page 5
...the surface. Align the side mount handle with screwdriver flat blade wrapped in literature pack and install over bottom portion of the door. 2. To Remove: Reverse installation procedure. 7 Freezer Handles Partial-Width Handle Materials Needed: • Phillips screwdriver To Install: 1. To Install: 1. Rotate...2. Ensure the large hole in step 1. • Snap bottom trim over top and bottom of handle, as illustrated. • Secure top handle trim with screws removed from edge of door. • If reversing freezer door, remove door plugs from the side of handle. To Remove: 1. Remove...
...the surface. Align the side mount handle with screwdriver flat blade wrapped in literature pack and install over bottom portion of the door. 2. To Remove: Reverse installation procedure. 7 Freezer Handles Partial-Width Handle Materials Needed: • Phillips screwdriver To Install: 1. To Install: 1. Rotate...2. Ensure the large hole in step 1. • Snap bottom trim over top and bottom of handle, as illustrated. • Secure top handle trim with screws removed from edge of door. • If reversing freezer door, remove door plugs from the side of handle. To Remove: 1. Remove...

Installation Instructions
Page 6
Installation Metal Handle Materials Needed: • 3⁄32" Allen wrench • Gloves to the handle and hold. • Fully tighten all screws. To Remove: • Loosen set screws in handle using 3⁄32" Allen wrench. • Repeat the procedure on all set screws to secure handle in place. 8 To Replace: • Align handle with the mounting posts. • Apply upward pressure to protect hands Note: Metal handles can scratch doors.
Installation Metal Handle Materials Needed: • 3⁄32" Allen wrench • Gloves to the handle and hold. • Fully tighten all screws. To Remove: • Loosen set screws in handle using 3⁄32" Allen wrench. • Repeat the procedure on all set screws to secure handle in place. 8 To Replace: • Align handle with the mounting posts. • Apply upward pressure to protect hands Note: Metal handles can scratch doors.

Use and Care Manual
Page 2
... Have complete model and serial number identification of purchase. Keep sales receipt and/or cancelled check as proof of your old refrigerator or freezer: • Take off the doors. • Leave the shelves in severe personal injury or death. Junked or abandoned refrigerators are not meant to cover all possible conditions and...
... Have complete model and serial number identification of purchase. Keep sales receipt and/or cancelled check as proof of your old refrigerator or freezer: • Take off the doors. • Leave the shelves in severe personal injury or death. Junked or abandoned refrigerators are not meant to cover all possible conditions and...

Use and Care Manual
Page 4
...8226; Do not install where temperature falls below 55° F (13° C) or rises above 110° F (43° C). Remove bottom bracket cover(s). • Place the eraser end of hinge cap to the compressor. Some clearance may make your refrigerator, measure carefully. IMPORTANT: If refrigerator... to top of a pencil or similar blunt tool in to assure oil returns to verify proper clearance. Note • Complete any required door reversal, panel installation and/or a water supply connection, before plugging it off. Remove toe grille. • Grasp firmly and pull outward...
...8226; Do not install where temperature falls below 55° F (13° C) or rises above 110° F (43° C). Remove bottom bracket cover(s). • Place the eraser end of hinge cap to the compressor. Some clearance may make your refrigerator, measure carefully. IMPORTANT: If refrigerator... to top of a pencil or similar blunt tool in to assure oil returns to verify proper clearance. Note • Complete any required door reversal, panel installation and/or a water supply connection, before plugging it off. Remove toe grille. • Grasp firmly and pull outward...


