Use and Care Guide
Page 7
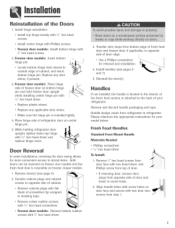
... Replace plastic sleeve. Replace any door shims, if present. 3. Place hinge side of fresh food door and freezer door, if applicabb, to refrigerator. Handle design varies from bottom edge of refrigerator door on bottom hinge pin and hold freezer door upright while installing center hinge pin with flat blade of cabinet. If reversing door, remove door plugs...
... Replace plastic sleeve. Replace any door shims, if present. 3. Place hinge side of fresh food door and freezer door, if applicabb, to refrigerator. Handle design varies from bottom edge of refrigerator door on bottom hinge pin and hold freezer door upright while installing center hinge pin with flat blade of cabinet. If reversing door, remove door plugs...
Use and Care Guide
Page 8
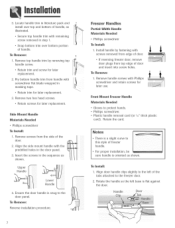
... door and insert into screw holes. Pry bottom handle trim from top edge of the door. 2. If reversing freezer door, remove door plugs from handle with remaining screw removed in literature pack and install over bottom portion of handle, as shown. Locate handle trim in step 1. . Snap bottom trim over top and bottom of handle. Retain trim for later replacement.
... door and insert into screw holes. Pry bottom handle trim from top edge of the door. 2. If reversing freezer door, remove door plugs from handle with remaining screw removed in literature pack and install over bottom portion of handle, as shown. Locate handle trim in step 1. . Snap bottom trim over top and bottom of handle. Retain trim for later replacement.
Use and Care Guide
Page 9
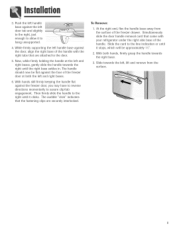
... right basesg, entlyslidethe handletowardsthe right untilthe right basesettlesin.Thehandle shouldnowbe flatagainstthe faceofthe freezer doorat boththe leftandright bases. 6. With both hands, firmly grasp the handle towards the left, lift and remove from the surface. Slide towards the...right untilit clicks. Whilefirmlysupportingthe left doortab andslightly to the right,just enoughto allowit to hangunsupported. 4. Pushthe left handle baseagainsthe left handlebaseagainst the door,alignthe right baseofthe handlewith the righttabsthat areattachedto the door. 5. Theaudible"click" indicates...
... right basesg, entlyslidethe handletowardsthe right untilthe right basesettlesin.Thehandle shouldnowbe flatagainstthe faceofthe freezer doorat boththe leftandright bases. 6. With both hands, firmly grasp the handle towards the left, lift and remove from the surface. Slide towards the...right untilit clicks. Whilefirmlysupportingthe left doortab andslightly to the right,just enoughto allowit to hangunsupported. 4. Pushthe left handle baseagainsthe left handlebaseagainst the door,alignthe right baseofthe handlewith the righttabsthat areattachedto the door. 5. Theaudible"click" indicates...


