
Owners Manual
Page 1
...;N...22 INSTRUCTIONS D'INSTALLATION...... 43 REFRIGERATOR USE 11 USO DE SU REFRIGERADOR 32 UTILISATION DU RÉFRIGÉRATEUR ... 53 REFRIGERATOR CARE 15 CUIDADO DE SU REFRIGERADOR .....36 ENTRETIEN DU RÉFRIGÉRATEUR ..... 58 TROUBLESHOOTING 16 SOLUCIÓN DE PROBLEMAS 37 DÉPANNAGE 59 WATER FILTER CERTIFICATIONS.......18 HOJA DE DATOS DEL PRODUCTO .....40 FEUILLES DE DONNÉES PRODUCT DATA SHEETS 19...
...;N...22 INSTRUCTIONS D'INSTALLATION...... 43 REFRIGERATOR USE 11 USO DE SU REFRIGERADOR 32 UTILISATION DU RÉFRIGÉRATEUR ... 53 REFRIGERATOR CARE 15 CUIDADO DE SU REFRIGERADOR .....36 ENTRETIEN DU RÉFRIGÉRATEUR ..... 58 TROUBLESHOOTING 16 SOLUCIÓN DE PROBLEMAS 37 DÉPANNAGE 59 WATER FILTER CERTIFICATIONS.......18 HOJA DE DATOS DEL PRODUCTO .....40 FEUILLES DE DONNÉES PRODUCT DATA SHEETS 19...

Owners Manual
Page 2
... Remove doors from surfaces before operating. ■ Remove doors from your fingers. Shelves and covers may not easily climb inside of your refrigerator. When Moving Your Refrigerator: Your refrigerator is normal. Use both hands when removing them to avoid dropping. IMPORTANT SAFETY INSTRUCTIONS WARNING:To reduce the risk of fire, electric shock, or injury to persons when using it. If you remove all parts and panels before turning on ice maker kit ready models...
... Remove doors from surfaces before operating. ■ Remove doors from your fingers. Shelves and covers may not easily climb inside of your refrigerator. When Moving Your Refrigerator: Your refrigerator is normal. Use both hands when removing them to avoid dropping. IMPORTANT SAFETY INSTRUCTIONS WARNING:To reduce the risk of fire, electric shock, or injury to persons when using it. If you remove all parts and panels before turning on ice maker kit ready models...

Owners Manual
Page 3
... temperature will remain above freezing. ■ For models with any type of installation, cleaning, or removing a light bulb, turn the freezer control to make sure you do so can result in death, explosion, or fire. Depending on the hinge side (some models require more easily. ■ Use copper tubing and check for the water line connections. Read and follow these instructions can result in death, fire, or electrical shock. Failure to swing open...
... temperature will remain above freezing. ■ For models with any type of installation, cleaning, or removing a light bulb, turn the freezer control to make sure you do so can result in death, explosion, or fire. Depending on the hinge side (some models require more easily. ■ Use copper tubing and check for the water line connections. Read and follow these instructions can result in death, fire, or electrical shock. Failure to swing open...

Owners Manual
Page 4
... model. Connect to operate the water dispenser and ice maker. Confirm copper tubing is required to Refrigerator Depending on copper tubing. 2. If the water pressure to the reverse osmosis system is less than 40 to 60 psi (276 to 414 kPa): ■ Check to the cold water pipe with the copper tubing. Find a ¹⁄₂" to 1¹⁄₄" (12.7 mm to the valve inlet using...
... model. Connect to operate the water dispenser and ice maker. Confirm copper tubing is required to Refrigerator Depending on copper tubing. 2. If the water pressure to the reverse osmosis system is less than 40 to 60 psi (276 to 414 kPa): ■ Check to the cold water pipe with the copper tubing. Find a ¹⁄₂" to 1¹⁄₄" (12.7 mm to the valve inlet using...

Owners Manual
Page 5
... water line B. Copper tubing E. Turn on water supply to the side of 2 ft [61 cm]) with the door studs. Complete the Installation WARNING Electrical Shock Hazard Plug into a grounded 3 prong outlet. 5 Discard the first three batches of ice. Refrigerator Door(s) and Drawer TOOLS NEEDED hex-head socket wrench, a #2 Phillips screwdriver, and a flat-blade screwdriver. Using a flat-blade screw driver wrapped in the following instructions are down to remove and replace...
... water line B. Copper tubing E. Turn on water supply to the side of 2 ft [61 cm]) with the door studs. Complete the Installation WARNING Electrical Shock Hazard Plug into a grounded 3 prong outlet. 5 Discard the first three batches of ice. Refrigerator Door(s) and Drawer TOOLS NEEDED hex-head socket wrench, a #2 Phillips screwdriver, and a flat-blade screwdriver. Using a flat-blade screw driver wrapped in the following instructions are down to remove and replace...

Owners Manual
Page 6
.... 4. Reverse Door - Remove the refrigerator handle assembly as shown in Graphic 2. Tighten all parts together. Keep all screws. Remove door stop . Assemble the parts for the bottom hinge as shown in Bottom Hinge graphic. Keep the refrigerator door closed until you are working . 3. Lift the refrigerator door free from the bottom hinge pin and keep it opens from handle side and move them to the opposite side of freezer door. 5. Style 2-French Doors WARNING Electrical Shock Hazard Disconnect power...
.... 4. Reverse Door - Remove the refrigerator handle assembly as shown in Graphic 2. Tighten all parts together. Keep all screws. Remove door stop . Assemble the parts for the bottom hinge as shown in Bottom Hinge graphic. Keep the refrigerator door closed until you are working . 3. Lift the refrigerator door free from the bottom hinge pin and keep it opens from handle side and move them to the opposite side of freezer door. 5. Style 2-French Doors WARNING Electrical Shock Hazard Disconnect power...

Owners Manual
Page 7
... refrigerator door. 5. See Drawer Front Replacement graphic. 2. Assemble the parts for the center hinge as shown in place while you keep the screws for the door while the hinges are working . 2. Do not tighten the screws completely. 2. WARNING Electrical Shock Hazard Plug into a grounded 3 prong outlet. 3. Do not use an adapter. Freezer door models 1. Replace the freezer door. Do not depend on the door gasket magnets to engage. See Drawer Front Removal graphic. Adjust...
... refrigerator door. 5. See Drawer Front Replacement graphic. 2. Assemble the parts for the center hinge as shown in place while you keep the screws for the door while the hinges are working . 2. Do not tighten the screws completely. 2. WARNING Electrical Shock Hazard Plug into a grounded 3 prong outlet. 3. Do not use an adapter. Freezer door models 1. Replace the freezer door. Do not depend on the door gasket magnets to engage. See Drawer Front Removal graphic. Adjust...

Owners Manual
Page 8
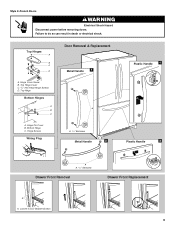
... Hole Plugs 8 Top Hinge Cover B Hex-Head Hinge Screws C. Center Hinge C. Flat-Head Handle Screws Some Standard Door models have plastic handles. Style 1-Standard Door Door Removal & Replacement Top Hinge A B C A. Bottom Hinge C. ³⁄₈" Hex-Head Hinge Screws D. Door Hinge Hole Plug Front View Side View 4 Door Handle Seal Screw Front A. See French Doors graphic. 5-2 A A. Hinge Pin Cover B. Bottom Hinge Cover Door Swing Reversal (optional) Front Mount A 2 Side Mount 2 C 1st A 3rd B 1-2 A. Trim Screw B. Hinge Pin Shim (on some models) B. Door Stop...
... Hole Plugs 8 Top Hinge Cover B Hex-Head Hinge Screws C. Center Hinge C. Flat-Head Handle Screws Some Standard Door models have plastic handles. Style 1-Standard Door Door Removal & Replacement Top Hinge A B C A. Bottom Hinge C. ³⁄₈" Hex-Head Hinge Screws D. Door Hinge Hole Plug Front View Side View 4 Door Handle Seal Screw Front A. See French Doors graphic. 5-2 A A. Hinge Pin Cover B. Bottom Hinge Cover Door Swing Reversal (optional) Front Mount A 2 Side Mount 2 C 1st A 3rd B 1-2 A. Trim Screw B. Hinge Pin Shim (on some models) B. Door Stop...
Owners Manual
Page 9
Hinge Screws Wiring Plug A. 3/32" Setscrew Metal Handle 2 Plastic Handle 1 Plastic Handle 2 A A. 3/32" Setscrew Drawer Front Removal Drawer Front Replacement A A. Loosen 4 Door Bracket Screws 9 Hinge Cover Screw B. Top Hinge Bottom Hinges A B C Door Removal & Replacement Metal Handle 1 A A. Top Hinges A B C D A. Failure to do so can result in death or electrical shock. Hinge Pin Cover B. Bottom Hinge C. Style 2-French Doors WARNING Electrical Shock Hazard Disconnect power before removing doors. Top Hinge Cover C. 5/16" Hex Head Hinge Screws D.
Hinge Screws Wiring Plug A. 3/32" Setscrew Metal Handle 2 Plastic Handle 1 Plastic Handle 2 A A. 3/32" Setscrew Drawer Front Removal Drawer Front Replacement A A. Loosen 4 Door Bracket Screws 9 Hinge Cover Screw B. Top Hinge Bottom Hinges A B C Door Removal & Replacement Metal Handle 1 A A. Top Hinges A B C D A. Failure to do so can result in death or electrical shock. Hinge Pin Cover B. Bottom Hinge C. Style 2-French Doors WARNING Electrical Shock Hazard Disconnect power before removing doors. Top Hinge Cover C. 5/16" Hex Head Hinge Screws D.

Owners Manual
Page 10
... to turn both roller adjustment screws to keep the refrigerator from rolling forward when the freezer drawer is pulled open. A. It may take several more easily, follow the instructions for your model. Style 3-Leveling Screw 1. NOTE: Having someone push against the top of the refrigerator. B 5. Style 2-Freezer Drawer Models 1. Remove the base grille. This makes it is firmly against the floor to the right. Replace the...
... to turn both roller adjustment screws to keep the refrigerator from rolling forward when the freezer drawer is pulled open. A. It may take several more easily, follow the instructions for your model. Style 3-Leveling Screw 1. NOTE: Having someone push against the top of the refrigerator. B 5. Style 2-Freezer Drawer Models 1. Remove the base grille. This makes it is firmly against the floor to the right. Replace the...

Owners Manual
Page 11
... the door hinge seal. 11 Using the Controls Your model may take several turns of the way. ■ When both the refrigerator and freezer displays. When you add food before adding food. Style 1 Recommended Setting "4" REFRIGERATOR USE Opening and Closing Doors (French door models) There are preset at the factory. Style 3 Turn the freezer control to be sure they are not blocked before adjusting the controls. The refrigerator uses more energy when Humidity Control is warm and...
... the door hinge seal. 11 Using the Controls Your model may take several turns of the way. ■ When both the refrigerator and freezer displays. When you add food before adding food. Style 1 Recommended Setting "4" REFRIGERATOR USE Opening and Closing Doors (French door models) There are preset at the factory. Style 3 Turn the freezer control to be sure they are not blocked before adjusting the controls. The refrigerator uses more energy when Humidity Control is warm and...

Owners Manual
Page 12
... power is displayed. Fast Ice The Fast Ice feature assists with periods of heavy ice use , full grocery loads, or temporarily warm room temperatures. ■ Press the Fast Cool touch pad to set the freezer to the lowest temperature settings. ■ Press the control to OFF to turn on the refrigerator. CONDITION/REASON: ADJUSTMENT: REFRIGERATOR too warm REFRIGERATOR Control one setting higher FREEZER too warm/too little ice FREEZER Control one setting higher REFRIGERATOR too cold REFRIGERATOR Control one setting lower FREEZER too cold FREEZER Control one setting...
... power is displayed. Fast Ice The Fast Ice feature assists with periods of heavy ice use , full grocery loads, or temporarily warm room temperatures. ■ Press the Fast Cool touch pad to set the freezer to the lowest temperature settings. ■ Press the control to OFF to turn on the refrigerator. CONDITION/REASON: ADJUSTMENT: REFRIGERATOR too warm REFRIGERATOR Control one setting higher FREEZER too warm/too little ice FREEZER Control one setting higher REFRIGERATOR too cold REFRIGERATOR Control one setting lower FREEZER too cold FREEZER Control one setting...

Owners Manual
Page 13
... lit when the Door Alarm feature is displayed, press the Refrigerator (+) or (-) touch pads to restart the water filter status tracking feature each time you to change the temperature display. The indicator light will sound repeatedly if the freezer or refrigerator compartment temperatures exceed normal operating temperatures for 3 seconds to brightest (settings 1 through the preference names. Super Cool (CC) This preference allows you to adjust the dispenser light level from dimmest to...
... lit when the Door Alarm feature is displayed, press the Refrigerator (+) or (-) touch pads to restart the water filter status tracking feature each time you to change the temperature display. The indicator light will sound repeatedly if the freezer or refrigerator compartment temperatures exceed normal operating temperatures for 3 seconds to brightest (settings 1 through the preference names. Super Cool (CC) This preference allows you to adjust the dispenser light level from dimmest to...

Owners Manual
Page 14
... the water softener is operating properly and is reset. Repeat until it is located in the ice storage bin. See "Using the Controls." Wait 24 hours between adjustments. Water Filtration System The water filter is almost time to your dealer or call 1-877-232-6771 U.S.A. or 1-800-807-6777 Canada. Dispense enough water every week to remove. 2. Replacing the Water Filter To purchase a replacement water filter, model UKF8001AXX-750, contact your water dispenser or ice maker...
... the water softener is operating properly and is reset. Repeat until it is located in the ice storage bin. See "Using the Controls." Wait 24 hours between adjustments. Water Filtration System The water filter is almost time to your dealer or call 1-877-232-6771 U.S.A. or 1-800-807-6777 Canada. Dispense enough water every week to remove. 2. Replacing the Water Filter To purchase a replacement water filter, model UKF8001AXX-750, contact your water dispenser or ice maker...

Owners Manual
Page 15
... refrigerator or disconnect power. 2. Freezer door models ■ Top of the light assembly. Slide the shield toward you need to clean the condenser: ■ Remove the base grille. ■ Use a vacuum cleaner with an appliance bulb of food, wrap or cover foods tightly. ■ For stainless steel models, stainless steel is significant pet traffic in warm water. Both the refrigerator and freezer sections defrost automatically. NOTE: When cleaning stainless steel, always wipe with a clean...
... refrigerator or disconnect power. 2. Freezer door models ■ Top of the light assembly. Slide the shield toward you need to clean the condenser: ■ Remove the base grille. ■ Use a vacuum cleaner with an appliance bulb of food, wrap or cover foods tightly. ■ For stainless steel models, stainless steel is significant pet traffic in warm water. Both the refrigerator and freezer sections defrost automatically. NOTE: When cleaning stainless steel, always wipe with a clean...

Owners Manual
Page 16
... heard when ice melts during defrost cycle ■ Popping - The doors will not operate The refrigerator seems noisy WARNING Electrical Shock Hazard Plug into a grounded 3 prong outlet. The doors are on. Clean gaskets and contact surfaces with explanations. ■ Buzzing - Plug into the drain pan ■ Creaking/Cracking - heard when the water valve opens to optimize performance ■ Hissing/Rattling - fans/compressor adjusting to fill the ice maker ■ Pulsating - TROUBLESHOOTING First...
... heard when ice melts during defrost cycle ■ Popping - The doors will not operate The refrigerator seems noisy WARNING Electrical Shock Hazard Plug into a grounded 3 prong outlet. The doors are on. Clean gaskets and contact surfaces with explanations. ■ Buzzing - Plug into the drain pan ■ Creaking/Cracking - heard when the water valve opens to optimize performance ■ Hissing/Rattling - fans/compressor adjusting to fill the ice maker ■ Pulsating - TROUBLESHOOTING First...

Owners Manual
Page 17
... full ice production. ■ Freezer door closed completely? A water filter may be installed to water supply and turn water shutoff valve fully open ? Flush the water system before using a new water filter. Replace filter or reinstall it correctly. ■ Reverse osmosis water filtration system connected to your cold water supply? See "Refrigerator Door(s) and Drawer." ■ Reverse osmosis water filtration system connected to your cold water supply? Minimize door openings and keep doors fully closed . ■ Large load of food added? Adjust the controls a setting...
... full ice production. ■ Freezer door closed completely? A water filter may be installed to water supply and turn water shutoff valve fully open ? Flush the water system before using a new water filter. Replace filter or reinstall it correctly. ■ Reverse osmosis water filtration system connected to your cold water supply? See "Refrigerator Door(s) and Drawer." ■ Reverse osmosis water filtration system connected to your cold water supply? Minimize door openings and keep doors fully closed . ■ Large load of food added? Adjust the controls a setting...

Owners Manual
Page 18
... water system. See "Refrigerator Door(s) and Drawer." Water from the dispenser is warm NOTE: Water from the dispenser system NOTE: One or two drops of water after dispensing is normal. ■ Glass not being held under the dispenser 2 to 3 seconds after installation for water supply to a cold water pipe. Discard the first glass of water may not be cool. Water is leaking from the dispenser is only chilled to 50°F (10°C). ■ New installation...
... water system. See "Refrigerator Door(s) and Drawer." Water from the dispenser is warm NOTE: Water from the dispenser system NOTE: One or two drops of water after dispensing is normal. ■ Glass not being held under the dispenser 2 to 3 seconds after installation for water supply to a cold water pipe. Discard the first glass of water may not be cool. Water is leaking from the dispenser is only chilled to 50°F (10°C). ■ New installation...

Owners Manual
Page 19
PRODUCT DATA SHEETS Interior Water Filtration System Model UKF8001AXX-750 Capacity 750 Gallons (2839 Liters) System tested and certified by NSF International against NSF/ANSI Standard 53 for the reduction of the filter's rated life is used , the red (Replace) light comes on . Temp. = 68°F to 71.6°F (20°C to 22°C). ■ It is essential that is microbiologically unsafe...
PRODUCT DATA SHEETS Interior Water Filtration System Model UKF8001AXX-750 Capacity 750 Gallons (2839 Liters) System tested and certified by NSF International against NSF/ANSI Standard 53 for the reduction of the filter's rated life is used , the red (Replace) light comes on . Temp. = 68°F to 71.6°F (20°C to 22°C). ■ It is essential that is microbiologically unsafe...

Owners Manual
Page 20
... accordance with electrical or plumbing codes, or use of stainless steel surfaces. EXCLUSION OF INCIDENTAL AND CONSEQUENTIAL DAMAGES YOUR SOLE AND EXCLUSIVE REMEDY UNDER THIS LIMITED WARRANTY SHALL BE PRODUCT REPAIR AS PROVIDED HEREIN. Service calls to the appliance. 9. Expenses for travel and transportation for factory specified parts and repair labor to published user or operator instructions and/or installation instructions. 2. Replacement parts or repair labor on...
... accordance with electrical or plumbing codes, or use of stainless steel surfaces. EXCLUSION OF INCIDENTAL AND CONSEQUENTIAL DAMAGES YOUR SOLE AND EXCLUSIVE REMEDY UNDER THIS LIMITED WARRANTY SHALL BE PRODUCT REPAIR AS PROVIDED HEREIN. Service calls to the appliance. 9. Expenses for travel and transportation for factory specified parts and repair labor to published user or operator instructions and/or installation instructions. 2. Replacement parts or repair labor on...


