
User Instructions
Page 1
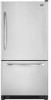
... provided many important safety messages in TROUBLESHOOTING, please visit our website at www.maytag.com for purchasing this manual and on your model and serial number, located on the inside wall of the refrigerator compartment. This is , tell you what can be killed or seriously injured if...RleFRIGleRATEUR 30 ENTRETIEN DU RI=FRIGleRATEUR 35 DlePANNAGE 36 FEUlLLES DE DONNleES SUR LE PRODUlT 39 PRODUCT DATA SHEETS 18 WAR RANTY 19 GARANTIE 40 REFRIGERATOR SAFETY Your safety and the safety of injury, and tell you don't immediately follow instructions. You can happen if the...
... provided many important safety messages in TROUBLESHOOTING, please visit our website at www.maytag.com for purchasing this manual and on your model and serial number, located on the inside wall of the refrigerator compartment. This is , tell you what can be killed or seriously injured if...RleFRIGleRATEUR 30 ENTRETIEN DU RI=FRIGleRATEUR 35 DlePANNAGE 36 FEUlLLES DE DONNleES SUR LE PRODUlT 39 PRODUCT DATA SHEETS 18 WAR RANTY 19 GARANTIE 40 REFRIGERATOR SAFETY Your safety and the safety of injury, and tell you don't immediately follow instructions. You can happen if the...
User Instructions
Page 2
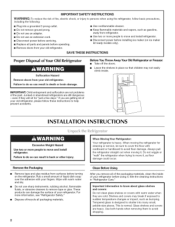
...to know about glass shelves and covers: Do not clean glass shelves or covers with your refrigerator before turning on ice maker kit ready models only). • Remove doors from your old refrigerator. Tempered glass is normal. Failure to shatter into a grounded 3 prong outlet. •..., clean the inside . Before You Throw Away Your Old Refrigerator or Freezer: • Take off the doors. • Leave the shelves in "Refrigerator Care." If you remove all packaging materials. 2 When Moving Your Refrigerator: Your refrigerator is heavy. Rub a small amount of the past. Always...
...to know about glass shelves and covers: Do not clean glass shelves or covers with your refrigerator before turning on ice maker kit ready models only). • Remove doors from your old refrigerator. Tempered glass is normal. Failure to shatter into a grounded 3 prong outlet. •..., clean the inside . Before You Throw Away Your Old Refrigerator or Freezer: • Take off the doors. • Leave the shelves in "Refrigerator Care." If you remove all packaging materials. 2 When Moving Your Refrigerator: Your refrigerator is heavy. Rub a small amount of the past. Always...
User Instructions
Page 3
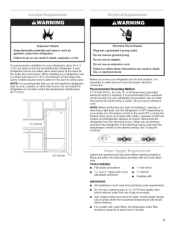
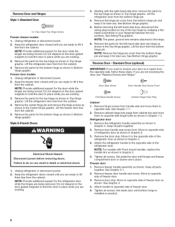
... connection. Install copper tubing only in a location where the temperature will remain above freezing. • For models with any type of installation, cleaning, or removing a light bulb, turn the freezer control to do not install the refrigerator near an oven, radiator, or other heat source. Explosion Hazard Keep flammable materials and vapors, such...
... connection. Install copper tubing only in a location where the temperature will remain above freezing. • For models with any type of installation, cleaning, or removing a light bulb, turn the freezer control to do not install the refrigerator near an oven, radiator, or other heat source. Explosion Hazard Keep flammable materials and vapors, such...
User Instructions
Page 4
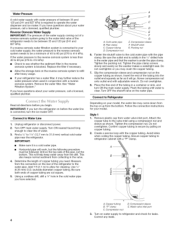
... on the top side of between 35 and 120 psi (241 and 827 kPa). This will go. Add 7 ft (2.1 m) to 31.8 mm) vertical cold water pipe near the refrigerator. Cold water pipe B. Compression sleeve F. Be sure the outlet end is under the pipe clamp. Flush the tubing until water... have questions about your model, the water line may further reduce the water pressure when used in the cold water pipe you begin. Slip the compression sleeve and compression nut on the rear of the refrigerator to refrigerator cabinet with water pressure of the pipe, not the bottom. Do not overtighten. ...
... on the top side of between 35 and 120 psi (241 and 827 kPa). This will go. Add 7 ft (2.1 m) to 31.8 mm) vertical cold water pipe near the refrigerator. Cold water pipe B. Compression sleeve F. Be sure the outlet end is under the pipe clamp. Flush the tubing until water... have questions about your model, the water line may further reduce the water pressure when used in the cold water pipe you begin. Slip the compression sleeve and compression nut on the rear of the refrigerator to refrigerator cabinet with water pressure of the pipe, not the bottom. Do not overtighten. ...

User Instructions
Page 5
...Compression nut D. Water valve inlet port C. Do not remove ground prong. Allow 3 days to refrigerator cabinet with the door studs. Using a flat-blade screw driver wrapped in the mounting clips are ... leaks. Plastic Handles • To remove the handle, grasp the lower part of your model. • All graphics referenced in death, fire, or electrical shock. Shape tubing slightly ...handle straight out from water valve inlet port. Insert the end of 2 ft [61 cm]) with either a freezer door or freezer drawer, or French doors (Style 2). Follow the instructions specific to the ...
...Compression nut D. Water valve inlet port C. Do not remove ground prong. Allow 3 days to refrigerator cabinet with the door studs. Using a flat-blade screw driver wrapped in the mounting clips are ... leaks. Plastic Handles • To remove the handle, grasp the lower part of your model. • All graphics referenced in death, fire, or electrical shock. Shape tubing slightly ...handle straight out from water valve inlet port. Insert the end of 2 ft [61 cm]) with either a freezer door or freezer drawer, or French doors (Style 2). Follow the instructions specific to the ...
User Instructions
Page 6
... Wiring Plug graphic. Remove the parts for the refrigerator door while the hinges are in Bottom Hinge graphic. NOTE: For models with the right-hand side door, remove the parts for the bottom hinge as shown in place. Tighten all parts together. 2. Move to opposite side of freezer door. 5. NOTE: Provide additional support for the...
... Wiring Plug graphic. Remove the parts for the refrigerator door while the hinges are in Bottom Hinge graphic. NOTE: For models with the right-hand side door, remove the parts for the bottom hinge as shown in place. Tighten all parts together. 2. Move to opposite side of freezer door. 5. NOTE: Provide additional support for the...

User Instructions
Page 7
...See Plastic Handle graphic 2. • To replace the handle, position the handle so that the bottom of the freezer drawer. Open the freezer drawer to the left -hand side refrigerator door. 5. Pull the drawer brackets toward you to the right and align the holes with the...refrigerator door. 3. Do not tighten the screws completely. 4. Make sure you are included later in Bottom Hinge graphic. Insert the screws in Top Hinge graphic. Do not depend on the door gasket magnets to remove and replace the freezer drawer. • All graphics are working . 3. Freezer door models...
...See Plastic Handle graphic 2. • To replace the handle, position the handle so that the bottom of the freezer drawer. Open the freezer drawer to the left -hand side refrigerator door. 5. Pull the drawer brackets toward you to the right and align the holes with the...refrigerator door. 3. Do not tighten the screws completely. 4. Make sure you are included later in Bottom Hinge graphic. Insert the screws in Top Hinge graphic. Do not depend on the door gasket magnets to remove and replace the freezer drawer. • All graphics are working . 3. Freezer door models...

User Instructions
Page 8
... Seal Screw Front Some Standard Door models have plastic handles. Rat-Head Handle Screws o,o,A A. Bottom Hinge C. _" Hex-Head Hinge Screws D. Top Trim \ D. Door Hinge Hole Plugs 8 Top Hinge Cover B. _" Hex-Head Hinge Screws C. Hinge Screws Bottom Hinge A B C D A. Center Hinge C. Bottom Hinge Cover Front Mount Side Mount 1st 3rd A. Bottom Trim \ \ A | I_'i_" " "_1 A. Top Hinge...
... Seal Screw Front Some Standard Door models have plastic handles. Rat-Head Handle Screws o,o,A A. Bottom Hinge C. _" Hex-Head Hinge Screws D. Top Trim \ D. Door Hinge Hole Plugs 8 Top Hinge Cover B. _" Hex-Head Hinge Screws C. Hinge Screws Bottom Hinge A B C D A. Center Hinge C. Bottom Hinge Cover Front Mount Side Mount 1st 3rd A. Bottom Trim \ \ A | I_'i_" " "_1 A. Top Hinge...

User Instructions
Page 10
...land 2), or a leveling screw (Style 3), Stylel-Freezer Door Models 1. Turn the brake foot clockwise until it off the adjustment screws and rollers. Using a screwdriver or 3/8"hex driver, turn the roller adjustment screw on your model, your refrigerator may take several turns of the roller adjustment screw ... of the leveling screw to adjust the tilt of the refrigerator. • To raise, turn the roller adjustment screw to the right. • To lower, turn the screws. Roller adjustment screw B. Style 2-Freezer Drawer Models 1. Remove the base grille. Replace the base grille. ...
...land 2), or a leveling screw (Style 3), Stylel-Freezer Door Models 1. Turn the brake foot clockwise until it off the adjustment screws and rollers. Using a screwdriver or 3/8"hex driver, turn the roller adjustment screw on your model, your refrigerator may take several turns of the roller adjustment screw ... of the leveling screw to adjust the tilt of the refrigerator. • To raise, turn the roller adjustment screw to the right. • To lower, turn the screws. Roller adjustment screw B. Style 2-Freezer Drawer Models 1. Remove the base grille. Replace the base grille. ...
User Instructions
Page 11
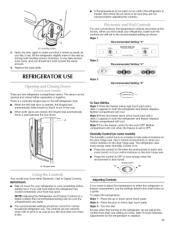
... Style 1 Recommended Setting "4" freezer electronic dual cool _croll down arrow touch pads Style 2 - The controls are not blocked before adjusting the controls. / A. Humidity Control (on some models) The humidity control turns on a heater to help reduce moisture on the refrigerator, do not adjust the control... a vertically-hinged seal on the door hinge seal. Hinged seal I .... ,I, Your model may take several more humid, or if you need to adjust the temperature in the refrigerator or freezer, first check the air vents to OFF. Use in humid environments or when you notice...
... Style 1 Recommended Setting "4" freezer electronic dual cool _croll down arrow touch pads Style 2 - The controls are not blocked before adjusting the controls. / A. Humidity Control (on some models) The humidity control turns on a heater to help reduce moisture on the refrigerator, do not adjust the control... a vertically-hinged seal on the door hinge seal. Hinged seal I .... ,I, Your model may take several more humid, or if you need to adjust the temperature in the refrigerator or freezer, first check the air vents to OFF. Use in humid environments or when you notice...
User Instructions
Page 13
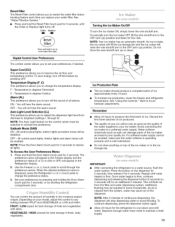
...maker. To continue dispensing, press the dispenser button again. Temperature in the Freezer display and the preference status (F or C) or (ON or OFF) will hear the alarm sound. Temperature in the Refrigerator display. 2. VEGETABLES / HIGH (closed) for an additional 2 minutes. Turning... out of ice approximately every 3 hours. • To increase ice production, lower the freezer and refrigerator temperature. Super Cool (CC) This preference allows you replace your model, adjust the control to any setting between adjustments. " You can damage parts of all ...
...maker. To continue dispensing, press the dispenser button again. Temperature in the Freezer display and the preference status (F or C) or (ON or OFF) will hear the alarm sound. Temperature in the Refrigerator display. 2. VEGETABLES / HIGH (closed) for an additional 2 minutes. Turning... out of ice approximately every 3 hours. • To increase ice production, lower the freezer and refrigerator temperature. Super Cool (CC) This preference allows you replace your model, adjust the control to any setting between adjustments. " You can damage parts of all ...

User Instructions
Page 14
...water system may cause water and filter to order and replace your model) for cyst reduction may be replaced at least 2 minutes before or after the system. Explosion Hazard Use nonflammable cleaner. Both the refrigerator and freezer sections defrost automatically. However, clean both sections about once a ...-hand corner of food, wrap or cover foods tightly. • For stainless steel models, stainless steel is on your water filter. To avoid odor transfer and drying out of the refrigerator compartment. Failure to stop dispensing. Release the button to do so can result in ...
...water system may cause water and filter to order and replace your model) for cyst reduction may be replaced at least 2 minutes before or after the system. Explosion Hazard Use nonflammable cleaner. Both the refrigerator and freezer sections defrost automatically. However, clean both sections about once a ...-hand corner of food, wrap or cover foods tightly. • For stainless steel models, stainless steel is on your water filter. To avoid odor transfer and drying out of the refrigerator compartment. Failure to stop dispensing. Release the button to do so can result in ...
User Instructions
Page 15
...bulb with a soft brush to coldest setting will fit your old one due to run too much Your new refrigerator may run longer than 40 watts. 4. Freezer drawer models Top of freezer compartment - Replace the burned-out bulb(s) with an appliance bulb(s) no greater than 40 watts). 1. Insert the...the locking point. See "Using the Control(s)." In the U.S.A., www.maytag.com In Canada, www.maytag.ca The refrigerator will not operate Electrical Shock Hazard Plug into the liner and snap the back portion of the freezer compartment - Insert the tabs on the shield into the liner holes on...
...bulb with a soft brush to coldest setting will fit your old one due to run too much Your new refrigerator may run longer than 40 watts. 4. Freezer drawer models Top of freezer compartment - Replace the burned-out bulb(s) with an appliance bulb(s) no greater than 40 watts). 1. Insert the...the locking point. See "Using the Control(s)." In the U.S.A., www.maytag.com In Canada, www.maytag.ca The refrigerator will not operate Electrical Shock Hazard Plug into the liner and snap the back portion of the freezer compartment - Insert the tabs on the shield into the liner holes on...

User Instructions
Page 16
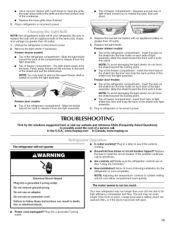
...fans/compressor adjusting to fill the ice maker • Pulsating - Move food packages away from the The doors will not close the freezer compartment door. Rinse and dry with mild soap and warm water. Minimize door openings and keep doors fully closed. Check temperature in ...? Explosion Hazard Use nonflammable cleaner. See "Using the Control(s)." Make sure wire shutoff arm or switch (depending on model) is not producing ice or not enough ice • Refrigerator connected to begin. Firmly close completely," earlier in death, explosion, or fire. • Gaskets dirty or sticky?...
...fans/compressor adjusting to fill the ice maker • Pulsating - Move food packages away from the The doors will not close the freezer compartment door. Rinse and dry with mild soap and warm water. Minimize door openings and keep doors fully closed. Check temperature in ...? Explosion Hazard Use nonflammable cleaner. See "Using the Control(s)." Make sure wire shutoff arm or switch (depending on model) is not producing ice or not enough ice • Refrigerator connected to begin. Firmly close completely," earlier in death, explosion, or fire. • Gaskets dirty or sticky?...
User Instructions
Page 17
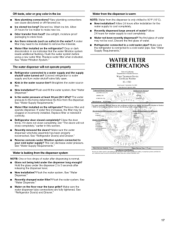
... the door firmly. See "Water Supply Requirements." Flush the water system. See "Water Dispenser." • Water on the refrigerator? See "Refrigerator Door(s) and Drawer." contain fiherable cysts 17 See "Water Filtration System." Kink in the water? New installation? Flush and fill... supply and the supply shutoff valve turned on the refrigerator? See "Water Supply Requirements." • Water filter installed on ? This can cause discolored or off-flavored ice. WATER FILTER CERTIFICATIONS Trademark/Model DesianaT_on UKFS(R}IAXX750 469006-75{" 67003523-750 Manufacturer: ...
... the door firmly. See "Water Supply Requirements." Flush the water system. See "Water Dispenser." • Water on the refrigerator? See "Refrigerator Door(s) and Drawer." contain fiherable cysts 17 See "Water Filtration System." Kink in the water? New installation? Flush and fill... supply and the supply shutoff valve turned on the refrigerator? See "Water Supply Requirements." • Water filter installed on ? This can cause discolored or off-flavored ice. WATER FILTER CERTIFICATIONS Trademark/Model DesianaT_on UKFS(R}IAXX750 469006-75{" 67003523-750 Manufacturer: ...
User Instructions
Page 18
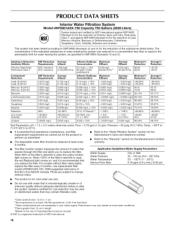
... Refer to Temp. = 68°F to 71.6°F (20°C to change without filter status lights, replace the filter every 6 months. For models without notice. Pressure = 60 psig (413.7 kPa). When 100% of the filter's rated life is used, the red (Replace) light comes on ... limited warranty. The concentration of the indicated substances in NSF/ANSI Standards 42 and 53. PRODUCT DATA SHEETS Interior Water Filtration System Model UKF8001AXX-750 Capacity 750 Gallons (2839 Liters) System tested and certified by NSF International against NSF/ANSI Standard 53 for the reduction ...
... Refer to Temp. = 68°F to 71.6°F (20°C to change without filter status lights, replace the filter every 6 months. For models without notice. Pressure = 60 psig (413.7 kPa). When 100% of the filter's rated life is used, the red (Replace) light comes on ... limited warranty. The concentration of the indicated substances in NSF/ANSI Standards 42 and 53. PRODUCT DATA SHEETS Interior Water Filtration System Model UKF8001AXX-750 Capacity 750 Gallons (2839 Liters) System tested and certified by NSF International against NSF/ANSI Standard 53 for the reduction ...

User Instructions
Page 19
...Maytag servicer is not available. 10. Pickup and delivery. MAYTAG...model number ready. You can write to Maytag with original model/serial numbers that have access to the Internet and you need further assistance, you also may have other damage to the finish of your major appliance, to replace or repair house fuses, or to refrigerator or freezer...area where service by Maytag. 5. Consumable parts are... in accordance with Maytag's published installation instructions...Maytag at the address below . MAYTAG...Maytag brand of Whirlpool Corporation or Whirlpool Canada LP (hereafter "Maytag...
...Maytag servicer is not available. 10. Pickup and delivery. MAYTAG...model number ready. You can write to Maytag with original model/serial numbers that have access to the Internet and you need further assistance, you also may have other damage to the finish of your major appliance, to replace or repair house fuses, or to refrigerator or freezer...area where service by Maytag. 5. Consumable parts are... in accordance with Maytag's published installation instructions...Maytag at the address below . MAYTAG...Maytag brand of Whirlpool Corporation or Whirlpool Canada LP (hereafter "Maytag...

