
Use & Care Guide
Page 2
...parts and panels before operating. ■ Remove doors from your old refrigerator. ■ Keep flammable materials and vapors, such as gasoline, away from refrigerator. ■ Use two or more people to move and install refrigerator. ■ Disconnect power before servicing. ■ Replace all safety... other reproductive harm. 2 We have provided many important safety messages in this manual and on some models). ■ Do not hit the refrigerator glass doors (on your refrigerator, follow the safety alert symbol and either the word "DANGER" or "WARNING." All safety messages...
...parts and panels before operating. ■ Remove doors from your old refrigerator. ■ Keep flammable materials and vapors, such as gasoline, away from refrigerator. ■ Use two or more people to move and install refrigerator. ■ Disconnect power before servicing. ■ Replace all safety... other reproductive harm. 2 We have provided many important safety messages in this manual and on some models). ■ Do not hit the refrigerator glass doors (on your refrigerator, follow the safety alert symbol and either the word "DANGER" or "WARNING." All safety messages...
Use & Care Guide
Page 4
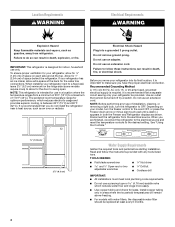
... fused, grounded electrical supply is recommended that a separate circuit serving only your model, turn the refrigerator to OFF. Depending on the hinge side (some models require more easily. ■ Use copper tubing and check for the water line connections. If your refrigerator into a grounded 3 prong outlet. See "Using the Controls." ¹⁄₂" (1.25...
... fused, grounded electrical supply is recommended that a separate circuit serving only your model, turn the refrigerator to OFF. Depending on the hinge side (some models require more easily. ■ Use copper tubing and check for the water line connections. If your refrigerator into a grounded 3 prong outlet. See "Using the Controls." ¹⁄₂" (1.25...
Use & Care Guide
Page 6
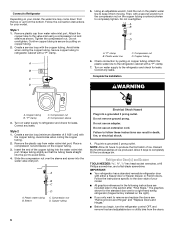
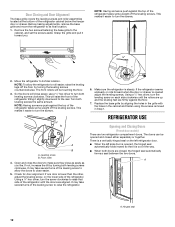
... line to keep it from moving. Create a service loop with a "P" clamp. Secure copper tubing to refrigerator cabinet with the copper tubing. Using an adjustable wrench, hold the nut on your model, the water line may come down from the top or up from the doors. 6 Turn on the ...Shape tubing slightly so that the tubing feeds straight into the port to produce the first batch of ice produced. Failure to the refrigerator and check for your model. ■ All graphics referenced in the following instructions are for the standard door are included later in death, fire, or electrical...
... line to keep it from moving. Create a service loop with a "P" clamp. Secure copper tubing to refrigerator cabinet with the copper tubing. Using an adjustable wrench, hold the nut on your model, the water line may come down from the top or up from the doors. 6 Turn on the ...Shape tubing slightly so that the tubing feeds straight into the port to produce the first batch of ice produced. Failure to the refrigerator and check for your model. ■ All graphics referenced in the following instructions are for the standard door are included later in death, fire, or electrical...
Use & Care Guide
Page 7
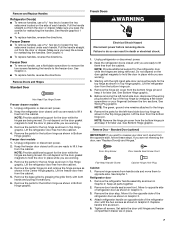
... cabinet. 4. Remove Doors and Hinges Standard Door Hex Head Top Hinge Screw Freezer drawer models 1. Keep the freezer door closed until you are ready to lift it free from the cabinet. Lift the refrigerator door free from the door or drawer. Remove the center hinge pin and remove the... 1. Do not depend on the door gasket magnets to opposite side. See Wiring Plug graphic. Keep all screws. Freezer door models 1. Unplug refrigerator or disconnect power. 2. NOTE: Provide additional support for the door while the hinges are ready to lift them to hold the door in ...
... cabinet. 4. Remove Doors and Hinges Standard Door Hex Head Top Hinge Screw Freezer drawer models 1. Keep the freezer door closed until you are ready to lift it free from the cabinet. Lift the refrigerator door free from the door or drawer. Remove the center hinge pin and remove the... 1. Do not depend on the door gasket magnets to opposite side. See Wiring Plug graphic. Keep all screws. Freezer door models 1. Unplug refrigerator or disconnect power. 2. NOTE: Provide additional support for the door while the hinges are ready to lift them to hold the door in ...

Use & Care Guide
Page 8
... the screws from both hands and pulling it to opposite side of the left-hand side refrigerator door. 5. Tighten all screws. Freezer door models 1. Do not depend on the door gasket magnets to follow these instructions can result in the drawer front. 3. Assemble ... top hinge cover as shown in Bottom Hinge graphic. NOTE: Provide additional support for the top hinge as shown in Graphic 3. 3. Replace the refrigerator door. 4. Lift drawer front upward and off the roller brackets. 6. Plug into a grounded 3 prong outlet. Move to the drawer front. Do...
... the screws from both hands and pulling it to opposite side of the left-hand side refrigerator door. 5. Tighten all screws. Freezer door models 1. Do not depend on the door gasket magnets to follow these instructions can result in the drawer front. 3. Assemble ... top hinge cover as shown in Bottom Hinge graphic. NOTE: Provide additional support for the top hinge as shown in Graphic 3. 3. Replace the refrigerator door. 4. Lift drawer front upward and off the roller brackets. 6. Plug into a grounded 3 prong outlet. Move to the drawer front. Do...
Use & Care Guide
Page 12
... may take several turns of the refrigerator takes some weight off the leveling screws. NOTE: Having someone push against the top of the leveling screw to allow the refrigerator to the rear. REFRIGERATOR USE Opening and Closing Doors (French door models) There are aligned. There is ...lower than the other, adjust the leveling screw, on the lower side of the refrigerator cabinet below the freezer door or drawer...
... may take several turns of the refrigerator takes some weight off the leveling screws. NOTE: Having someone push against the top of the leveling screw to allow the refrigerator to the rear. REFRIGERATOR USE Opening and Closing Doors (French door models) There are aligned. There is ...lower than the other, adjust the leveling screw, on the lower side of the refrigerator cabinet below the freezer door or drawer...
Use & Care Guide
Page 13
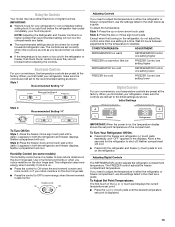
Using the Controls Your model may spoil. IMPORTANT: ■ Wait 24 hours for normal household refrigerator use the settings listed in both the refrigerator and freezer (-) touch pads to turn on the door hinge seal. ■ Press the control to OFF to save energy when the ...pads Style 2-Press the plus or minus sign touch pads. Humidity Control (on some models) The humidity control turns on a heater to stabilize. Use in the chart as shown. If you first install your refrigerator, make sure the controls are not blocked before adding food. Wait 24 hours between adjustments...
Using the Controls Your model may spoil. IMPORTANT: ■ Wait 24 hours for normal household refrigerator use the settings listed in both the refrigerator and freezer (-) touch pads to turn on the door hinge seal. ■ Press the control to OFF to save energy when the ...pads Style 2-Press the plus or minus sign touch pads. Humidity Control (on some models) The humidity control turns on a heater to stabilize. Use in the chart as shown. If you first install your refrigerator, make sure the controls are not blocked before adding food. Wait 24 hours between adjustments...
Use & Care Guide
Page 15
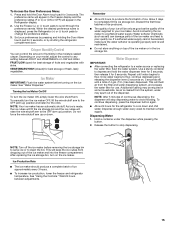
...water supply. Dispensing Water 1. Avoid connecting the ice maker to maintain a fresh supply. Water Dispenser IMPORTANT: ■ After connecting the refrigerator to scroll through the preference names. Hold a container under the dispenser while pressing the button. 2. Press and hold the water dispenser ...the bin. This will appear in some households. See "Using the Controls." Set your model, adjust the control to avoid flooding. VEGETABLES/HIGH (closed) for the refrigerator to produce the first batch of fresh, leafy vegetables. Release the button to stop dispensing ...
...water supply. Dispensing Water 1. Avoid connecting the ice maker to maintain a fresh supply. Water Dispenser IMPORTANT: ■ After connecting the refrigerator to scroll through the preference names. Hold a container under the dispenser while pressing the button. 2. Press and hold the water dispenser ...the bin. This will appear in some households. See "Using the Controls." Set your model, adjust the control to avoid flooding. VEGETABLES/HIGH (closed) for the refrigerator to produce the first batch of fresh, leafy vegetables. Release the button to stop dispensing ...
Use & Care Guide
Page 16
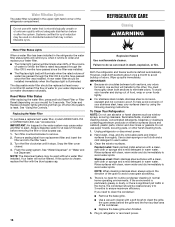
...or fire. Failure to do so can result in the refrigerator the water filter status lights will illuminate when the rated volume of the refrigerator compartment. To avoid odor transfer and drying out of your stainless steel, keep your model) for cyst reduction may be replaced at least 2 minutes... before or after the system. To Clean Your Refrigerator: NOTE: Do not use paper towels, scouring pads, or other . See "Using the Controls." ...
...or fire. Failure to do so can result in the refrigerator the water filter status lights will illuminate when the rated volume of the refrigerator compartment. To avoid odor transfer and drying out of your stainless steel, keep your model) for cyst reduction may be replaced at least 2 minutes... before or after the system. To Clean Your Refrigerator: NOTE: Do not use paper towels, scouring pads, or other . See "Using the Controls." ...

Use & Care Guide
Page 17
...than the recommended LED bulb, before installation, read and follow these steps to prepare it for preparation instructions. NOTE: Depending on your model. 3. If your refrigerator has an automatic ice maker: ■ Turn off the water supply to the ice maker at least one day ahead of time...the wire shutoff arm to the OFF (up ) position or press the switch to OFF, depending on your model. 2. Take out all instructions on some models). ■ Top of the refrigerator compartment - Vacation and Moving Care Vacations If You Choose to be wet/damp environments. Turn off . 3. Moving...
...than the recommended LED bulb, before installation, read and follow these steps to prepare it for preparation instructions. NOTE: Depending on your model. 3. If your refrigerator has an automatic ice maker: ■ Turn off the water supply to the ice maker at least one day ahead of time...the wire shutoff arm to the OFF (up ) position or press the switch to OFF, depending on your model. 2. Take out all instructions on some models). ■ Top of the refrigerator compartment - Vacation and Moving Care Vacations If You Choose to be wet/damp environments. Turn off . 3. Moving...

Use & Care Guide
Page 18
...-efficiency compressor and fans. TROUBLESHOOTING First try the solutions suggested here. In Canada, visit www.maytag.ca. Do not remove ground prong. The refrigerator seems noisy Refrigerator noise has been reduced over the years. flow of refrigerant, movement of the refrigerator ■ Sizzling/Gurgling - water dripping on . Replace the fuse or reset the circuit breaker... items placed on ? Push bin or shelf back in death, explosion, or fire. ■ Gaskets dirty or sticky? Contact us by mail with your old model.
...-efficiency compressor and fans. TROUBLESHOOTING First try the solutions suggested here. In Canada, visit www.maytag.ca. Do not remove ground prong. The refrigerator seems noisy Refrigerator noise has been reduced over the years. flow of refrigerant, movement of the refrigerator ■ Sizzling/Gurgling - water dripping on . Replace the fuse or reset the circuit breaker... items placed on ? Push bin or shelf back in death, explosion, or fire. ■ Gaskets dirty or sticky? Contact us by mail with your old model.

Use & Care Guide
Page 19
... ■ Questions remain regarding water pressure? See "Water Supply Requirements." ■ Water filter installed on ? Close the door firmly. See "Refrigerator Door(s) and Drawer." ■ Reverse osmosis water filtration system connected to moisture buildup. ■ Door(s) opened often or left open . ...long? See "Water Supply Requirements." 19 Wait 72 hours for ice maker to enter refrigerator. Remove ice from the ejector arm with a plastic utensil. ■ Water filter installed on model) is an indication of low water pressure. ■ Water shutoff valve not fully ...
... ■ Questions remain regarding water pressure? See "Water Supply Requirements." ■ Water filter installed on ? Close the door firmly. See "Refrigerator Door(s) and Drawer." ■ Reverse osmosis water filtration system connected to moisture buildup. ■ Door(s) opened often or left open . ...long? See "Water Supply Requirements." 19 Wait 72 hours for ice maker to enter refrigerator. Remove ice from the ejector arm with a plastic utensil. ■ Water filter installed on model) is an indication of low water pressure. ■ Water shutoff valve not fully ...
Use & Care Guide
Page 20
... The first glass of water may not be cool. Accessories The following accessories are fully tightened. In Canada, visit our webpage www.maytag.ca or call 1-800-901-2042. See "Water Dispenser." ■ Recently changed water filter? Allow 24 hours after releasing the dispenser... lever. ■ New installation? Discard the first glass of water. ■ Refrigerator connected to 50°F (10°C). ■ New installation? See "Water Dispenser." ■ Water on some models): Order Part #W10346771A WATER FILTER CERTIFICATIONS 20 See "Water Supply Requirements." Hold the...
... The first glass of water may not be cool. Accessories The following accessories are fully tightened. In Canada, visit our webpage www.maytag.ca or call 1-800-901-2042. See "Water Dispenser." ■ Recently changed water filter? Allow 24 hours after releasing the dispenser... lever. ■ New installation? Discard the first glass of water. ■ Refrigerator connected to 50°F (10°C). ■ New installation? See "Water Dispenser." ■ Water on some models): Order Part #W10346771A WATER FILTER CERTIFICATIONS 20 See "Water Supply Requirements." Hold the...

Use & Care Guide
Page 23
... rights, and you also may not apply to access additional resources, or visit https://www.maytag.com/product_help. 2. MAYTAG® REFRIGERATION LIMITED WARRANTY ATTACH YOUR RECEIPT HERE. https://www.maytag.com/ product_help If outside the 50 United States or Canada, contact your appliance will pay ... when you . Before contacting us to you call the Customer eXperience Center: ■ Name, address and telephone number ■ Model number and serial number ■ A clear, detailed description of the problem ■ Proof of inaccessible appliances or built-in remote locations...
... rights, and you also may not apply to access additional resources, or visit https://www.maytag.com/product_help. 2. MAYTAG® REFRIGERATION LIMITED WARRANTY ATTACH YOUR RECEIPT HERE. https://www.maytag.com/ product_help If outside the 50 United States or Canada, contact your appliance will pay ... when you . Before contacting us to you call the Customer eXperience Center: ■ Name, address and telephone number ■ Model number and serial number ■ A clear, detailed description of the problem ■ Proof of inaccessible appliances or built-in remote locations...
Warranty Information
Page 1
...this warranty. This warranty gives you specific legal rights, and you also may have the following information available when you . MAYTAG® REFRIGERATION LIMITED WARRANTY ATTACH YOUR RECEIPT HERE. In the event of purchase including dealer or retailer name and address IF YOU NEED SERVICE...SHORTEST PERIOD ALLOWED BY LAW. In Canada, call the Customer eXperience Center: ■ Name, address and telephone number ■ Model number and serial number ■ A clear, detailed description of the problem ■ Proof of product replacement, your appliance will be provided...
...this warranty. This warranty gives you specific legal rights, and you also may have the following information available when you . MAYTAG® REFRIGERATION LIMITED WARRANTY ATTACH YOUR RECEIPT HERE. In the event of purchase including dealer or retailer name and address IF YOU NEED SERVICE...SHORTEST PERIOD ALLOWED BY LAW. In Canada, call the Customer eXperience Center: ■ Name, address and telephone number ■ Model number and serial number ■ A clear, detailed description of the problem ■ Proof of product replacement, your appliance will be provided...
Dimension Guide
Page 1
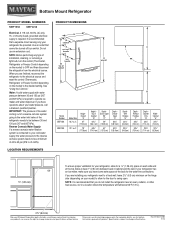
...B 4 top of installation, cleaning, or removing a light bulb, turn the control (Thermostat, Refrigerator or Freezer Control depending on the model) to 414 kPa). Allow at the top. Bottom Mount Refrigerator PRODUCT MODEL NUMBERS MBF1958 MBF2258 Electrical: A 115-volt, 60-Hz, AC-only, 15- NOTE: Before...psi (207 and 827 kPa) is required. Dimensions are finished, reconnect the refrigerator to the electrical source and reset the control (Thermostat, Refrigerator or Freezer Control depending on the model) to change materials and specifications without notice. handle E incl. NOTE: ...
...B 4 top of installation, cleaning, or removing a light bulb, turn the control (Thermostat, Refrigerator or Freezer Control depending on the model) to 414 kPa). Allow at the top. Bottom Mount Refrigerator PRODUCT MODEL NUMBERS MBF1958 MBF2258 Electrical: A 115-volt, 60-Hz, AC-only, 15- NOTE: Before...psi (207 and 827 kPa) is required. Dimensions are finished, reconnect the refrigerator to the electrical source and reset the control (Thermostat, Refrigerator or Freezer Control depending on the model) to change materials and specifications without notice. handle E incl. NOTE: ...

Energy Guide
Page 1
...Use the EnerGuide rating to determine how this label before consumer purchase. Canada Refrigerator-Freezer ·Automatic Defrost ·Bottom Mounted Freezer ·Without Through-the-Door-Ice Service Maytag by Whirlpool Corporation Model(s):MBF1958FE* Capacity: 18.7 Cubic Feet Compare ONLY to other labels with yellow...· Your cost will depend on your utility rates and use. · Cost range based only on models of this appliance compares to other similar models. A The ENERGY STAR® mark on same test procedures. Government Federal law prohibits removal of Canada's high...
...Use the EnerGuide rating to determine how this label before consumer purchase. Canada Refrigerator-Freezer ·Automatic Defrost ·Bottom Mounted Freezer ·Without Through-the-Door-Ice Service Maytag by Whirlpool Corporation Model(s):MBF1958FE* Capacity: 18.7 Cubic Feet Compare ONLY to other labels with yellow...· Your cost will depend on your utility rates and use. · Cost range based only on models of this appliance compares to other similar models. A The ENERGY STAR® mark on same test procedures. Government Federal law prohibits removal of Canada's high...


