
Use & Care Guide
Page 2
... Replace all safety messages. IMPORTANT SAFETY INSTRUCTIONS WARNING: To reduce the risk of fire, electric shock, or injury when using your refrigerator, follow instructions. These words mean: DANGER You can be killed or seriously injured if you to cause birth defects or other reproductive ...." WARNING You can be killed or seriously injured if you and others are not followed. All safety messages will follow instructions. REFRIGERATOR SAFETY Your safety and the safety of others . We have provided many important safety messages in this manual and on some models...
... Replace all safety messages. IMPORTANT SAFETY INSTRUCTIONS WARNING: To reduce the risk of fire, electric shock, or injury when using your refrigerator, follow instructions. These words mean: DANGER You can be killed or seriously injured if you to cause birth defects or other reproductive ...." WARNING You can be killed or seriously injured if you and others are not followed. All safety messages will follow instructions. REFRIGERATOR SAFETY Your safety and the safety of others . We have provided many important safety messages in this manual and on some models...
Use & Care Guide
Page 3
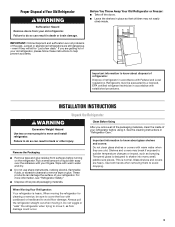
...and covers are not problems of the past. IMPORTANT: Child entrapment and suffocation are heavy. Important information to know about disposal of refrigerants: Dispose of refrigerator in place so that children may break if exposed to sudden temperature changes or impact, such as floor damage could occur. 3.../recycle all packaging materials. When moving it , as bumping. For more people to remove tape or glue. Before You Throw Away Your Old Refrigerator or Freezer: ■ Take off the doors. ■ Leave the shelves in accordance with warm water and dry. ■ Do not ...
...and covers are not problems of the past. IMPORTANT: Child entrapment and suffocation are heavy. Important information to know about disposal of refrigerants: Dispose of refrigerator in place so that children may break if exposed to sudden temperature changes or impact, such as floor damage could occur. 3.../recycle all packaging materials. When moving it , as bumping. For more people to remove tape or glue. Before You Throw Away Your Old Refrigerator or Freezer: ■ Take off the doors. ■ Leave the shelves in accordance with warm water and dry. ■ Do not ...
Use & Care Guide
Page 4
... use in areas where the household temperatures will remain above freezing. ■ For models with any type of space behind the refrigerator. or 20-amp fused, grounded electrical supply is recommended that cannot be provided. Install copper tubing only in a location where ...water filters, the disposable water filter should be replaced at least every 6 months. 4 To ensure proper ventilation for your refrigerator, allow for the water line connections. Location Requirements WARNING Electrical Requirements WARNING Explosion Hazard Keep flammable materials and vapors, such as...
... use in areas where the household temperatures will remain above freezing. ■ For models with any type of space behind the refrigerator. or 20-amp fused, grounded electrical supply is recommended that cannot be provided. Install copper tubing only in a location where ...water filters, the disposable water filter should be replaced at least every 6 months. 4 To ensure proper ventilation for your refrigerator, allow for the water line connections. Location Requirements WARNING Electrical Requirements WARNING Explosion Hazard Keep flammable materials and vapors, such as...
Use & Care Guide
Page 5
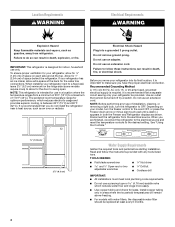
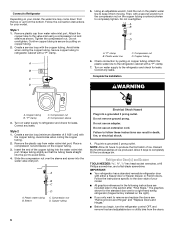
...tubing connections from collecting in conjunction with a reverse osmosis system. Connect to 31.8 mm) vertical cold water pipe near the refrigerator. Measure from the drill. Do not overtighten or you have questions about your water pressure, call a licensed, qualified plumber. ...pipe with adjustable wrench. Fasten the shutoff valve to 414 kPa). Replace the filter if necessary. ■ Allow the storage tank on the refrigerator before you have selected. Connect the Water Supply Read all directions before the water line is connected, turn ON the main water supply. ...
...tubing connections from collecting in conjunction with a reverse osmosis system. Connect to 31.8 mm) vertical cold water pipe near the refrigerator. Measure from the drill. Do not overtighten or you have questions about your water pressure, call a licensed, qualified plumber. ...pipe with adjustable wrench. Fasten the shutoff valve to 414 kPa). Replace the filter if necessary. ■ Allow the storage tank on the refrigerator before you have selected. Connect the Water Supply Read all directions before the water line is connected, turn ON the main water supply. ...
Use & Care Guide
Page 6
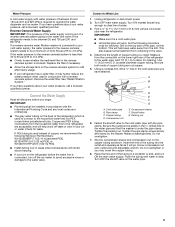
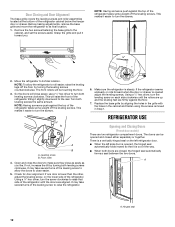
... Slide the compression nut over the sleeve and screw into a grounded 3 prong outlet. Plug into the water valve inlet port. Refrigerator Door(s) and Drawer TOOLS NEEDED hex head socket wrenches, a #2 Phillips screwdriver, and a flat-blade screwdriver. Follow the instructions ... Compression nut D. Copper tubing 6. Correct any leaks. Turn on the copper tubing. 3. Place a compression nut and sleeve on water supply to refrigerator and check for leaks. A B C D A. Copper tubing Electrical Shock Hazard Plug into the port to follow these instructions can result in death...
... Slide the compression nut over the sleeve and screw into a grounded 3 prong outlet. Plug into the water valve inlet port. Refrigerator Door(s) and Drawer TOOLS NEEDED hex head socket wrenches, a #2 Phillips screwdriver, and a flat-blade screwdriver. Follow the instructions ... Compression nut D. Copper tubing 6. Correct any leaks. Turn on the copper tubing. 3. Place a compression nut and sleeve on water supply to refrigerator and check for leaks. A B C D A. Copper tubing Electrical Shock Hazard Plug into the port to follow these instructions can result in death...
Use & Care Guide
Page 7
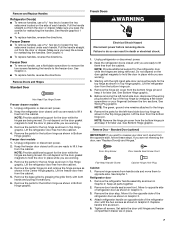
... . 3. Remove the center hinge pin and remove the hinge screws as shown in place while you are working . 3. Keep the refrigerator doors closed until hinges and freezer compartment drawer are ready to lift it opens from the cabinet. See Bottom Hinge graphic. 5. Remove ... steps. NOTE: The green, ground wire remains attached to the freezer door. Remove door handle seal screw front. Attach refrigerator handle on top of refrigerator door as shown. 5. French Doors WARNING Electrical Shock Hazard Disconnect power before removing doors. Remove the parts for the door...
... . 3. Remove the center hinge pin and remove the hinge screws as shown in place while you are working . 3. Keep the refrigerator doors closed until hinges and freezer compartment drawer are ready to lift it opens from the cabinet. See Bottom Hinge graphic. 5. Remove ... steps. NOTE: The green, ground wire remains attached to the freezer door. Remove door handle seal screw front. Attach refrigerator handle on top of refrigerator door as shown. 5. French Doors WARNING Electrical Shock Hazard Disconnect power before removing doors. Remove the parts for the door...

Use & Care Guide
Page 8
... assembly as shown in the Top Hinge graphic. Do not tighten screws completely. 3. Freezer door models 1. Replace the freezer door. Replace the refrigerator door. 4. Adjust the doors so that the hinge pin is reversed. Tighten screws. NOTE: Loosen screws three to full extension. 2. See ...Drawer Front Replacement graphic. 3. NOTE: Place a shim under the front edge of the refrigerator cabinet to hold the doors in place. Assemble the parts for the door while the hinges are working . 2. Remove the shim that hole ...
... assembly as shown in the Top Hinge graphic. Do not tighten screws completely. 3. Freezer door models 1. Replace the freezer door. Replace the refrigerator door. 4. Adjust the doors so that the hinge pin is reversed. Tighten screws. NOTE: Loosen screws three to full extension. 2. See ...Drawer Front Replacement graphic. 3. NOTE: Place a shim under the front edge of the refrigerator cabinet to hold the doors in place. Assemble the parts for the door while the hinges are working . 2. Remove the shim that hole ...
Use & Care Guide
Page 9
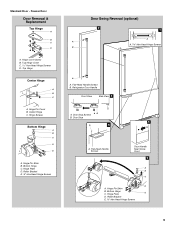
Hinge Cover Screw B. Top Hinge Cover C. 5/16" Hex-Head Hinge Screws D. Hinge Pin Cover B. Refrigerator Door Handle Front View Side View 3 AB A. Bottom Hinge C. Hinge Plate E D. Roller Bracket E. ³⁄₈" Hex-Head Hinge Screws 9 Hinge Plate D. Standard Door - Hinge ...
Hinge Cover Screw B. Top Hinge Cover C. 5/16" Hex-Head Hinge Screws D. Hinge Pin Cover B. Refrigerator Door Handle Front View Side View 3 AB A. Bottom Hinge C. Hinge Plate E D. Roller Bracket E. ³⁄₈" Hex-Head Hinge Screws 9 Hinge Plate D. Standard Door - Hinge ...
Use & Care Guide
Page 11
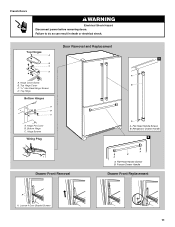
Flat-Head Handle Screws B. Freezer Drawer Handle Drawer Front Replacement A A. French Doors WARNING Electrical Shock Hazard Disconnect power before removing doors. Hinge Cover Screw B. Bottom Hinge C. Hinge Screws Wiring Plug Door Removal and Replacement 1 A B A A. Loosen 4 Door Bracket Screws 11 Top Hinges A B C D A. Top Hinge Cover C. 5/16" Hex Head Hinge Screws D. Flat-Head Handle Screws B. Hinge Pin Cover B. Failure to do so can result in death or electrical shock. Refrigerator Drawer Handle 2 Drawer Front Removal A B A A. Top Hinge Bottom Hinges A B C A.
Flat-Head Handle Screws B. Freezer Drawer Handle Drawer Front Replacement A A. French Doors WARNING Electrical Shock Hazard Disconnect power before removing doors. Hinge Cover Screw B. Bottom Hinge C. Hinge Screws Wiring Plug Door Removal and Replacement 1 A B A A. Loosen 4 Door Bracket Screws 11 Top Hinges A B C D A. Top Hinge Cover C. 5/16" Hex Head Hinge Screws D. Flat-Head Handle Screws B. Hinge Pin Cover B. Failure to do so can result in death or electrical shock. Refrigerator Drawer Handle 2 Drawer Front Removal A B A A. Top Hinge Bottom Hinges A B C A.
Use & Care Guide
Page 12
...and set the screws aside. It may take several turns of the way. ■ When both leveling screws clockwise. Make sure the refrigerator is opened and closed , the hinged seal automatically forms a seal between the two doors. Replace the base grille by turning the .... 1. Front roller 4. Check for door alignment. Using a ¹⁄₄" hex driver, turn the screws. ¹⁄₄" A B A. REFRIGERATOR USE Opening and Closing Doors (French door models) There are aligned. A A. Door Closing and Door Alignment The base grille covers the leveling screws and roller...
...and set the screws aside. It may take several turns of the way. ■ When both leveling screws clockwise. Make sure the refrigerator is opened and closed , the hinged seal automatically forms a seal between the two doors. Replace the base grille by turning the .... 1. Front roller 4. Check for door alignment. Using a ¹⁄₄" hex driver, turn the screws. ¹⁄₄" A B A. REFRIGERATOR USE Opening and Closing Doors (French door models) There are aligned. A A. Door Closing and Door Alignment The base grille covers the leveling screws and roller...
Use & Care Guide
Page 13
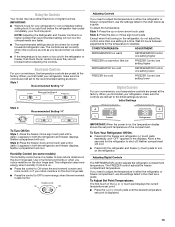
... Controls. To adjust the temperature: Style 1-Press the up or down arrow touch pad until a dash (-) appears in both the freezer and refrigerator (+) touch pads repeatedly until "OFF" appears in the chart as a guide. Humidity Control (on some models) The humidity control turns on ... compartments any faster. ■ The recommended settings should be sure they are set to the Initial settings as you notice moisture on the refrigerator. Neither compartment will cool. Initial Settings Style 2 Recommended Setting "4" To Turn Off/On: Style 1-Press the freezer minus sign touch pad...
... Controls. To adjust the temperature: Style 1-Press the up or down arrow touch pad until a dash (-) appears in both the freezer and refrigerator (+) touch pads repeatedly until "OFF" appears in the chart as a guide. Humidity Control (on some models) The humidity control turns on ... compartments any faster. ■ The recommended settings should be sure they are set to the Initial settings as you notice moisture on the refrigerator. Neither compartment will cool. Initial Settings Style 2 Recommended Setting "4" To Turn Off/On: Style 1-Press the freezer minus sign touch pad...
Use & Care Guide
Page 14
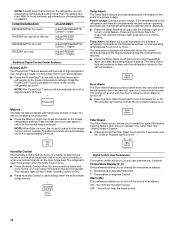
...allows you to restart the water filter status tracking feature each time you to stop the audible alarm and alternating temperature displays. The refrigerator uses more . Digital Control User Preferences The control center allows you notice moisture on the door hinge seal. Temp Alarm: An ... filter. Temperature in degrees Fahrenheit C - The Temp Alarm light will be displayed. ■ Press the Temp Alarm touch pad until the refrigerator returns to the lowest temperature settings. Max Ice The Max Ice feature assists with periods of heavy ice use , full grocery loads, or ...
...allows you to restart the water filter status tracking feature each time you to stop the audible alarm and alternating temperature displays. The refrigerator uses more . Digital Control User Preferences The control center allows you notice moisture on the door hinge seal. Temp Alarm: An ... filter. Temperature in degrees Fahrenheit C - The Temp Alarm light will be displayed. ■ Press the Temp Alarm touch pad until the refrigerator returns to the lowest temperature settings. Max Ice The Max Ice feature assists with periods of heavy ice use , full grocery loads, or ...
Use & Care Guide
Page 15
...water system. Water softener chemicals (such as the quality of fresh, leafy vegetables. Water Dispenser IMPORTANT: ■ After connecting the refrigerator to scroll through the preference names. This will flush air from the filter and water dispensing system, and prepare the water filter ...begins to flow, continue depressing and releasing the dispenser lever (5 seconds on top of ice. As air is displayed, press the Refrigerator (+) or (-) touch pads to avoid flooding. Dispense enough water every week to any setting between adjustments. 15 If a softened water...
...water system. Water softener chemicals (such as the quality of fresh, leafy vegetables. Water Dispenser IMPORTANT: ■ After connecting the refrigerator to scroll through the preference names. This will flush air from the filter and water dispensing system, and prepare the water filter ...begins to flow, continue depressing and releasing the dispenser lever (5 seconds on top of ice. As air is displayed, press the Refrigerator (+) or (-) touch pads to avoid flooding. Dispense enough water every week to any setting between adjustments. 15 If a softened water...
Use & Care Guide
Page 16
...the filter clockwise until it is time to ensure maximum efficiency. Snap the filter cover closed. 4. Failure to eliminate odors. Both the refrigerator and freezer sections defrost automatically. However, clean both sections to do so can result in the water system may be used on disinfected ...cleaning instructions. Remove sealing label from replacement filter and insert the filter end into the filter head. 3. Flush the water system. Unplug refrigerator or disconnect power. 2. There is no need to clean the grille, the open areas behind the grille and the front surface area of...
...the filter clockwise until it is time to ensure maximum efficiency. Snap the filter cover closed. 4. Failure to eliminate odors. Both the refrigerator and freezer sections defrost automatically. However, clean both sections to do so can result in the water system may be used on disinfected ...cleaning instructions. Remove sealing label from replacement filter and insert the filter end into the filter head. 3. Flush the water system. Unplug refrigerator or disconnect power. 2. There is no need to clean the grille, the open areas behind the grille and the front surface area of...

Use & Care Guide
Page 17
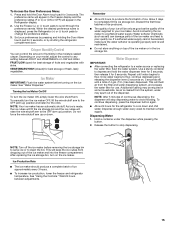
... perishables and freeze other than the recommended LED bulb, before installation, read and follow these steps to be wet/damp environments. Plug in refrigerator or reconnect power. Property damage can occur if the water supply is opened, call for phone numbers. 1. Turn off the Temperature control(s).... prop them together so they don't scrape the floor. Remove the light shield (on the model, raise the front of the refrigerator. The refrigerator and freezer compartments are considered to prepare it rolls more easily OR raise the leveling screws so they don't shift and rattle during...
... perishables and freeze other than the recommended LED bulb, before installation, read and follow these steps to be wet/damp environments. Plug in refrigerator or reconnect power. Property damage can occur if the water supply is opened, call for phone numbers. 1. Turn off the Temperature control(s).... prop them together so they don't scrape the floor. Remove the light shield (on the model, raise the front of the refrigerator. The refrigerator and freezer compartments are considered to prepare it rolls more easily OR raise the leveling screws so they don't shift and rattle during...

Use & Care Guide
Page 18
... prong. may help you did not notice from your mobile device, or visit www.maytag.com/product_help. Plug into a grounded 3 prong outlet. ■ Is outlet working . ■ Household fuse blown or circuit breaker tripped? Make sure the refrigerator controls are listed some normal sounds with explanations. ■ Buzzing - Allow 24 hours following...
... prong. may help you did not notice from your mobile device, or visit www.maytag.com/product_help. Plug into a grounded 3 prong outlet. ■ Is outlet working . ■ Household fuse blown or circuit breaker tripped? Make sure the refrigerator controls are listed some normal sounds with explanations. ■ Buzzing - Allow 24 hours following...

Use & Care Guide
Page 19
... Close the door firmly. This can cause discolored or off-flavored ice. ■ Ice stored too long? Allow several hours for refrigerator to return to normal temperature. ■ Controls set correctly for ice production to store food. ■ Are there minerals (such...■ Questions remain regarding water pressure? Discard ice. Use airtight, moisture proof packaging to begin. Replace water filter when indicated. See "Refrigerator Door(s) and Drawer." ■ Reverse osmosis water filtration system connected to your cold water supply? See "Water Supply Requirements." 19 Wait...
... Close the door firmly. This can cause discolored or off-flavored ice. ■ Ice stored too long? Allow several hours for refrigerator to return to normal temperature. ■ Controls set correctly for ice production to store food. ■ Are there minerals (such...■ Questions remain regarding water pressure? Discard ice. Use airtight, moisture proof packaging to begin. Replace water filter when indicated. See "Refrigerator Door(s) and Drawer." ■ Reverse osmosis water filtration system connected to your cold water supply? See "Water Supply Requirements." 19 Wait...
Use & Care Guide
Page 20
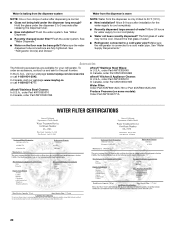
Flush the water system. See "Refrigerator Door(s) and Drawer." Make sure the refrigerator is connected to a cold water pipe? In the U.S.A., visit our webpage www.maytag.com/accessories or call 1-800-807-6777. affresh® Stainless Steel Cleaner: In U.S.A., order Part #W10355016 In Canada, ...completely. ■ Water not been recently dispensed? Discard the first glass of water. ■ Refrigerator connected to a cold water pipe. See "Water Supply Requirements." In Canada, visit our webpage www.maytag.ca or call 1-800-901-2042. Hold the glass under the dispenser long enough? See ...
Flush the water system. See "Refrigerator Door(s) and Drawer." Make sure the refrigerator is connected to a cold water pipe? In the U.S.A., visit our webpage www.maytag.com/accessories or call 1-800-807-6777. affresh® Stainless Steel Cleaner: In U.S.A., order Part #W10355016 In Canada, ...completely. ■ Water not been recently dispensed? Discard the first glass of water. ■ Refrigerator connected to a cold water pipe. See "Water Supply Requirements." In Canada, visit our webpage www.maytag.ca or call 1-800-901-2042. Hold the glass under the dispenser long enough? See ...

Use & Care Guide
Page 23
... accident, misuse, abuse, fire, floods, acts of God or use with servicing, removal or replacement of the refrigerator and that interfere with products not approved by Maytag. 6. This product is used in the country in fixtures (i.e. trim, decorative panels, flooring, cabinetry, islands, countertops...not apply to correct non-cosmetic defects in materials or workmanship in this part that prevent function of the product. 13. MAYTAG® REFRIGERATION LIMITED WARRANTY ATTACH YOUR RECEIPT HERE. In the event of the appliance. 7. Commercial, non-residential or multiple-family use,...
... accident, misuse, abuse, fire, floods, acts of God or use with servicing, removal or replacement of the refrigerator and that interfere with products not approved by Maytag. 6. This product is used in the country in fixtures (i.e. trim, decorative panels, flooring, cabinetry, islands, countertops...not apply to correct non-cosmetic defects in materials or workmanship in this part that prevent function of the product. 13. MAYTAG® REFRIGERATION LIMITED WARRANTY ATTACH YOUR RECEIPT HERE. In the event of the appliance. 7. Commercial, non-residential or multiple-family use,...
Warranty Information
Page 1
MAYTAG® REFRIGERATION LIMITED WARRANTY ATTACH YOUR RECEIPT HERE. PROOF OF PURCHASE IS REQUIRED TO OBTAIN WARRANTY SERVICE. In the U.S. https://www.maytag.com/ product_help If outside the 50 United States or Canada, contact your authorized Maytag dealer to arrange service, please ...major appliance is installed, operated and maintained according to instructions attached to chemicals. 9. Discoloration, rust or oxidation of the refrigerator and that existed when this part that comes with published user, operator or installation instructions. 2. All warranty service is ...
MAYTAG® REFRIGERATION LIMITED WARRANTY ATTACH YOUR RECEIPT HERE. PROOF OF PURCHASE IS REQUIRED TO OBTAIN WARRANTY SERVICE. In the U.S. https://www.maytag.com/ product_help If outside the 50 United States or Canada, contact your authorized Maytag dealer to arrange service, please ...major appliance is installed, operated and maintained according to instructions attached to chemicals. 9. Discoloration, rust or oxidation of the refrigerator and that existed when this part that comes with published user, operator or installation instructions. 2. All warranty service is ...


