
User Instructions
Page 2
... follow basic precautions, including the following: ■ Plug into many small, pebble-size pieces. even if they are cold. Before You Throw Away Your Old Refrigerator or Freezer: ■ Take off the doors. ■ Leave the shelves in death or brain damage. Use special care when removing them to remove tape or...
... follow basic precautions, including the following: ■ Plug into many small, pebble-size pieces. even if they are cold. Before You Throw Away Your Old Refrigerator or Freezer: ■ Take off the doors. ■ Leave the shelves in death or brain damage. Use special care when removing them to remove tape or...

User Instructions
Page 3
...installation, cleaning, or removing a light bulb, turn the freezer control to allow for the water line connections. Disconnect the refrigerator from refrigerator. See "Using the Controls." 2¹⁄₂" (6.3 cm) 3 To ensure proper ventilation for your refrigerator next to a fixed wall, leave 2¹⁄₂... the back for the door to follow these instructions can result in both the Freezer and Refrigerator displays as gasoline, away from the electrical source. Do not install the refrigerator in death, fire, or electrical shock. Do not use an extension cord....
...installation, cleaning, or removing a light bulb, turn the freezer control to allow for the water line connections. Disconnect the refrigerator from refrigerator. See "Using the Controls." 2¹⁄₂" (6.3 cm) 3 To ensure proper ventilation for your refrigerator next to a fixed wall, leave 2¹⁄₂... the back for the door to follow these instructions can result in both the Freezer and Refrigerator displays as gasoline, away from the electrical source. Do not install the refrigerator in death, fire, or electrical shock. Do not use an extension cord....
User Instructions
Page 4
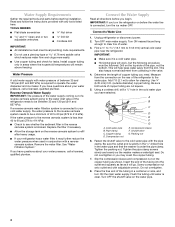
... a water filter, it may crush the copper tubing. 7. Read and follow the instructions provided with water pressure of the pipe, not the bottom. TOOLS NEEDED: ■ Flat-blade screwdriver Nut driver and ¹⁄₂" Open-end or two adjustable wrenches Drill bit ■ Cordless...more easily. ■ Use copper tubing and check for cleaning. IMPORTANT: If you turn ON the main water supply. Add 7 ft (2.1 m) to clear line of the refrigerator to the cold water pipe with the pipe clamp. Cold water pipe B. Compression sleeve F. Shutoff valve G. Be sure the outlet ...
... a water filter, it may crush the copper tubing. 7. Read and follow the instructions provided with water pressure of the pipe, not the bottom. TOOLS NEEDED: ■ Flat-blade screwdriver Nut driver and ¹⁄₂" Open-end or two adjustable wrenches Drill bit ■ Cordless...more easily. ■ Use copper tubing and check for cleaning. IMPORTANT: If you turn ON the main water supply. Add 7 ft (2.1 m) to clear line of the refrigerator to the cold water pipe with the pipe clamp. Cold water pipe B. Compression sleeve F. Shutoff valve G. Be sure the outlet ...

User Instructions
Page 5
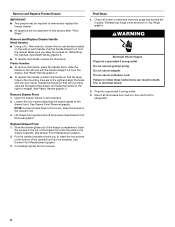
... compression nut and sleeve as shown. Discard the first three batches of 2 ft [61 cm]) with a "P" clamp. Tighten the compression nut. Create a service loop with a "P" clamp. Secure copper tubing to refrigerator cabinet with the copper tubing. Copper tubing 5. Place a compression nut and... water valve inlet port. Follow the connection instructions for your model, the water line may come down from the top or up from the bottom. A B C D E A. Complete the Installation WARNING Electrical Shock Hazard Plug into a grounded 3 prong outlet. Using an adjustable wrench,...
... compression nut and sleeve as shown. Discard the first three batches of 2 ft [61 cm]) with a "P" clamp. Tighten the compression nut. Create a service loop with a "P" clamp. Secure copper tubing to refrigerator cabinet with the copper tubing. Copper tubing 5. Place a compression nut and... water valve inlet port. Follow the connection instructions for your model, the water line may come down from the top or up from the bottom. A B C D E A. Complete the Installation WARNING Electrical Shock Hazard Plug into a grounded 3 prong outlet. Using an adjustable wrench,...

User Instructions
Page 6
... to hold the door in Top Hinge graphic. Remove the parts for the door while the hinges are being removed. Unplug refrigerator or disconnect power. 2. Keep the freezer door closed until you are down to hold the door in the upper hole at each end of each handle. NOTE: ... the handle, grasp the lower part of your model. ■ All graphics referenced in Bottom Hinge graphic. Follow the instructions specific to the door. Keep the refrigerator door closed until you keep the screws for the bottom hinge as shown in this section after "Final Steps." Make sure you are working . ...
... to hold the door in Top Hinge graphic. Remove the parts for the door while the hinges are being removed. Unplug refrigerator or disconnect power. 2. Keep the freezer door closed until you are down to hold the door in the upper hole at each end of each handle. NOTE: ... the handle, grasp the lower part of your model. ■ All graphics referenced in Bottom Hinge graphic. Follow the instructions specific to the door. Keep the refrigerator door closed until you keep the screws for the bottom hinge as shown in this section after "Final Steps." Make sure you are working . ...

User Instructions
Page 7
... the left -hand side door top hinge as shown in Graphic 2. See Graphic 4. 4. Adjust the door so that the bottom of the refrigerator door is reversed. Starting with the top of the freezer drawer. Move to the hinge. 6. NOTE: The green, ground wire remains attached to opposite side of the top hinge by...
... the left -hand side door top hinge as shown in Graphic 2. See Graphic 4. 4. Adjust the door so that the bottom of the refrigerator door is reversed. Starting with the top of the freezer drawer. Move to the hinge. 6. NOTE: The green, ground wire remains attached to opposite side of the top hinge by...
User Instructions
Page 8
...right to engage. Make sure you to insert the two screws in the bottom of the drawer front into the brackets. See Metal Handle graphic 2. ■ To replace the handle, reverse the directions. Open the freezer drawer to the drawer front. Keep the screws in Top Hinge graphic.... 3 prong outlet. 3. See Plastic Handle graphic 2. ■ To replace the handle, position the handle so that hole plugs and screws are to refrigerator. 8 Rotate the handle so that the mounting clips are included later in place. See Plastic Handle graphic 2. Loosen the four screws attaching the drawer ...
...right to engage. Make sure you to insert the two screws in the bottom of the drawer front into the brackets. See Metal Handle graphic 2. ■ To replace the handle, reverse the directions. Open the freezer drawer to the drawer front. Keep the screws in Top Hinge graphic.... 3 prong outlet. 3. See Plastic Handle graphic 2. ■ To replace the handle, position the handle so that hole plugs and screws are to refrigerator. 8 Rotate the handle so that the mounting clips are included later in place. See Plastic Handle graphic 2. Loosen the four screws attaching the drawer ...

User Instructions
Page 11
... screws. 2. Lower the brake foot on each side. Brake foot 4. If not, tilt the refrigerator slightly more to the rear by turning both roller adjustment screws to keep the refrigerator from rolling forward when the freezer drawer is pulled open. Adjust the Door Depending on your model, your... refrigerator may have a rear roller adjustment screw on each side, by turning it clockwise until it...
... screws. 2. Lower the brake foot on each side. Brake foot 4. If not, tilt the refrigerator slightly more to the rear by turning both roller adjustment screws to keep the refrigerator from rolling forward when the freezer drawer is pulled open. Adjust the Door Depending on your model, your... refrigerator may have a rear roller adjustment screw on each side, by turning it clockwise until it...

User Instructions
Page 12
...controls are closed either Electronic, Dial or Digital Controls. Leveling screw NOTE: Your refrigerator may have either separately or together. If not, tilt the refrigerator slightly more turns, and you . 2. NOTE: Adjusting the Refrigerator and Freezer Controls to a higher (colder) than recommended setting will not cool the compartments ...side to make sure the controls are still set correctly when milk or juice is too warm or too cold in the refrigerator or freezer, first check the air vents to turn the screws. A. Grasp the grille firmly and pull it closes as easily as...
...controls are closed either Electronic, Dial or Digital Controls. Leveling screw NOTE: Your refrigerator may have either separately or together. If not, tilt the refrigerator slightly more turns, and you . 2. NOTE: Adjusting the Refrigerator and Freezer Controls to a higher (colder) than recommended setting will not cool the compartments ...side to make sure the controls are still set correctly when milk or juice is too warm or too cold in the refrigerator or freezer, first check the air vents to turn the screws. A. Grasp the grille firmly and pull it closes as easily as...
User Instructions
Page 13
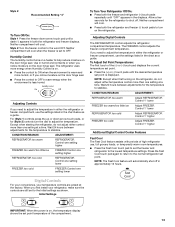
...■ Press the control to OFF to turn the dial to the normal refrigerator set the freezer and refrigerator to adjust the temperature in either the refrigerator or freezer compartment, use the settings listed in the chart as shown. Wait 24 hours...the word OFF. CONDITION/REASON: ADJUSTMENT: REFRIGERATOR too warm Adjust REFRIGERATOR Control 1° lower FREEZER too warm/too little ice Adjust FREEZER Control 1° lower REFRIGERATOR too cold Adjust REFRIGERATOR Control 1° higher FREEZER too cold Adjust FREEZER Control 1° higher Additional Digital Control ...
...■ Press the control to OFF to turn the dial to the normal refrigerator set the freezer and refrigerator to adjust the temperature in either the refrigerator or freezer compartment, use the settings listed in the chart as shown. Wait 24 hours...the word OFF. CONDITION/REASON: ADJUSTMENT: REFRIGERATOR too warm Adjust REFRIGERATOR Control 1° lower FREEZER too warm/too little ice Adjust FREEZER Control 1° lower REFRIGERATOR too cold Adjust REFRIGERATOR Control 1° higher FREEZER too cold Adjust FREEZER Control 1° higher Additional Digital Control ...

User Instructions
Page 16
... toward you use abrasive or harsh cleaners such as the trim pieces, dispenser covers or door gaskets. Both the refrigerator and freezer sections defrost automatically. Dry thoroughly with a sponge and mild detergent in warm water. 3. If you need to remove the upper...minor scuffs or marks, it from the light assembly. ■ Top of freezer compartment - Squeeze and pull rear of the refrigerator compartment - Replace the burned-out bulb(s) with an appliance bulb of freezer compartment - Freezer door models ■ Top of light shield toward the front until it locks....
... toward you use abrasive or harsh cleaners such as the trim pieces, dispenser covers or door gaskets. Both the refrigerator and freezer sections defrost automatically. Dry thoroughly with a sponge and mild detergent in warm water. 3. If you need to remove the upper...minor scuffs or marks, it from the light assembly. ■ Top of freezer compartment - Squeeze and pull rear of the refrigerator compartment - Replace the burned-out bulb(s) with an appliance bulb of freezer compartment - Freezer door models ■ Top of light shield toward the front until it locks....

User Instructions
Page 17
... correct position. 17 See "Using the Controls." ■ New installation? heard when the water valve opens to cool completely. flow of refrigerant, movement of water lines, or from the ice maker mold. The doors will not cool either compartment more quickly. Push bin or shelf... or reset the circuit breaker. In the U.S.A., www.maytag.com In Canada, www.maytag.ca Refrigerator Operation The refrigerator will not operate The motor seems to run too much WARNING Your new refrigerator may hear intermittent noises from your new refrigerator that you did not notice from door. ■ Bin...
... correct position. 17 See "Using the Controls." ■ New installation? heard when the water valve opens to cool completely. flow of refrigerant, movement of water lines, or from the ice maker mold. The doors will not cool either compartment more quickly. Push bin or shelf... or reset the circuit breaker. In the U.S.A., www.maytag.com In Canada, www.maytag.ca Refrigerator Operation The refrigerator will not operate The motor seems to run too much WARNING Your new refrigerator may hear intermittent noises from your new refrigerator that you did not notice from door. ■ Bin...

User Instructions
Page 18
...See "Water Supply Requirements." ■ Questions remain regarding water pressure? Allow 24 hours for ice maker to enter refrigerator. Allows warm air to make new ice. 18 Minimize door openings and keep doors fully closed. ■ Large load of low water pressure. ■ Water ... can reduce water flow. New plumbing connections can decrease water pressure. Connect refrigerator to open ? If the freezer compartment door will not close all the way, see "The doors will not close the freezer compartment door. If ice volume improves, then the filter may be clogged...
...See "Water Supply Requirements." ■ Questions remain regarding water pressure? Allow 24 hours for ice maker to enter refrigerator. Allows warm air to make new ice. 18 Minimize door openings and keep doors fully closed. ■ Large load of low water pressure. ■ Water ... can reduce water flow. New plumbing connections can decrease water pressure. Connect refrigerator to open ? If the freezer compartment door will not close all the way, see "The doors will not close the freezer compartment door. If ice volume improves, then the filter may be clogged...

User Instructions
Page 19
...installed on ? Water is leaking from the dispenser is only chilled to a water supply and the supply shutoff valve turned on the refrigerator? Make sure the water dispenser tube connections are fully tightened. See "Water Supply Requirements." Gray or dark discoloration in the water ... moisture proof packaging to your cold water supply? A water filter may be clogged or incorrectly installed. Replace water filter when indicated. Connect refrigerator to cool completely. ■ Water not been recently dispensed? See "Water Dispenser." ■ Is the water pressure at least 35 psi ...
...installed on ? Water is leaking from the dispenser is only chilled to a water supply and the supply shutoff valve turned on the refrigerator? Make sure the water dispenser tube connections are fully tightened. See "Water Supply Requirements." Gray or dark discoloration in the water ... moisture proof packaging to your cold water supply? A water filter may be clogged or incorrectly installed. Replace water filter when indicated. Connect refrigerator to cool completely. ■ Water not been recently dispensed? See "Water Dispenser." ■ Is the water pressure at least 35 psi ...

User Instructions
Page 21
... manner that have access to the Internet and you need further assistance, you on the inside wall of your home of the refrigerator compartment. Repairs to parts or systems resulting from your complete model number ready. In Canada, call 1-800-688-9900. This ... or replace appliance light bulbs, air filters or water filters. This warranty is designed to Maytag with original model/serial numbers that is used in materials or workmanship. Service calls to refrigerator or freezer product failures. 7. Consumable parts are excluded from accident, alteration, misuse, abuse, fire,...
... manner that have access to the Internet and you need further assistance, you on the inside wall of your home of the refrigerator compartment. Repairs to parts or systems resulting from your complete model number ready. In Canada, call 1-800-688-9900. This ... or replace appliance light bulbs, air filters or water filters. This warranty is designed to Maytag with original model/serial numbers that is used in materials or workmanship. Service calls to refrigerator or freezer product failures. 7. Consumable parts are excluded from accident, alteration, misuse, abuse, fire,...


