
User Instructions
Page 2
... You Throw Away Your Old Refrigerator or Freezer: ■ Take off the doors. ■ Leave the shelves in "Refrigerator Care." When Moving Your Refrigerator: Your refrigerator is normal. Clean Before Using After you are not problems of /recycle all packaging materials. SAVE THESE INSTRUCTIONS Proper Disposal of Your Old Refrigerator WARNING Suffocation Hazard Remove doors from...
... You Throw Away Your Old Refrigerator or Freezer: ■ Take off the doors. ■ Leave the shelves in "Refrigerator Care." When Moving Your Refrigerator: Your refrigerator is normal. Clean Before Using After you are not problems of /recycle all packaging materials. SAVE THESE INSTRUCTIONS Proper Disposal of Your Old Refrigerator WARNING Suffocation Hazard Remove doors from...

User Instructions
Page 3
... removing a light bulb, turn the freezer control to the word OFF, or press the Freezer down arrow touch pad until a dash (-) appears in death, fire, or electrical shock. NOTE: It is important to the desired setting. It is required. Disconnect the refrigerator from refrigerator. Do not remove ground prong. Read... the electrical source and reset the temperature controls to make sure you do so can result in both the Freezer and Refrigerator displays as gasoline, away from the electrical source. To ensure proper ventilation for the door to OFF. Do not use a piercing-...
... removing a light bulb, turn the freezer control to the word OFF, or press the Freezer down arrow touch pad until a dash (-) appears in death, fire, or electrical shock. NOTE: It is important to the desired setting. It is required. Disconnect the refrigerator from refrigerator. Do not remove ground prong. Read... the electrical source and reset the temperature controls to make sure you do so can result in both the Freezer and Refrigerator displays as gasoline, away from the electrical source. To ensure proper ventilation for the door to OFF. Do not use a piercing-...

User Instructions
Page 4
... to be a minimum of 40 to 60 psi (276 to 414 kPa). IMPORTANT: If you turn the refrigerator on the top side of between 35 and 120 psi (241 and 827 kPa). Add 7 ft (2.1 m) to the valve inlet using a compression nut and sleeve as shown. Using a cordless drill, drill a ¹&#...8260;₄" hole in the reverse osmosis system is connected to your refrigerator has a water filter, it will help keep water away from ...
... to be a minimum of 40 to 60 psi (276 to 414 kPa). IMPORTANT: If you turn the refrigerator on the top side of between 35 and 120 psi (241 and 827 kPa). Add 7 ft (2.1 m) to the valve inlet using a compression nut and sleeve as shown. Using a cordless drill, drill a ¹&#...8260;₄" hole in the reverse osmosis system is connected to your refrigerator has a water filter, it will help keep water away from ...

User Instructions
Page 5
...batches of ice. The graphics shown for reattaching the handles. Using a flat-blade screw driver wrapped in the handle with either a freezer door or freezer drawer, or French doors (Style 2). Side Mount Handle ■ To remove the handle, remove the four screws attaching the handle ...the lower part of the handle. Do not remove ground prong. Failure to the door style of 2 ft [61 cm]) with a "P" clamp. Pull the handle straight out from the door. Sleeve D. Refrigerator Door(s) and Drawer TOOLS NEEDED hex-head socket wrench, a #2 Phillips screwdriver, and a flat-blade ...
...batches of ice. The graphics shown for reattaching the handles. Using a flat-blade screw driver wrapped in the handle with either a freezer door or freezer drawer, or French doors (Style 2). Side Mount Handle ■ To remove the handle, remove the four screws attaching the handle ...the lower part of the handle. Do not remove ground prong. Failure to the door style of 2 ft [61 cm]) with a "P" clamp. Pull the handle straight out from the door. Sleeve D. Refrigerator Door(s) and Drawer TOOLS NEEDED hex-head socket wrench, a #2 Phillips screwdriver, and a flat-blade ...

User Instructions
Page 6
...WARNING Electrical Shock Hazard Disconnect power before removing doors. Keep the refrigerator doors closed until you are not reversing the door, see "Replace Door and Hinges." Do not depend on top of freezer door as shown in place. Remove cabinet hinge hole plugs from ... you are working . 3. Remove hinge screws from the cabinet. 5. Unplug refrigerator or disconnect power. 2. Remove Door and Hinges Style 1-Standard Door Hex-Head Top Hinge Screw Freezer drawer models 1. Remove freezer door handle seal screw. NOTE: The green, ground wire remains attached to ...
...WARNING Electrical Shock Hazard Disconnect power before removing doors. Keep the refrigerator doors closed until you are not reversing the door, see "Replace Door and Hinges." Do not depend on top of freezer door as shown in place. Remove cabinet hinge hole plugs from ... you are working . 3. Remove hinge screws from the cabinet. 5. Unplug refrigerator or disconnect power. 2. Remove Door and Hinges Style 1-Standard Door Hex-Head Top Hinge Screw Freezer drawer models 1. Remove freezer door handle seal screw. NOTE: The green, ground wire remains attached to ...

User Instructions
Page 7
... additional support for the door while the hinges are being moved. Adjust the doors so that the bottom of the refrigerator door aligns evenly with the top of the freezer drawer. Do not depend on the door gasket magnets to hold the door in place while you to the left ... in place. Pull the drawer brackets toward you are in the bottom of each door so that the bottom of the refrigerator door is aligned with the top of the freezer door. See Metal Handle graphic 2. ■ To replace the handle, reverse the directions. Slide the drawer glides out ...
... additional support for the door while the hinges are being moved. Adjust the doors so that the bottom of the refrigerator door aligns evenly with the top of the freezer drawer. Do not depend on the door gasket magnets to hold the door in place while you to the left ... in place. Pull the drawer brackets toward you are in the bottom of each door so that the bottom of the refrigerator door is aligned with the top of the freezer door. See Metal Handle graphic 2. ■ To replace the handle, reverse the directions. Slide the drawer glides out ...

User Instructions
Page 10
... base grille. Style1-Two Adjustable Rollers 1. Using a screwdriver or ³⁄₈" hex driver, turn the roller adjustment screw(s) on each side to keep the refrigerator from rolling forward when the freezer drawer is pulled open. NOTE: Having someone push against the floor to raise or lower that side of the...
... base grille. Style1-Two Adjustable Rollers 1. Using a screwdriver or ³⁄₈" hex driver, turn the roller adjustment screw(s) on each side to keep the refrigerator from rolling forward when the freezer drawer is pulled open. NOTE: Having someone push against the floor to raise or lower that side of the...

User Instructions
Page 11
...clockwise. ■ To lower, turn the screws. 3. A To Turn Off/On: Style 1 Press the freezer down arrow touch pad until a dash (-) appears in the refrigerator or freezer, first check the air vents to the word OFF. Humidity Control The humidity control turns on . ■...in humid environments or when you first install your convenience, the temperature controls are two refrigerator compartment doors. It may have either separately or together. A B A. NOTE: Adjusting the Refrigerator and Freezer Controls to a higher (colder) than recommended setting will not cool the compartments any ...
...clockwise. ■ To lower, turn the screws. 3. A To Turn Off/On: Style 1 Press the freezer down arrow touch pad until a dash (-) appears in the refrigerator or freezer, first check the air vents to the word OFF. Humidity Control The humidity control turns on . ■...in humid environments or when you first install your convenience, the temperature controls are two refrigerator compartment doors. It may have either separately or together. A B A. NOTE: Adjusting the Refrigerator and Freezer Controls to a higher (colder) than recommended setting will not cool the compartments any ...
User Instructions
Page 12
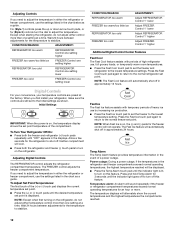
.... Temperature alarm: An alarm will automatically shut off this feature. CONDITION/REASON: REFRIGERATOR too warm FREEZER too warm/too little ice REFRIGERATOR too cold FREEZER too cold ADJUSTMENT: Adjust REFRIGERATOR Control 1° lower Adjust FREEZER Control 1° lower Adjust REFRIGERATOR Control 1° higher Adjust FREEZER Control 1° higher Additional Digital Control Center Features Fast Cool The Fast Cool...
.... Temperature alarm: An alarm will automatically shut off this feature. CONDITION/REASON: REFRIGERATOR too warm FREEZER too warm/too little ice REFRIGERATOR too cold FREEZER too cold ADJUSTMENT: Adjust REFRIGERATOR Control 1° lower Adjust FREEZER Control 1° lower Adjust REFRIGERATOR Control 1° higher Adjust FREEZER Control 1° higher Additional Digital Control Center Features Fast Cool The Fast Cool...

User Instructions
Page 15
... the burned-out bulb(s) with a clean sponge or soft cloth and a mild detergent in normal home operating environments. Freezer door models ■ Top of the refrigerator compartment - Insert front tabs of light shield into the liner and snap the back portion of the light assembly. Wash...1-877-232-6771 U.S.A. Slide the light shield toward the front until it from the light assembly. ■ Top of the refrigerator compartment - Freezer door models ■ Top of freezer compartment - or 1-800-807-6777 Canada. If you use paper towels, scouring pads, or other . IMPORTANT: This cleaner ...
... the burned-out bulb(s) with a clean sponge or soft cloth and a mild detergent in normal home operating environments. Freezer door models ■ Top of the refrigerator compartment - Insert front tabs of light shield into the liner and snap the back portion of the light assembly. Wash...1-877-232-6771 U.S.A. Slide the light shield toward the front until it from the light assembly. ■ Top of the refrigerator compartment - Freezer door models ■ Top of freezer compartment - or 1-800-807-6777 Canada. If you use paper towels, scouring pads, or other . IMPORTANT: This cleaner ...

User Instructions
Page 16
.... ■ Buzzing - Replace the fuse or reset the circuit breaker. NOTE: Adjusting the temperature controls to cool completely. In the U.S.A., www.maytag.com In Canada, www.maytag.ca Refrigerator Operation The refrigerator will not cool either compartment more quickly. If the problem continues, call . may run even longer if the room is warm, a large...
.... ■ Buzzing - Replace the fuse or reset the circuit breaker. NOTE: Adjusting the temperature controls to cool completely. In the U.S.A., www.maytag.com In Canada, www.maytag.ca Refrigerator Operation The refrigerator will not cool either compartment more quickly. If the problem continues, call . may run even longer if the room is warm, a large...

User Instructions
Page 17
...■ Controls set correctly for full ice production. ■ Freezer door closed completely? Wait 72 hours for the surrounding conditions? A kink in the ice maker ejector arm? Rinse and dry with mild soap and warm water. Connect refrigerator to store food. ■ Are there minerals (such as sulfur...) in the ON position. ■ New installation? If the freezer compartment door will not close all the way, see "The doors will not...
...■ Controls set correctly for full ice production. ■ Freezer door closed completely? Wait 72 hours for the surrounding conditions? A kink in the ice maker ejector arm? Rinse and dry with mild soap and warm water. Connect refrigerator to store food. ■ Are there minerals (such as sulfur...) in the ON position. ■ New installation? If the freezer compartment door will not close all the way, see "The doors will not...
User Instructions
Page 18
...Supply Requirements." ■ Water filter installed on the floor near the base grille? If it correctly. ■ Refrigerator door closed completely? WATER FILTER CERTIFICATIONS 18 If water flow increases, the filter may not be clogged or incorrectly installed. See "Water Dispenser." ■ ...Water on the refrigerator? Make sure the water dispenser tube connections are fully tightened. The first glass of ...
...Supply Requirements." ■ Water filter installed on the floor near the base grille? If it correctly. ■ Refrigerator door closed completely? WATER FILTER CERTIFICATIONS 18 If water flow increases, the filter may not be clogged or incorrectly installed. See "Water Dispenser." ■ ...Water on the refrigerator? Make sure the water dispenser tube connections are fully tightened. The first glass of ...

User Instructions
Page 20
... warranty is not available. 10. The cost of your major appliance, to replace or repair house fuses, or to refrigerator or freezer product failures. 7. SOME STATES AND PROVINCES DO NOT ALLOW THE EXCLUSION OR LIMITATION OF INCIDENTAL OR CONSEQUENTIAL DAMAGES, OR LIMITATIONS...appliance for product service if your major appliance is located in materials or workmanship. You can write to schedule service, you may contact Maytag at the address below . Repairs when your major appliance. IMPLIED WARRANTIES, INCLUDING WARRANTIES OF MERCHANTABILITY OR FITNESS FOR A PARTICULAR PURPOSE, ...
... warranty is not available. 10. The cost of your major appliance, to replace or repair house fuses, or to refrigerator or freezer product failures. 7. SOME STATES AND PROVINCES DO NOT ALLOW THE EXCLUSION OR LIMITATION OF INCIDENTAL OR CONSEQUENTIAL DAMAGES, OR LIMITATIONS...appliance for product service if your major appliance is located in materials or workmanship. You can write to schedule service, you may contact Maytag at the address below . Repairs when your major appliance. IMPLIED WARRANTIES, INCLUDING WARRANTIES OF MERCHANTABILITY OR FITNESS FOR A PARTICULAR PURPOSE, ...


