
Installation Instructions
Page 2
Table of Contents WASHER SAFETY 2 INSTALLATION REQUIREMENTS 3 Tools and Parts 3 Location Requirements 3 Drain System 4 Electrical Requirements 5 INSTALLATION INSTRUCTIONS 6 Remove Shipping Strap 6 Connect the Hoses 6 Level the Washer 7 Complete Installation 8 ELECTRONIC CONTROLS SETUP 10 WARRANTY 14 Table des matières SÉCURIT... de l'aplomb de la laveuse 20 Achever l'installation 21 RÉGLAGE DE LA COMMANDE ÉLECTRONIQUE 23 GARANTIE 27 WASHER SAFETY Your safety and the safety of injury, and tell you what the potential hazard is the safety alert symbol. This...
Table of Contents WASHER SAFETY 2 INSTALLATION REQUIREMENTS 3 Tools and Parts 3 Location Requirements 3 Drain System 4 Electrical Requirements 5 INSTALLATION INSTRUCTIONS 6 Remove Shipping Strap 6 Connect the Hoses 6 Level the Washer 7 Complete Installation 8 ELECTRONIC CONTROLS SETUP 10 WARRANTY 14 Table des matières SÉCURIT... de l'aplomb de la laveuse 20 Achever l'installation 21 RÉGLAGE DE LA COMMANDE ÉLECTRONIQUE 23 GARANTIE 27 WASHER SAFETY Your safety and the safety of injury, and tell you what the potential hazard is the safety alert symbol. This...

Installation Instructions
Page 3
...or agitator is available by removing 2 No. Under certain conditions, hydrogen gas may be exposed to the weather. Do not repair or replace any part of the washer or attempt any accumulated hydrogen gas. This will need: A water heater set to deliver 120°F (49°C) water to the pump area...only where local codes permit. machine, turn on or in , or spotted with controls. Gather the required tools and parts before using the washer. Check that could ignite or Before the washer is flammable, do not smoke or use an open flame during this manual or in this time. NOTE: Front ...
...or agitator is available by removing 2 No. Under certain conditions, hydrogen gas may be exposed to the weather. Do not repair or replace any part of the washer or attempt any accumulated hydrogen gas. This will need: A water heater set to deliver 120°F (49°C) water to the pump area...only where local codes permit. machine, turn on or in , or spotted with controls. Gather the required tools and parts before using the washer. Check that could ignite or Before the washer is flammable, do not smoke or use an open flame during this manual or in this time. NOTE: Front ...

Installation Instructions
Page 7
...parts package. Check for good fit. Mark which is leveled. 4. Attach bottom hose (inlet marked "H") to cold water faucet. Attach top hose (inlet marked "C") to hot water faucet. Tighten coupling to each coupling. Use pliers to make an additional two-thirds turn to faucet by hand. 3. Tilt washer... both faucets into the nearest hole in the shipping strap. Measure and mark a point approximately 16" (406 mm) from one side of washer until the washer is the hot water faucet. 2. Cut the shipping strap at each other side of drain hose into correct holes at this point. 2. ...
...parts package. Check for good fit. Mark which is leveled. 4. Attach bottom hose (inlet marked "H") to cold water faucet. Attach top hose (inlet marked "C") to hot water faucet. Tighten coupling to each coupling. Use pliers to make an additional two-thirds turn to faucet by hand. 3. Tilt washer... both faucets into the nearest hole in the shipping strap. Measure and mark a point approximately 16" (406 mm) from one side of washer until the washer is the hot water faucet. 2. Cut the shipping strap at each other side of drain hose into correct holes at this point. 2. ...
Installation Instructions
Page 8
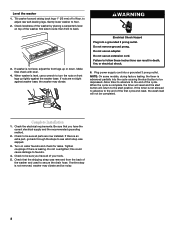
... timer is level, use an extension cord. Complete Installation 1. Check to be sure you have all parts are not tight against the washer base. Turn on top of the washer by placing a carpenter's level on water faucets and check for leaks. Do not overtighten; Check that.... Check to side; Tighten couplings if there is not level, adjust the front legs up tightly against washer base, the washer may vibrate and be noisy. 8 Level the washer 1. Gently lower washer to faucets. 4. Electrical Shock Hazard Plug into a grounded 3 prong outlet. Do not use an adapter...
... timer is level, use an extension cord. Complete Installation 1. Check to be sure you have all parts are not tight against the washer base. Turn on top of the washer by placing a carpenter's level on water faucets and check for leaks. Do not overtighten; Check that.... Check to side; Tighten couplings if there is not level, adjust the front legs up tightly against washer base, the washer may vibrate and be noisy. 8 Level the washer 1. Gently lower washer to faucets. 4. Electrical Shock Hazard Plug into a grounded 3 prong outlet. Do not use an adapter...
Installation Instructions
Page 9
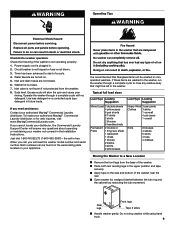
...Cthoemcmalel risciafrleLea. undry SWuhpepnoyrtouCecnatlle,rywouillwainllsnweeerdatnhyeqwuaesshtieornms oadbeoluntuompbereartainngd serial onur mbaeinr.taBinoitnhgnyuomubr ewrsaschaenr bneotfocuonvderoend tihnethseerIinasl-traaltlaintgionplate Iloncsatrtuecdtionsy.our washer. When you will slow the spin and cause poor rinsing. Both numbers can Do not ...the washer that fiberglass items not be found on the serial-rating plate located on . 5. WARNING Operating Tips WARNING Electrical Shock Hazard Disconnect power before operating. Fire Never place items in . 2. Replace all parts ...
...Cthoemcmalel risciafrleLea. undry SWuhpepnoyrtouCecnatlle,rywouillwainllsnweeerdatnhyeqwuaesshtieornms oadbeoluntuompbereartainngd serial onur mbaeinr.taBinoitnhgnyuomubr ewrsaschaenr bneotfocuonvderoend tihnethseerIinasl-traaltlaintgionplate Iloncsatrtuecdtionsy.our washer. When you will slow the spin and cause poor rinsing. Both numbers can Do not ...the washer that fiberglass items not be found on the serial-rating plate located on . 5. WARNING Operating Tips WARNING Electrical Shock Hazard Disconnect power before operating. Fire Never place items in . 2. Replace all parts ...
Installation Instructions
Page 10
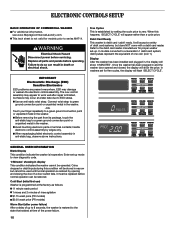
... to view diagnostic code. '0 Minutes' showing in display This condition indicates the washer cannot be restored. In washers set -up to 8 seconds, the washer is debit card 'cable' ready. Before removing the part from its package, touch the anti-static bag to work well after power failure...free cycles, the display will accept a variety of one coin (coin 1). ELECTRONIC CONTROLS SETUP BASIC OPERATION OF COMMERCIAL WASHER For additional information, see www.MaytagCommercialLaundry.com. IMPORTANT Electrostatic Discharge (ESD) Sensitive Electronics ESD problems are present everywhere.
... to view diagnostic code. '0 Minutes' showing in display This condition indicates the washer cannot be restored. In washers set -up to 8 seconds, the washer is debit card 'cable' ready. Before removing the part from its package, touch the anti-static bag to work well after power failure...free cycles, the display will accept a variety of one coin (coin 1). ELECTRONIC CONTROLS SETUP BASIC OPERATION OF COMMERCIAL WASHER For additional information, see www.MaytagCommercialLaundry.com. IMPORTANT Electrostatic Discharge (ESD) Sensitive Electronics ESD problems are present everywhere.
Installation Instructions
Page 14
... defects in materials or workmanship. To locate your authorized Maytag® Commercial Laundry distributor. Proof of original purchase date is excluded from all warranty coverage. 9. ITEMS MAYTAG WILL NOT PAY FOR 1. MAYTAG® COMMERCIAL SINGLE-LOAD AND VENDED MULTI-LOAD WASHER AND DRYER WARRANTY LIMITED WARRANTY ON PARTS For the first five years from the date of...
... defects in materials or workmanship. To locate your authorized Maytag® Commercial Laundry distributor. Proof of original purchase date is excluded from all warranty coverage. 9. ITEMS MAYTAG WILL NOT PAY FOR 1. MAYTAG® COMMERCIAL SINGLE-LOAD AND VENDED MULTI-LOAD WASHER AND DRYER WARRANTY LIMITED WARRANTY ON PARTS For the first five years from the date of...


