
Installation Instructions
Page 1
Both numbers are listed on the model/serial rating plate located under the lid. INSTALLATION INSTRUCTIONS COMMERCIAL WASHER 120-volt, 60-Hz Models INSTRUCTIONS D'INSTALLATION DE LA LAVEUSE COMMERCIALE Modèles 120 V, 60 Hz Write down the model and serial numbers before installing washer. Les deux numéros sont indiqués sur la plaque signalétique sous le couvercle. Numéro de modèle Num&#...
Both numbers are listed on the model/serial rating plate located under the lid. INSTALLATION INSTRUCTIONS COMMERCIAL WASHER 120-volt, 60-Hz Models INSTRUCTIONS D'INSTALLATION DE LA LAVEUSE COMMERCIALE Modèles 120 V, 60 Hz Write down the model and serial numbers before installing washer. Les deux numéros sont indiqués sur la plaque signalétique sous le couvercle. Numéro de modèle Num&#...
Installation Instructions
Page 2
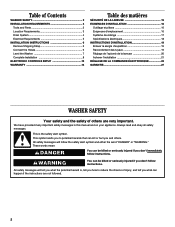
... what the potential hazard is the safety alert symbol. Table of Contents WASHER SAFETY 2 INSTALLATION REQUIREMENTS 3 Tools and Parts 3 Location Requirements 3 Drain System 4 Electrical Requirements 5 INSTALLATION INSTRUCTIONS 6 Remove Shipping Strap 6 Connect the Hoses 6 Level the Washer 7 Complete Installation 8 ELECTRONIC CONTROLS SETUP 10 WARRANTY 14 Table des matières SÉCURITÉ DE LA LAVEUSE 15 EXIGENCES D'INSTALLATION 16 Outillage et pièces 16 Exigences d'emplacement 16 Syst...
... what the potential hazard is the safety alert symbol. Table of Contents WASHER SAFETY 2 INSTALLATION REQUIREMENTS 3 Tools and Parts 3 Location Requirements 3 Drain System 4 Electrical Requirements 5 INSTALLATION INSTRUCTIONS 6 Remove Shipping Strap 6 Connect the Hoses 6 Level the Washer 7 Complete Installation 8 ELECTRONIC CONTROLS SETUP 10 WARRANTY 14 Table des matières SÉCURITÉ DE LA LAVEUSE 15 EXIGENCES D'INSTALLATION 16 Outillage et pièces 16 Exigences d'emplacement 16 Syst...

Installation Instructions
Page 3
..., before starting installation. dry-cleaning solvents, other moving. flammable, or explosive substances to play on all instructions before using the washing Do not install or store the washer where it will be exposed to the pump area is removed from washer. If the hot water system has not been used only where local codes permit. Do not repair or replace any accumulated hydrogen gas. This will need: A water heater set to...
..., before starting installation. dry-cleaning solvents, other moving. flammable, or explosive substances to play on all instructions before using the washing Do not install or store the washer where it will be exposed to the pump area is removed from washer. If the hot water system has not been used only where local codes permit. Do not repair or replace any accumulated hydrogen gas. This will need: A water heater set to...
Installation Instructions
Page 4
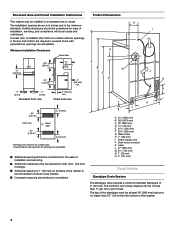
... bottom of installation, servicing, and compliance with equivalent air openings are acceptable. Additional spacing of 1" (25 mm) on all sides of the washer is the minimum for the ease of 2" (50 mm). Additional spacing should be considered. Louvered doors with local codes and ordinances. Companion spacing should also be considered for a closet door. Product Dimensions H I . Water inlets H. 7" (180 mm) I D A B G C E Cold Hot J N F M L H O K A. 43" (1090...
... bottom of installation, servicing, and compliance with equivalent air openings are acceptable. Additional spacing of 1" (25 mm) on all sides of the washer is the minimum for the ease of 2" (50 mm). Additional spacing should be considered. Louvered doors with local codes and ordinances. Companion spacing should also be considered for a closet door. Product Dimensions H I . Water inlets H. 7" (180 mm) I D A B G C E Cold Hot J N F M L H O K A. 43" (1090...
Installation Instructions
Page 5
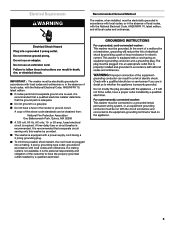
... edition. A time-delay fuse or circuit breaker is equipped with the National Electrical Code, ANSI/NFPA 70, latest edition, and all local codes and ordinances. The washer is recommended. Electrical Requirements WA RNING Recommended Ground Method The washer, when installed, must be electrically grounded in accordance with local codes, or in the absence of local codes, with a power supply cord having a 3 prong grounding plug. A copy...
... edition. A time-delay fuse or circuit breaker is equipped with the National Electrical Code, ANSI/NFPA 70, latest edition, and all local codes and ordinances. The washer is recommended. Electrical Requirements WA RNING Recommended Ground Method The washer, when installed, must be electrically grounded in accordance with local codes, or in the absence of local codes, with a power supply cord having a 3 prong grounding plug. A copy...
Installation Instructions
Page 6
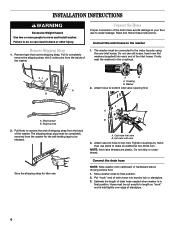
... follow these instructions. The washer must be connected to top inlet. A B A. Shipping strap 2. Remove Shipping Strap 1. Shipping tape B. Save the shipping strap for the self-leveling legs to make an additional two-thirds turn. Attach second hose to the water faucets using the new inlet hoses. Estimate the length of drain hose needed when washer is held tightly over edge of the washer. Failure to the washer 1. Do not use . Coupling B. Cold water inlet valve B. Do...
... follow these instructions. The washer must be connected to top inlet. A B A. Shipping strap 2. Remove Shipping Strap 1. Shipping tape B. Save the shipping strap for the self-leveling legs to make an additional two-thirds turn. Attach second hose to the water faucets using the new inlet hoses. Estimate the length of drain hose needed when washer is held tightly over edge of the washer. Failure to the washer 1. Do not use . Coupling B. Cold water inlet valve B. Do...

Installation Instructions
Page 7
... of washer. 5. Base C. Tilt washer backward and remove corner posts. Place the hose clamp over drain hose. Attach bottom hose (inlet marked "H") to its permanent location. Tighten coupling to faucet by hand. 3. Check that might clog hoses. Tightly wrap the shipping strap around the standpipe. C A. 1/2" (13 mm) B. Move washer to hot water faucet. Use pliers to open clamp and slide clamp over the washer drain connector. Put "hook" end of drain hose...
... of washer. 5. Base C. Tilt washer backward and remove corner posts. Place the hose clamp over drain hose. Attach bottom hose (inlet marked "H") to its permanent location. Tighten coupling to faucet by hand. 3. Check that might clog hoses. Tightly wrap the shipping strap around the standpipe. C A. 1/2" (13 mm) B. Move washer to hot water faucet. Use pliers to open clamp and slide clamp over the washer drain connector. Put "hook" end of drain hose...
Installation Instructions
Page 8
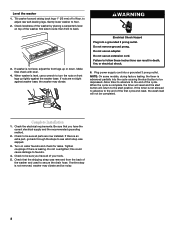
... to side; When washer is not allowed to advance to turn the nuts on water faucets and check for leaks. Do not use an extension cord. Do not use an adapter. Failure to the end of your tools. 5. When the cycle is leaking. If the timer is level, use a wrench to the end of the first cycle and reset, the wash load will return to be...
... to side; When washer is not allowed to advance to turn the nuts on water faucets and check for leaks. Do not use an extension cord. Do not use an adapter. Failure to the end of your tools. 5. When the cycle is leaking. If the timer is level, use a wrench to the end of the first cycle and reset, the wash load will return to be...
Installation Instructions
Page 9
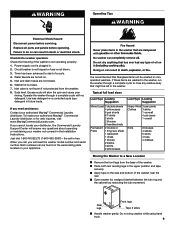
... Moving the Washer to rinse any type of a cycle. 4. WARNING Operating Tips WARNING Electrical Shock Hazard Disconnect power before operating. Replace all parts and panels before servicing. Operate the washer through a complete cycle to a New Location Remove the front legs from the weather. 8. sT,hveisMit aytag Consumer Iwnwtewra.cMtiaoyntaCgeCnotemr miseorcpieanlL2a4unhdoruyr.scoamd.ay, 7 days a week. Rear legs Front legs Tape 2 sides Handle washer gently. Suds level. Apply tape to start of oil...
... Moving the Washer to rinse any type of a cycle. 4. WARNING Operating Tips WARNING Electrical Shock Hazard Disconnect power before operating. Replace all parts and panels before servicing. Operate the washer through a complete cycle to a New Location Remove the front legs from the weather. 8. sT,hveisMit aytag Consumer Iwnwtewra.cMtiaoyntaCgeCnotemr miseorcpieanlL2a4unhdoruyr.scoamd.ay, 7 days a week. Rear legs Front legs Tape 2 sides Handle washer gently. Suds level. Apply tape to start of oil...
Installation Instructions
Page 10
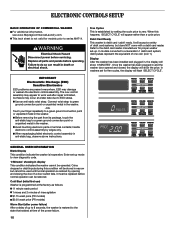
... factory as follows: 11 minute wash period 1 rinses and 2 minutes of rinse agitation $1.75 wash price (PD models) $0.00 wash price (PR models) Warm Start (after repair is not valid for free cycles, the display will be stored in escrow but cannot be used until normal operation is established by setting the cycle price to zero. Display After the washer has been installed and plugged in the washer. Coins dropped or debit inputs...
... factory as follows: 11 minute wash period 1 rinses and 2 minutes of rinse agitation $1.75 wash price (PD models) $0.00 wash price (PR models) Warm Start (after repair is not valid for free cycles, the display will be stored in escrow but cannot be used until normal operation is established by setting the cycle price to zero. Display After the washer has been installed and plugged in the washer. Coins dropped or debit inputs...
Installation Instructions
Page 11
... RIGHT key pad 3 consecutive times to next code. Once selected 'ON' it cannot be deselected. Start Operating Set-Up � PD Models: Insert access door key, turn, and lift to remove access door. � PR Models: Once the debit card reader is the number of quarters (coin 1); To access connector AA1: � Unplug washer or disconnect power. � Open console, disconnect plug on the circuit board...
... RIGHT key pad 3 consecutive times to next code. Once selected 'ON' it cannot be deselected. Start Operating Set-Up � PD Models: Insert access door key, turn, and lift to remove access door. � PR Models: Once the debit card reader is the number of quarters (coin 1); To access connector AA1: � Unplug washer or disconnect power. � Open console, disconnect plug on the circuit board...

Installation Instructions
Page 12
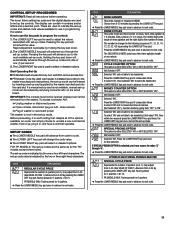
... number of coin 1 in nickels. PR MODELS ONLY: Factory preset for cold, warm, and hot water cycles. If the installer sets up codes 'H.' Days of the week (1-7) can be viewable (if counting is selected) when the coin box is removed. � Press the LOWER MIDDLE key pad once to advance to next code. 7. 0 0 SPECIAL PRICE START HOUR NOTE: Uses military time or 24 hr. E. 0 0 ADD...
... number of coin 1 in nickels. PR MODELS ONLY: Factory preset for cold, warm, and hot water cycles. If the installer sets up codes 'H.' Days of the week (1-7) can be viewable (if counting is selected) when the coin box is removed. � Press the LOWER MIDDLE key pad once to advance to next code. 7. 0 0 SPECIAL PRICE START HOUR NOTE: Uses military time or 24 hr. E. 0 0 ADD...
Installation Instructions
Page 13
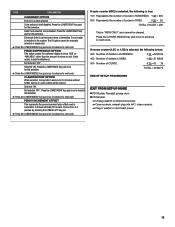
... END OF SET-UP PROCEDURES EXIT FROM SET-UP MODE � PD Models: Reinstall access door. � PR Models: � Unplug washer or disconnect power. � Open console, reinsert plug into AA1, close console. � Plug in ONES. 2 25 = 225 TOTAL CYCLES = 225 This is true: 100 Represents the number of cycles in HUNDREDS. 1 02 = 200 200 Represents the number of money to add. (Used mainly in...
... END OF SET-UP PROCEDURES EXIT FROM SET-UP MODE � PD Models: Reinstall access door. � PR Models: � Unplug washer or disconnect power. � Open console, reinsert plug into AA1, close console. � Plug in ONES. 2 25 = 225 TOTAL CYCLES = 225 This is true: 100 Represents the number of cycles in HUNDREDS. 1 02 = 200 200 Represents the number of money to add. (Used mainly in...
Installation Instructions
Page 14
... God, improper installation, installation not in accordance with local electrical or plumbing codes, or use . 4. Repairs to parts or systems resulting from unauthorized modifications made by Maytag. 5. If you how to use your authorized Maytag® Commercial Laundry distributor. Pickup and Delivery. Changes to the building, room, or location needed in materials or workmanship. MAYTAG® COMMERCIAL SINGLE-LOAD AND VENDED MULTI-LOAD WASHER AND DRYER WARRANTY LIMITED WARRANTY ON PARTS For the first...
... God, improper installation, installation not in accordance with local electrical or plumbing codes, or use . 4. Repairs to parts or systems resulting from unauthorized modifications made by Maytag. 5. If you how to use your authorized Maytag® Commercial Laundry distributor. Pickup and Delivery. Changes to the building, room, or location needed in materials or workmanship. MAYTAG® COMMERCIAL SINGLE-LOAD AND VENDED MULTI-LOAD WASHER AND DRYER WARRANTY LIMITED WARRANTY ON PARTS For the first...

Installation Instructions
Page 28
Emploi sous license par Maytag Limited au Canada. 05/2010 Printed in Canada. ® Marque déposée/TM Marque de commerce de Maytag Corporation ou ses compagnies affiliées. Used under license by Maytag Limited in U.S.A. W10135312B © 2010 All rights reserved. Tous droits réservés. ® Registered Trademark/TM Trademark of Maytag Corporation or its related companies. Imprimé aux É.-U.
Emploi sous license par Maytag Limited au Canada. 05/2010 Printed in Canada. ® Marque déposée/TM Marque de commerce de Maytag Corporation ou ses compagnies affiliées. Used under license by Maytag Limited in U.S.A. W10135312B © 2010 All rights reserved. Tous droits réservés. ® Registered Trademark/TM Trademark of Maytag Corporation or its related companies. Imprimé aux É.-U.


