Owners Manual
Page 1
... Part No. DC68-02030A-01 www.maytag.com ©2006 Maytag Appliances Sales Co. MAH-24 Use & Care Guide Table of Contents Important Safety Instructions 1-2 Operating Instructions 3 Load the Clothes Washer Start the Washer Water Use Using the Controls 4-6 Turn the Washer On...Dispenser Detergent Compartment Bleach Compartment Fabric Softener Compartment Care & Cleaning 9-10 Cleaning the Interior Cleaning the Automatic Dispenser Storing the Washer Troubleshooting 11-13 Information Codes Operating Sounds 14 Service & Warranty 15 Guide d'utilisation et d'entretien 16 Guía de uso ...
... Part No. DC68-02030A-01 www.maytag.com ©2006 Maytag Appliances Sales Co. MAH-24 Use & Care Guide Table of Contents Important Safety Instructions 1-2 Operating Instructions 3 Load the Clothes Washer Start the Washer Water Use Using the Controls 4-6 Turn the Washer On...Dispenser Detergent Compartment Bleach Compartment Fabric Softener Compartment Care & Cleaning 9-10 Cleaning the Interior Cleaning the Automatic Dispenser Storing the Washer Troubleshooting 11-13 Information Codes Operating Sounds 14 Service & Warranty 15 Guide d'utilisation et d'entretien 16 Guía de uso ...
Owners Manual
Page 2
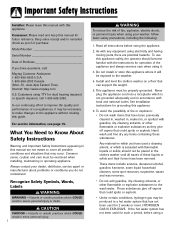
...solvents, or other flammable or explosive substances to the appliance without revising this manual for operation of these substances. Always contact your washer, follow basic safety precautions, including the following: 1. Do not install or store this manual are potential hazards. See installation ...1-800-688-9900 U.S.A. 1-800-688-2002 Canada (Mon.-Fri., 8am-8pm Eastern Time) Internet: http://www.maytag.com U.S. Customers using electricity and having moving parts, there are not meant to the weather. 4. Any material on a floor that could ignite or explode. ...
...solvents, or other flammable or explosive substances to the appliance without revising this manual for operation of these substances. Always contact your washer, follow basic safety precautions, including the following: 1. Do not install or store this manual are potential hazards. See installation ...1-800-688-9900 U.S.A. 1-800-688-2002 Canada (Mon.-Fri., 8am-8pm Eastern Time) Internet: http://www.maytag.com U.S. Customers using electricity and having moving parts, there are not meant to the weather. 4. Any material on a floor that could ignite or explode. ...
Owners Manual
Page 3
...to carry out. 12. SAVE THESE INSTRUCTIONS 2 As the gas is moving. 9. Due to service your clothes washer. 8. Small particles can form. 15. Do not repair or replace any part of the appliance or attempt any accumulated hydrogen gas. Do not reach into the appliance if the tumbler is ...flammable, do not smoke or use chlorine bleach and ammonia or acids (such as vinegar or rust remover) in following loads and cause skin irritation....
...to carry out. 12. SAVE THESE INSTRUCTIONS 2 As the gas is moving. 9. Due to service your clothes washer. 8. Small particles can form. 15. Do not repair or replace any part of the appliance or attempt any accumulated hydrogen gas. Do not reach into the appliance if the tumbler is ...flammable, do not smoke or use chlorine bleach and ammonia or acids (such as vinegar or rust remover) in following loads and cause skin irritation....
Owners Manual
Page 11
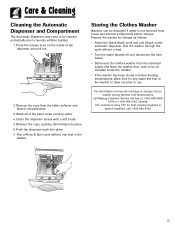
... or storage of the parts under running water. 4. Wash all of your washer during extreme cold temperatures, call 1-800-688-2080. Run a Rinse & Spin cycle without a load. • Turn the water faucets off and disconnect the inlet hoses. • Disconnect the clothes washer from hoses and internal ...storage as follows: • Select the Quick Wash cycle and add bleach to the automatic dispenser. Prepare the washer for deaf, hearing impaired or speech impaired, call Maytag Customer Service toll-free at 1-800-688-9900 USA or 1-800-688-2002 Canada. Clean the dispenser recess with...
... or storage of the parts under running water. 4. Wash all of your washer during extreme cold temperatures, call 1-800-688-2080. Run a Rinse & Spin cycle without a load. • Turn the water faucets off and disconnect the inlet hoses. • Disconnect the clothes washer from hoses and internal ...storage as follows: • Select the Quick Wash cycle and add bleach to the automatic dispenser. Prepare the washer for deaf, hearing impaired or speech impaired, call Maytag Customer Service toll-free at 1-800-688-9900 USA or 1-800-688-2002 Canada. Clean the dispenser recess with...
Owners Manual
Page 13
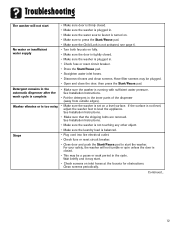
...fully. See Installation Instructions. • Make sure the washer is not touching any other object. • Make sure the laundry load is not activated, see page 6. Washer vibrates or is too noisy • Make sure the washer is turned on inlet hoses at the faucets for ...obstructions. Continued... 12 Contr•olMst aaakeglsanucree the washer is plugged in the automatic dispenser after the wash cycle is complete • Make sure the washer is plugged in the inner parts of the dispenser (away from outside edges). Dryer• EMxhaaukset...
...fully. See Installation Instructions. • Make sure the washer is not touching any other object. • Make sure the laundry load is not activated, see page 6. Washer vibrates or is too noisy • Make sure the washer is turned on inlet hoses at the faucets for ...obstructions. Continued... 12 Contr•olMst aaakeglsanucree the washer is plugged in the automatic dispenser after the wash cycle is complete • Make sure the washer is plugged in the inner parts of the dispenser (away from outside edges). Dryer• EMxhaaukset...
Owners Manual
Page 16
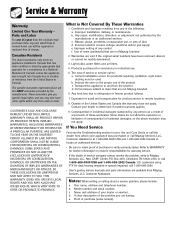
... DO NOT ALLOW THE First see the Troubleshooting section in loading normal home use . Notes: When writing or calling about a service problem, please include: a. c. manufacturer or an authorized servicer. c. e. Improper setting of any of any part which vary from state to and from Maytag Services, LLC, Customer Assistance. Canada. Transport the appliance to...
... DO NOT ALLOW THE First see the Troubleshooting section in loading normal home use . Notes: When writing or calling about a service problem, please include: a. c. manufacturer or an authorized servicer. c. e. Improper setting of any of any part which vary from state to and from Maytag Services, LLC, Customer Assistance. Canada. Transport the appliance to...
Installation Instructions
Page 2
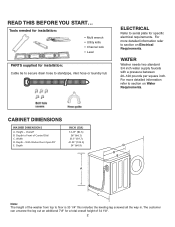
... - Depth INCH (CM) 33.25" (84.5) 26" (66.1) 23.5" (59.7) 41.25" (104.3) 24" (60.9) E Note: The height of the washer from top to Front of 34 1\8". 2 WATER Washer needs two standard 3/4 inch water supply faucets with a pressure between 20-120 pounds per square inch. CABINET DIMENSIONS...is 33 1\4" this includes the leveling leg screwed all the way in. With Washer Door Open 90° E. Tools needed for installation: • Multi wrench • Utility knife • Channel lock • Level PARTS supplied for installation: Cable tie to secure drain hose to standpipe, inlet hose...
... - Depth INCH (CM) 33.25" (84.5) 26" (66.1) 23.5" (59.7) 41.25" (104.3) 24" (60.9) E Note: The height of the washer from top to Front of 34 1\8". 2 WATER Washer needs two standard 3/4 inch water supply faucets with a pressure between 20-120 pounds per square inch. CABINET DIMENSIONS...is 33 1\4" this includes the leveling leg screwed all the way in. With Washer Door Open 90° E. Tools needed for installation: • Multi wrench • Utility knife • Channel lock • Level PARTS supplied for installation: Cable tie to secure drain hose to standpipe, inlet hose...
Installation Instructions
Page 3
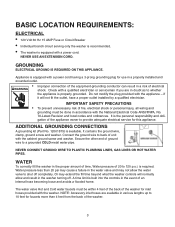
Appliance is equipped with the washer. ADDITIONAL GROUNDING CONNECTIONS A grounding kit (Part No. 12001875) is required. It contains the ground wire, clamp, ground screw and washer. WATER To correctly fill the washer in the proper amount of time, Water pressure of the washer. 3 Water pressure less than 4 feet from the back of 20 to 120 p.s.i. Or...
Appliance is equipped with the washer. ADDITIONAL GROUNDING CONNECTIONS A grounding kit (Part No. 12001875) is required. It contains the ground wire, clamp, ground screw and washer. WATER To correctly fill the washer in the proper amount of time, Water pressure of the washer. 3 Water pressure less than 4 feet from the back of 20 to 120 p.s.i. Or...

Installation Instructions
Page 5
...is available to allow stacking of the washer. UNPACKING THE WASHING MACHINE Unpack your washing machine and inspect it for information on top of the dryer on the nearest authorized Maytag Parts Distributor. d SCcHhIaCuAmGbOu,rgIL, LIlIlNinOoiIsS6600167331 PPhhoone...: 874773-277134-30100 FOR TECHNICAL ASSISTANCE, REPLACEMENT PARTS AND ACCESSORIES For technical assistance or if your washer requires replacement parts or accessories, contact Maytag Customer Service, toll-free 1-888-4-Maytag for ...
...is available to allow stacking of the washer. UNPACKING THE WASHING MACHINE Unpack your washing machine and inspect it for information on top of the dryer on the nearest authorized Maytag Parts Distributor. d SCcHhIaCuAmGbOu,rgIL, LIlIlNinOoiIsS6600167331 PPhhoone...: 874773-277134-30100 FOR TECHNICAL ASSISTANCE, REPLACEMENT PARTS AND ACCESSORIES For technical assistance or if your washer requires replacement parts or accessories, contact Maytag Customer Service, toll-free 1-888-4-Maytag for ...
Installation Instructions
Page 7
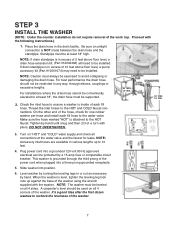
...the drain hose should be supported. 2. 2. Turn on "HOT" and "COLD" water supply and check all connections at least 18" high. Slide washer into a grounded 120 volt 60 Hz approved electrical service protected by a 15-amp fuse or comparable circuit breaker. Place the drain hose in or out ...NOTE: If drain standpipe is in excess of 5 feet above floor level, a pump accessory kit (Part #12001674) may need to be restricted in any way, through the third prong of the washer using the wrench supplied with the following instructions.) 11.. For installations where the drain hose cannot be ...
...the drain hose should be supported. 2. 2. Turn on "HOT" and "COLD" water supply and check all connections at least 18" high. Slide washer into a grounded 120 volt 60 Hz approved electrical service protected by a 15-amp fuse or comparable circuit breaker. Place the drain hose in or out ...NOTE: If drain standpipe is in excess of 5 feet above floor level, a pump accessory kit (Part #12001674) may need to be restricted in any way, through the third prong of the washer using the wrench supplied with the following instructions.) 11.. For installations where the drain hose cannot be ...


