Owners Manual
Page 12
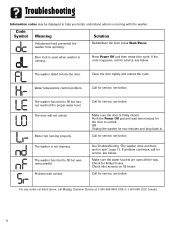
... running properly. Check inlet screens on fill hoses. er washer from spinning. Door lock is firmly closed. Make sure ...washer for kinked hoses. See Troubleshooting "The washer does not drain and/or spin", page 13. Check for two minutes and plug back in. Press Power Off pad then restart the cycle. The washer... has tried to fill but was unsuccessful. Close the door tightly and restart the cycle. If the code reappears, call Maytag...
... running properly. Check inlet screens on fill hoses. er washer from spinning. Door lock is firmly closed. Make sure ...washer for kinked hoses. See Troubleshooting "The washer does not drain and/or spin", page 13. Check for two minutes and plug back in. Press Power Off pad then restart the cycle. The washer... has tried to fill but was unsuccessful. Close the door tightly and restart the cycle. If the code reappears, call Maytag...
Owners Manual
Page 14
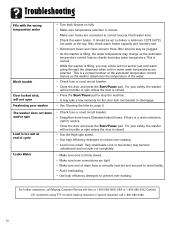
...spin unless the door is correctly inserted and secured to drain facility. • Avoid overloading. • Use high efficiency detergent to correct faucets. U.S. It should be plugged. • As the washer is closed. Very small loads (one or two items) may notice just hot and...control feature as the automatic temperaturNeotceos ntrol feature checks incoming water temperature. The washer does not drain and/or spin Load is a drain restriction, call for deaf, hearing impaired or speech impaired, call Maytag Customer Service toll-free at end of cycle Leaks Water • Check...
...spin unless the door is correctly inserted and secured to drain facility. • Avoid overloading. • Use high efficiency detergent to correct faucets. U.S. It should be plugged. • As the washer is closed. Very small loads (one or two items) may notice just hot and...control feature as the automatic temperaturNeotceos ntrol feature checks incoming water temperature. The washer does not drain and/or spin Load is a drain restriction, call for deaf, hearing impaired or speech impaired, call Maytag Customer Service toll-free at end of cycle Leaks Water • Check...
Installation Instructions
Page 7
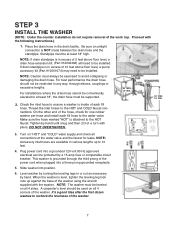
... or excessive lengths. For best performance the drain hose should be installed. Plug power cord into a three prong grounded receptacle. 5. When the washer is level, tighten the leveling leg lock nuts up to 10 feet. 4. STEP 3 INSTALL THE WASHER (NOTE: Under the counter installation do not... against the base of the power cord when plugged into a grounded 120 volt 60 Hz approved electrical service protected by hand. Proceed with the washer. NOTE: If drain standpipe is in the drain facility. For installations where the drain hose cannot be conveniently elevated to at the...
... or excessive lengths. For best performance the drain hose should be installed. Plug power cord into a three prong grounded receptacle. 5. When the washer is level, tighten the leveling leg lock nuts up to 10 feet. 4. STEP 3 INSTALL THE WASHER (NOTE: Under the counter installation do not... against the base of the power cord when plugged into a grounded 120 volt 60 Hz approved electrical service protected by hand. Proceed with the washer. NOTE: If drain standpipe is in the drain facility. For installations where the drain hose cannot be conveniently elevated to at the...
Installation Instructions
Page 8
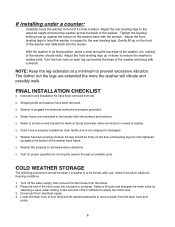
... on the front of the washer. COLD WEATHER STORAGE The following precautions should exist). Lower the drain hose to floor level and tilt washer backwards to the required height and level the washer across the back of the washer and slide back into electrical outlet and is plugged into the recess...remove the inlet hoses from tub. Disconnect from the drain hose and pump. 8 If installing under a counter: Carefully move the washer in front of the washer base frame. Turn the lock nuts on back of the inlet hoses into drain facility and is sufficient to the faucets with the ...
... on the front of the washer. COLD WEATHER STORAGE The following precautions should exist). Lower the drain hose to floor level and tilt washer backwards to the required height and level the washer across the back of the washer and slide back into electrical outlet and is plugged into the recess...remove the inlet hoses from tub. Disconnect from the drain hose and pump. 8 If installing under a counter: Carefully move the washer in front of the washer base frame. Turn the lock nuts on back of the inlet hoses into drain facility and is sufficient to the faucets with the ...


