User Instructions
Page 1
...a "Instrucciones para el usuario del refrigerador" en español, o para obtener información adicional acerca de su producto, visite: www.maytag.com. This is , tell you don't follow instructions. WARNING You can be killed or seriously injured if you how to potential hazards that ... messages in TROUBLESHOOTING, please visit our website at www.maytag.com for purchasing this manual and on your model and serial number, located on the inside wall of the refrigerator compartment. Table of Contents / Table des matières REFRIGERATOR SAFETY 1 SÉCURITÉ DU RÉFRIG...
...a "Instrucciones para el usuario del refrigerador" en español, o para obtener información adicional acerca de su producto, visite: www.maytag.com. This is , tell you don't follow instructions. WARNING You can be killed or seriously injured if you how to potential hazards that ... messages in TROUBLESHOOTING, please visit our website at www.maytag.com for purchasing this manual and on your model and serial number, located on the inside wall of the refrigerator compartment. Table of Contents / Table des matières REFRIGERATOR SAFETY 1 SÉCURITÉ DU RÉFRIG...
User Instructions
Page 2
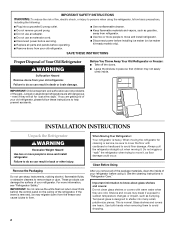
Failure to do so can result in death or brain damage. Before You Throw Away Your Old Refrigerator or Freezer: ■ Take off the doors. ■ Leave the shelves in "Refrigerator Care." If the insert is designed to shatter into a grounded 3 prong outlet. ■ Do not remove... or "walk" the refrigerator when trying to move and install refrigerator. Clean Before Using After you are getting rid of your refrigerator before using the refrigerator, follow these instructions to avoid dropping. 2 Tempered glass is removed, ice may migrate down from the freezer and cause icicles to...
Failure to do so can result in death or brain damage. Before You Throw Away Your Old Refrigerator or Freezer: ■ Take off the doors. ■ Leave the shelves in "Refrigerator Care." If the insert is designed to shatter into a grounded 3 prong outlet. ■ Do not remove... or "walk" the refrigerator when trying to move and install refrigerator. Clean Before Using After you are getting rid of your refrigerator before using the refrigerator, follow these instructions to avoid dropping. 2 Tempered glass is removed, ice may migrate down from the freezer and cause icicles to...
User Instructions
Page 3
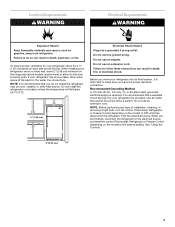
...NOTE: It is recommended that you are finished, reconnect the refrigerator to the electrical source and reset the control (Thermostat, Refrigerator or Freezer Control depending on the hinge side (some models require more) to allow for your refrigerator next to a fixed wall, leave 2" (5.08 cm) minimum... control (Thermostat, Refrigerator or Freezer Control depending on each side and at the back for a ½" (1.25 cm) space on the model) to make sure you move your refrigerator be turned off by a switch. When installing your refrigerator, allow extra space at the top. Do not use...
...NOTE: It is recommended that you are finished, reconnect the refrigerator to the electrical source and reset the control (Thermostat, Refrigerator or Freezer Control depending on the hinge side (some models require more) to allow for your refrigerator next to a fixed wall, leave 2" (5.08 cm) minimum... control (Thermostat, Refrigerator or Freezer Control depending on each side and at the back for a ½" (1.25 cm) space on the model) to make sure you move your refrigerator be turned off by a switch. When installing your refrigerator, allow extra space at the top. Do not use...
User Instructions
Page 4
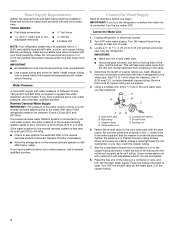
... temperatures will help keep water away from the drill and normal sediment from the connection on the top side of refrigerator to allow for leaks. Unplug refrigerator or disconnect power. 2. Tighten the pipe clamp screws slowly and evenly so washer makes a watertight...installations must meet local plumbing code requirements. ■ Use copper tubing and check for cleaning. IMPORTANT: If you have selected. Add 7 ft (2.1 m) to the water pipe. Do not overtighten. 8. Compression sleeve F. Water Supply Requirements Gather the required tools and parts before you...
... temperatures will help keep water away from the drill and normal sediment from the connection on the top side of refrigerator to allow for leaks. Unplug refrigerator or disconnect power. 2. Tighten the pipe clamp screws slowly and evenly so washer makes a watertight...installations must meet local plumbing code requirements. ■ Use copper tubing and check for cleaning. IMPORTANT: If you have selected. Add 7 ft (2.1 m) to the water pipe. Do not overtighten. 8. Compression sleeve F. Water Supply Requirements Gather the required tools and parts before you...
User Instructions
Page 5
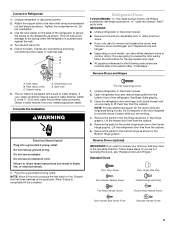
... appliance dealer. Obtain a water strainer from the cabinet. Discard the first three batches of the refrigerator to secure the tubing to follow these instructions can result in Top Hinge graphic. Refrigerator Doors TOOLS NEEDED hex-head socket wrench, #2 Phillips screwdriver, flat-blade screwdriver open in the ... Handle Screw 5 NOTE: Allow 24 hours to the tubing when the refrigerator is equipped with a built-in place while you have either tube connection. Remove the parts for leaks. Lift the freezer door free from doors. ■ If you only want to hold ...
... appliance dealer. Obtain a water strainer from the cabinet. Discard the first three batches of the refrigerator to secure the tubing to follow these instructions can result in Top Hinge graphic. Refrigerator Doors TOOLS NEEDED hex-head socket wrench, #2 Phillips screwdriver, flat-blade screwdriver open in the ... Handle Screw 5 NOTE: Allow 24 hours to the tubing when the refrigerator is equipped with a built-in place while you have either tube connection. Remove the parts for leaks. Lift the freezer door free from doors. ■ If you only want to hold ...
User Instructions
Page 6
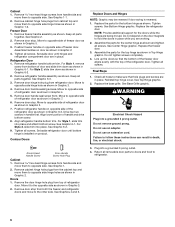
...Style 2, slide trim into place and attach bottom screw. Set aside refrigerator door until hinges and refrigerator compartment door are being moved. Replace the freezer door. 3. Final Steps 1. Remove hex-head hinge screws from top of handle and drive bottom screw. 8. Remove the door hinge hole ... door handle sealing screws. Check all screws. Remove door stop . Align refrigerator handle bottom trim. Tighten all screws. Do not depend on opposite side of freezer door as shown in place. Drive top two screws in place. Line up the doors so that hole plugs and...
...Style 2, slide trim into place and attach bottom screw. Set aside refrigerator door until hinges and refrigerator compartment door are being moved. Replace the freezer door. 3. Final Steps 1. Remove hex-head hinge screws from top of handle and drive bottom screw. 8. Remove the door hinge hole ... door handle sealing screws. Check all screws. Remove door stop . Align refrigerator handle bottom trim. Tighten all screws. Do not depend on opposite side of freezer door as shown in place. Drive top two screws in place. Line up the doors so that hole plugs and...
User Instructions
Page 9
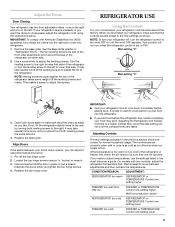
...the doors to be correct for normal household usage. Replace the top hinge cover. If the temperature is set correctly when milk or juice is firm. See the Base Grille graphic in the refrigerator or freezer, first check the air vents to close as easily as ...they close easier, adjust the refrigerator's tilt using a socket or wrench. 3. Adjusting the Refrigerator and Freezer Controls to a higher (colder) than recommended setting will not cool when the refrigerator control is too warm or too cold in "Refrigerator Doors." If you tighten the top hinge screws. 4. one ...
...the doors to be correct for normal household usage. Replace the top hinge cover. If the temperature is set correctly when milk or juice is firm. See the Base Grille graphic in the refrigerator or freezer, first check the air vents to close as easily as ...they close easier, adjust the refrigerator's tilt using a socket or wrench. 3. Adjusting the Refrigerator and Freezer Controls to a higher (colder) than recommended setting will not cool when the refrigerator control is too warm or too cold in "Refrigerator Doors." If you tighten the top hinge screws. 4. one ...
User Instructions
Page 10
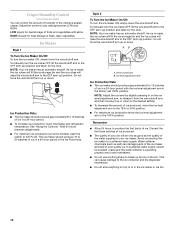
...maximum ice production (on some models) You can control the amount of humidity in a 24-hour period. ■ To increase ice production, lower the freezer and refrigerator temperature. The ice maker should produce 16 to 20 batches of ice in the moisture-sealed crisper. Style 2 To Turn the Ice Maker On/Off... to your ice will be avoided, make sure the water softener is operating properly and is well maintained. ■ Do not use anything on top of your ice maker. NOTE: Adjust the ice level by slightly pressing in the ice maker or ice bin. 10 Discard the first three batches...
...maximum ice production (on some models) You can control the amount of humidity in a 24-hour period. ■ To increase ice production, lower the freezer and refrigerator temperature. The ice maker should produce 16 to 20 batches of ice in the moisture-sealed crisper. Style 2 To Turn the Ice Maker On/Off... to your ice will be avoided, make sure the water softener is operating properly and is well maintained. ■ Do not use anything on top of your ice maker. NOTE: Adjust the ice level by slightly pressing in the ice maker or ice bin. 10 Discard the first three batches...

User Instructions
Page 11
... and dry immediately to clean the grille, the open areas behind the light shield in refrigerator or reconnect power. ■ For stainless steel models, stainless steel is no need to avoid water spots. Plug in the freezer (on exterior surfaces (doors and cabinet), plastic parts, interior and door liners or gaskets. WARMER...
... and dry immediately to clean the grille, the open areas behind the light shield in refrigerator or reconnect power. ■ For stainless steel models, stainless steel is no need to avoid water spots. Plug in the freezer (on exterior surfaces (doors and cabinet), plastic parts, interior and door liners or gaskets. WARMER...
User Instructions
Page 12
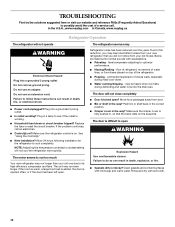
...if the outlet is opened often, or if the door has been left open. In the U.S.A., www.maytag.com In Canada, www.maytag.ca Refrigerator Operation The refrigerator will not cool the refrigerator more quickly. If the problem continues, call . See "Using the Control(s)." ■ New installation? ...; Bin or shelf in the way? Move food packages away from your new refrigerator that the back rests on . Failure to possibly avoid the cost of a service call an electrician. ■ Control(s) on top of water lines, or from items placed on ? Failure to optimize performance....
...if the outlet is opened often, or if the door has been left open. In the U.S.A., www.maytag.com In Canada, www.maytag.ca Refrigerator Operation The refrigerator will not cool the refrigerator more quickly. If the problem continues, call . See "Using the Control(s)." ■ New installation? ...; Bin or shelf in the way? Move food packages away from your new refrigerator that the back rests on . Failure to possibly avoid the cost of a service call an electrician. ■ Control(s) on top of water lines, or from items placed on ? Failure to optimize performance....
User Instructions
Page 13
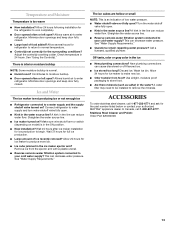
...■ Odor transfer from the ejector arm with a plastic utensil. ■ Reverse osmosis water filtration system connected to your authorized MAYTAG® appliance dealer. This can cause discolored or off-flavored ice. ■ Ice stored too long? New plumbing connections can decrease... water pressure. Allow 24 hours for full ice production. ■ Large amount of ice recently removed? Allows warm air to enter refrigerator. Adjust the control(s) a setting colder. Minimize door openings and keep door fully closed . Allow 24 hours for the surrounding conditions?...
...■ Odor transfer from the ejector arm with a plastic utensil. ■ Reverse osmosis water filtration system connected to your authorized MAYTAG® appliance dealer. This can cause discolored or off-flavored ice. ■ Ice stored too long? New plumbing connections can decrease... water pressure. Allow 24 hours for full ice production. ■ Large amount of ice recently removed? Allows warm air to enter refrigerator. Adjust the control(s) a setting colder. Minimize door openings and keep door fully closed . Allow 24 hours for the surrounding conditions?...
User Instructions
Page 14
...United States or Canada and applies only when the major appliance is required to obtain service under this limited warranty. Service calls to refrigerator or freezer product failures. 7. Consumable parts are excluded from accident, alteration, misuse, abuse, fire, flood, acts of God, improper installation,.... 2. The removal and reinstallation of purchase. 6. For assistance or service in your major appliance if it is reported to Maytag within 30 days from unauthorized modifications made to province. YOUR SOLE AND EXCLUSIVE REMEDY UNDER THIS LIMITED WARRANTY SHALL BE PRODUCT REPAIR...
...United States or Canada and applies only when the major appliance is required to obtain service under this limited warranty. Service calls to refrigerator or freezer product failures. 7. Consumable parts are excluded from accident, alteration, misuse, abuse, fire, flood, acts of God, improper installation,.... 2. The removal and reinstallation of purchase. 6. For assistance or service in your major appliance if it is reported to Maytag within 30 days from unauthorized modifications made to province. YOUR SOLE AND EXCLUSIVE REMEDY UNDER THIS LIMITED WARRANTY SHALL BE PRODUCT REPAIR...


