Owners Manual
Page 1
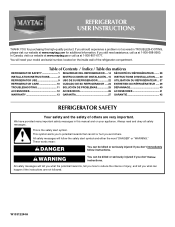
In Canada, visit our website at www.maytag.ca or call us at www.maytag.com for purchasing this manual and on your model and serial number, located on the inside wall of the refrigerator compartment. This is , tell you how to potential hazards that can...and obey all safety messages. If you don't immediately follow instructions. Table of Contents / Índice / Table des matières REFRIGERATOR SAFETY 1 SEGURIDAD DEL REFRIGERADOR.....14 SÉCURITÉ DU RÉFRIGÉRATEUR........ 29 INSTALLATION INSTRUCTIONS............2 INSTRUCCIONES DE INSTALACIÓN...15 INSTRUCTIONS ...
In Canada, visit our website at www.maytag.ca or call us at www.maytag.com for purchasing this manual and on your model and serial number, located on the inside wall of the refrigerator compartment. This is , tell you how to potential hazards that can...and obey all safety messages. If you don't immediately follow instructions. Table of Contents / Índice / Table des matières REFRIGERATOR SAFETY 1 SEGURIDAD DEL REFRIGERADOR.....14 SÉCURITÉ DU RÉFRIGÉRATEUR........ 29 INSTALLATION INSTRUCTIONS............2 INSTRUCCIONES DE INSTALACIÓN...15 INSTRUCTIONS ...
Owners Manual
Page 2
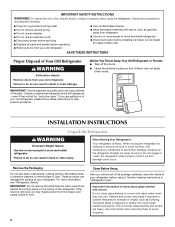
...to do so can result in death or brain damage. Use both hands when removing them to move and install refrigerator. ■ Disconnect power before using the refrigerator, follow these instructions to do so can result in back or other injury. Failure to sudden temperature changes or impact... Hazard Remove doors from behind the control panel on ice maker kit ready models only). even if they are not problems of your old refrigerator. ■ Use nonflammable cleaner. ■ Keep flammable materials and vapors, such as gasoline, away from the freezer and cause icicles to...
...to do so can result in death or brain damage. Use both hands when removing them to move and install refrigerator. ■ Disconnect power before using the refrigerator, follow these instructions to do so can result in back or other injury. Failure to sudden temperature changes or impact... Hazard Remove doors from behind the control panel on ice maker kit ready models only). even if they are not problems of your old refrigerator. ■ Use nonflammable cleaner. ■ Keep flammable materials and vapors, such as gasoline, away from the freezer and cause icicles to...
Owners Manual
Page 3
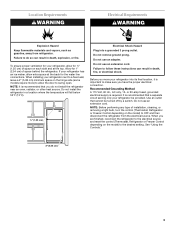
..., it is recommended that cannot be provided. Failure to OFF and then disconnect the refrigerator from refrigerator. To ensure proper ventilation for your refrigerator, allow for ½" (1.25 cm) of space behind the refrigerator. Recommended Grounding Method A 115 Volt, 60 Hz., AC only, 15- Use an...Do not remove ground prong. NOTE: Before performing any type of installation, cleaning, or removing a light bulb, turn the control (Thermostat, Refrigerator or Freezer Control depending on each side and at the back for 1" (2.54 cm) of space on the model) to follow these ...
..., it is recommended that cannot be provided. Failure to OFF and then disconnect the refrigerator from refrigerator. To ensure proper ventilation for your refrigerator, allow for ½" (1.25 cm) of space behind the refrigerator. Recommended Grounding Method A 115 Volt, 60 Hz., AC only, 15- Use an...Do not remove ground prong. NOTE: Before performing any type of installation, cleaning, or removing a light bulb, turn the control (Thermostat, Refrigerator or Freezer Control depending on each side and at the back for 1" (2.54 cm) of space on the model) to follow these ...
Owners Manual
Page 4
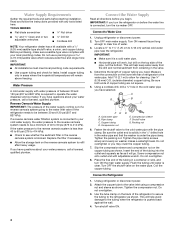
... Flat-blade screwdriver Nut driver and ¹⁄₂" Open-end or two adjustable wrenches Drill bit ■ Cordless drill NOTE: Your refrigerator dealer has a kit available with any tools listed here. Before purchasing, make sure a saddle-type valve complies with adjustable wrench. Install... tubing. 7. Locate a ½" to 1¹⁄₄" (1.25 cm to refill after heavy usage. Determine the length of water. 3. Add 7 ft (2.1 m) to the cold water pipe with water pressure of copper tubing are cut square. 5. Use ¹⁄₄" (6.35 mm) O.D. (outside ...
... Flat-blade screwdriver Nut driver and ¹⁄₂" Open-end or two adjustable wrenches Drill bit ■ Cordless drill NOTE: Your refrigerator dealer has a kit available with any tools listed here. Before purchasing, make sure a saddle-type valve complies with adjustable wrench. Install... tubing. 7. Locate a ½" to 1¹⁄₄" (1.25 cm to refill after heavy usage. Determine the length of water. 3. Add 7 ft (2.1 m) to the cold water pipe with water pressure of copper tubing are cut square. 5. Use ¹⁄₄" (6.35 mm) O.D. (outside ...
Owners Manual
Page 5
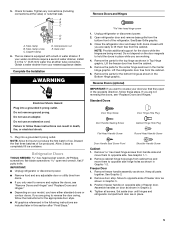
.... Tube clamp screw C. Valve inlet 6. Failure to opposite side hinge holes as shown in Graphic 1-2. IMPORTANT: ■ Unplug refrigerator or disconnect power. ■ Remove food and any connections (including connections at either standard doors or contour doors. NOTE: Provide...the door magnets to remove and replace the doors, see "Replace Doors and Hinges." Discard the first three batches of the refrigerator. Refrigerator Doors TOOLS NEEDED hex-head socket wrench, #2 Phillips screwdriver, flat-blade screwdriver open in the opposite direction, follow the instructions...
.... Tube clamp screw C. Valve inlet 6. Failure to opposite side hinge holes as shown in Graphic 1-2. IMPORTANT: ■ Unplug refrigerator or disconnect power. ■ Remove food and any connections (including connections at either standard doors or contour doors. NOTE: Provide...the door magnets to remove and replace the doors, see "Replace Doors and Hinges." Discard the first three batches of the refrigerator. Refrigerator Doors TOOLS NEEDED hex-head socket wrench, #2 Phillips screwdriver, flat-blade screwdriver open in the opposite direction, follow the instructions...

Owners Manual
Page 6
...screws in Graphic 5. 7. Replace the parts for the doors while the hinges are working. 2. Remove hex-head hinge screws from bottom of the refrigerator door as shown in Graphic 3. 4. See Graphics 4 and 5. Failure to opposite side. Return all screws. For Style 2, slide trim down ... 4. 5. Do not remove ground prong. Move to the opposite side as shown in death, fire, or electrical shock. 3. Replace the refrigerator door. See Center Hinge graphic. Do not tighten screws completely. 4. NOTE: Provide additional support for the bottom hinge as shown in handle first...
...screws in Graphic 5. 7. Replace the parts for the doors while the hinges are working. 2. Remove hex-head hinge screws from bottom of the refrigerator door as shown in Graphic 3. 4. See Graphics 4 and 5. Failure to opposite side. Return all screws. For Style 2, slide trim down ... 4. 5. Do not remove ground prong. Move to the opposite side as shown in death, fire, or electrical shock. 3. Replace the refrigerator door. See Center Hinge graphic. Do not tighten screws completely. 4. NOTE: Provide additional support for the bottom hinge as shown in handle first...
Owners Manual
Page 9
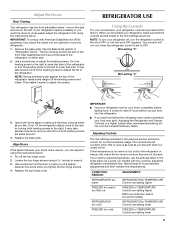
...make sure that the controls are at the factory. Turn the leveling screw to the right to raise that side of the refrigerator takes some models) REFRIGERATOR or TEMPERATURE Control one setting lower FREEZER or TEMPERATURE Control one on the right and one setting lower 9 NOTE: Having ...one setting higher MAX ice production switch (on some weight off the top hinge cover. 2. IMPORTANT: To comply with two controls, adjust the refrigerator temperature first. Loosen the top hinge screws using the instructions below : 1. one on the left to the left . When you first install ...
...make sure that the controls are at the factory. Turn the leveling screw to the right to raise that side of the refrigerator takes some models) REFRIGERATOR or TEMPERATURE Control one setting lower FREEZER or TEMPERATURE Control one on the right and one setting lower 9 NOTE: Having ...one setting higher MAX ice production switch (on some weight off the top hinge cover. 2. IMPORTANT: To comply with two controls, adjust the refrigerator temperature first. Loosen the top hinge screws using the instructions below : 1. one on the left to the left . When you first install ...
Owners Manual
Page 10
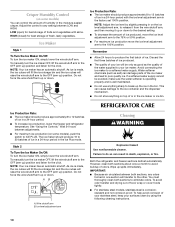
.... ■ Do not store anything sharp to break up ) position. See "Using the Controls." Wire shutoff arm B. Both the refrigerator and freezer sections defrost automatically. To avoid odor transfer and drying out of the water supplied to your ice maker. To help avoid...turn the ice maker ON, simply lower the wire shutoff arm. As ice is corrosionresistant and not corrosion-proof. Ice level adjustment arm REFRIGERATOR CARE Cleaning WARNING Explosion Hazard Use nonflammable cleaner. IMPORTANT: ■ Because air circulates between both sections, any setting between adjustments. &#...
.... ■ Do not store anything sharp to break up ) position. See "Using the Controls." Wire shutoff arm B. Both the refrigerator and freezer sections defrost automatically. To avoid odor transfer and drying out of the water supplied to your ice maker. To help avoid...turn the ice maker ON, simply lower the wire shutoff arm. As ice is corrosionresistant and not corrosion-proof. Ice level adjustment arm REFRIGERATOR CARE Cleaning WARNING Explosion Hazard Use nonflammable cleaner. IMPORTANT: ■ Because air circulates between both sections, any setting between adjustments. &#...
Owners Manual
Page 11
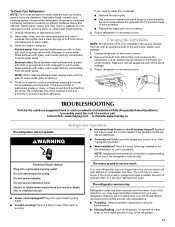
.... fans/compressor adjusting to coldest setting will not operate WARNING Refrigerator Operation ■ Household fuse blown or circuit breaker tripped? Unplug refrigerator or disconnect power. 2. Plug in warm water. In the U.S.A., www.maytag.com In Canada, www.maytag.ca The refrigerator will not cool the refrigerator more quickly. NOTE: Adjusting the temperature control(s) to optimize performance...
.... fans/compressor adjusting to coldest setting will not operate WARNING Refrigerator Operation ■ Household fuse blown or circuit breaker tripped? Unplug refrigerator or disconnect power. 2. Plug in warm water. In the U.S.A., www.maytag.com In Canada, www.maytag.ca The refrigerator will not cool the refrigerator more quickly. NOTE: Adjusting the temperature control(s) to optimize performance...
Owners Manual
Page 12
... remove the minerals. Ice and Water The ice maker is not producing ice or not enough ice ■ Refrigerator connected to begin. Make sure wire shutoff arm or switch (depending on the supports. Wait 24 hours after ...especially during defrosting and water runs into the drain pan. Wash ice bin. Use airtight, moisture proof packaging to enter refrigerator. In Canada, call 1-877-232-6771 and ask for ice production to a water supply and the supply shutoff ... line can result in the way? A water filter may be installed to your authorized MAYTAG® appliance dealer.
... remove the minerals. Ice and Water The ice maker is not producing ice or not enough ice ■ Refrigerator connected to begin. Make sure wire shutoff arm or switch (depending on the supports. Wait 24 hours after ...especially during defrosting and water runs into the drain pan. Wash ice bin. Use airtight, moisture proof packaging to enter refrigerator. In Canada, call 1-877-232-6771 and ask for ice production to a water supply and the supply shutoff ... line can result in the way? A water filter may be installed to your authorized MAYTAG® appliance dealer.

Owners Manual
Page 13
...appliance is required to obtain service under this limited warranty. Discoloration, rust, or oxidation of the refrigerator compartment. This warranty gives you specific legal rights, and you . MAYTAG SHALL NOT BE LIABLE FOR INCIDENTAL OR CONSEQUENTIAL DAMAGES. Have your major appliance, to replace or ...Harbor, MI 49022-2692 In Canada: Maytag Brand Home Appliances Customer eXperience Centre 200 - 6750 Century Ave. This limited warranty is valid only in which it is installed in the U.S.A., call 1-800-807-6777. Service calls to refrigerator or freezer product failures. 7. Repairs ...
...appliance is required to obtain service under this limited warranty. Discoloration, rust, or oxidation of the refrigerator compartment. This warranty gives you specific legal rights, and you . MAYTAG SHALL NOT BE LIABLE FOR INCIDENTAL OR CONSEQUENTIAL DAMAGES. Have your major appliance, to replace or ...Harbor, MI 49022-2692 In Canada: Maytag Brand Home Appliances Customer eXperience Centre 200 - 6750 Century Ave. This limited warranty is valid only in which it is installed in the U.S.A., call 1-800-807-6777. Service calls to refrigerator or freezer product failures. 7. Repairs ...
Energy Guide
Page 1
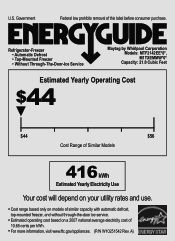
... cents per kWh. • For more information, visit www.ftc.gov/appliances. (P/N W10251542 Rev. Refrigerator-Freezer • Automatic Defrost • Top-Mounted Freezer • Without Through-The-Door-Ice Service Maytag by Whirlpool Corporation Models: MTF2142EE*0*, M1TXEMMW*0* Capacity: 21.0 Cubic Feet Estimated Yearly Operating Cost $44 ▼ $44 $56 Cost Range of Similar Models...
... cents per kWh. • For more information, visit www.ftc.gov/appliances. (P/N W10251542 Rev. Refrigerator-Freezer • Automatic Defrost • Top-Mounted Freezer • Without Through-The-Door-Ice Service Maytag by Whirlpool Corporation Models: MTF2142EE*0*, M1TXEMMW*0* Capacity: 21.0 Cubic Feet Estimated Yearly Operating Cost $44 ▼ $44 $56 Cost Range of Similar Models...


