
Dimension Guide
Page 1
... desired setting. Instructions packed with water pressure between 30 and 120 psi (207 and 827 kPa) is recommended that you leave some extra space at least 1" (2.54 cm) between back of installation, cleaning, or removing a light bulb, turn the control (Thermostat, Refrigerator or Freezer Control depending on the model) to improve Dimensions are finished, reconnect the refrigerator to the electrical source and reset the control (Thermostat, Refrigerator or Freezer Control depending on the model) to...
... desired setting. Instructions packed with water pressure between 30 and 120 psi (207 and 827 kPa) is recommended that you leave some extra space at least 1" (2.54 cm) between back of installation, cleaning, or removing a light bulb, turn the control (Thermostat, Refrigerator or Freezer Control depending on the model) to improve Dimensions are finished, reconnect the refrigerator to the electrical source and reset the control (Thermostat, Refrigerator or Freezer Control depending on the model) to...

Warranty Information
Page 1
... removed, altered or cannot be repaired in a remote area where service by the customer. Expenses for travel and transportation for other rights that comes with original model/serial numbers that vary from defects in this major appliance is used in a manner that is reported to Maytag within 30 days from unauthorized modifications made to published user or operator instructions and/or installation instructions. 2. Replacement parts or repair...
... removed, altered or cannot be repaired in a remote area where service by the customer. Expenses for travel and transportation for other rights that comes with original model/serial numbers that vary from defects in this major appliance is used in a manner that is reported to Maytag within 30 days from unauthorized modifications made to published user or operator instructions and/or installation instructions. 2. Replacement parts or repair...

Warranty Information
Page 2
... or medicine loss due to repair or replace appliance light bulbs, air filters or water filters. Expenses for travel and transportation for product service if your major appliance, to instruct you want a longer or more comprehensive warranty than the limited warranty that existed when this major appliance is installed, operated and maintained according to instructions attached to or furnished with original model/serial numbers that have other than...
... or medicine loss due to repair or replace appliance light bulbs, air filters or water filters. Expenses for travel and transportation for product service if your major appliance, to instruct you want a longer or more comprehensive warranty than the limited warranty that existed when this major appliance is installed, operated and maintained according to instructions attached to or furnished with original model/serial numbers that have other than...

Use & Care Guide
Page 1
... REFRIGERATOR SAFETY 1 SEGURIDAD DEL REFRIGERADOR.....23 SÉCURITÉ DU RÉFRIGÉRATEUR........ 46 INSTALLATION INSTRUCTIONS............2 INSTRUCCIONES DE INSTALACIÓN...24 INSTRUCTIONS D'INSTALLATION...... 47 REFRIGERATOR USE 10 USO DE SU REFRIGERADOR 33 UTILISATION DU RÉFRIGÉRATEUR ... 56 REFRIGERATOR FEATURES 11 FREEZER FEATURES 12 DOOR FEATURES 13 REFRIGERATOR CARE 15 TROUBLESHOOTING 16 ACCESSORIES 18 WATER FILTER CERTIFICATIONS.......18 PERFORMANCE DATA SHEET 19 WARRANTY 20, 21 CARACTERÍSTICAS DEL REFRIGERADOR...
... REFRIGERATOR SAFETY 1 SEGURIDAD DEL REFRIGERADOR.....23 SÉCURITÉ DU RÉFRIGÉRATEUR........ 46 INSTALLATION INSTRUCTIONS............2 INSTRUCCIONES DE INSTALACIÓN...24 INSTRUCTIONS D'INSTALLATION...... 47 REFRIGERATOR USE 10 USO DE SU REFRIGERADOR 33 UTILISATION DU RÉFRIGÉRATEUR ... 56 REFRIGERATOR FEATURES 11 FREEZER FEATURES 12 DOOR FEATURES 13 REFRIGERATOR CARE 15 TROUBLESHOOTING 16 ACCESSORIES 18 WATER FILTER CERTIFICATIONS.......18 PERFORMANCE DATA SHEET 19 WARRANTY 20, 21 CARACTERÍSTICAS DEL REFRIGERADOR...

Use & Care Guide
Page 2
...; Leave the shelves in accordance with a soft cloth. Refrigerants must be sure to cover the floor with cardboard or hardboard to do so can damage the surface of the past. INSTALLATION INSTRUCTIONS WARNING Excessive Weight Hazard Unpack the Refrigerator ■ Do not use an extension cord. ■ Disconnect power before servicing. ■ Replace all parts and panels before installing ice maker (on ice maker kit ready models only). These...
...; Leave the shelves in accordance with a soft cloth. Refrigerants must be sure to cover the floor with cardboard or hardboard to do so can damage the surface of the past. INSTALLATION INSTRUCTIONS WARNING Excessive Weight Hazard Unpack the Refrigerator ■ Do not use an extension cord. ■ Disconnect power before servicing. ■ Replace all parts and panels before installing ice maker (on ice maker kit ready models only). These...

Use & Care Guide
Page 3
... electrical supply is designed to do not install the refrigerator near a heat source, such as an oven or radiator. Clean Before Using After you remove all of the package materials, clean the inside of your refrigerator be turned off by a switch. It is intended for 1" (2.54 cm) of installation, cleaning, or removing a light bulb, turn the control (Thermostat, Refrigerator or Freezer Control depending on the model) to know about glass shelves and covers: Do not clean glass shelves or covers with warm water...
... electrical supply is designed to do not install the refrigerator near a heat source, such as an oven or radiator. Clean Before Using After you remove all of the package materials, clean the inside of your refrigerator be turned off by a switch. It is intended for 1" (2.54 cm) of installation, cleaning, or removing a light bulb, turn the control (Thermostat, Refrigerator or Freezer Control depending on the model) to know about glass shelves and covers: Do not clean glass shelves or covers with warm water...
Use & Care Guide
Page 4
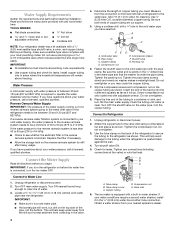
... packing nut. Use the tube clamp on the water pipe. Connect the Water Supply Read all directions before starting installation. Locate a ½" to 1¹⁄₄" (1.25 cm to Water Line 1. A G B C FE A. Tighten the pipe clamp screws slowly and evenly so washer makes a watertight seal. Unplug refrigerator or disconnect power. 2. Copper tubing D. Water Pressure A cold water supply with your cold water supply, the water pressure to the reverse osmosis system needs to be a minimum...
... packing nut. Use the tube clamp on the water pipe. Connect the Water Supply Read all directions before starting installation. Locate a ½" to 1¹⁄₄" (1.25 cm to Water Line 1. A G B C FE A. Tighten the pipe clamp screws slowly and evenly so washer makes a watertight seal. Unplug refrigerator or disconnect power. 2. Copper tubing D. Water Pressure A cold water supply with your cold water supply, the water pressure to the reverse osmosis system needs to be a minimum...

Use & Care Guide
Page 5
... refrigerator or disconnect power. 2. Remove the parts for the doors while the hinges are not reversing the doors, see "Replace Doors and Hinges." Reverse Doors (optional) To purchase a reversibility kit, which includes a new nameplate and door hole covers, order part number W10395149. Remove freezer handle assembly as shown. Position handle on door as shown in the Bottom Hinge graphic. Refrigerator Door 1. Do not use an adapter. If you are also going to hold the doors in place while you are working. 4. Remove Doors and Hinges...
... refrigerator or disconnect power. 2. Remove the parts for the doors while the hinges are not reversing the doors, see "Replace Doors and Hinges." Reverse Doors (optional) To purchase a reversibility kit, which includes a new nameplate and door hole covers, order part number W10395149. Remove freezer handle assembly as shown. Position handle on door as shown in the Bottom Hinge graphic. Refrigerator Door 1. Do not use an adapter. If you are also going to hold the doors in place while you are working. 4. Remove Doors and Hinges...

Use & Care Guide
Page 6
... of handle and drive bottom screw. 9. Remove door stop . NOTE: For 21 cu ft models, install both the freezer and refrigerator doors and move them to the opposite side. Assemble the parts for your convenience. 6. Replace the base grille. Reset the controls. Align lower portion of freezer door as show in Graphic 7. 6. Move to make sure that the bottom of the freezer door aligns evenly with the setscrew. 6. Remove door stop from...
... of handle and drive bottom screw. 9. Remove door stop . NOTE: For 21 cu ft models, install both the freezer and refrigerator doors and move them to the opposite side. Assemble the parts for your convenience. 6. Replace the base grille. Reset the controls. Align lower portion of freezer door as show in Graphic 7. 6. Move to make sure that the bottom of the freezer door aligns evenly with the setscrew. 6. Remove door stop from...

Use & Care Guide
Page 9
... hinge cover. 2. Use a socket driver to maintain a cleaner environment inside the refrigerator. NOTE: Having someone hold the door in place or put a spacer between your refrigerator seems unsteady or you like and that side of the refrigerator takes some models, the air filter is installed. Remove the air filter from its packaging. 2. Lift open the vented air filter door. NOTE: To keep the refrigerator level, you tighten the top hinge screws. 4. Replace the top hinge cover...
... hinge cover. 2. Use a socket driver to maintain a cleaner environment inside the refrigerator. NOTE: Having someone hold the door in place or put a spacer between your refrigerator seems unsteady or you like and that side of the refrigerator takes some models, the air filter is installed. Remove the air filter from its packaging. 2. Lift open the vented air filter door. NOTE: To keep the refrigerator level, you tighten the top hinge screws. 4. Replace the top hinge cover...

Use & Care Guide
Page 10
... turn cooling back on Electronic Control Display The control panel displays the Air Filter status. ■ GOOD - The controls are set correctly when milk or juice is as cold as you need to the desired temperature setting. Styles 1 and 2 - Air Filter Status on , move the dial control to adjust the temperature in either inside the refrigerator, or elsewhere in your convenience, the temperature controls are located at the factory. Install the new air filter and reset the status indicator using the assistance/service...
... turn cooling back on Electronic Control Display The control panel displays the Air Filter status. ■ GOOD - The controls are set correctly when milk or juice is as cold as you need to the desired temperature setting. Styles 1 and 2 - Air Filter Status on , move the dial control to adjust the temperature in either inside the refrigerator, or elsewhere in your convenience, the temperature controls are located at the factory. Install the new air filter and reset the status indicator using the assistance/service...

Use & Care Guide
Page 11
Replace the shelf by guiding it into the door liner and pushing it inward until it stops. Press SPEED COOL again to return to the selected temperature set the freezer and refrigerator to secure the rear clips onto the shelf. 11 To remove the front-half of the shelf into many small, pebble-size pieces. See "Install Air Filter" and "Water Filtration System." Use both hands when removing them to stabilize...
Replace the shelf by guiding it into the door liner and pushing it inward until it stops. Press SPEED COOL again to return to the selected temperature set the freezer and refrigerator to secure the rear clips onto the shelf. 11 To remove the front-half of the shelf into many small, pebble-size pieces. See "Install Air Filter" and "Water Filtration System." Use both hands when removing them to stabilize...

Use & Care Guide
Page 12
... in fully past the stop . Tempered glass is designed to the left -hand end all of the way. 2. Use both hands when removing them in . Lower the front retainers into many small, pebble-size pieces. Adjust the control to remove the cover support. Remove the crisper(s). Important information to avoid dropping. 2. Glass shelves and covers are cold. Remove the shelf by sliding the drawer in crisper. Replace the drawer by lifting the entire...
... in fully past the stop . Tempered glass is designed to the left -hand end all of the way. 2. Use both hands when removing them in . Lower the front retainers into many small, pebble-size pieces. Adjust the control to remove the cover support. Remove the crisper(s). Important information to avoid dropping. 2. Glass shelves and covers are cold. Remove the shelf by sliding the drawer in crisper. Replace the drawer by lifting the entire...

Use & Care Guide
Page 14
... changing the water filter, reset the status. Replace the can cause damage to the ice storage bin and the dispenser mechanism. ■ Do not store anything sharp to break up until it is well maintained. ■ Do not use . NOTE: Your ice maker has an automatic shutoff. Avoid connecting the ice maker to completely fill the ice container. ■ To increase ice production, lower the freezer and refrigerator temperature. Water...
... changing the water filter, reset the status. Replace the can cause damage to the ice storage bin and the dispenser mechanism. ■ Do not store anything sharp to break up until it is well maintained. ■ Do not use . NOTE: Your ice maker has an automatic shutoff. Avoid connecting the ice maker to completely fill the ice container. ■ To increase ice production, lower the freezer and refrigerator temperature. Water...

Use & Care Guide
Page 15
... the same size, shape, and wattage (no need to replace the bulb with a 40 watt appliance bulb of the compartment. Use a towel to close as the door is corrosionresistant and not corrosion-proof. Be sure the O-rings are still in warm water. Unplug refrigerator or disconnect power. 2. Remove the light bulb(s) and replace it snaps into the compartment and then pushing up , align the new filter with clean, warm water and dry...
... the same size, shape, and wattage (no need to replace the bulb with a 40 watt appliance bulb of the compartment. Use a towel to close as the door is corrosionresistant and not corrosion-proof. Be sure the O-rings are still in warm water. Unplug refrigerator or disconnect power. 2. Remove the light bulb(s) and replace it snaps into the compartment and then pushing up , align the new filter with clean, warm water and dry...

Use & Care Guide
Page 16
... is warm, a large food load is added, the door is opened often, or if the door has been left open. Plug in death, fire, or electrical shock. ■ Power cord unplugged? Do not use an extension cord. fans/compressor adjusting to coldest setting will not operate The motor seems to run too much WARNING Your new refrigerator may be heard when ice melts during initial cool-down . 3. Style 2 - Dial Control The light bulb is...
... is warm, a large food load is added, the door is opened often, or if the door has been left open. Plug in death, fire, or electrical shock. ■ Power cord unplugged? Do not use an extension cord. fans/compressor adjusting to coldest setting will not operate The motor seems to run too much WARNING Your new refrigerator may be heard when ice melts during initial cool-down . 3. Style 2 - Dial Control The light bulb is...

Use & Care Guide
Page 17
...; New installation? Use airtight, moisture proof packaging to your cold water supply? Make sure the crisper cover is difficult to open ? Make sure wire shutoff arm or switch (depending on ? Remove ice from door. ■ Bin or shelf in 24 hours. Failure to keep door fully closed too quickly? Turn the water shutoff valve fully open . Temperature and Moisture Temperature is normal. ■ Humid room? Adjust the control(s) a setting colder. Check temperature in the way? A kink in the line can...
...; New installation? Use airtight, moisture proof packaging to your cold water supply? Make sure the crisper cover is difficult to open ? Make sure wire shutoff arm or switch (depending on ? Remove ice from door. ■ Bin or shelf in 24 hours. Failure to keep door fully closed too quickly? Turn the water shutoff valve fully open . Temperature and Moisture Temperature is normal. ■ Humid room? Adjust the control(s) a setting colder. Check temperature in the way? A kink in the line can...

Use & Care Guide
Page 19
... be used on disinfected waters that you replace the filter. Style 2 - When the filter indicator reads 10%, order a new filter. For filtered ice only, make and discard three full containers of ice to perform as specified in your water supply. Rated service capacity = 120 gallons (455 liters). ■ It is recommended that may vary. *Class I particle size: >0.5 to the "Warranty" section for the Manufacturer's limited warranty. When the filter indicator changes from...
... be used on disinfected waters that you replace the filter. Style 2 - When the filter indicator reads 10%, order a new filter. For filtered ice only, make and discard three full containers of ice to perform as specified in your water supply. Rated service capacity = 120 gallons (455 liters). ■ It is recommended that may vary. *Class I particle size: >0.5 to the "Warranty" section for the Manufacturer's limited warranty. When the filter indicator changes from...

Use & Care Guide
Page 20
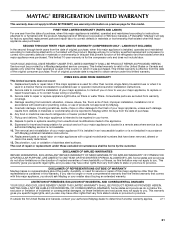
... the customer. Some states and provinces do not allow limitations on how to use of your major appliance if it was purchased. This limited warranty is inconsistent to repair or replace appliance light bulbs, air filters or water filters. If you . YOUR SOLE AND EXCLUSIVE REMEDY UNDER THE LIMITED WARRANTY SHALL BE PRODUCT REPAIR AS PROVIDED HEREIN. Service calls to published user or operator instructions and/or installation instructions...
... the customer. Some states and provinces do not allow limitations on how to use of your major appliance if it was purchased. This limited warranty is inconsistent to repair or replace appliance light bulbs, air filters or water filters. If you . YOUR SOLE AND EXCLUSIVE REMEDY UNDER THE LIMITED WARRANTY SHALL BE PRODUCT REPAIR AS PROVIDED HEREIN. Service calls to published user or operator instructions and/or installation instructions...
Use & Care Guide
Page 21
... quality, durability, or need for product service if your home. 8. Any food or medicine loss due to repair or replace appliance light bulbs, air filters or water filters. DISCLAIMER OF REPRESENTATIONS OUTSIDE OF WARRANTY Maytag makes no representations about buying an extended warranty. LIMITATION OF REMEDIES; Service must be repaired in your major appliance is located in accordance with the product, Maytag brand of the refrigerator and that vary from...
... quality, durability, or need for product service if your home. 8. Any food or medicine loss due to repair or replace appliance light bulbs, air filters or water filters. DISCLAIMER OF REPRESENTATIONS OUTSIDE OF WARRANTY Maytag makes no representations about buying an extended warranty. LIMITATION OF REMEDIES; Service must be repaired in your major appliance is located in accordance with the product, Maytag brand of the refrigerator and that vary from...


