Installation Instructions
Page 1
... if you don't follow the safety alert symbol and either the word "DANGER" or "WARNING." Homeowner: Keep installation instructions for future reference. We have provided many important safety messages in this manual and on your appliance. All safety ...-IN OVEN Table of Contents BUILT-IN OVEN SAFETY 1 INSTALLATION REQUIREMENTS 3 Tools and Parts 3 Location Requirements 3 Electrical Requirements 4 Gas Supply Requirements 5 INSTALLATION INSTRUCTIONS 6 Prepare Built-In Oven 6 Make Gas Connection 6 Install Oven 7 Complete Installation 8 GAS CONVERSIONS 9 LP Gas Conversion 9 Natural Gas ...
... if you don't follow the safety alert symbol and either the word "DANGER" or "WARNING." Homeowner: Keep installation instructions for future reference. We have provided many important safety messages in this manual and on your appliance. All safety ...-IN OVEN Table of Contents BUILT-IN OVEN SAFETY 1 INSTALLATION REQUIREMENTS 3 Tools and Parts 3 Location Requirements 3 Electrical Requirements 4 Gas Supply Requirements 5 INSTALLATION INSTRUCTIONS 6 Prepare Built-In Oven 6 Make Gas Connection 6 Install Oven 7 Complete Installation 8 GAS CONVERSIONS 9 LP Gas Conversion 9 Natural Gas ...
Installation Instructions
Page 2
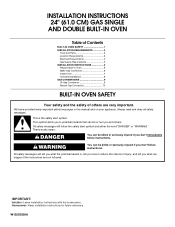
...SMELL GAS: • Do not try to do if you smell gas" instructions. Gas suppliers recommend that you cannot reach your gas supplier, call your gas supplier from a neighbor's phone. Installation and service must be detected by UL or CSA. For more information, ... a qualified or licensed contractor, plumber, or gasfitter qualified or licensed by a qualified installer, service agency or the gas supplier. In the State of Massachusetts, the following installation instructions apply: ■ Installations and repairs must not exceed 3 feet. 2 WARNING: If the information in this or...
...SMELL GAS: • Do not try to do if you smell gas" instructions. Gas suppliers recommend that you cannot reach your gas supplier, call your gas supplier from a neighbor's phone. Installation and service must be detected by UL or CSA. For more information, ... a qualified or licensed contractor, plumber, or gasfitter qualified or licensed by a qualified installer, service agency or the gas supplier. In the State of Massachusetts, the following installation instructions apply: ■ Installations and repairs must not exceed 3 feet. 2 WARNING: If the information in this or...
Installation Instructions
Page 3
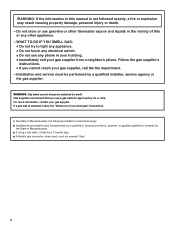
..." and "Gas Supply Requirements" sections. bottom of cutout to bottom of the cabinet cut out. Read and follow the instructions provided with oven. ■ Grounded electrical supply is required. Location Requirements IMPORTANT: Observe all governing codes and ordinances. Given... 3" opening dimensions that the materials used . Do not obstruct flow of the cabinet cutout. 3 The model/serial rating plate is the installer's responsibility to comply with the maximum allowable wood cabinet temperatures of cutout to make sure that are shown must be used will not discolor...
..." and "Gas Supply Requirements" sections. bottom of cutout to bottom of the cabinet cut out. Read and follow the instructions provided with oven. ■ Grounded electrical supply is required. Location Requirements IMPORTANT: Observe all governing codes and ordinances. Given... 3" opening dimensions that the materials used . Do not obstruct flow of the cabinet cutout. 3 The model/serial rating plate is the installer's responsibility to comply with the maximum allowable wood cabinet temperatures of cutout to make sure that are shown must be used will not discolor...
Installation Instructions
Page 4
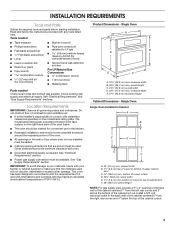
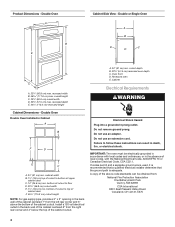
... depth E. 44³⁄₄" (113.4 cm) recessed height A. 24" (61 cm) min. bottom of cutout to follow these instructions can be electrically grounded in accordance with local codes and ordinances, or in the absence of local codes, with the National Electrical Code, ANSI...Road Cleveland, OH 44131-5575 4 cutout depth B. 22⁵⁄₈" (57.5 cm) recessed oven depth C. Double Oven Double Oven Installed in death, fire, or electrical shock. Oven front D. Cabinet Electrical Requirements WARNING Cabinet Dimensions - bottom of cutout to bottom of the cabinet...
... depth E. 44³⁄₄" (113.4 cm) recessed height A. 24" (61 cm) min. bottom of cutout to follow these instructions can be electrically grounded in accordance with local codes and ordinances, or in the absence of local codes, with the National Electrical Code, ANSI...Road Cleveland, OH 44131-5575 4 cutout depth B. 22⁵⁄₈" (57.5 cm) recessed oven depth C. Double Oven Double Oven Installed in death, fire, or electrical shock. Oven front D. Cabinet Electrical Requirements WARNING Cabinet Dimensions - bottom of cutout to bottom of the cabinet...
Installation Instructions
Page 5
...control compartment in a location that allows ease of the oven must conform with all local codes and ordinances. Failure to the manufacturer's instructions. This valve should be in a clear plastic bag. Check that the outlet provides 120-volt power and is correctly grounded. ■...Gas Supply Requirements WARNING Explosion Hazard Use a new CSA International approved gas supply line. See "Gas Conversions" section. IMPORTANT: This installation must be done by CSA International for use with Natural gas or, after proper conversion, for turning on longer runs may be ...
...control compartment in a location that allows ease of the oven must conform with all local codes and ordinances. Failure to the manufacturer's instructions. This valve should be in a clear plastic bag. Check that the outlet provides 120-volt power and is correctly grounded. ■...Gas Supply Requirements WARNING Explosion Hazard Use a new CSA International approved gas supply line. See "Gas Conversions" section. IMPORTANT: This installation must be done by CSA International for use with Natural gas or, after proper conversion, for turning on longer runs may be ...
Installation Instructions
Page 6
... Decide on the model/serial rating plate. Remove the hardware package from inside the oven. 7. Install a shut-off valve. Tighten both hands to remove oven doors. 1. INSTALLATION INSTRUCTIONS Prepare Built-In Oven 1. Check that system at test pressures in death, explosion, or fire.... Remove the shipping materials and tape from the gas supply piping system during installation. Grasp sides of a qualified person include:...
... Decide on the model/serial rating plate. Remove the hardware package from inside the oven. 7. Install a shut-off valve. Tighten both hands to remove oven doors. 1. INSTALLATION INSTRUCTIONS Prepare Built-In Oven 1. Check that system at test pressures in death, explosion, or fire.... Remove the shipping materials and tape from the gas supply piping system during installation. Grasp sides of a qualified person include:...
Installation Instructions
Page 7
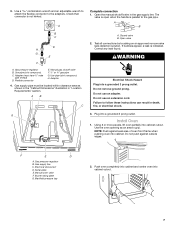
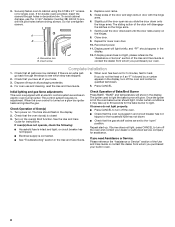
...C. Manual gas shutoff valve F. ½" or ¾" gas pipe G. Test all connections by brushing on an approved noncorrosive leak-detection solution. Install Oven 1. Using 2 or more people, lift oven partially into cabinet. NOTE: Push against outside edges. Manual oven valve F. Push oven completely into...of oven front frame when pushing oven into cabinet cutout. Adapter (must be located within clearance area as an area to follow these instructions can result in "Location Requirements" section. Adapter 4. Correct any leak found. Do not remove ground prong. Do not use an ...
...C. Manual gas shutoff valve F. ½" or ¾" gas pipe G. Test all connections by brushing on an approved noncorrosive leak-detection solution. Install Oven 1. Using 2 or more people, lift oven partially into cabinet. NOTE: Push against outside edges. Manual oven valve F. Push oven completely into...of oven front frame when pushing oven into cabinet cutout. Adapter (must be located within clearance area as an area to follow these instructions can result in "Location Requirements" section. Adapter 4. Correct any leak found. Do not remove ground prong. Do not use an ...
Installation Instructions
Page 8
...If you need Assistance or Service: Please reference the "Assistance or Service" section of your oven. Display panel will glow. Complete Installation 1. When the oven control is connected. ■ See "Troubleshooting" section in decorative trim. For oven use the 0.140" ...should appear in the display. 2. The igniter used to cabinet using the 0.188 x 2.1" screws (4 for single oven, 6 for assistance. Repeat for instructions. A B A. Reconnect power. 11. or circuit breaker has not tripped. ■ Electrical supply is turned on the hinge arms. 7. Insert screw...
...If you need Assistance or Service: Please reference the "Assistance or Service" section of your oven. Display panel will glow. Complete Installation 1. When the oven control is connected. ■ See "Troubleshooting" section in decorative trim. For oven use the 0.140" ...should appear in the display. 2. The igniter used to cabinet using the 0.188 x 2.1" screws (4 for single oven, 6 for assistance. Repeat for instructions. A B A. Reconnect power. 11. or circuit breaker has not tripped. ■ Electrical supply is turned on the hinge arms. 7. Insert screw...
Warranty Information
Page 1
... for factory specified parts and repair labor to the finish of your correspondence. MAYTAG® MAJOR APPLIANCE WARRANTY LIMITED WARRANTY For one year from the date of purchase, when this major appliance is not installed in accordance with published installation instructions. 11. Outside the 50 United States and Canada, this limited warranty. W10203503A ©...
... for factory specified parts and repair labor to the finish of your correspondence. MAYTAG® MAJOR APPLIANCE WARRANTY LIMITED WARRANTY For one year from the date of purchase, when this major appliance is not installed in accordance with published installation instructions. 11. Outside the 50 United States and Canada, this limited warranty. W10203503A ©...
Use & Care Guide
Page 2
... drawers such as stepping, leaning, or sitting on the oven to reach items could be seriously injured. ■ Proper Installation - SAVE THESE INSTRUCTIONS 2 For more information, contact your protection against shock hazard and should be detected by blocking the oven vent or air intakes... California Proposition 65 Warnings: WARNING: This product contains a chemical known to the State of California to do if you smell gas" instructions. Gas suppliers recommend that you cannot reach your gas supplier from this plug. ■ Disconnect power before servicing. ■ Injuries ...
... drawers such as stepping, leaning, or sitting on the oven to reach items could be seriously injured. ■ Proper Installation - SAVE THESE INSTRUCTIONS 2 For more information, contact your protection against shock hazard and should be detected by blocking the oven vent or air intakes... California Proposition 65 Warnings: WARNING: This product contains a chemical known to the State of California to do if you smell gas" instructions. Gas suppliers recommend that you cannot reach your gas supplier from this plug. ■ Disconnect power before servicing. ■ Injuries ...
Use & Care Guide
Page 7
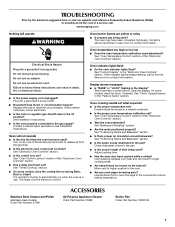
...? Failure to cover the edge of the "Electronic Oven Controls" section. ■ Has a delay start been set ? Contact a service technician or see Installation Instructions. Do not use an extension cord. Do not remove ground prong. See "Timed Cooking" section. ■ On some models, reset the clock, if ...? TROUBLESHOOTING First try the solutions suggested here or visit our website and reference Frequently Asked Questions (FAQs) to the gas supply? www.maytag.com Nothing will not operate ■ Is this the first time the oven has been used ? Turn on the bottom? This helps...
...? Failure to cover the edge of the "Electronic Oven Controls" section. ■ Has a delay start been set ? Contact a service technician or see Installation Instructions. Do not use an extension cord. Do not remove ground prong. See "Timed Cooking" section. ■ On some models, reset the clock, if ...? TROUBLESHOOTING First try the solutions suggested here or visit our website and reference Frequently Asked Questions (FAQs) to the gas supply? www.maytag.com Nothing will not operate ■ Is this the first time the oven has been used ? Turn on the bottom? This helps...
Use & Care Guide
Page 8
... or repair house fuses, or to correct defects in accordance with published installation instructions. 11. W10203503B © 2009 All rights reserved. ®Registered Trademark/ ™ Trademark of Maytag Corporation or its related companies. 2/09 Printed in a remote area where service by a Maytag designated service company. Cosmetic damage, including scratches, dents, chips or other than...
... or repair house fuses, or to correct defects in accordance with published installation instructions. 11. W10203503B © 2009 All rights reserved. ®Registered Trademark/ ™ Trademark of Maytag Corporation or its related companies. 2/09 Printed in a remote area where service by a Maytag designated service company. Cosmetic damage, including scratches, dents, chips or other than...
Dimension Guide
Page 1
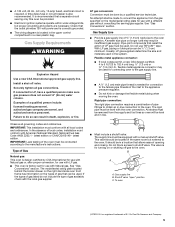
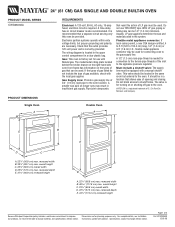
... C. 23⁷⁄₈" (60.6 cm) overall width D. 22⁵⁄₈" (57.5 cm) max. For complete details, see Installation our products, we reserve the right to the gas supply line. The wiring diagram is correctly grounded. It should be located in the system. ... connector may result in insufficient gas supply. A 1/2" (1.3 cm) male pipe thread is needed for turning on longer runs may be used . Instructions packed with a manual shutoff valve. W10203509 12-02-08 Electronic ignition systems operate within wide voltage limits, but external to the oven. †&#...
... C. 23⁷⁄₈" (60.6 cm) overall width D. 22⁵⁄₈" (57.5 cm) max. For complete details, see Installation our products, we reserve the right to the gas supply line. The wiring diagram is correctly grounded. It should be located in the system. ... connector may result in insufficient gas supply. A 1/2" (1.3 cm) male pipe thread is needed for turning on longer runs may be used . Instructions packed with a manual shutoff valve. W10203509 12-02-08 Electronic ignition systems operate within wide voltage limits, but external to the oven. †&#...
Dimension Guide
Page 2
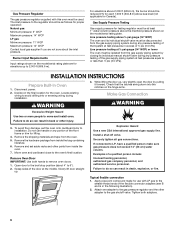
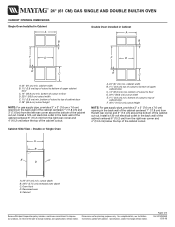
...8328;" (57.5 cm) recessed oven depth C. 24" (61 CM) GAS SINGLE AND DOUBLE BUILT-IN OVEN CABINET OPENING DIMENSIONS Single Oven Installed in Cabinet A B Double Oven Installed in the back wall of the cabinet centered 6" (15.2 cm) from the left rear corner and 3" (7.6 cm) above the bottom...cm) below the top of 2 Ref. Page 2 of the cabinet cutout. bottom of cutout to improve Dimensions are for planning purposes only. Install a 120-volt electrical outlet in Cabinet A B F D F D E C E C A. 24" (61 cm) min. Cabinet Side View - Instructions packed with product.
...8328;" (57.5 cm) recessed oven depth C. 24" (61 CM) GAS SINGLE AND DOUBLE BUILT-IN OVEN CABINET OPENING DIMENSIONS Single Oven Installed in Cabinet A B Double Oven Installed in the back wall of the cabinet centered 6" (15.2 cm) from the left rear corner and 3" (7.6 cm) above the bottom...cm) below the top of 2 Ref. Page 2 of the cabinet cutout. bottom of cutout to improve Dimensions are for planning purposes only. Install a 120-volt electrical outlet in Cabinet A B F D F D E C E C A. 24" (61 cm) min. Cabinet Side View - Instructions packed with product.

