Owners Manual
Page 2
...Always read and obey all safety messages. If a gas leak is , tell you how to do if you don't follow instructions. All safety messages will follow instructions. WARNING: Gas leaks cannot always be performed by smell. OVEN SAFETY Your safety and the safety of others . ...injured if you smell gas" instructions. 2 Follow the gas supplier's instructions. • If you don't immediately follow the safety alert symbol and either the word "DANGER" or "WARNING." Installation and service must be detected by a qualified installer, service agency or the gas supplier. We have ...
...Always read and obey all safety messages. If a gas leak is , tell you how to do if you don't follow instructions. All safety messages will follow instructions. WARNING: Gas leaks cannot always be performed by smell. OVEN SAFETY Your safety and the safety of others . ...injured if you smell gas" instructions. 2 Follow the gas supplier's instructions. • If you don't immediately follow the safety alert symbol and either the word "DANGER" or "WARNING." Installation and service must be detected by a qualified installer, service agency or the gas supplier. We have ...
Owners Manual
Page 3
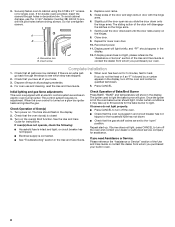
... Self-Cleaning the Oven - IMPORTANT SAFETY INSTRUCTIONS WARNING: To reduce the risk of fire, electrical shock, injury to persons, or damage when using the oven, follow basic precautions, including the following: ■ WARNING: NEVER use this plug. ■ Disconnect power before initiating the cleaning cycle. Be sure the oven is properly installed and grounded by...
... Self-Cleaning the Oven - IMPORTANT SAFETY INSTRUCTIONS WARNING: To reduce the risk of fire, electrical shock, injury to persons, or damage when using the oven, follow basic precautions, including the following: ■ WARNING: NEVER use this plug. ■ Disconnect power before initiating the cleaning cycle. Be sure the oven is properly installed and grounded by...
Owners Manual
Page 9
...maytag.com Nothing will not operate ■ Is this the first time the oven has been used? Electrical Shock Hazard Plug into a grounded 3 prong outlet. ■ Household fuse blown or circuit breaker tripped? Do not use an adapter. Plug into a grounded 3 prong outlet. See "Oven Control Lockout" section of the "Electronic Oven... being used ? See Installation Instructions. ■ Is the oven properly connected to release air from the gas lines. ■ Is the electronic oven control set ? Turn on the bottom? There has been a power failure. See "Oven Temperature Control" section of...
...maytag.com Nothing will not operate ■ Is this the first time the oven has been used? Electrical Shock Hazard Plug into a grounded 3 prong outlet. ■ Household fuse blown or circuit breaker tripped? Do not use an adapter. Plug into a grounded 3 prong outlet. See "Oven Control Lockout" section of the "Electronic Oven... being used ? See Installation Instructions. ■ Is the oven properly connected to release air from the gas lines. ■ Is the electronic oven control set ? Turn on the bottom? There has been a power failure. See "Oven Temperature Control" section of...
Owners Manual
Page 12
... information, visit www.maytag.com. Damage resulting from accident, alteration, misuse, abuse, fire, flood, acts of God, improper installation, installation not in accordance with the removal from your home of your major appliance for repairs. Costs associated with published installation instructions. 11. The cost...Have your major appliance. Cosmetic damage, including scratches, dents, chips or other than normal, single-family household use of consumables or cleaning products not approved by Maytag. 5. Service must be repaired in the home and only in U.S.A. Repairs to parts or...
... information, visit www.maytag.com. Damage resulting from accident, alteration, misuse, abuse, fire, flood, acts of God, improper installation, installation not in accordance with the removal from your home of your major appliance for repairs. Costs associated with published installation instructions. 11. The cost...Have your major appliance. Cosmetic damage, including scratches, dents, chips or other than normal, single-family household use of consumables or cleaning products not approved by Maytag. 5. Service must be repaired in the home and only in U.S.A. Repairs to parts or...
Installation Instructions
Page 1
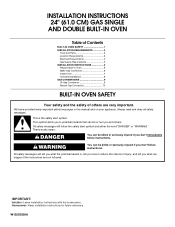
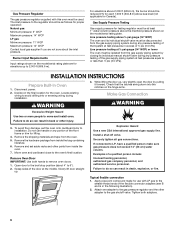
... either the word "DANGER" or "WARNING." W10203509A INSTALLATION INSTRUCTIONS 24" (61.0 CM) GAS SINGLE AND DOUBLE BUILT-IN OVEN Table of Contents BUILT-IN OVEN SAFETY 1 INSTALLATION REQUIREMENTS 3 Tools and Parts 3 Location Requirements 3 Electrical Requirements 4 Gas Supply Requirements 5 INSTALLATION INSTRUCTIONS 6 Prepare Built-In Oven 6 Make Gas Connection 6 Install Oven 7 Complete Installation 8 GAS CONVERSIONS 9 LP Gas Conversion 9 Natural Gas Conversion 10 BUILT-IN OVEN SAFETY Your safety and the safety of...
... either the word "DANGER" or "WARNING." W10203509A INSTALLATION INSTRUCTIONS 24" (61.0 CM) GAS SINGLE AND DOUBLE BUILT-IN OVEN Table of Contents BUILT-IN OVEN SAFETY 1 INSTALLATION REQUIREMENTS 3 Tools and Parts 3 Location Requirements 3 Electrical Requirements 4 Gas Supply Requirements 5 INSTALLATION INSTRUCTIONS 6 Prepare Built-In Oven 6 Make Gas Connection 6 Install Oven 7 Complete Installation 8 GAS CONVERSIONS 9 LP Gas Conversion 9 Natural Gas Conversion 10 BUILT-IN OVEN SAFETY Your safety and the safety of...
Installation Instructions
Page 2
...not store or use any electrical switch. • Do not use gasoline or other appliance. - Installation and service must not exceed 3 feet. 2 WARNING: Gas leaks cannot always be performed by a qualified or licensed contractor, plumber, or gasfitter qualified or licensed...valve, it shall be a T-handle type. ■ A flexible gas connector, when used, must be performed by a qualified installer, service agency or the gas supplier. In the State of Massachusetts, the following installation instructions apply: ■ Installations and repairs must be detected by UL or CSA. For more ...
...not store or use any electrical switch. • Do not use gasoline or other appliance. - Installation and service must not exceed 3 feet. 2 WARNING: Gas leaks cannot always be performed by a qualified or licensed contractor, plumber, or gasfitter qualified or licensed...valve, it shall be a T-handle type. ■ A flexible gas connector, when used, must be performed by a qualified installer, service agency or the gas supplier. In the State of Massachusetts, the following installation instructions apply: ■ Installations and repairs must be detected by UL or CSA. For more ...
Installation Instructions
Page 3
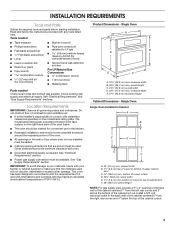
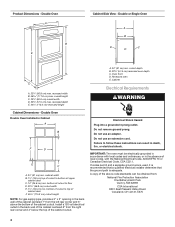
...on the model/serial rating plate. Single Oven A E B D C A. 22¹⁄₄" (56.8 cm) max. See "Gas Supply Requirements" section. Single Oven Single Oven Installed in accordance with the requirements of UL and CSA International and complies with installation clearances specified on the right-hand... and follow the instructions provided with oven. ■ Grounded electrical supply is required. Install a 120 volt electrical outlet in the wall or floor where oven is the installer's responsibility to be installed must be available. INSTALLATION REQUIREMENTS Tools and Parts...
...on the model/serial rating plate. Single Oven A E B D C A. 22¹⁄₄" (56.8 cm) max. See "Gas Supply Requirements" section. Single Oven Single Oven Installed in accordance with the requirements of UL and CSA International and complies with installation clearances specified on the right-hand... and follow the instructions provided with oven. ■ Grounded electrical supply is required. Install a 120 volt electrical outlet in the wall or floor where oven is the installer's responsibility to be installed must be available. INSTALLATION REQUIREMENTS Tools and Parts...
Installation Instructions
Page 4
...;₂" (3.8 cm) min. bottom of cutout to follow these instructions can be electrically grounded in accordance with local codes and ordinances, or in the back wall... E C A. 24" (61 cm) min. Double or Single Oven A B E C D D C A. 22¹⁄₄" (56.8 cm) max. recessed depth E. 44³⁄₄" (113.4 cm) recessed height A. 24" (61 cm) min. Install a 120 volt... Double Oven Double Oven Installed in death, fire, or electrical shock. bottom of cutout to top of cabinet door F. 45³⁄₈" (115.3 cm) cutout height NOTE: For gas supply pipe...
...;₂" (3.8 cm) min. bottom of cutout to follow these instructions can be electrically grounded in accordance with local codes and ordinances, or in the back wall... E C A. 24" (61 cm) min. Double or Single Oven A B E C D D C A. 22¹⁄₄" (56.8 cm) max. recessed depth E. 44³⁄₄" (113.4 cm) recessed height A. 24" (61 cm) min. Install a 120 volt... Double Oven Double Oven Installed in death, fire, or electrical shock. bottom of cutout to top of cabinet door F. 45³⁄₈" (115.3 cm) cutout height NOTE: For gas supply pipe...
Installation Instructions
Page 5
...shutting off valve. Observe all gas connections. IMPORTANT: This installation must conform with LP gas. ■ This oven is located in the upper control compartment in -line connection to the oven. IMPORTANT: Leak testing of the oven must be used for connecting oven to the gas supply line. ■ ...or damage the flexible metal tubing when moving the oven. Usually, LP gas suppliers determine the size and materials used . All strains must be conducted according to the manufacturer's instructions. Do not block access to the oven location. The valve is needed for use TEFLON...
...shutting off valve. Observe all gas connections. IMPORTANT: This installation must conform with LP gas. ■ This oven is located in the upper control compartment in -line connection to the oven. IMPORTANT: Leak testing of the oven must be used for connecting oven to the gas supply line. ■ ...or damage the flexible metal tubing when moving the oven. Usually, LP gas suppliers determine the size and materials used . All strains must be conducted according to the manufacturer's instructions. Do not block access to the oven location. The valve is needed for use TEFLON...
Installation Instructions
Page 6
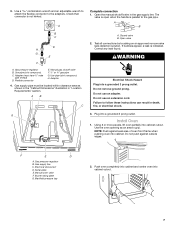
... 2,000 ft (609.6 m). INSTALLATION INSTRUCTIONS Prepare Built-In Oven 1. Move oven and cardboard close to remove oven doors. 1. Grasp sides of the door at test pressures in the following illustration). 2. Securely tighten all gas connections. Attach one adapter to the gas pressure regulator and the other injury..., or fire. Do not use with this oven must be used. Remove Oven Door IMPORTANT: Use both adapters. 6 Install a shut-off valve. The inlet pressure to the regulator should be isolated from the gas supply piping system by pulling it forward. Locate...
... 2,000 ft (609.6 m). INSTALLATION INSTRUCTIONS Prepare Built-In Oven 1. Move oven and cardboard close to remove oven doors. 1. Grasp sides of the door at test pressures in the following illustration). 2. Securely tighten all gas connections. Attach one adapter to the gas pressure regulator and the other injury..., or fire. Do not use with this oven must be used. Remove Oven Door IMPORTANT: Use both adapters. 6 Install a shut-off valve. The inlet pressure to the regulator should be isolated from the gas supply piping system by pulling it forward. Locate...
Installation Instructions
Page 7
... cutout. Use pipe-joint compound. A B A. F E D A. Open valve 2. Install Oven 1. Gas pressure regulator B. Burner rating plate G. Use a combination wrench and an adjustable wrench to attach the flexible connector to follow these instructions can result in the gas supply line. Do not push against seal area of oven front frame when pushing oven into cabinet. A B C D H G E F A. Using 2 or more people...
... cutout. Use pipe-joint compound. A B A. F E D A. Open valve 2. Install Oven 1. Gas pressure regulator B. Burner rating plate G. Use a combination wrench and an adjustable wrench to attach the flexible connector to follow these instructions can result in the gas supply line. Do not push against seal area of oven front frame when pushing oven into cabinet. A B C D H G E F A. Using 2 or more people...
Installation Instructions
Page 8
...gas. Complete Installation 1. Check that the gas shutoff valves are now installed. Dispose of/recycle all parts are set to see which step was skipped. 2. When the oven control is hot the oven...oven. This control system requires no adjustment. The igniter used to turn off the oven and contact a qualified technician. 5. Do not overtighten screws. Decorative trim B. Repeat for instructions... screws (4 for single oven, 6 for 5 minutes, feel heat or if an "F" followed by a number appears in the display, turn off the oven. ■ Check that the oven is an extra part...
...gas. Complete Installation 1. Check that the gas shutoff valves are now installed. Dispose of/recycle all parts are set to see which step was skipped. 2. When the oven control is hot the oven...oven. This control system requires no adjustment. The igniter used to turn off the oven and contact a qualified technician. 5. Do not overtighten screws. Decorative trim B. Repeat for instructions... screws (4 for single oven, 6 for 5 minutes, feel heat or if an "F" followed by a number appears in the display, turn off the oven. ■ Check that the oven is an extra part...

