Owners Manual
Page 1
... serial number located on some models 7 OVEN CARE 8 General Cleaning 8 Oven Light 8 TROUBLESHOOTING 9 ACCESSORIES 10 WARRANTY 12 W10203503A You will need assistance, call us at www.maytag.com for purchasing this high-quality product. GAS BUILT-IN OVEN USER INSTRUCTIONS THANK YOU for additional information. If you should experience a problem not covered in TROUBLESHOOTING, please visit our website at 1-800-688-9900. Table of Contents OVEN SAFETY 2 FEATURE GUIDE 4 OVEN USE 5 Electronic Oven Controls 5 Aluminum Foil 6 Positioning Racks and Bakeware 6 Oven Vent 6 Baking...
... serial number located on some models 7 OVEN CARE 8 General Cleaning 8 Oven Light 8 TROUBLESHOOTING 9 ACCESSORIES 10 WARRANTY 12 W10203503A You will need assistance, call us at www.maytag.com for purchasing this high-quality product. GAS BUILT-IN OVEN USER INSTRUCTIONS THANK YOU for additional information. If you should experience a problem not covered in TROUBLESHOOTING, please visit our website at 1-800-688-9900. Table of Contents OVEN SAFETY 2 FEATURE GUIDE 4 OVEN USE 5 Electronic Oven Controls 5 Aluminum Foil 6 Positioning Racks and Bakeware 6 Oven Vent 6 Baking...
Owners Manual
Page 2
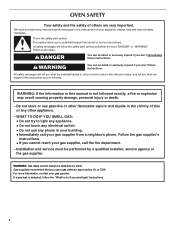
... try to do if you smell gas" instructions. 2 Installation and service must be killed or seriously injured if you don't immediately follow the "What to light any appliance. • Do not touch any electrical switch. • Do not use any other flammable vapors and liquids in the vicinity of this manual and on your gas supplier from a neighbor's phone. Do...
... try to do if you smell gas" instructions. 2 Installation and service must be killed or seriously injured if you don't immediately follow the "What to light any appliance. • Do not touch any electrical switch. • Do not use any other flammable vapors and liquids in the vicinity of this manual and on your gas supplier from a neighbor's phone. Do...
Owners Manual
Page 3
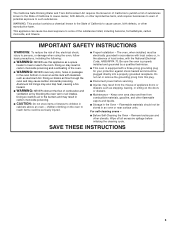
... use this plug. ■ Disconnect power before initiating the cleaning cycle. Remove broiler pan and other flammable vapors and liquids. ■ Storage in an oven or near surface units. IMPORTANT SAFETY INSTRUCTIONS WARNING: To reduce the risk of appliance doors or drawers such as aluminum foil. Be sure the oven is equipped with the National Electrical Code, ANSI/NFPA 70. For self-cleaning ovens - ■ Before Self-Cleaning the Oven...
... use this plug. ■ Disconnect power before initiating the cleaning cycle. Remove broiler pan and other flammable vapors and liquids. ■ Storage in an oven or near surface units. IMPORTANT SAFETY INSTRUCTIONS WARNING: To reduce the risk of appliance doors or drawers such as aluminum foil. Be sure the oven is equipped with the National Electrical Code, ANSI/NFPA 70. For self-cleaning ovens - ■ Before Self-Cleaning the Oven...
Owners Manual
Page 4
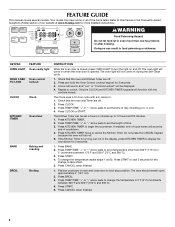
... be set a temperature other than one hour before or after cooking. Press KITCHEN TIMER. 2. If the Kitchen Timer is running, but not in food poisoning or sickness. Press START. 4. Press START. 5. Your model may have some or all of time. 3. KEYPAD OVEN LIGHT HOLD 3 SEC TO LOCK CLOCK KITCHEN TIMER BAKE BROIL FEATURE Oven cavity light Oven control lockout Clock Oven timer Baking and roasting Broiling INSTRUCTIONS While the oven door is opened. and p.m. 1. Press CLOCK. 3. The Kitchen Timer can result in the display, press KITCHEN TIMER to this manual...
... be set a temperature other than one hour before or after cooking. Press KITCHEN TIMER. 2. If the Kitchen Timer is running, but not in food poisoning or sickness. Press START. 4. Press START. 5. Your model may have some or all of time. 3. KEYPAD OVEN LIGHT HOLD 3 SEC TO LOCK CLOCK KITCHEN TIMER BAKE BROIL FEATURE Oven cavity light Oven control lockout Clock Oven timer Baking and roasting Broiling INSTRUCTIONS While the oven door is opened. and p.m. 1. Press CLOCK. 3. The Kitchen Timer can result in the display, press KITCHEN TIMER to this manual...
Owners Manual
Page 5
... end of the Kitchen Timer may not bake properly. The Start keypad begins any timed or delayed cook function. Press CANCEL to operate the oven without power. Indicator lights show functions that function is canceled and the time of day is used to adjust time and temperature settings. "Opt" will function with a pilotless ignition. Use TEMP/TIME to cycle through the options until the oven display shows the current calibration, for foods such...
... end of the Kitchen Timer may not bake properly. The Start keypad begins any timed or delayed cook function. Press CANCEL to operate the oven without power. Indicator lights show functions that function is canceled and the time of day is used to adjust time and temperature settings. "Opt" will function with a pilotless ignition. Use TEMP/TIME to cycle through the options until the oven display shows the current calibration, for foods such...
Owners Manual
Page 6
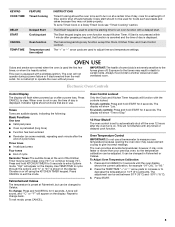
.... Baking Layer Cakes on 2 racks use racks 2 and 4 or 1 and 4 for 2-rack baking and broiling. Place the cakes on a cookie sheet or jelly roll pan, layer cakes, frozen convenience foods. Broiling chicken pieces. To move freely. C 6 Positioning Racks and Bakeware IMPORTANT: To avoid permanent damage to move a rack, pull it out to circulate. Rack 2: Roasting small cuts of meat, pies, loaves of meat and poultry. Control panel B. Do not set...
.... Baking Layer Cakes on 2 racks use racks 2 and 4 or 1 and 4 for 2-rack baking and broiling. Place the cakes on a cookie sheet or jelly roll pan, layer cakes, frozen convenience foods. Broiling chicken pieces. To move freely. C 6 Positioning Racks and Bakeware IMPORTANT: To avoid permanent damage to move a rack, pull it out to circulate. Rack 2: Roasting small cuts of meat, pies, loaves of meat and poultry. Control panel B. Do not set...
Owners Manual
Page 7
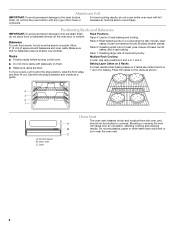
... models) WARNING To Set a Delayed Timed Cook: Before setting, make sure the clock is in use a broiler pan and grid. Changing the temperature when broiling allows more than the one may cook better at lower broiling temperatures. ■ For best results, use . Timed Cooking (on the display. When the time ends, the oven will shut off automatically and "End" will appear on the display. 6. This feature is automatically activated when the oven is set cook time ends, the oven...
... models) WARNING To Set a Delayed Timed Cook: Before setting, make sure the clock is in use a broiler pan and grid. Changing the temperature when broiling allows more than the one may cook better at lower broiling temperatures. ■ For best results, use . Timed Cooking (on the display. When the time ends, the oven will shut off automatically and "End" will appear on the display. 6. This feature is automatically activated when the oven is set cook time ends, the oven...
Owners Manual
Page 8
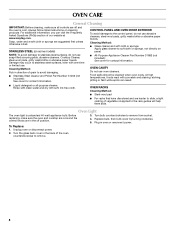
.... Oven Light The oven light is cool. STAINLESS STEEL (on some models) CONTROL PANEL AND OVEN DOOR EXTERIOR To avoid damage to soft cloth or sponge, not directly on cleaning products. Replace bulb, then bulb cover by turning clockwise. 5. Turn the glass bulb cover in oven or reconnect power. Damage may occur to the rack guides will help them slide. Plug in the back of vegetable oil applied to stainless steel surfaces, even with soft, lint-free...
.... Oven Light The oven light is cool. STAINLESS STEEL (on some models) CONTROL PANEL AND OVEN DOOR EXTERIOR To avoid damage to soft cloth or sponge, not directly on cleaning products. Replace bulb, then bulb cover by turning clockwise. 5. Turn the glass bulb cover in oven or reconnect power. Damage may occur to the rack guides will help them slide. Plug in the back of vegetable oil applied to stainless steel surfaces, even with soft, lint-free...
Owners Manual
Page 9
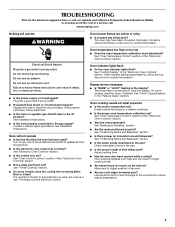
... oven temperature calibration set ? Electrical Shock Hazard Plug into a grounded 3 prong outlet. ■ Household fuse blown or circuit breaker tripped? Oven will operate WARNING Oven burner flames are yellow or noisy ■ Is propane gas being used ? See "Control Display" in the display? See "Clock" keypad feature in the pan? Contact a service technician or see Installation Instructions. On some models, does the cooling fan run when the oven is normal for contact information. Replace the fuse or reset...
... oven temperature calibration set ? Electrical Shock Hazard Plug into a grounded 3 prong outlet. ■ Household fuse blown or circuit breaker tripped? Oven will operate WARNING Oven burner flames are yellow or noisy ■ Is propane gas being used ? See "Control Display" in the display? See "Clock" keypad feature in the pan? Contact a service technician or see Installation Instructions. On some models, does the cooling fan run when the oven is normal for contact information. Replace the fuse or reset...
Owners Manual
Page 12
... appliance is used in the country in a remote area where service by an authorized Maytag servicer is not available. 10. Proof of original purchase date is required to obtain service under these User Instructions and model number information for repairs. Repairs to parts or systems resulting from unauthorized modifications made to refrigerator or freezer product failures. 7. Expenses for travel and transportation for product service if your...
... appliance is used in the country in a remote area where service by an authorized Maytag servicer is not available. 10. Proof of original purchase date is required to obtain service under these User Instructions and model number information for repairs. Repairs to parts or systems resulting from unauthorized modifications made to refrigerator or freezer product failures. 7. Expenses for travel and transportation for product service if your...
Installation Instructions
Page 1
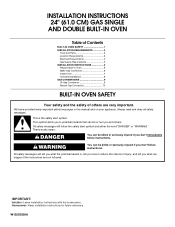
... will follow instructions. INSTALLATION INSTRUCTIONS 24" (61.0 CM) GAS SINGLE AND DOUBLE BUILT-IN OVEN Table of Contents BUILT-IN OVEN SAFETY 1 INSTALLATION REQUIREMENTS 3 Tools and Parts 3 Location Requirements 3 Electrical Requirements 4 Gas Supply Requirements 5 INSTALLATION INSTRUCTIONS 6 Prepare Built-In Oven 6 Make Gas Connection 6 Install Oven 7 Complete Installation 8 GAS CONVERSIONS 9 LP Gas Conversion 9 Natural Gas Conversion 10 BUILT-IN OVEN SAFETY Your ..."WARNING." We have provided many important safety messages in this manual and on your appliance.
... will follow instructions. INSTALLATION INSTRUCTIONS 24" (61.0 CM) GAS SINGLE AND DOUBLE BUILT-IN OVEN Table of Contents BUILT-IN OVEN SAFETY 1 INSTALLATION REQUIREMENTS 3 Tools and Parts 3 Location Requirements 3 Electrical Requirements 4 Gas Supply Requirements 5 INSTALLATION INSTRUCTIONS 6 Prepare Built-In Oven 6 Make Gas Connection 6 Install Oven 7 Complete Installation 8 GAS CONVERSIONS 9 LP Gas Conversion 9 Natural Gas Conversion 10 BUILT-IN OVEN SAFETY Your ..."WARNING." We have provided many important safety messages in this manual and on your appliance.
Installation Instructions
Page 3
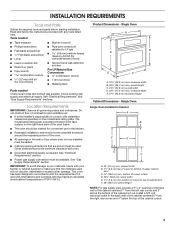
... with any tools listed here. INSTALLATION REQUIREMENTS Tools and Parts Gather the required tools and parts before starting installation. See "Gas Supply Requirements" section. bottom of cutout to bottom of 194°F (90°C). Location Requirements IMPORTANT: Observe all governing codes and ordinances. Do not obstruct flow of the cabinet cutout. 3 See "Electrical Requirements" section. ■ Proper gas supply connection must be sealed. ■ Cabinet opening dimensions that the materials used . Single Oven A E B D C A. 22¹⁄...
... with any tools listed here. INSTALLATION REQUIREMENTS Tools and Parts Gather the required tools and parts before starting installation. See "Gas Supply Requirements" section. bottom of cutout to bottom of 194°F (90°C). Location Requirements IMPORTANT: Observe all governing codes and ordinances. Do not obstruct flow of the cabinet cutout. 3 See "Electrical Requirements" section. ■ Proper gas supply connection must be sealed. ■ Cabinet opening dimensions that the materials used . Single Oven A E B D C A. 22¹⁄...
Installation Instructions
Page 4
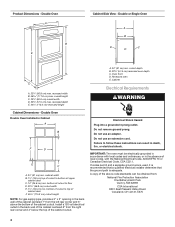
... electrical shock. bottom of cutout to bottom of the cabinet cutout. Double Oven A B E Cabinet Side View - cabinet width B. 1¹⁄₂" (3.8 cm) top of cutout to top of cabinet door F. 45³⁄₈" (115.3 cm) cutout height NOTE: For gas supply pipe, provide a 3" x 3" opening in the back wall of the cabinet centered 7" from the left rear corner and 3" above code standards can result in Cabinet A B F D E C A. 24" (61 cm) min. Install...
... electrical shock. bottom of cutout to bottom of the cabinet cutout. Double Oven A B E Cabinet Side View - cabinet width B. 1¹⁄₂" (3.8 cm) top of cutout to top of cabinet door F. 45³⁄₈" (115.3 cm) cutout height NOTE: For gas supply pipe, provide a 3" x 3" opening in the back wall of the cabinet centered 7" from the left rear corner and 3" above code standards can result in Cabinet A B F D E C A. 24" (61 cm) min. Install...
Installation Instructions
Page 5
... the size and materials used for connecting oven to the oven. The model/serial rating plate located behind the broiler drawer on the right-hand side oven front frame has information on or shutting off valve. B A C A. Du Pont De Nemours and Company. 5 ■ A 120 volt, 60 Hz., AC only, 15-amp fused, electrical circuit is also recommended. It is design-certified by a qualified service technician. Install a shut-off gas to the gas supply...
... the size and materials used for connecting oven to the oven. The model/serial rating plate located behind the broiler drawer on the right-hand side oven front frame has information on or shutting off valve. B A C A. Du Pont De Nemours and Company. 5 ■ A 120 volt, 60 Hz., AC only, 15-amp fused, electrical circuit is also recommended. It is design-certified by a qualified service technician. Install a shut-off gas to the gas supply...
Installation Instructions
Page 6
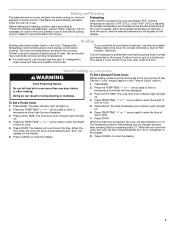
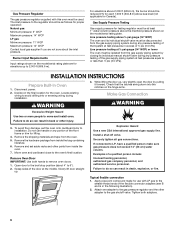
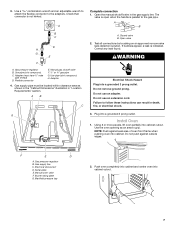
... inside the bag containing literature. 6. Open door to the broil stop position (about the inlet pressure. Explosion Hazard Use a new CSA International approved gas supply line. Securely tighten all gas connections. The inlet pressure to the regulator should be disconnected from the gas supply piping system during any portion of the front frame or trim for the oven. INSTALLATION INSTRUCTIONS Prepare Built-In Oven 1. WARNING 3. Remove and set...
... inside the bag containing literature. 6. Open door to the broil stop position (about the inlet pressure. Explosion Hazard Use a new CSA International approved gas supply line. Securely tighten all gas connections. The inlet pressure to the regulator should be disconnected from the gas supply piping system during any portion of the front frame or trim for the oven. INSTALLATION INSTRUCTIONS Prepare Built-In Oven 1. WARNING 3. Remove and set...
Installation Instructions
Page 7
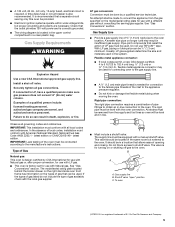
... cord. Manual oven valve F. Plug into a grounded 3 prong outlet. Manifold pressure tap 2. A B A. Do not remove ground prong. Install Oven 1. Use the oven opening as shown in the "Cabinet Dimensions" illustration in "Location Requirements" section. Flexible connector E. Correct any leak found. Use a combination wrench and an adjustable wrench to attach the flexible connector to the gas pipe. Gas supply line C. C. Gas supply pipe must have ½" male pipe thread) D. Serial plate E. Electrical disconnect D. Use...
... cord. Manual oven valve F. Plug into a grounded 3 prong outlet. Manifold pressure tap 2. A B A. Do not remove ground prong. Install Oven 1. Use the oven opening as shown in the "Cabinet Dimensions" illustration in "Location Requirements" section. Flexible connector E. Correct any leak found. Use a combination wrench and an adjustable wrench to attach the flexible connector to the gas pipe. Gas supply line C. C. Gas supply pipe must have ½" male pipe thread) D. Serial plate E. Electrical disconnect D. Use...
Installation Instructions
Page 8
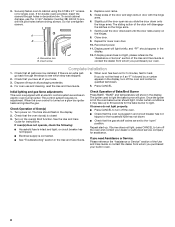
... "open as an electric oven burner igniter. Initial lighting and gas flame adjustments This oven is turned on the hinges. 8. Press CANCEL. For oven use the 0.140" diameter (number 28) drill bit to light the bake burner will light briefly, and "PF" should flash in the display. 12. Under certain conditions it may take up . Dispose of Bake/Broil Burner Press BAKE. Check Operation of /recycle all parts are set to turn off...
... "open as an electric oven burner igniter. Initial lighting and gas flame adjustments This oven is turned on the hinges. 8. Press CANCEL. For oven use the 0.140" diameter (number 28) drill bit to light the bake burner will light briefly, and "PF" should flash in the display. 12. Under certain conditions it may take up . Dispose of Bake/Broil Burner Press BAKE. Check Operation of /recycle all parts are set to turn off...
Installation Instructions
Page 9
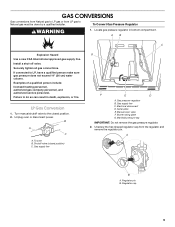
... do so can result in bottom compartment. Gas supply line G F E D A. Electrical disconnect D. Burner rating plate G. Manifold pressure tap IMPORTANT: Do not remove the gas pressure regulator. 2. Regulator pin B. Securely tighten all gas connections. Examples of a qualified person include: licensed heating personnel, authorized gas company personnel, and authorized service personnel. Gas pressure regulator B. A B A. Install a shut-off valve. Turn manual shutoff valve to the closed position) C. B A C A. Shutoff valve...
... do so can result in bottom compartment. Gas supply line G F E D A. Electrical disconnect D. Burner rating plate G. Manifold pressure tap IMPORTANT: Do not remove the gas pressure regulator. 2. Regulator pin B. Securely tighten all gas connections. Examples of a qualified person include: licensed heating personnel, authorized gas company personnel, and authorized service personnel. Gas pressure regulator B. A B A. Install a shut-off valve. Turn manual shutoff valve to the closed position) C. B A C A. Shutoff valve...
Installation Instructions
Page 10
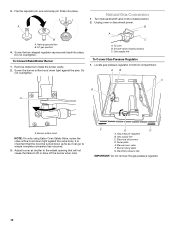
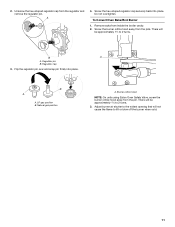
... place. B A C A. Gas supply line To Convert Gas Pressure Regulator 1. 3. A B A. Natural gas position B. Do not overtighten. To Convert Bake/Broiler Burner 1. Remove racks from inside the broiler cavity. 2. Do not overtighten. Turn manual shutoff valve to ensure complete conversion has occurred. 3. Adjust burner air shutter to the widest opening that the hood be turned down tight against the valve body. Gas pressure regulator B. Gas supply line C. Electrical disconnect D. Manual oven valve F. Burner rating plate G.
... place. B A C A. Gas supply line To Convert Gas Pressure Regulator 1. 3. A B A. Natural gas position B. Do not overtighten. To Convert Bake/Broiler Burner 1. Remove racks from inside the broiler cavity. 2. Do not overtighten. Turn manual shutoff valve to ensure complete conversion has occurred. 3. Adjust burner air shutter to the widest opening that the hood be turned down tight against the valve body. Gas pressure regulator B. Gas supply line C. Electrical disconnect D. Manual oven valve F. Burner rating plate G.
Installation Instructions
Page 11
... B. Burner orifice hood NOTE: On units using Eaton Oven Safety Valve, screw the burner orifice hood away from the pins. B A A. Regulator cap 3. B A A. Natural gas position A. Do not overtighten. To Convert Oven Bake/Broil Burner 1. A 4. Regulator pin B. Adjust burner air shutter to the widest opening that will be approximately 1¹⁄₂ to 2 turns. 3. There will not cause the flame to...
... B. Burner orifice hood NOTE: On units using Eaton Oven Safety Valve, screw the burner orifice hood away from the pins. B A A. Regulator cap 3. B A A. Natural gas position A. Do not overtighten. To Convert Oven Bake/Broil Burner 1. A 4. Regulator pin B. Adjust burner air shutter to the widest opening that will be approximately 1¹⁄₂ to 2 turns. 3. There will not cause the flame to...


