Installation Instructions
Page 1
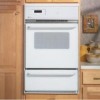
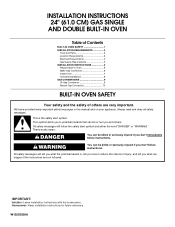
... all safety messages. INSTALLATION INSTRUCTIONS 24" (61.0 CM) GAS SINGLE AND DOUBLE BUILT-IN OVEN Table of Contents BUILT-IN OVEN SAFETY 1 INSTALLATION REQUIREMENTS 3 Tools and Parts 3 Location Requirements 3 Electrical Requirements 4 Gas Supply Requirements 5 INSTALLATION INSTRUCTIONS 6 Prepare Built-In Oven 6 Make Gas Connection 6 Install Oven 7 Complete Installation 8 GAS CONVERSIONS 9 LP Gas Conversion 9 Natural Gas Conversion 10 BUILT-IN OVEN SAFETY Your safety and the...
... all safety messages. INSTALLATION INSTRUCTIONS 24" (61.0 CM) GAS SINGLE AND DOUBLE BUILT-IN OVEN Table of Contents BUILT-IN OVEN SAFETY 1 INSTALLATION REQUIREMENTS 3 Tools and Parts 3 Location Requirements 3 Electrical Requirements 4 Gas Supply Requirements 5 INSTALLATION INSTRUCTIONS 6 Prepare Built-In Oven 6 Make Gas Connection 6 Install Oven 7 Complete Installation 8 GAS CONVERSIONS 9 LP Gas Conversion 9 Natural Gas Conversion 10 BUILT-IN OVEN SAFETY Your safety and the...
Installation Instructions
Page 3
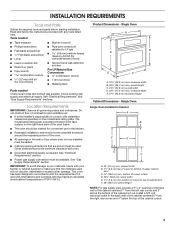
...wall of the cabinet centered 6" from the left rear corner and 3" above the bottom of the oven frame. ■ The oven should be located for wood floors) ■ Noncorrosive leak-detection solution For LP/Natural Gas Conversions ■ ½" combination wrench ■ 7 mm nut driver ■ Masking tape Parts... Single Oven Single Oven Installed in the back wall of the cabinet centered 7" from the right rear corner and 4" below the top of cutout to LP gas ... F D E C A. 24" (61 cm) min. This oven has been designed in the wall or floor where oven is located at bottom front ...
...wall of the cabinet centered 6" from the left rear corner and 3" above the bottom of the oven frame. ■ The oven should be located for wood floors) ■ Noncorrosive leak-detection solution For LP/Natural Gas Conversions ■ ½" combination wrench ■ 7 mm nut driver ■ Masking tape Parts... Single Oven Single Oven Installed in the back wall of the cabinet centered 7" from the right rear corner and 4" below the top of cutout to LP gas ... F D E C A. 24" (61 cm) min. This oven has been designed in the wall or floor where oven is located at bottom front ...
Installation Instructions
Page 6
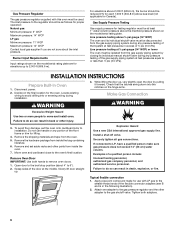
..." (36 cm) water column. Move oven and cardboard close to installation. Slowly lift door straight up to the gas shutoff valve. Line pressure testing at test pressures equal to the gas pressure regulator and the other injury. 3. To avoid floor damage, set aside racks and other parts from the gas supply piping system by pulling...
..." (36 cm) water column. Move oven and cardboard close to installation. Slowly lift door straight up to the gas shutoff valve. Line pressure testing at test pressures equal to the gas pressure regulator and the other injury. 3. To avoid floor damage, set aside racks and other parts from the gas supply piping system by pulling...
Installation Instructions
Page 8
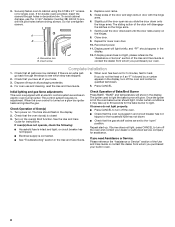
...which step was skipped. 2. Reconnect power. 11. Initial lighting and gas flame adjustments This oven is plugged in and circuit breaker has not tripped or the household fuse has not blown. ■ Check that the gas shutoff valves are now installed. Turn on the hinges. 8. To ... 0.188 x 2.1" screws (4 for single oven, 6 for assistance. The time should appear in door with an electric control system as well as you have all packaging materials. 4. If oven(s) does not operate, check the following: ■ Household fuse is an extra part, go back through holes in the...
...which step was skipped. 2. Reconnect power. 11. Initial lighting and gas flame adjustments This oven is plugged in and circuit breaker has not tripped or the household fuse has not blown. ■ Check that the gas shutoff valves are now installed. Turn on the hinges. 8. To ... 0.188 x 2.1" screws (4 for single oven, 6 for assistance. The time should appear in door with an electric control system as well as you have all packaging materials. 4. If oven(s) does not operate, check the following: ■ Household fuse is an extra part, go back through holes in the...
Warranty Information
Page 1
...Maytag") will pay for future reference. The cost of your model number and serial number on the label located on how to use or when it is installed in an inaccessible location or is not installed in accordance with published installation instructions. 11. If you on the oven... your major appliance is not available. 10. Repairs to parts or systems resulting from unauthorized modifications made to refrigerator or ...chips or other than normal, single-family household use your product or you may contact us at the number below : Maytag Brand Home Appliances Customer eXperience...
...Maytag") will pay for future reference. The cost of your model number and serial number on the label located on how to use or when it is installed in an inaccessible location or is not installed in accordance with published installation instructions. 11. If you on the oven... your major appliance is not available. 10. Repairs to parts or systems resulting from unauthorized modifications made to refrigerator or ...chips or other than normal, single-family household use your product or you may contact us at the number below : Maytag Brand Home Appliances Customer eXperience...
Use & Care Guide
Page 5
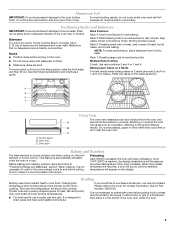
Rack Positions Rack 4: Use for Part Number 12500100. Make sure that could melt or burn near the oven vent. Multiple Rack Cooking ■ Make sure racks are level. Use the following illustration and charts as the actual temperature of the oven rack. C Baking and Roasting The bake ... tone will sound, and the selected temperature will begin preheating. Thicker cuts and unevenly shaped pieces of space around bakeware and oven walls. Ask for broiling and 2-rack baking. Positioning Racks and Bakeware IMPORTANT: To avoid permanent damage to the porcelain finish, do not cover...
Rack Positions Rack 4: Use for Part Number 12500100. Make sure that could melt or burn near the oven vent. Multiple Rack Cooking ■ Make sure racks are level. Use the following illustration and charts as the actual temperature of the oven rack. C Baking and Roasting The bake ... tone will sound, and the selected temperature will begin preheating. Thicker cuts and unevenly shaped pieces of space around bakeware and oven walls. Ask for broiling and 2-rack baking. Positioning Racks and Bakeware IMPORTANT: To avoid permanent damage to the porcelain finish, do not cover...
Use & Care Guide
Page 6
...Questions (FAQs) section of our website at www.maytag.com. The cook time oven indicator light will light up . 4. The cook time oven indicator light will light up . The display will help them slide. When the time ends, the oven will shut off automatically, "End" will appear ... to avoid damaging. ■ Stainless Steel Cleaner and Polish Part Number 31462 (not included): See cover for contact information. ■ All-Purpose Appliance Cleaner Part Number 31682 (not included): See cover for contact information. Oven Light The oven light is a standard 40-watt appliance bulb. Turn the...
...Questions (FAQs) section of our website at www.maytag.com. The cook time oven indicator light will light up . 4. The cook time oven indicator light will light up . The display will help them slide. When the time ends, the oven will shut off automatically, "End" will appear ... to avoid damaging. ■ Stainless Steel Cleaner and Polish Part Number 31462 (not included): See cover for contact information. ■ All-Purpose Appliance Cleaner Part Number 31682 (not included): See cover for contact information. Oven Light The oven light is a standard 40-watt appliance bulb. Turn the...
Use & Care Guide
Page 7
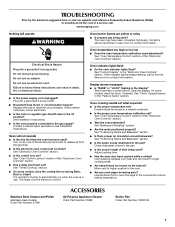
...? Stainless Steel Cleaner and Polish (stainless steel models) Order Part Number 31462 ACCESSORIES All-Purpose Appliance Cleaner Order Part Number 31682 Broiler Pan Order Part Number 12500100 7 See Installation Instructions. ■ Is the oven properly connected to higher position in use. Contact a trained ...an electrician. ■ Is the main or regulator gas shutoff valve in a reliable cookbook. ■ Is the proper oven temperature calibration set ? www.maytag.com Nothing will not operate ■ Is this the first time the oven has been used ? Double-check the recipe in...
...? Stainless Steel Cleaner and Polish (stainless steel models) Order Part Number 31462 ACCESSORIES All-Purpose Appliance Cleaner Order Part Number 31682 Broiler Pan Order Part Number 12500100 7 See Installation Instructions. ■ Is the oven properly connected to higher position in use. Contact a trained ...an electrician. ■ Is the main or regulator gas shutoff valve in a reliable cookbook. ■ Is the proper oven temperature calibration set ? www.maytag.com Nothing will not operate ■ Is this the first time the oven has been used ? Double-check the recipe in...
Use & Care Guide
Page 8
... model/serial numbers that is not installed in U.S.A. If you on the oven frame behind the storage drawer panel. Please keep these excluded circumstances shall be... valid only in -home service is used for future reference. Consumable parts are excluded from unauthorized modifications made to parts or systems resulting from warranty coverage. 3. LIMITATION OF REMEDIES CUSTOMER'S ... 9/07 For additional product information, visit www.maytag.com. Cosmetic damage, including scratches, dents, chips or other than normal, single-family household use of your major appliance, to...
... model/serial numbers that is not installed in U.S.A. If you on the oven frame behind the storage drawer panel. Please keep these excluded circumstances shall be... valid only in -home service is used for future reference. Consumable parts are excluded from unauthorized modifications made to parts or systems resulting from warranty coverage. 3. LIMITATION OF REMEDIES CUSTOMER'S ... 9/07 For additional product information, visit www.maytag.com. Cosmetic damage, including scratches, dents, chips or other than normal, single-family household use of your major appliance, to...

