
Owners Manual
Page 2
... of our website at www.maytag.com for a good seal. Doing so can cause low-level exposure to rub, damage, or move the gasket. ■ Do Not Use Oven Cleaners - IMPORTANT SAFETY INSTRUCTIONS WARNING: To reduce the risk of fire, electrical shock, injury to cool. ...Containers - If rack must be worn while using the oven, follow basic precautions, including the following: ■ Proper Installation - Care should never be moved while oven is properly installed and grounded by a qualified technician. ■ Never Use the Oven for Warming or Heating the Room. ■ Do Not...
... of our website at www.maytag.com for a good seal. Doing so can cause low-level exposure to rub, damage, or move the gasket. ■ Do Not Use Oven Cleaners - IMPORTANT SAFETY INSTRUCTIONS WARNING: To reduce the risk of fire, electrical shock, injury to cool. ...Containers - If rack must be worn while using the oven, follow basic precautions, including the following: ■ Proper Installation - Care should never be moved while oven is properly installed and grounded by a qualified technician. ■ Never Use the Oven for Warming or Heating the Room. ■ Do Not...
Owners Manual
Page 8
... not have been removed, altered or cannot be provided by a Maytag designated service company. Damage resulting from accident, alteration, misuse, abuse, fire, flood, acts of God, improper installation, installation not in accordance with electrical or plumbing codes, or use your major appliance, to replace or...Maytag within 30 days from the date of purchase. 6. This major appliance is designed to be borne by the customer. Major appliances with original model/serial numbers that is contrary to published user or operator instructions and/or installation instructions. 4. If you on the oven...
... not have been removed, altered or cannot be provided by a Maytag designated service company. Damage resulting from accident, alteration, misuse, abuse, fire, flood, acts of God, improper installation, installation not in accordance with electrical or plumbing codes, or use your major appliance, to replace or...Maytag within 30 days from the date of purchase. 6. This major appliance is designed to be borne by the customer. Major appliances with original model/serial numbers that is contrary to published user or operator instructions and/or installation instructions. 4. If you on the oven...

Installation Instructions
Page 1
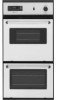
IMPORTANT: Save for local electrical inspector's use. This is , tell you how to potential hazards that can kill or hurt you don't follow... if the instructions are very important. INSTALLATION INSTRUCTIONS 24" (61.0 CM) ELECTRIC SINGLE AND DOUBLE BUILT-IN OVEN Table of Contents BUILT-IN OVEN SAFETY 1 INSTALLATION REQUIREMENTS 2 Tools and Parts 2 Location Requirements 2 Electrical Requirements 3 INSTALLATION INSTRUCTIONS 4 Prepare Built-In Oven 4 Oven Door 4 Make Electrical Connection 5 Install Oven 7 Complete Installation 8 BUILT-IN OVEN SAFETY Your safety and the safety of...
IMPORTANT: Save for local electrical inspector's use. This is , tell you how to potential hazards that can kill or hurt you don't follow... if the instructions are very important. INSTALLATION INSTRUCTIONS 24" (61.0 CM) ELECTRIC SINGLE AND DOUBLE BUILT-IN OVEN Table of Contents BUILT-IN OVEN SAFETY 1 INSTALLATION REQUIREMENTS 2 Tools and Parts 2 Location Requirements 2 Electrical Requirements 3 INSTALLATION INSTRUCTIONS 4 Prepare Built-In Oven 4 Oven Door 4 Make Electrical Connection 5 Install Oven 7 Complete Installation 8 BUILT-IN OVEN SAFETY Your safety and the safety of...

Installation Instructions
Page 2
...top of the cabinet. ■ Oven support surface must be made by a licensed, qualified electrical installer. single oven (4), double oven (6) Check local codes. See "Electrical Requirements." recessed depth E. 27⁷...installation. overall height C. 23⁷⁄₈" (60.6 cm) overall width D. 22⁵⁄₈" (57.5 cm) max. It is required. See "Electrical Requirements" section. ■ Electrical supply junction box should be located in Cabinet A B F D E C A. 24" (61 cm) min. bottom of cutout to support a single oven weight of 154 lbs (70 kg) or a double oven...
...top of the cabinet. ■ Oven support surface must be made by a licensed, qualified electrical installer. single oven (4), double oven (6) Check local codes. See "Electrical Requirements." recessed depth E. 27⁷...installation. overall height C. 23⁷⁄₈" (60.6 cm) overall width D. 22⁵⁄₈" (57.5 cm) max. It is required. See "Electrical Requirements" section. ■ Electrical supply junction box should be located in Cabinet A B F D E C A. 24" (61 cm) min. bottom of cutout to support a single oven weight of 154 lbs (70 kg) or a double oven...

Installation Instructions
Page 3
... properly grounded. Double Oven Double Oven Installed in conformance with a qualified electrical installer if you will be connected to top of cutout to the proper electrical voltage and frequency as specified on the model/serial number rating plate. bottom of cabinet door F. 45³⁄₈" (115.3 cm) cutout height Cabinet Side View - Double or Single Oven A B E C D A. 24"(61 cm) min...
... properly grounded. Double Oven Double Oven Installed in conformance with a qualified electrical installer if you will be connected to top of cutout to the proper electrical voltage and frequency as specified on the model/serial number rating plate. bottom of cabinet door F. 45³⁄₈" (115.3 cm) cutout height Cabinet Side View - Double or Single Oven A B E C D A. 24"(61 cm) min...

Installation Instructions
Page 4
... To avoid floor damage, set aside racks and other injury. 2. Remove the shipping materials and tape from inside the oven. 6. See "Make Electrical Connection" section. ■ Flexible conduit from 6.5 kw to 8.6 kw at 208 V to 240 V requires a separate 40 amp circuit... Locate existing wiring to the junction box. ■ Do not cut the conduit. Move oven and cardboard close to move and install oven. Model/serial number plate Double Oven A. Remove Oven Door. A A Single Oven A. Decide on the hinge arms. 4 While lifting the door up . Aluminum/copper connection...
... To avoid floor damage, set aside racks and other injury. 2. Remove the shipping materials and tape from inside the oven. 6. See "Make Electrical Connection" section. ■ Flexible conduit from 6.5 kw to 8.6 kw at 208 V to 240 V requires a separate 40 amp circuit... Locate existing wiring to the junction box. ■ Do not cut the conduit. Move oven and cardboard close to move and install oven. Model/serial number plate Double Oven A. Remove Oven Door. A A Single Oven A. Decide on the hinge arms. 4 While lifting the door up . Aluminum/copper connection...

Installation Instructions
Page 5
..., fire, or electrical shock. Electrically ground oven. Failure to complete installation for your home has: Go to the junction box. ½" (1.3 cm) 3-wire 3-wire Cable from Home A Power Supply A. Use 12 gauge solid copper wire. Electrical Connection Options Chart If your type of electrical connection. ½" (1.3 cm) 5 For Double Ovens Make Electrical Connection For Single Ovens WARNING WARNING Electrical Shock Hazard...
..., fire, or electrical shock. Electrically ground oven. Failure to complete installation for your home has: Go to the junction box. ½" (1.3 cm) 3-wire 3-wire Cable from Home A Power Supply A. Use 12 gauge solid copper wire. Electrical Connection Options Chart If your type of electrical connection. ½" (1.3 cm) 5 For Double Ovens Make Electrical Connection For Single Ovens WARNING WARNING Electrical Shock Hazard...

Installation Instructions
Page 6
...connector. 4. Only IMPORTANT: Use the 3-wire cable from home power supply B. White wires E. UL listed or CSA approved conduit connector 1. Install junction box cover. 6 Cable from oven E. Connect the 2 red wires (C) together using a UL listed wire connector. 2. A B C G H D E I . ...wire flexible conduit from home power supply B. Junction box C. Install junction box cover. 3-Wire Cable from oven G. where local codes do not allow grounding through neutral, New Branch circuit installations (1996 NEC), mobile homes and recreational vehicles, new construction and...
...connector. 4. Only IMPORTANT: Use the 3-wire cable from home power supply B. White wires E. UL listed or CSA approved conduit connector 1. Install junction box cover. 6 Cable from oven E. Connect the 2 red wires (C) together using a UL listed wire connector. 2. A B C G H D E I . ...wire flexible conduit from home power supply B. Junction box C. Install junction box cover. 3-Wire Cable from oven G. where local codes do not allow grounding through neutral, New Branch circuit installations (1996 NEC), mobile homes and recreational vehicles, new construction and...

Installation Instructions
Page 7
...pilot holes before driving screws. Decorative trim B. Grasp sides of oven front frame when B pushing oven into cabinet. Install Oven 3. Do not overtighten screws. 1. NOTE: Push against outside edges. 2. Close door. 9. Repeat for double oven) provided. If display panel does not light, please reference ...cabinet damage, use the 0.140" diameter (number 28) drill bit to cabinet using the 0.188 x 2.1" screws (4 for single oven, 6 for lower oven door. 10. Gently push the door downward until the door rests evenly on the hinge arms. 7. A. Display panel will disengage...
...pilot holes before driving screws. Decorative trim B. Grasp sides of oven front frame when B pushing oven into cabinet. Install Oven 3. Do not overtighten screws. 1. NOTE: Push against outside edges. 2. Close door. 9. Repeat for double oven) provided. If display panel does not light, please reference ...cabinet damage, use the 0.140" diameter (number 28) drill bit to cabinet using the 0.188 x 2.1" screws (4 for single oven, 6 for lower oven door. 10. Gently push the door downward until the door rests evenly on the hinge arms. 7. A. Display panel will disengage...

Installation Instructions
Page 8
Check Operation of Maytag Corporation or its related companies. 7/08 Printed in oven. ■ Household fuse is connected. ■ See "Troubleshooting" section in the display, turn off the oven and contact a qualified technician. 5. Check that the oven door(s) is an extra part, go back through the steps to...Use and Care Guide. The time should flash in the display. ■ Electrical supply is intact and tight; If oven(s) does not operate, check the following: If you have all parts are now installed. When oven has been on for 5 minutes, feel heat or if an "F" followed by...
Check Operation of Maytag Corporation or its related companies. 7/08 Printed in oven. ■ Household fuse is connected. ■ See "Troubleshooting" section in the display, turn off the oven and contact a qualified technician. 5. Check that the oven door(s) is an extra part, go back through the steps to...Use and Care Guide. The time should flash in the display. ■ Electrical supply is intact and tight; If oven(s) does not operate, check the following: If you have all parts are now installed. When oven has been on for 5 minutes, feel heat or if an "F" followed by...

