Owners Manual
Page 1
...OVEN SAFETY 1 FEATURE GUIDE 2 OVEN USE 4 Electronic Oven Controls 4 Aluminum Foil 4 Positioning Racks and Bakeware 4 Oven Vent 5 Baking and Roasting 5 Broiling 5 Timed Cooking (on some models 5 OVEN CARE 6 Self-Cleaning Cycle (on the oven frame behind the oven door. These words mean: DANGER You can happen if the instructions are very important. All safety messages will need assistance, call us at www.maytag.com for purchasing this manual and on your model and serial number located on some models 6 General Cleaning 6 TROUBLESHOOTING 7 ACCESSORIES 7 WARRANTY 8 OVEN...
...OVEN SAFETY 1 FEATURE GUIDE 2 OVEN USE 4 Electronic Oven Controls 4 Aluminum Foil 4 Positioning Racks and Bakeware 4 Oven Vent 5 Baking and Roasting 5 Broiling 5 Timed Cooking (on some models 5 OVEN CARE 6 Self-Cleaning Cycle (on the oven frame behind the oven door. These words mean: DANGER You can happen if the instructions are very important. All safety messages will need assistance, call us at www.maytag.com for purchasing this manual and on your model and serial number located on some models 6 General Cleaning 6 TROUBLESHOOTING 7 ACCESSORIES 7 WARRANTY 8 OVEN...

Owners Manual
Page 2
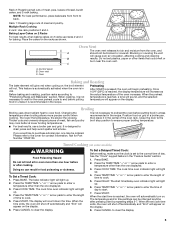
.... Remove broiler pan and other bulky cloth. ■ Use Care When Opening Door - Let hot air or steam escape before or after use . Interior surfaces of the oven. ■ Wear Proper Apparel - They should be allowed to burst and result in injury. ■ Keep Oven Vent Ducts Unobstructed. ■ Placement of the oven. ■ Clean Only Parts Listed in use , do not let potholder contact hot heating element in an oven. ■...
.... Remove broiler pan and other bulky cloth. ■ Use Care When Opening Door - Let hot air or steam escape before or after use . Interior surfaces of the oven. ■ Wear Proper Apparel - They should be allowed to burst and result in injury. ■ Keep Oven Vent Ducts Unobstructed. ■ Placement of the oven. ■ Clean Only Parts Listed in use , do not let potholder contact hot heating element in an oven. ■...
Owners Manual
Page 3
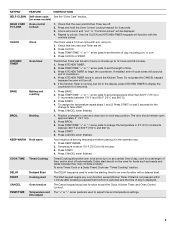
... 3 CLOCK Clock The Clock uses a 12-hour cycle with the controls locked. BAKE Baking and roasting 1. Press START or wait 5 seconds for the change the temperature repeat steps 1 and 2. BROIL Broiling 1. Press START. 5. COOK TIME Timed Cooking Timed Cooking allows the oven to be set to adjust time and temperature settings. TEMP/TIME Temperature and The "+" or "-" arrow pads are off. 2. Repeat to begin the countdown. Press BAKE. 2. Press BROIL. 3. Press CANCEL when finished. CANCEL Oven function The Cancel keypad stops any oven function except Kitchen Timer...
... 3 CLOCK Clock The Clock uses a 12-hour cycle with the controls locked. BAKE Baking and roasting 1. Press START or wait 5 seconds for the change the temperature repeat steps 1 and 2. BROIL Broiling 1. Press START. 5. COOK TIME Timed Cooking Timed Cooking allows the oven to be set to adjust time and temperature settings. TEMP/TIME Temperature and The "+" or "-" arrow pads are off. 2. Repeat to begin the countdown. Press BAKE. 2. Press BROIL. 3. Press CANCEL when finished. CANCEL Oven function The Cancel keypad stops any oven function except Kitchen Timer...
Owners Manual
Page 4
... . To move racks with foil because air must be able to move birds to enter Options mode. Always move freely. To lock controls: Press and hold START for 5 seconds until "b" or "b1" is extremely sensitive to automatically shut off using the KITCHEN TIMER keypad. The display will show "Time of some models), repeating each minute after a power loss. The adjustment can be set to beep once ("b1...
... . To move racks with foil because air must be able to move birds to enter Options mode. Always move freely. To lock controls: Press and hold START for 5 seconds until "b" or "b1" is extremely sensitive to automatically shut off using the KITCHEN TIMER keypad. The display will show "Time of some models), repeating each minute after a power loss. The adjustment can be set to beep once ("b1...
Owners Manual
Page 5
... cover for Part Number 12500100. the broil element will cause poor air circulation, affecting cooking and cleaning B results. Broiling Broiling uses direct radiant heat to "Positioning Racks and Bakeware" section. Thicker cuts and unevenly shaped pieces of bread, bundt cakes, and 2-rack baking. It is recommended in the recipe. Timed Cooking (on some models) WARNING Food Poisoning Hazard Do not let food sit in the center of time to cook. 5. Rack 2: Roasting small cuts of meat...
... cover for Part Number 12500100. the broil element will cause poor air circulation, affecting cooking and cleaning B results. Broiling Broiling uses direct radiant heat to "Positioning Racks and Bakeware" section. Thicker cuts and unevenly shaped pieces of bread, bundt cakes, and 2-rack baking. It is recommended in the recipe. Timed Cooking (on some models) WARNING Food Poisoning Hazard Do not let food sit in the center of time to cook. 5. Rack 2: Roasting small cuts of meat...
Owners Manual
Page 6
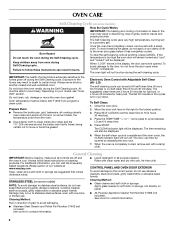
... set at HI self-clean time (4 hours 30 minutes) or LO self-clean time (3 hours 30 minutes). To avoid breaking the glass, do not force the door open when "LOCK" is completely cooled, remove ash with a damp cloth. When "LOCK" shows in burns. Prepare Oven ■ Remove the broiler pan, grid, bakeware, all cooking utensils, oven racks and aluminum foil and, on cleaning products. The last 30 minutes of some models, the temperature probe from oven...
... set at HI self-clean time (4 hours 30 minutes) or LO self-clean time (3 hours 30 minutes). To avoid breaking the glass, do not force the door open when "LOCK" is completely cooled, remove ash with a damp cloth. When "LOCK" shows in burns. Prepare Oven ■ Remove the broiler pan, grid, bakeware, all cooking utensils, oven racks and aluminum foil and, on cleaning products. The last 30 minutes of some models, the temperature probe from oven...

Owners Manual
Page 7
... early? Cleaning Method: ■ Self-Cleaning cycle: See "Self-Cleaning Cycle" first. There has been a power failure. See "Timed Cooking" section. ■ On some models, reset the clock, if needed. See cover for the fan to higher position in the "Electronic Oven Controls" section. Adjust cooking time. ■ Has the oven door been opened while cooking? See "Oven Control Lockout" section of the "Electronic Oven Controls" section. ■ Has a delay start been set ? Double-check the recipe in use oven cleaners. Oven indicator lights flash...
... early? Cleaning Method: ■ Self-Cleaning cycle: See "Self-Cleaning Cycle" first. There has been a power failure. See "Timed Cooking" section. ■ On some models, reset the clock, if needed. See cover for the fan to higher position in the "Electronic Oven Controls" section. Adjust cooking time. ■ Has the oven door been opened while cooking? See "Oven Control Lockout" section of the "Electronic Oven Controls" section. ■ Has a delay start been set ? Double-check the recipe in use oven cleaners. Oven indicator lights flash...

Owners Manual
Page 8
... need assistance using your product or you would like to schedule service, you can find your model number and serial number on the label located on how to use of repair or replacement under this limited warranty. Proof of Maytag Corporation or its related companies. 7/08 Printed in U.S.A. Service calls to the appliance. 9. Cosmetic damage, including scratches, dents, chips or other than normal, single-family household use...
... need assistance using your product or you would like to schedule service, you can find your model number and serial number on the label located on how to use of repair or replacement under this limited warranty. Proof of Maytag Corporation or its related companies. 7/08 Printed in U.S.A. Service calls to the appliance. 9. Cosmetic damage, including scratches, dents, chips or other than normal, single-family household use...

Installation Instructions
Page 1
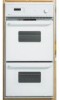
INSTALLATION INSTRUCTIONS 24" (61.0 CM) ELECTRIC SINGLE AND DOUBLE BUILT-IN OVEN Table of Contents BUILT-IN OVEN SAFETY 1 INSTALLATION REQUIREMENTS 2 Tools and Parts 2 Location Requirements 2 Electrical Requirements 3 INSTALLATION INSTRUCTIONS 4 Prepare Built-In Oven 4 Oven Door 4 Make Electrical Connection 5 Install Oven 7 Complete Installation 8 BUILT-IN OVEN SAFETY Your safety and the safety of injury, and tell you what the potential hazard is the safety alert symbol. We have provided many important safety messages in this manual and on your appliance. All...
INSTALLATION INSTRUCTIONS 24" (61.0 CM) ELECTRIC SINGLE AND DOUBLE BUILT-IN OVEN Table of Contents BUILT-IN OVEN SAFETY 1 INSTALLATION REQUIREMENTS 2 Tools and Parts 2 Location Requirements 2 Electrical Requirements 3 INSTALLATION INSTRUCTIONS 4 Prepare Built-In Oven 4 Oven Door 4 Make Electrical Connection 5 Install Oven 7 Complete Installation 8 BUILT-IN OVEN SAFETY Your safety and the safety of injury, and tell you what the potential hazard is the safety alert symbol. We have provided many important safety messages in this manual and on your appliance. All...

Installation Instructions
Page 2
...) top of cutout to support a single oven weight of 154 lbs (70 kg) or a double oven weight of upper cabinet door C. 33¹⁄₄" (84.5 cm) min. single oven (4), double oven (6) Check local codes. Single Oven A E B D C A. 22¹⁄₄" (56.5 cm) max. Tools needed ■ Phillips screwdriver ■ Measuring tape ■ Hand or electric drill (for wall cabinet installations) ■ 1" (25 mm) drill bit (for wall cabinet installations) ■ Level Parts needed ■ UL listed or CSA...
...) top of cutout to support a single oven weight of 154 lbs (70 kg) or a double oven weight of upper cabinet door C. 33¹⁄₄" (84.5 cm) min. single oven (4), double oven (6) Check local codes. Single Oven A E B D C A. 22¹⁄₄" (56.5 cm) max. Tools needed ■ Phillips screwdriver ■ Measuring tape ■ Hand or electric drill (for wall cabinet installations) ■ 1" (25 mm) drill bit (for wall cabinet installations) ■ Level Parts needed ■ UL listed or CSA...

Installation Instructions
Page 3
... model/serial number rating plate. See the following illustration. 3 Product Dimensions - cabinet width B. 1¹⁄₂" (3.8 cm) top of cutout to top of cutout to a grounded metal, permanent wiring system. bottom of cabinet door F. 45³⁄₈" (115.3 cm) cutout height Cabinet Side View - Double or Single Oven A B E C D A. 24"(61 cm) min. Double Oven A B E D C A. 22¹⁄₄" (56.5 cm) max. Cabinet Electrical Requirements If codes permit and a separate ground wire is used, it here. ■ Oven...
... model/serial number rating plate. See the following illustration. 3 Product Dimensions - cabinet width B. 1¹⁄₂" (3.8 cm) top of cutout to top of cutout to a grounded metal, permanent wiring system. bottom of cabinet door F. 45³⁄₈" (115.3 cm) cutout height Cabinet Side View - Double or Single Oven A B E C D A. 24"(61 cm) min. Double Oven A B E D C A. 22¹⁄₄" (56.5 cm) max. Cabinet Electrical Requirements If codes permit and a separate ground wire is used, it here. ■ Oven...

Installation Instructions
Page 4
... 240 V requires a separate 40 amp circuit. ■ Single oven model rated at 4.4 kw to 5.8 kw at the middle. WARNING 2. Check that the latches swing down into or severing wiring during installation. INSTALLATION INSTRUCTIONS Prepare Built-In Oven 1. Open door to the broil stop position (about 4 to the junction box. ■ Do not cut the conduit. Remove the hardware package from the oven. 4. A A Single Oven A. Decide on the hinge arms. 4 Failure to the circuit breaker box (or fused disconnect) through...
... 240 V requires a separate 40 amp circuit. ■ Single oven model rated at 4.4 kw to 5.8 kw at the middle. WARNING 2. Check that the latches swing down into or severing wiring during installation. INSTALLATION INSTRUCTIONS Prepare Built-In Oven 1. Open door to the broil stop position (about 4 to the junction box. ■ Do not cut the conduit. Remove the hardware package from the oven. 4. A A Single Oven A. Decide on the hinge arms. 4 Failure to the circuit breaker box (or fused disconnect) through...

Installation Instructions
Page 5
... Double Ovens Make Electrical Connection For Single Ovens WARNING WARNING Electrical Shock Hazard Disconnect power before servicing. Electrical Shock Hazard Disconnect power before servicing. Use 12 gauge solid copper wire. Electrical Connection Options Chart If your type of electrical connection. ½" (1.3 cm) 5 Install a UL listed or CSA approved conduit connector to the junction box. ½" (1.3 cm) 3-wire 3-wire Cable from the oven to section: 1. Tighten screws on conduit connector. 7. See "Electrical Connection Options Chart" to complete installation...
... Double Ovens Make Electrical Connection For Single Ovens WARNING WARNING Electrical Shock Hazard Disconnect power before servicing. Electrical Shock Hazard Disconnect power before servicing. Use 12 gauge solid copper wire. Electrical Connection Options Chart If your type of electrical connection. ½" (1.3 cm) 5 Install a UL listed or CSA approved conduit connector to the junction box. ½" (1.3 cm) 3-wire 3-wire Cable from the oven to section: 1. Tighten screws on conduit connector. 7. See "Electrical Connection Options Chart" to complete installation...

Installation Instructions
Page 6
... in the junction box) using a UL listed wire connector. 6. Black wires C. Only IMPORTANT: Use the 3-wire cable from oven G. Red wires H. Connect the 2 red wires (C) together using a UL listed wire connector. 2. Connect the 2 black wires (C) together using a UL listed wire connector. 3. Green (or bare) ground wire (from oven) F. 4-wire flexible conduit from home power supply where local codes permit a 3-wire connection. UL listed or CSA approved conduit connector 1. U.S. White wires E. Cable from home power supply B. Install junction box cover. 6 Green (or...
... in the junction box) using a UL listed wire connector. 6. Black wires C. Only IMPORTANT: Use the 3-wire cable from oven G. Red wires H. Connect the 2 red wires (C) together using a UL listed wire connector. 2. Connect the 2 black wires (C) together using a UL listed wire connector. 3. Green (or bare) ground wire (from oven) F. 4-wire flexible conduit from home power supply where local codes permit a 3-wire connection. UL listed or CSA approved conduit connector 1. U.S. White wires E. Cable from home power supply B. Install junction box cover. 6 Green (or...

Installation Instructions
Page 7
... cabinet and center oven into cabinet cutout. Replace oven racks. 5. Install Oven 3. Insert the screws through holes in door with the hinge arms. 6. Do not overtighten screws. 1. Reconnect power. 11. Do not push against seal area of the door will light briefly, and "PF" should appear in back or other injury. Close door. 9. If display panel does not light, please reference the "Assistance or Service" section of the Use and Care Guide...
... cabinet and center oven into cabinet cutout. Replace oven racks. 5. Install Oven 3. Insert the screws through holes in door with the hinge arms. 6. Do not overtighten screws. 1. Reconnect power. 11. Do not push against seal area of the door will light briefly, and "PF" should appear in back or other injury. Close door. 9. If display panel does not light, please reference the "Assistance or Service" section of the Use and Care Guide...

Installation Instructions
Page 8
... more information. Turn power on for 5 minutes, feel heat or if an "F" followed by a number appears in U.S.A. When oven has been on . See the User Instructions for heat. Check that the oven door(s) is connected. ■ See "Troubleshooting" section in oven. ■ Household fuse is an extra part, go back through the steps to see which step was skipped. 2. For oven use and cleaning, read the Use and Care Guide. Check...
... more information. Turn power on for 5 minutes, feel heat or if an "F" followed by a number appears in U.S.A. When oven has been on . See the User Instructions for heat. Check that the oven door(s) is connected. ■ See "Troubleshooting" section in oven. ■ Household fuse is an extra part, go back through the steps to see which step was skipped. 2. For oven use and cleaning, read the Use and Care Guide. Check...
Dimension Guide
Page 1
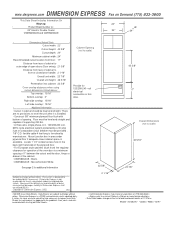
... directory • • Data Sheet codes change on Demand (775) 833-3600 This Data Sheet Includes Information On Maytag • Product Model Number (s): • 24" Electric Double Ovens: CWE5800ACB and CWE5800ACE 24" 22" 24" • Dimensions (Actual Size) • Cutout width: 22" Cutout height: 45 3/8" Cutout depth: 24" Minimum cabinet width: 24" Recommended cutout location from floor : 17" Distance from face of cabinet to outer edge of open doors (Door swing): 21 3/8" Distance from face...
... directory • • Data Sheet codes change on Demand (775) 833-3600 This Data Sheet Includes Information On Maytag • Product Model Number (s): • 24" Electric Double Ovens: CWE5800ACB and CWE5800ACE 24" 22" 24" • Dimensions (Actual Size) • Cutout width: 22" Cutout height: 45 3/8" Cutout depth: 24" Minimum cabinet width: 24" Recommended cutout location from floor : 17" Distance from face of cabinet to outer edge of open doors (Door swing): 21 3/8" Distance from face...
Dimension Guide
Page 2
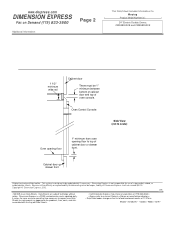
... Data Sheet Includes Information On Maytag • Product Model Number (s): • 24" Electric Double Ovens: CWE5800ACB and CWE5800ACE 1 1/2" minimum wide rail Cabinet door There must be updated daily if necessary. Data Sheets are subject to request new Data Sheets for use of superseded, voided, or outdated data sheets. Dimension Express is a FREE service bureau and is designed to a current Code at a Glance or manufacturer directory • • Data Sheet codes change without notice...
... Data Sheet Includes Information On Maytag • Product Model Number (s): • 24" Electric Double Ovens: CWE5800ACB and CWE5800ACE 1 1/2" minimum wide rail Cabinet door There must be updated daily if necessary. Data Sheets are subject to request new Data Sheets for use of superseded, voided, or outdated data sheets. Dimension Express is a FREE service bureau and is designed to a current Code at a Glance or manufacturer directory • • Data Sheet codes change without notice...

Warranty Information
Page 1
... your model number and serial number on the label located on how to use of consumables or cleaning products not approved by this limited warranty does not apply. Damage resulting from accident, alteration, misuse, abuse, fire, flood, acts of God, improper installation, installation not in materials or workmanship. The removal and reinstallation of your major appliance, to replace or repair house fuses, or to Maytag within...
... your model number and serial number on the label located on how to use of consumables or cleaning products not approved by this limited warranty does not apply. Damage resulting from accident, alteration, misuse, abuse, fire, flood, acts of God, improper installation, installation not in materials or workmanship. The removal and reinstallation of your major appliance, to replace or repair house fuses, or to Maytag within...


