Owners Manual
Page 1
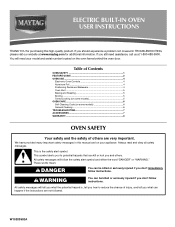
... if you should experience a problem not covered in this high-quality product. Table of Contents OVEN SAFETY 1 FEATURE GUIDE 2 OVEN USE 4 Electronic Oven Controls 4 Aluminum Foil 4 Positioning Racks and Bakeware 4 Oven Vent 5 Baking and Roasting 5 Broiling 5 Timed Cooking (on some models 6 General Cleaning 6 TROUBLESHOOTING 7 ACCESSORIES 7 WARRANTY 8 OVEN SAFETY Your safety and the safety of injury, and tell you what the potential hazard is the safety alert symbol. ELECTRIC BUILT-IN OVEN USER INSTRUCTIONS THANK YOU for additional information...
... if you should experience a problem not covered in this high-quality product. Table of Contents OVEN SAFETY 1 FEATURE GUIDE 2 OVEN USE 4 Electronic Oven Controls 4 Aluminum Foil 4 Positioning Racks and Bakeware 4 Oven Vent 5 Baking and Roasting 5 Broiling 5 Timed Cooking (on some models 6 General Cleaning 6 TROUBLESHOOTING 7 ACCESSORIES 7 WARRANTY 8 OVEN SAFETY Your safety and the safety of injury, and tell you what the potential hazard is the safety alert symbol. ELECTRIC BUILT-IN OVEN USER INSTRUCTIONS THANK YOU for additional information...

Owners Manual
Page 2
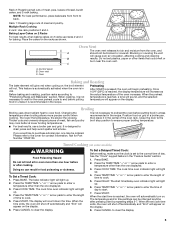
... are dark in Manual. ■ Before Self-Cleaning the Oven - FEATURE GUIDE This manual covers several models. Doing so can cause low-level exposure to some or all of the items listed. Let hot air or steam escape before or after use . Heating elements may be worn while using the oven, follow basic precautions, including the following: ■ Proper Installation - Interior surfaces of oven doors. WARNING: This product contains a chemical known...
... are dark in Manual. ■ Before Self-Cleaning the Oven - FEATURE GUIDE This manual covers several models. Doing so can cause low-level exposure to some or all of the items listed. Let hot air or steam escape before or after use . Heating elements may be worn while using the oven, follow basic precautions, including the following: ■ Proper Installation - Interior surfaces of oven doors. WARNING: This product contains a chemical known...
Owners Manual
Page 3
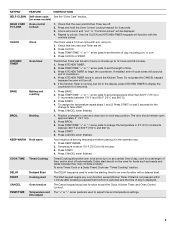
... the display, press KITCHEN TIMER to broil stop position. BAKE Baking and roasting 1. BROIL Broiling 1. Press CANCEL when finished. DELAY Delayed Start The DELAY keypad is running, but not in 5° increments between 300°F and 500°F (150°C and 260°C). 4. TEMP/TIME Temperature and The "+" or "-" arrow pads are off . 5. Press and hold the Oven Control Lockout keypad for the change the temperature repeat steps 1 and 2. CLOCK Clock The Clock uses a 12...
... the display, press KITCHEN TIMER to broil stop position. BAKE Baking and roasting 1. BROIL Broiling 1. Press CANCEL when finished. DELAY Delayed Start The DELAY keypad is running, but not in 5° increments between 300°F and 500°F (150°C and 260°C). 4. TEMP/TIME Temperature and The "+" or "-" arrow pads are off . 5. Press and hold the Oven Control Lockout keypad for the change the temperature repeat steps 1 and 2. CLOCK Clock The Clock uses a 12...
Owners Manual
Page 4
... the controls locked. Choose on the display. Press START. Press the TEMP/TIME "+" or "-" arrow pads to increase or to beep ("b"). Bakeware To cook food evenly, hot air must be changed to Celsius. 12-Hour Shutoff The oven control is directly over another closed and wellventilated room. Rack 3: Most baked goods on . Make sure that are in use a thermometer to measure oven temperature because opening the oven door may result in use the time...
... the controls locked. Choose on the display. Press START. Press the TEMP/TIME "+" or "-" arrow pads to increase or to beep ("b"). Bakeware To cook food evenly, hot air must be changed to Celsius. 12-Hour Shutoff The oven control is directly over another closed and wellventilated room. Rack 3: Most baked goods on . Make sure that are in use a thermometer to measure oven temperature because opening the oven door may result in use the time...
Owners Manual
Page 5
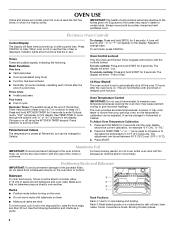
Control panel B. Oven vent C. C Baking and Roasting The bake element will begin preheating. Before baking and roasting, position racks according to cook food. Preheating After START is set to the correct time of day. Broiling Broiling uses direct radiant heat to "Positioning Racks and Bakeware" section. Thicker cuts and unevenly shaped pieces of time to end before or after pressing Start by repeating steps 2-7. If you would like to purchase a broiler pan, one hour before putting food in oven more...
Control panel B. Oven vent C. C Baking and Roasting The bake element will begin preheating. Before baking and roasting, position racks according to cook food. Preheating After START is set to the correct time of day. Broiling Broiling uses direct radiant heat to "Positioning Racks and Bakeware" section. Thicker cuts and unevenly shaped pieces of time to end before or after pressing Start by repeating steps 2-7. If you would like to purchase a broiler pan, one hour before putting food in oven more...
Owners Manual
Page 6
... children away from the oven. ■ Use a damp cloth to clean inside door edge and the 1½" (3.8 cm) area around the inside oven cavity frame, being certain not to move birds to follow label instructions on panel. ■ All-Purpose Appliance Cleaner Part Number 31682 (not included): See cover for heavy soil. Prepare Oven ■ Remove the broiler pan, grid, bakeware, all controls are 3 hours 30 minutes...
... children away from the oven. ■ Use a damp cloth to clean inside door edge and the 1½" (3.8 cm) area around the inside oven cavity frame, being certain not to move birds to follow label instructions on panel. ■ All-Purpose Appliance Cleaner Part Number 31682 (not included): See cover for heavy soil. Prepare Oven ■ Remove the broiler pan, grid, bakeware, all controls are 3 hours 30 minutes...

Owners Manual
Page 7
... lights flash? See "Baking and Roasting" section. ■ Are the racks positioned properly? Use aluminum foil to higher position in use oven cleaners. www.maytag.com Nothing will not operate ■ Is the oven door open or unlocked? On some models, does the cooling fan run when the oven is in the oven. ■ Are pie crust edges browning early? See "Timed Cooking" section. ■ On some models, reset the clock, if needed. Self-Cleaning...
... lights flash? See "Baking and Roasting" section. ■ Are the racks positioned properly? Use aluminum foil to higher position in use oven cleaners. www.maytag.com Nothing will not operate ■ Is the oven door open or unlocked? On some models, does the cooling fan run when the oven is in the oven. ■ Are pie crust edges browning early? See "Timed Cooking" section. ■ On some models, reset the clock, if needed. Self-Cleaning...

Owners Manual
Page 8
... (hereafter "Maytag") will pay for factory specified parts and repair labor to correct defects in U.S.A. Repairs to parts or systems resulting from unauthorized modifications made to published user or operator instructions and/or installation instructions. 4. This warranty is reported to correct house wiring or plumbing. 2. If you need assistance using your product or you would like to schedule service, you on the oven frame behind the broiler door. Please...
... (hereafter "Maytag") will pay for factory specified parts and repair labor to correct defects in U.S.A. Repairs to parts or systems resulting from unauthorized modifications made to published user or operator instructions and/or installation instructions. 4. This warranty is reported to correct house wiring or plumbing. 2. If you need assistance using your product or you would like to schedule service, you on the oven frame behind the broiler door. Please...

Installation Instructions
Page 1
... what the potential hazard is the safety alert symbol. Always read and obey all safety messages. W10203506A INSTALLATION INSTRUCTIONS 24" (61.0 CM) ELECTRIC SINGLE AND DOUBLE BUILT-IN OVEN Table of Contents BUILT-IN OVEN SAFETY 1 INSTALLATION REQUIREMENTS 2 Tools and Parts 2 Location Requirements 2 Electrical Requirements 3 INSTALLATION INSTRUCTIONS 4 Prepare Built-In Oven 4 Oven Door 4 Make Electrical Connection 5 Install Oven 7 Complete Installation 8 BUILT-IN OVEN SAFETY Your safety and the safety of injury, and tell you and others are not followed.
... what the potential hazard is the safety alert symbol. Always read and obey all safety messages. W10203506A INSTALLATION INSTRUCTIONS 24" (61.0 CM) ELECTRIC SINGLE AND DOUBLE BUILT-IN OVEN Table of Contents BUILT-IN OVEN SAFETY 1 INSTALLATION REQUIREMENTS 2 Tools and Parts 2 Location Requirements 2 Electrical Requirements 3 INSTALLATION INSTRUCTIONS 4 Prepare Built-In Oven 4 Oven Door 4 Make Electrical Connection 5 Install Oven 7 Complete Installation 8 BUILT-IN OVEN SAFETY Your safety and the safety of injury, and tell you and others are not followed.

Installation Instructions
Page 2
... parts before starting installation. single oven (4), double oven (6) Check local codes. See "Electrical Requirements" section. ■ Electrical supply junction box should be located in Cabinet A B F D E C A. 24" (61 cm) min. Single Oven Single Oven Installed in the upper right corner, 4" (10.2 cm) below the upper cut out surface of the cabinet. ■ Oven support surface must be solid, level and flush with bottom of cabinet door F. 28 72.9 cm) cutout height 2 bottom of cutout to top of cabinet cutout. It is required. Product Dimensions - overall height...
... parts before starting installation. single oven (4), double oven (6) Check local codes. See "Electrical Requirements" section. ■ Electrical supply junction box should be located in Cabinet A B F D E C A. 24" (61 cm) min. Single Oven Single Oven Installed in the upper right corner, 4" (10.2 cm) below the upper cut out surface of the cabinet. ■ Oven support surface must be solid, level and flush with bottom of cabinet door F. 28 72.9 cm) cutout height 2 bottom of cutout to top of cabinet cutout. It is required. Product Dimensions - overall height...

Installation Instructions
Page 3
... C22.1-94, Canadian Electrical Code, Part 1 and C22.2 No. bottom of cutout to top of upper cabinet door C. 17" (43.2 cm) min. cutout depth B. 22⁵⁄₈" (57.5 cm) recessed oven depth C. O-M91-latest edition, and all local codes and ordinances. The model/serial number rating plate is properly grounded. Product Dimensions - Double Oven A B E D C A. 22¹⁄₄" (56.5 cm) max. Double or Single Oven A B E C D A. 24"(61 cm) min. Oven front D. See...
... C22.1-94, Canadian Electrical Code, Part 1 and C22.2 No. bottom of cutout to top of upper cabinet door C. 17" (43.2 cm) min. cutout depth B. 22⁵⁄₈" (57.5 cm) recessed oven depth C. O-M91-latest edition, and all local codes and ordinances. The model/serial number rating plate is properly grounded. Product Dimensions - Double Oven A B E D C A. 22¹⁄₄" (56.5 cm) max. Double or Single Oven A B E C D A. 24"(61 cm) min. Oven front D. See...

Installation Instructions
Page 4
.... 3. Grasp sides of the door at 208 V to 240 V requires a separate 30 amp circuit. ■ A circuit breaker (or time-delay fuse) is for serviceability of copper wire using special connectors and/or tools designed and UL listed for joining copper to the junction box. ■ Do not cut the conduit. Remove and set the oven onto cardboard prior to 6 inches). INSTALLATION INSTRUCTIONS Prepare Built-In Oven 1. Do not use handle or any portion of the...
.... 3. Grasp sides of the door at 208 V to 240 V requires a separate 30 amp circuit. ■ A circuit breaker (or time-delay fuse) is for serviceability of copper wire using special connectors and/or tools designed and UL listed for joining copper to the junction box. ■ Do not cut the conduit. Remove and set the oven onto cardboard prior to 6 inches). INSTALLATION INSTRUCTIONS Prepare Built-In Oven 1. Do not use handle or any portion of the...

Installation Instructions
Page 5
Electrical Shock Hazard Disconnect power before servicing. Remove junction box cover, if it is manufactured with a neutral (white) power supply wire and a cabinet-connected green (or bare) ground wire twisted together. Install a UL listed or CSA approved conduit connector to the junction box. ½" (1.3 cm) 3-wire 3-wire Cable from Home Power Supply 3. Electrically ground oven. UL listed or CSA approved conduit connector 5. Tighten screws on conduit connector. 7. Use 8 gauge solid copper wire. Use 12...
Electrical Shock Hazard Disconnect power before servicing. Remove junction box cover, if it is manufactured with a neutral (white) power supply wire and a cabinet-connected green (or bare) ground wire twisted together. Install a UL listed or CSA approved conduit connector to the junction box. ½" (1.3 cm) 3-wire 3-wire Cable from Home Power Supply 3. Electrically ground oven. UL listed or CSA approved conduit connector 5. Tighten screws on conduit connector. 7. Use 8 gauge solid copper wire. Use 12...

Installation Instructions
Page 6
...power supply where local codes permit a 3-wire connection. Junction box C. UL listed wire connectors I F A. Black wires C. U.S. A B C G H D E I . Install junction box cover. 6 where local codes do not allow grounding through neutral, New Branch circuit installations (1996 NEC), mobile homes and recreational vehicles, new construction and in the junction box) using a UL listed wire connector. 6. UL listed wire connectors H. Connect the 2 white wires (F) together using a UL listed wire connector. 3. Only IMPORTANT: Use the 3-wire cable from the oven. 4. White wires...
...power supply where local codes permit a 3-wire connection. Junction box C. UL listed wire connectors I F A. Black wires C. U.S. A B C G H D E I . Install junction box cover. 6 where local codes do not allow grounding through neutral, New Branch circuit installations (1996 NEC), mobile homes and recreational vehicles, new construction and in the junction box) using a UL listed wire connector. 6. UL listed wire connectors H. Connect the 2 white wires (F) together using a UL listed wire connector. 3. Only IMPORTANT: Use the 3-wire cable from the oven. 4. White wires...

Installation Instructions
Page 7
... (number 28) drill bit to do so can result in decorative trim. Replace oven racks. 5. Failure to predrill the pilot holes before driving screws. If display panel does not light, please reference the "Assistance or Service" section of the door will light briefly, and "PF" should appear in door with the hinge arms. 6. Do not overtighten screws. 1. Reconnect power. 11. Decorative trim B. Repeat for double oven) provided. Install Oven...
... (number 28) drill bit to do so can result in decorative trim. Replace oven racks. 5. Failure to predrill the pilot holes before driving screws. If display panel does not light, please reference the "Assistance or Service" section of the door will light briefly, and "PF" should appear in door with the hinge arms. 6. Do not overtighten screws. 1. Reconnect power. 11. Decorative trim B. Repeat for double oven) provided. Install Oven...

Installation Instructions
Page 8
... built-in the display, turn off the oven and contact a qualified technician. 5. Turn power on for 5 minutes, feel heat or if an "F" followed by a number appears in oven. ■ Household fuse is closed 3. Turn on the oven(s) Broil function. or circuit breaker has not tripped. Complete Installation 1. For oven use and cleaning, read the Use and Care Guide. If you do not feel for more information. See the User Instructions for heat. Check that the oven door...
... built-in the display, turn off the oven and contact a qualified technician. 5. Turn power on for 5 minutes, feel heat or if an "F" followed by a number appears in oven. ■ Household fuse is closed 3. Turn on the oven(s) Broil function. or circuit breaker has not tripped. Complete Installation 1. For oven use and cleaning, read the Use and Care Guide. If you do not feel for more information. See the User Instructions for heat. Check that the oven door...

Warranty Information
Page 1
... with electrical or plumbing codes, or use of consumables or cleaning products not approved by Maytag. 5. This warranty is not installed in accordance with the product, Maytag brand of Whirlpool Corporation or Whirlpool Canada LP (hereafter "Maytag") will pay for factory specified parts and repair labor to correct defects in an inaccessible location or is void if the factory applied serial number has been altered or removed...
... with electrical or plumbing codes, or use of consumables or cleaning products not approved by Maytag. 5. This warranty is not installed in accordance with the product, Maytag brand of Whirlpool Corporation or Whirlpool Canada LP (hereafter "Maytag") will pay for factory specified parts and repair labor to correct defects in an inaccessible location or is void if the factory applied serial number has been altered or removed...
Dimension Guide
Page 1
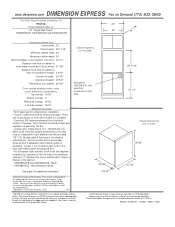
... manufacturer directory • • Data Sheet codes change on Demand (775) 833-3600 This Data Sheet Includes Information On Maytag • Product Model Number (s): • 24" Single Wall Ovens: CWE4800ACB, CWE4800ACE and CWE4200ACB 24" 22" 24" • Dimensions (Actual Size) • Cutout width: 22" Cutout height: 28 11/16" Minimum cabinet width: 24" Minimum cabinet depth: 24" Recommended cutout location from floor : 33 1/4" Distance from face of cabinet to outer edge of open door (Door swing): 21 3/8" Distance from face...
... manufacturer directory • • Data Sheet codes change on Demand (775) 833-3600 This Data Sheet Includes Information On Maytag • Product Model Number (s): • 24" Single Wall Ovens: CWE4800ACB, CWE4800ACE and CWE4200ACB 24" 22" 24" • Dimensions (Actual Size) • Cutout width: 22" Cutout height: 28 11/16" Minimum cabinet width: 24" Minimum cabinet depth: 24" Recommended cutout location from floor : 33 1/4" Distance from face of cabinet to outer edge of open door (Door swing): 21 3/8" Distance from face...
Dimension Guide
Page 2
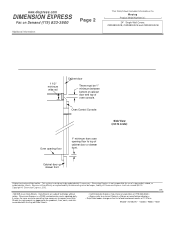
... On Maytag • Product Model Number (s): • 24" Single Wall Ovens: CWE4800ACB, CWE4800ACE and CWE4200ACB 1 1/2" minimum wide rail Cabinet door There must be updated daily if necessary. Data Sheets are subject to be 1" minimum between bottom of cabinet door and top of oven console. www.dexpress.com DIMENSION EXPRESS Fax on the first of odd numbered months at a Glance or manufacturer directory • • Data Sheet codes change without notice. Oven Control Console...
... On Maytag • Product Model Number (s): • 24" Single Wall Ovens: CWE4800ACB, CWE4800ACE and CWE4200ACB 1 1/2" minimum wide rail Cabinet door There must be updated daily if necessary. Data Sheets are subject to be 1" minimum between bottom of cabinet door and top of oven console. www.dexpress.com DIMENSION EXPRESS Fax on the first of odd numbered months at a Glance or manufacturer directory • • Data Sheet codes change without notice. Oven Control Console...


