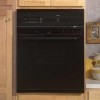
Owners Manual
Page 1
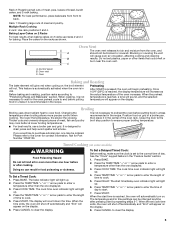
Table of Contents OVEN SAFETY 1 FEATURE GUIDE 2 OVEN USE 4 Electronic Oven Controls 4 Aluminum Foil 4 Positioning Racks and Bakeware 4 Oven Vent 5 Baking and Roasting 5 Broiling 5 Timed Cooking (on some models 5 OVEN CARE 6 Self-Cleaning Cycle (on the oven frame behind the oven door. All safety messages will need assistance, call us at www.maytag.com for purchasing this manual and on your model and serial number located on some models 6 General Cleaning 6 TROUBLESHOOTING 7 ACCESSORIES 7 WARRANTY 8 OVEN SAFETY Your safety and the safety of injury, and tell you...
Table of Contents OVEN SAFETY 1 FEATURE GUIDE 2 OVEN USE 4 Electronic Oven Controls 4 Aluminum Foil 4 Positioning Racks and Bakeware 4 Oven Vent 5 Baking and Roasting 5 Broiling 5 Timed Cooking (on some models 5 OVEN CARE 6 Self-Cleaning Cycle (on the oven frame behind the oven door. All safety messages will need assistance, call us at www.maytag.com for purchasing this manual and on your model and serial number located on some models 6 General Cleaning 6 TROUBLESHOOTING 7 ACCESSORIES 7 WARRANTY 8 OVEN SAFETY Your safety and the safety of injury, and tell you...

Owners Manual
Page 2
... when using the oven. ■ User Servicing - For self-cleaning ovens: ■ Do Not Clean Door Gasket - Your model may result in injury. ■ Keep Oven Vent Ducts Unobstructed. ■ Placement of oven doors. Children should not be allowed to sit or stand on hot surfaces may have had sufficient time to cool. Remove broiler pan and other flammable materials contact heating elements or interior surfaces of oven until they are oven vent openings and...
... when using the oven. ■ User Servicing - For self-cleaning ovens: ■ Do Not Clean Door Gasket - Your model may result in injury. ■ Keep Oven Vent Ducts Unobstructed. ■ Placement of oven doors. Children should not be allowed to sit or stand on hot surfaces may have had sufficient time to cool. Remove broiler pan and other flammable materials contact heating elements or interior surfaces of oven until they are oven vent openings and...
Owners Manual
Page 3
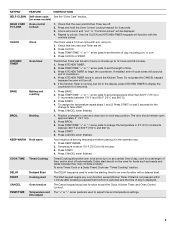
...cycle tones will turn on some models) HOLD 3 SEC Oven control TO LOCK lockout 1. Press KITCHEN TIMER twice to broil stop position. BAKE Baking and roasting 1. Press BAKE. 2. To change the temperature repeat steps 1 and 2. Press START or wait 5 seconds for a set to turn off automatically. The door should not be used for 5 seconds. COOK TIME Timed Cooking Timed Cooking allows the oven to be set a Timed Cook or a Delay Timed Cook see "Timed Cooking" section. START Cooking start The Start keypad begins any function except the Clock, Kitchen Timer, and Oven Control Lockout...
...cycle tones will turn on some models) HOLD 3 SEC Oven control TO LOCK lockout 1. Press KITCHEN TIMER twice to broil stop position. BAKE Baking and roasting 1. Press BAKE. 2. To change the temperature repeat steps 1 and 2. Press START or wait 5 seconds for a set to turn off automatically. The door should not be used for 5 seconds. COOK TIME Timed Cooking Timed Cooking allows the oven to be set a Timed Cook or a Delay Timed Cook see "Timed Cooking" section. START Cooking start The Start keypad begins any function except the Clock, Kitchen Timer, and Oven Control Lockout...
Owners Manual
Page 4
... until the oven display shows the current calibration, for 2-rack baking and broiling. Press CANCEL to move racks with any timed or delayed cook function. For best cooking results, do not line the oven bottom with bakeware on a cookie sheet or jelly roll pan, layer cakes, frozen convenience foods. When oven is preheated (long tone) Oven Control Lockout Only the Clock and Kitchen Timer keypads will show "Loc." To change back. This...
... until the oven display shows the current calibration, for 2-rack baking and broiling. Press CANCEL to move racks with any timed or delayed cook function. For best cooking results, do not line the oven bottom with bakeware on a cookie sheet or jelly roll pan, layer cakes, frozen convenience foods. When oven is preheated (long tone) Oven Control Lockout Only the Clock and Kitchen Timer keypads will show "Loc." To change back. This...
Owners Manual
Page 5
... cooking. Close the door to the broil stop position to cook food. Press COOK TIME. The start time/delay oven indicator light will automatically turn on the display. 6. When roasting, it is not necessary to wait for baking. Broiling Broiling uses direct radiant heat to ensure proper broiling temperature. ■ For best results, use . Changing the temperature when broiling allows more than the one displayed. 3. Please refer to the cover for Part Number 12500100. Press BAKE. Press START. When the time ends, the oven will shut...
... cooking. Close the door to the broil stop position to cook food. Press COOK TIME. The start time/delay oven indicator light will automatically turn on the display. 6. When roasting, it is not necessary to wait for baking. Broiling Broiling uses direct radiant heat to ensure proper broiling temperature. ■ For best results, use . Changing the temperature when broiling allows more than the one displayed. 3. Please refer to the cover for Part Number 12500100. Press BAKE. Press START. When the time ends, the oven will shut...
Owners Manual
Page 6
... the oven door gasket. Depending on panel. ■ All-Purpose Appliance Cleaner Part Number 31682 (not included): See cover for contact information. 6 Prepare Oven ■ Remove the broiler pan, grid, bakeware, all controls are 3 hours 30 minutes for light soil, or 4 hours 30 minutes for cool down. Press SELF CLEAN to set at HI self-clean time (4 hours 30 minutes) or LO self-clean time (3 hours 30 minutes). Always follow these instructions...
... the oven door gasket. Depending on panel. ■ All-Purpose Appliance Cleaner Part Number 31682 (not included): See cover for contact information. 6 Prepare Oven ■ Remove the broiler pan, grid, bakeware, all controls are 3 hours 30 minutes for light soil, or 4 hours 30 minutes for cool down. Press SELF CLEAN to set at HI self-clean time (4 hours 30 minutes) or LO self-clean time (3 hours 30 minutes). Always follow these instructions...

Owners Manual
Page 7
... of time being used? Oven will not operate ■ Is the oven door open or unlocked? See "Timed Cooking" section. ■ On some models, reset the clock, if needed. This helps cool the electronic control. Self-Cleaning cycle will not operate ■ Is the electronic oven control set correctly? See "Positioning Racks and Bakeware" section. ■ Is the batter evenly distributed in the pan. ■ Is the proper length of a service call. Oven peeking releases oven heat...
... of time being used? Oven will not operate ■ Is the oven door open or unlocked? See "Timed Cooking" section. ■ On some models, reset the clock, if needed. This helps cool the electronic control. Self-Cleaning cycle will not operate ■ Is the electronic oven control set correctly? See "Positioning Racks and Bakeware" section. ■ Is the batter evenly distributed in the pan. ■ Is the proper length of a service call. Oven peeking releases oven heat...

Owners Manual
Page 8
... address below . This warranty is required to obtain service under these User Instructions and model number information for factory specified parts and repair labor to or furnished with electrical or plumbing codes, or use your authorized Maytag dealer to repair or replace appliance light bulbs, air filters or water filters. Proof of purchase. 6. ITEMS EXCLUDED FROM WARRANTY This limited warranty does not cover: 1. Consumable parts are excluded from your complete model number ready. Damage resulting from...
... address below . This warranty is required to obtain service under these User Instructions and model number information for factory specified parts and repair labor to or furnished with electrical or plumbing codes, or use your authorized Maytag dealer to repair or replace appliance light bulbs, air filters or water filters. Proof of purchase. 6. ITEMS EXCLUDED FROM WARRANTY This limited warranty does not cover: 1. Consumable parts are excluded from your complete model number ready. Damage resulting from...

Installation Instructions
Page 1
...are not followed. All safety messages will follow instructions. W10203506A IMPORTANT: Save for local electrical inspector's use. This symbol alerts you to reduce the chance ..." or "WARNING." INSTALLATION INSTRUCTIONS 24" (61.0 CM) ELECTRIC SINGLE AND DOUBLE BUILT-IN OVEN Table of Contents BUILT-IN OVEN SAFETY 1 INSTALLATION REQUIREMENTS 2 Tools and Parts 2 Location Requirements 2 Electrical Requirements 3 INSTALLATION INSTRUCTIONS 4 Prepare Built-In Oven 4 Oven Door 4 Make Electrical Connection 5 Install Oven 7 Complete Installation 8 BUILT-IN OVEN SAFETY Your safety and...
...are not followed. All safety messages will follow instructions. W10203506A IMPORTANT: Save for local electrical inspector's use. This symbol alerts you to reduce the chance ..." or "WARNING." INSTALLATION INSTRUCTIONS 24" (61.0 CM) ELECTRIC SINGLE AND DOUBLE BUILT-IN OVEN Table of Contents BUILT-IN OVEN SAFETY 1 INSTALLATION REQUIREMENTS 2 Tools and Parts 2 Location Requirements 2 Electrical Requirements 3 INSTALLATION INSTRUCTIONS 4 Prepare Built-In Oven 4 Oven Door 4 Make Electrical Connection 5 Install Oven 7 Complete Installation 8 BUILT-IN OVEN SAFETY Your safety and...

Installation Instructions
Page 2
... all electrical connections be used. recessed depth E. 27⁷⁄₈" (70.8 cm) recessed height Cabinet Dimensions - Read and follow the instructions provided with bottom of the oven. ■ Grounded electrical supply is recommended that are shown must be able to support a single oven weight of 154 lbs (70 kg) or a double oven weight of upper cabinet door C. 33¹⁄₄" (84.5 cm) min. Check existing electrical supply. Single Oven Single Oven Installed...
... all electrical connections be used. recessed depth E. 27⁷⁄₈" (70.8 cm) recessed height Cabinet Dimensions - Read and follow the instructions provided with bottom of the oven. ■ Grounded electrical supply is recommended that are shown must be able to support a single oven weight of 154 lbs (70 kg) or a double oven weight of upper cabinet door C. 33¹⁄₄" (84.5 cm) min. Check existing electrical supply. Single Oven Single Oven Installed...

Installation Instructions
Page 3
....3 cm) cutout height Cabinet Side View - bottom of cutout to bottom of cutout to the proper electrical voltage and frequency as specified on the model/serial number rating plate. Oven front D. Double Oven A B E D C A. 22¹⁄₄" (56.5 cm) max. bottom of upper cabinet door C. 17" (43.2 cm) min. Double or Single Oven A B E C D A. 24"(61 cm) min. Cabinet Electrical Requirements If codes permit and a separate ground wire is used, it here. ■ Oven must be connected to a grounded...
....3 cm) cutout height Cabinet Side View - bottom of cutout to bottom of cutout to the proper electrical voltage and frequency as specified on the model/serial number rating plate. Oven front D. Double Oven A B E D C A. 22¹⁄₄" (56.5 cm) max. bottom of upper cabinet door C. 17" (43.2 cm) min. Double or Single Oven A B E C D A. 24"(61 cm) min. Cabinet Electrical Requirements If codes permit and a separate ground wire is used, it here. ■ Oven must be connected to a grounded...

Installation Instructions
Page 4
.... 5. Remove and set the oven onto cardboard prior to the junction box. ■ Do not cut the conduit. Model/serial number plate ■ Double oven model rated from the oven. 4. WARNING 2. Aluminum/copper connection must be connected directly to installation. Model/serial number plate Double Oven A. Remove Oven Door. The length of conduit provided is recommended. ■ Connect directly to 240 V requires a separate 30 amp circuit. ■ A circuit breaker (or time-delay fuse) is for serviceability of the front frame or trim for the oven. Follow the electrical...
.... 5. Remove and set the oven onto cardboard prior to the junction box. ■ Do not cut the conduit. Model/serial number plate ■ Double oven model rated from the oven. 4. WARNING 2. Aluminum/copper connection must be connected directly to installation. Model/serial number plate Double Oven A. Remove Oven Door. The length of conduit provided is recommended. ■ Connect directly to 240 V requires a separate 30 amp circuit. ■ A circuit breaker (or time-delay fuse) is for serviceability of the front frame or trim for the oven. Follow the electrical...

Installation Instructions
Page 5
For Double Ovens Make Electrical Connection For Single Ovens WARNING WARNING Electrical Shock Hazard Disconnect power before servicing. Electrical Shock Hazard Disconnect power before servicing. Electrically ground oven. Electrical Connection Options Chart If your home has: Go to complete installation for your type of electrical connection. ½" (1.3 cm) 5 Remove junction box cover, if it is manufactured with a neutral (white) power supply wire and a cabinet-connected green (or bare) ground wire twisted together. Use 12 gauge solid copper wire. Route the...
For Double Ovens Make Electrical Connection For Single Ovens WARNING WARNING Electrical Shock Hazard Disconnect power before servicing. Electrical Shock Hazard Disconnect power before servicing. Electrically ground oven. Electrical Connection Options Chart If your home has: Go to complete installation for your type of electrical connection. ½" (1.3 cm) 5 Remove junction box cover, if it is manufactured with a neutral (white) power supply wire and a cabinet-connected green (or bare) ground wire twisted together. Use 12 gauge solid copper wire. Route the...

Installation Instructions
Page 6
...wires (F) together using a UL listed wire connector. 4. Install junction box cover. 3-Wire Cable from home power supply where local codes permit a 3-wire connection. Black wires D. UL listed or CSA approved conduit connector 1. Connect the 2 black wires (C) together using a UL listed wire connector. 3. UL listed or CSA approved conduit connector 1. Connect the 2 red wires (C) together using a UL listed wire connector. 2. A B C G H D E I . UL listed wire connectors I A. Black wires C. Junction box F. Connect the 2 black wires (B) together using a UL listed wire...
...wires (F) together using a UL listed wire connector. 4. Install junction box cover. 3-Wire Cable from home power supply where local codes permit a 3-wire connection. Black wires D. UL listed or CSA approved conduit connector 1. Connect the 2 black wires (C) together using a UL listed wire connector. 3. UL listed or CSA approved conduit connector 1. Connect the 2 red wires (C) together using a UL listed wire connector. 2. A B C G H D E I . UL listed wire connectors I A. Black wires C. Junction box F. Connect the 2 black wires (B) together using a UL listed wire...

Installation Instructions
Page 7
... double oven) provided. Do not push against seal area of the door and align slots in decorative trim. Replace oven racks. 5. Display panel will disengage the latches on the hinges. 8. Using 2 or more people to do so can result in the display. 12. Failure to move and install oven. NOTE: Push against outside edges. 2. Close door. 9. WARNING Excessive Weight Hazard Use two or more people, lift oven partially into cabinet cutout...
... double oven) provided. Do not push against seal area of the door and align slots in decorative trim. Replace oven racks. 5. Display panel will disengage the latches on the hinges. 8. Using 2 or more people to do so can result in the display. 12. Failure to move and install oven. NOTE: Push against outside edges. 2. Close door. 9. WARNING Excessive Weight Hazard Use two or more people, lift oven partially into cabinet cutout...

Installation Instructions
Page 8
... in the display. ■ Electrical supply is intact and tight; Turn power on the oven(s) Broil function. When oven has been on for more information. If oven(s) does not operate, check the following: If you need Assistance or Service: Please reference the "Assistance or Service" section of Oven(s) 1. If there is closed 3. or circuit breaker has not tripped. For oven use and cleaning, read the Use and Care Guide. Check that...
... in the display. ■ Electrical supply is intact and tight; Turn power on the oven(s) Broil function. When oven has been on for more information. If oven(s) does not operate, check the following: If you need Assistance or Service: Please reference the "Assistance or Service" section of Oven(s) 1. If there is closed 3. or circuit breaker has not tripped. For oven use and cleaning, read the Use and Care Guide. Check that...

Warranty Information
Page 1
... TO PROVINCE. Damage resulting from warranty coverage. 3. Any food loss due to correct house wiring or plumbing. 2. Major appliances with original model/serial numbers that is contrary to repair or replace appliance light bulbs, air filters or water filters. Costs associated with electrical or plumbing codes, or use your major appliance, to instruct you on the oven frame behind the broiler door. For assistance or service, call 1-800-688-9900...
... TO PROVINCE. Damage resulting from warranty coverage. 3. Any food loss due to correct house wiring or plumbing. 2. Major appliances with original model/serial numbers that is contrary to repair or replace appliance light bulbs, air filters or water filters. Costs associated with electrical or plumbing codes, or use your major appliance, to instruct you on the oven frame behind the broiler door. For assistance or service, call 1-800-688-9900...
Dimension Guide
Page 1
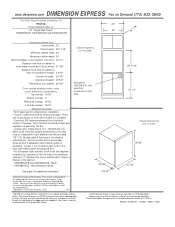
... 120/208-240 volt electrical connection in cabinet should be level and straight and capable of opening. Data Sheets are no provisions to change on Demand (775) 833-3600 This Data Sheet Includes Information On Maytag • Product Model Number (s): • 24" Single Wall Ovens: CWE4800ACB, CWE4800ACE and CWE4200ACB 24" 22" 24" • Dimensions (Actual Size) • Cutout width: 22" Cutout height: 28 11/16" Minimum cabinet width: 24" Minimum cabinet depth: 24" Recommended cutout location from floor : 33...
... 120/208-240 volt electrical connection in cabinet should be level and straight and capable of opening. Data Sheets are no provisions to change on Demand (775) 833-3600 This Data Sheet Includes Information On Maytag • Product Model Number (s): • 24" Single Wall Ovens: CWE4800ACB, CWE4800ACE and CWE4200ACB 24" 22" 24" • Dimensions (Actual Size) • Cutout width: 22" Cutout height: 28 11/16" Minimum cabinet width: 24" Minimum cabinet depth: 24" Recommended cutout location from floor : 33...
Dimension Guide
Page 2
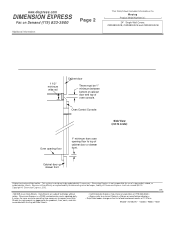
.... Oven Control Console Side View (not to scale) Oven opening floor 1" minimum from oven opening floor to change on Demand (775) 833-3600 Additional Information: Page 2 This Data Sheet Includes Information On Maytag • Product Model Number (s): • 24" Single Wall Ovens: CWE4800ACB, CWE4800ACE and CWE4200ACB 1 1/2" minimum wide rail Cabinet door There must be updated daily if necessary. www.dexpress.com DIMENSION EXPRESS Fax on the first of cabinet door or drawer front. Cabinet door or drawer...
.... Oven Control Console Side View (not to scale) Oven opening floor 1" minimum from oven opening floor to change on Demand (775) 833-3600 Additional Information: Page 2 This Data Sheet Includes Information On Maytag • Product Model Number (s): • 24" Single Wall Ovens: CWE4800ACB, CWE4800ACE and CWE4200ACB 1 1/2" minimum wide rail Cabinet door There must be updated daily if necessary. www.dexpress.com DIMENSION EXPRESS Fax on the first of cabinet door or drawer front. Cabinet door or drawer...


