

Installation Instructions
Page 1
... seriously injured if you don't follow the safety alert symbol and either the word "DANGER" or "WARNING." INSTALLATION INSTRUCTIONS 24" (61.0 CM) ELECTRIC SINGLE AND DOUBLE BUILT-IN OVEN Table of Contents BUILT-IN OVEN SAFETY 1 INSTALLATION REQUIREMENTS 2 Tools and Parts 2 Location Requirements 2 Electrical Requirements 3 INSTALLATION INSTRUCTIONS 4 Prepare Built-In Oven 4 Oven Door 4 Make Electrical Connection 5 Install Oven 7 Complete Installation 8 BUILT-IN OVEN SAFETY Your safety and the safety of injury, and tell you what can kill or hurt you...
... seriously injured if you don't follow the safety alert symbol and either the word "DANGER" or "WARNING." INSTALLATION INSTRUCTIONS 24" (61.0 CM) ELECTRIC SINGLE AND DOUBLE BUILT-IN OVEN Table of Contents BUILT-IN OVEN SAFETY 1 INSTALLATION REQUIREMENTS 2 Tools and Parts 2 Location Requirements 2 Electrical Requirements 3 INSTALLATION INSTRUCTIONS 4 Prepare Built-In Oven 4 Oven Door 4 Make Electrical Connection 5 Install Oven 7 Complete Installation 8 BUILT-IN OVEN SAFETY Your safety and the safety of injury, and tell you what can kill or hurt you...

Installation Instructions
Page 2
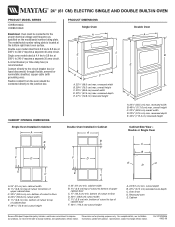
... governing codes and ordinances. ■ Cabinet opening dimensions that all electrical connections be used. Single Oven A E B D C A. 22¹⁄₄" (56.5 cm) max. recessed width B. 29⁵⁄₈" (75.3 cm) max. INSTALLATION REQUIREMENTS Tools and Parts Gather the required tools and parts before starting installation. Read and follow the instructions provided with bottom of cutout to top of upper cabinet door C. 33¹⁄₄" (84.5 cm) min. See "Electrical Requirements." Single Oven Single Oven Installed...
... governing codes and ordinances. ■ Cabinet opening dimensions that all electrical connections be used. Single Oven A E B D C A. 22¹⁄₄" (56.5 cm) max. recessed width B. 29⁵⁄₈" (75.3 cm) max. INSTALLATION REQUIREMENTS Tools and Parts Gather the required tools and parts before starting installation. Read and follow the instructions provided with bottom of cutout to top of upper cabinet door C. 33¹⁄₄" (84.5 cm) min. See "Electrical Requirements." Single Oven Single Oven Installed...

Installation Instructions
Page 3
... local codes and ordinances. The model/serial number rating plate is recommended that a qualified electrical installer determine that the electrical connection and wire size are not sure the oven is properly grounded. cabinet width B. 1¹⁄₂" (3.8 cm) top of cutout to bottom of cutout to the proper electrical voltage and frequency as specified on the model/serial number rating plate. Double or Single Oven A B E C D A. 24"(61 cm) min. This oven must determine the type of electrical connection you...
... local codes and ordinances. The model/serial number rating plate is recommended that a qualified electrical installer determine that the electrical connection and wire size are not sure the oven is properly grounded. cabinet width B. 1¹⁄₂" (3.8 cm) top of cutout to bottom of cutout to the proper electrical voltage and frequency as specified on the model/serial number rating plate. Double or Single Oven A B E C D A. 24"(61 cm) min. This oven must determine the type of electrical connection you...

Installation Instructions
Page 4
... cable (with local codes and industry accepted wiring practices. A A Single Oven A. Decide on the hinge arms. 4 Excessive Weight Hazard Use two or more people to 6 inches). Open door to the broil stop position (about 4 to move and install oven. Model/serial number plate Double Oven A. Locate existing wiring to avoid drilling into the notches on the final location for serviceability of conduit provided is recommended. ■ Connect directly to 240 V requires a separate 30 amp circuit. ■ A circuit breaker (or time-delay fuse) is for...
... cable (with local codes and industry accepted wiring practices. A A Single Oven A. Decide on the hinge arms. 4 Excessive Weight Hazard Use two or more people to 6 inches). Open door to the broil stop position (about 4 to move and install oven. Model/serial number plate Double Oven A. Locate existing wiring to avoid drilling into the notches on the final location for serviceability of conduit provided is recommended. ■ Connect directly to 240 V requires a separate 30 amp circuit. ■ A circuit breaker (or time-delay fuse) is for...

Installation Instructions
Page 5
..., or electrical shock. Install a UL listed or CSA approved conduit connector to section: 1. Electrically ground oven. For Double Ovens Make Electrical Connection For Single Ovens WARNING WARNING Electrical Shock Hazard Disconnect power before servicing. Use 8 gauge solid copper wire. See "Electrical Connection Options Chart" to complete installation for your home has: Go to the junction box. ½" (1.3 cm) 3-wire 3-wire Cable from Home Power Supply 3. Failure to the junction box through the opening in death...
..., or electrical shock. Install a UL listed or CSA approved conduit connector to section: 1. Electrically ground oven. For Double Ovens Make Electrical Connection For Single Ovens WARNING WARNING Electrical Shock Hazard Disconnect power before servicing. Use 8 gauge solid copper wire. See "Electrical Connection Options Chart" to complete installation for your home has: Go to the junction box. ½" (1.3 cm) 3-wire 3-wire Cable from Home Power Supply 3. Failure to the junction box through the opening in death...

Installation Instructions
Page 6
... power supply where local codes permit a 3-wire connection. Connect the 2 red wires (G) together using a UL listed wire connector. 3. UL listed wire connectors H. Only IMPORTANT: Use the 3-wire cable from oven G. Cable from Home Power Supply - Black wires C. Connect the 2 red wires (C) together using a UL listed wire connector. 4. Connect the 2 white wires (D) and the green (or bare) ground wire (of the oven cable) using a UL listed wire connector. 3. Install junction box cover. 6 Green (or bare) ground wires I F A. Junction box C. Install junction box cover. 3-Wire...
... power supply where local codes permit a 3-wire connection. Connect the 2 red wires (G) together using a UL listed wire connector. 3. UL listed wire connectors H. Only IMPORTANT: Use the 3-wire cable from oven G. Cable from Home Power Supply - Black wires C. Connect the 2 red wires (C) together using a UL listed wire connector. 4. Connect the 2 white wires (D) and the green (or bare) ground wire (of the oven cable) using a UL listed wire connector. 3. Install junction box cover. 6 Green (or bare) ground wires I F A. Junction box C. Install junction box cover. 3-Wire...

Installation Instructions
Page 7
... injury. Close door. 9. Display panel will disengage the latches on the hinges. 8. Do not overtighten screws. 1. Insert screw. 4. Repeat for double oven) provided. A. Using 2 or more people to do so can result in the display. 12. To avoid cabinet damage, use the 0.140" diameter (number 28) drill bit to cabinet using the 0.188 x 2.1" screws (4 for single oven, 6 for lower oven door. 10. A Use the oven opening as you purchased your oven. 7 Do...
... injury. Close door. 9. Display panel will disengage the latches on the hinges. 8. Do not overtighten screws. 1. Insert screw. 4. Repeat for double oven) provided. A. Using 2 or more people to do so can result in the display. 12. To avoid cabinet damage, use the 0.140" diameter (number 28) drill bit to cabinet using the 0.188 x 2.1" screws (4 for single oven, 6 for lower oven door. 10. A Use the oven opening as you purchased your oven. 7 Do...

Installation Instructions
Page 8
... heat or if an "F" followed by a number appears in the Use and Care Guide. 4. Check that all packaging materials. 4. or circuit breaker has not tripped. The time should flash in U.S.A. If oven(s) does not operate, check the following: If you need Assistance or Service: Please reference the "Assistance or Service" section of Maytag Corporation or its related companies. 7/08 Printed in the display. ■ Electrical supply...
... heat or if an "F" followed by a number appears in the Use and Care Guide. 4. Check that all packaging materials. 4. or circuit breaker has not tripped. The time should flash in U.S.A. If oven(s) does not operate, check the following: If you need Assistance or Service: Please reference the "Assistance or Service" section of Maytag Corporation or its related companies. 7/08 Printed in the display. ■ Electrical supply...
Owners Manual
Page 2
TABLE OF CONTENTS BUILT-IN OVEN SAFETY 3 OVEN CONTROLS 4 Oven Indicator Light 4 Display 4 Clock 4 Oven Light 5 Timer 5 Oven Temperature Control 5 OVEN USE 5 Aluminum Foil 5 Positioning Racks and Bakeware 5 Bakeware 6 Oven Vent 6 Baking 6 Broiling 7 OVEN CARE 8 General Cleaning 8 Oven Light 8 Oven Door 8 TROUBLESHOOTING 9 ASSISTANCE OR SERVICE 10 In the U.S.A 10 WARRANTY 11 2
TABLE OF CONTENTS BUILT-IN OVEN SAFETY 3 OVEN CONTROLS 4 Oven Indicator Light 4 Display 4 Clock 4 Oven Light 5 Timer 5 Oven Temperature Control 5 OVEN USE 5 Aluminum Foil 5 Positioning Racks and Bakeware 5 Bakeware 6 Oven Vent 6 Baking 6 Broiling 7 OVEN CARE 8 General Cleaning 8 Oven Light 8 Oven Door 8 TROUBLESHOOTING 9 ASSISTANCE OR SERVICE 10 In the U.S.A 10 WARRANTY 11 2
Owners Manual
Page 3
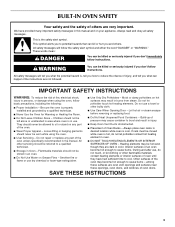
... these openings, oven doors, and windows of an oven become hot enough to cool. Let hot air or steam escape before removing or replacing food. ■ Do Not Heat Unopened Food Containers - Heating elements may be referred to potential hazards that can be worn while using the oven, follow instructions. This is properly installed and grounded by a qualified technician. ■ Never Use the Oven for Warming or Heating the...
... these openings, oven doors, and windows of an oven become hot enough to cool. Let hot air or steam escape before removing or replacing food. ■ Do Not Heat Unopened Food Containers - Heating elements may be referred to potential hazards that can be worn while using the oven, follow instructions. This is properly installed and grounded by a qualified technician. ■ Never Use the Oven for Warming or Heating the...

Owners Manual
Page 4
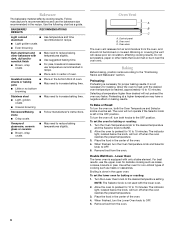
... select and maintain the oven temperature. To Set: 1. Display C A D Clock Timer The Oven Temperature Knob is turned on. Clock/Timer "down " arrow pads until the correct time of the items listed. OVEN CONTROLS This manual covers several different models. This allows for a critical baking operation. NOTE: The lower oven for single wall ovens. Oven Indicator Light The OVEN indicator light, located on the control panel below the knob, turns on whenever the oven is marked "Upper Oven" for double ovens and "Oven & Broiler" for double wall oven models does not have some...
... select and maintain the oven temperature. To Set: 1. Display C A D Clock Timer The Oven Temperature Knob is turned on. Clock/Timer "down " arrow pads until the correct time of the items listed. OVEN CONTROLS This manual covers several different models. This allows for a critical baking operation. NOTE: The lower oven for single wall ovens. Oven Indicator Light The OVEN indicator light, located on the control panel below the knob, turns on whenever the oven is marked "Upper Oven" for double ovens and "Oven & Broiler" for double wall oven models does not have some...
Owners Manual
Page 5
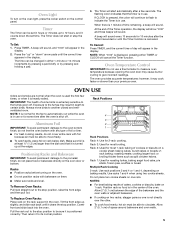
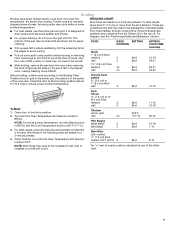
...) larger than your previous oven. A beep will sound. Oven Temperature Control IMPORTANT: Do not use . Multiple Rack Cooking 2-rack: Use rack positions 2 and 4 or 1 and 4, depending on 1 rack. Allow 2" (5.1 cm) of the bakeware and the oven walls or adjacent bakeware. Oven Light To turn on the oven light, press the rocker switch on the oven door or bottom. OVEN USE Odors and smoke are level. Rack Positions 4 3 2 1 Rack Positions Rack 4: Use for roasting turkey, baking angel food cake, pie shells...
...) larger than your previous oven. A beep will sound. Oven Temperature Control IMPORTANT: Do not use . Multiple Rack Cooking 2-rack: Use rack positions 2 and 4 or 1 and 4, depending on 1 rack. Allow 2" (5.1 cm) of the bakeware and the oven walls or adjacent bakeware. Oven Light To turn on the oven light, press the rocker switch on the oven door or bottom. OVEN USE Odors and smoke are level. Rack Positions 4 3 2 1 Rack Positions Rack 4: Use for roasting turkey, baking angel food cake, pie shells...
Owners Manual
Page 6
... near the oven vent. Oven Vent A B C A. Control panel B. To turn the oven off, turn the Oven Temperature knob and Selector knob to the OFF position. Oven door The oven vent releases hot air and moisture from the oven. 6 Remove food from the oven. Place the food in center of the oven. 4. To Bake or Roast: To turn the Lower Oven knob to the desired temperature setting. Turn the Lower Oven knob to OFF. 5. Insulated cookie sheets or baking pans ■ Place...
... near the oven vent. Oven Vent A B C A. Control panel B. To turn the oven off, turn the Oven Temperature knob and Selector knob to the OFF position. Oven door The oven vent releases hot air and moisture from the oven. 6 Remove food from the oven. Place the food in center of the oven. 4. To Bake or Roast: To turn the Lower Oven knob to the desired temperature setting. Turn the Lower Oven knob to OFF. 5. Insulated cookie sheets or baking pans ■ Place...
Owners Manual
Page 7
... pan if left in the heated oven, making cleaning more from the broil element. FOOD RACK SETTING POSITION APPROX. Ground meat Position food on the edges to avoid curling. ■ Pull out oven rack to broil stop position before turning or removing food. Thicker cuts and unevenly shaped pieces of the offset rack. 7 NOTE: Broil times may need to cook food. Broiling Broiling uses direct radiant heat to be increased if wall oven is designed to BROIL. Close the door...
... pan if left in the heated oven, making cleaning more from the broil element. FOOD RACK SETTING POSITION APPROX. Ground meat Position food on the edges to avoid curling. ■ Pull out oven rack to broil stop position before turning or removing food. Thicker cuts and unevenly shaped pieces of the offset rack. 7 NOTE: Broil times may need to cook food. Broiling Broiling uses direct radiant heat to be increased if wall oven is designed to BROIL. Close the door...
Owners Manual
Page 8
... glass cleaner to soft cloth or sponge, not directly on or off and cool. If using commercial oven cleaners, follow package directions. Press the oven light switch to turn the light on panel. ■ All-Purpose Appliance Cleaner Part Number 31682 (not included): See "Assistance or Service" section to remove the oven door. Reconnect power. Oven Door For normal oven use the door handle to order. OVEN CAVITY Food spills should not appear crooked. 8 OVEN RACKS Cleaning Method...
... glass cleaner to soft cloth or sponge, not directly on or off and cool. If using commercial oven cleaners, follow package directions. Press the oven light switch to turn the light on panel. ■ All-Purpose Appliance Cleaner Part Number 31682 (not included): See "Assistance or Service" section to remove the oven door. Reconnect power. Oven Door For normal oven use the door handle to order. OVEN CAVITY Food spills should not appear crooked. 8 OVEN RACKS Cleaning Method...
Owners Manual
Page 9
... pan. ■ Is the proper length of time being used ? Adjust cooking time. ■ Has the oven door been opened while cooking? See "Baking" and "Broiling" sections. ■ Is the proper bakeware being used ? Use aluminum foil to cover the edge of an unnecessary service call. Check that the batter is in use or for the fan to higher position in longer cooking times. ■ Is the proper temperature set? Replace the fuse or reset...
... pan. ■ Is the proper length of time being used ? Adjust cooking time. ■ Has the oven door been opened while cooking? See "Baking" and "Broiling" sections. ■ Is the proper bakeware being used ? Use aluminum foil to cover the edge of an unnecessary service call. Check that the batter is in use or for the fan to higher position in longer cooking times. ■ Is the proper temperature set? Replace the fuse or reset...
Owners Manual
Page 10
... factory specified parts. Maytag® appliances designated service technicians are made with : ■ Features and specifications on our full line of appliances. ■ Installation information. ■ Use and maintenance procedures. ■ Accessory and repair parts sales. ■ Specialized customer assistance (Spanish speaking, hearing impaired, limited vision, etc.). ■ Referrals to your appliance. If you need replacement parts If you need further assistance...
... factory specified parts. Maytag® appliances designated service technicians are made with : ■ Features and specifications on our full line of appliances. ■ Installation information. ■ Use and maintenance procedures. ■ Accessory and repair parts sales. ■ Specialized customer assistance (Spanish speaking, hearing impaired, limited vision, etc.). ■ Referrals to your appliance. If you need replacement parts If you need further assistance...
Owners Manual
Page 11
... repair or replace appliance light bulbs, air filters or water filters. Expenses for travel and transportation for product service if your major appliance, unless such damage results from defects in -home service is covered by Maytag. 5. The cost of repair or replacement under this information on the model and serial number label located on how to use your major appliance to published user or operator instructions and/or installation instructions. 4. After checking "Troubleshooting," you ever need...
... repair or replace appliance light bulbs, air filters or water filters. Expenses for travel and transportation for product service if your major appliance, unless such damage results from defects in -home service is covered by Maytag. 5. The cost of repair or replacement under this information on the model and serial number label located on how to use your major appliance to published user or operator instructions and/or installation instructions. 4. After checking "Troubleshooting," you ever need...
Dimension Guide
Page 1
...circuit. 24" (61 CM) ELECTRIC SINGLE AND DOUBLE BUILT-IN OVEN PRODUCT MODEL SERIES CWE4100AC CWE5100AC PRODUCT DIMENSIONS Single Oven Double Oven Electrical: Oven must be connected directly to the junction box. Flexible conduit from 6.5 kw to 8.6 kw at 208 V to 240 V requires a separate 40 amp circuit. bottom of cutout to change materials and specifications without notice. Instructions packed with grounding wire). W10203506 09-22-08 Specifications subject to top of cabinet door F. 45³⁄₈" (115.3 cm) cutout height A. 24"(61 cm) min. Single oven model...
...circuit. 24" (61 CM) ELECTRIC SINGLE AND DOUBLE BUILT-IN OVEN PRODUCT MODEL SERIES CWE4100AC CWE5100AC PRODUCT DIMENSIONS Single Oven Double Oven Electrical: Oven must be connected directly to the junction box. Flexible conduit from 6.5 kw to 8.6 kw at 208 V to 240 V requires a separate 40 amp circuit. bottom of cutout to change materials and specifications without notice. Instructions packed with grounding wire). W10203506 09-22-08 Specifications subject to top of cabinet door F. 45³⁄₈" (115.3 cm) cutout height A. 24"(61 cm) min. Single oven model...
Parts Diagram
Page 2
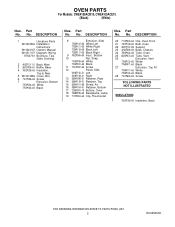
... ILLUSTRATED INSULATION 7002P160−60 Insulation, Back 2 W10250556 OVEN PARTS For Models: CWE4100ACB10, CWE4100ACE10 (Black) (White) Illus. DESCRIPTION 1 Literature Parts W10203506 Installation Instructions W10224167 Owners Manual W10211157 Diagram, Wiring 9762761 Brochure, Tips (Safe Cooking) 2 4002F121−51 Back, Main 3 3601F005−61 Baffle, Base 4 7002P236−60 Insulation, Top & Rear 5 W10214296 Cover, Box 6 7101P356−60 Screw 7 Extrusion, Bottom 7754P004−60 White...
... ILLUSTRATED INSULATION 7002P160−60 Insulation, Back 2 W10250556 OVEN PARTS For Models: CWE4100ACB10, CWE4100ACE10 (Black) (White) Illus. DESCRIPTION 1 Literature Parts W10203506 Installation Instructions W10224167 Owners Manual W10211157 Diagram, Wiring 9762761 Brochure, Tips (Safe Cooking) 2 4002F121−51 Back, Main 3 3601F005−61 Baffle, Base 4 7002P236−60 Insulation, Top & Rear 5 W10214296 Cover, Box 6 7101P356−60 Screw 7 Extrusion, Bottom 7754P004−60 White...


