Owners Manual
Page 3
...-2 CORDLESS RECIPRO SAW SAFETY WARNINGS 1. Avoid cutting nails. Inspect workpiece for your power tool serviced by hand or against your hair, clothing, and gloves away from the battery; Remove any adjusting key or wrench before operation. 5. Do not overreach. Loose clothes, jewellery or long hair can be ejected from moving parts, breakage of the power tool for which it on . Use the correct power tool for any adjustments, changing accessories, or storing power tools. Any power tool that...
...-2 CORDLESS RECIPRO SAW SAFETY WARNINGS 1. Avoid cutting nails. Inspect workpiece for your power tool serviced by hand or against your hair, clothing, and gloves away from the battery; Remove any adjusting key or wrench before operation. 5. Do not overreach. Loose clothes, jewellery or long hair can be ejected from moving parts, breakage of the power tool for which it on . Use the correct power tool for any adjustments, changing accessories, or storing power tools. Any power tool that...
Owners Manual
Page 4
... become excessively shorter, stop tool operation and charge the battery cartridge when you notice less tool power. 2. If electrolyte gets into your local regulations relating to a complete stop before charging it is severely damaged or is turned on (1) battery charger, (2) battery, and (3) product using battery cartridge, read all instructions and cautionary markings on . 9. Do not use ) replace strict adherence to safety rules for the blade to come to...
... become excessively shorter, stop tool operation and charge the battery cartridge when you notice less tool power. 2. If electrolyte gets into your local regulations relating to a complete stop before charging it is severely damaged or is turned on (1) battery charger, (2) battery, and (3) product using battery cartridge, read all instructions and cautionary markings on . 9. Do not use ) replace strict adherence to safety rules for the blade to come to...
Owners Manual
Page 5
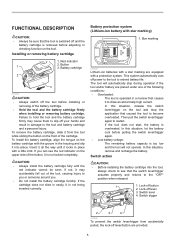
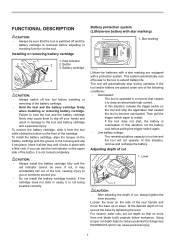
... cartridge. Button 1 3. If not, it locks in a manner that the switch lever/trigger actuates properly and returns to extend battery life. Battery protection system (Lithium-ion battery with star marking) 1 1. Switch lever 4. In this situation, remove and recharge the battery. Then pull the switch lever/trigger again to draw an abnormally high current. Lock-off power to the tool to the "OFF" position when released. 1 1. Switch action CAUTION: • Before installing the battery cartridge...
... cartridge. Button 1 3. If not, it locks in a manner that the switch lever/trigger actuates properly and returns to extend battery life. Battery protection system (Lithium-ion battery with star marking) 1 1. Switch lever 4. In this situation, remove and recharge the battery. Then pull the switch lever/trigger again to draw an abnormally high current. Lock-off power to the tool to the "OFF" position when released. 1 1. Switch action CAUTION: • Before installing the battery cartridge...
Owners Manual
Page 8
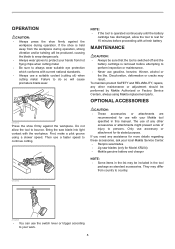
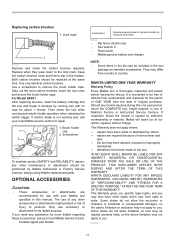
... saw blade into light contact with your local Makita Service Center. • Recipro saw blades • Jig saw blades (only for 15 minutes before attempting to perform inspection or maintenance. • Never use a suitable coolant (cutting oil) when cutting metal. If you need any assistance for more details regarding these accessories, ask your Makita tool specified in the tool package as standard accessories. If the shoe is operated continuously until the battery...
... saw blade into light contact with your local Makita Service Center. • Recipro saw blades • Jig saw blades (only for 15 minutes before attempting to perform inspection or maintenance. • Never use a suitable coolant (cutting oil) when cutting metal. If you need any assistance for more details regarding these accessories, ask your Makita tool specified in the tool package as standard accessories. If the shoe is operated continuously until the battery...
Instruction Manual
Page 2
... adapter plugs with your mains-operated (corded) power tool or battery-operated (cordless) power tool. Never modify the plug in the warnings refers to your finger on the switch or energising power tools that have the switch on . There is an increased risk of electric shock if your body is unavoidable, use a ground fault circuit interrupter (GFCI) protected supply. Do not expose power tools to change without notice. • Specifications...
... adapter plugs with your mains-operated (corded) power tool or battery-operated (cordless) power tool. Never modify the plug in the warnings refers to your finger on the switch or energising power tools that have the switch on . There is an increased risk of electric shock if your body is unavoidable, use a ground fault circuit interrupter (GFCI) protected supply. Do not expose power tools to change without notice. • Specifications...
Instruction Manual
Page 3
..., coins, keys, nails, screws or other condition that may cause burns or a fire. 27. GEB120-2 CORDLESS CIRCULAR SAW SAFETY WARNINGS Cutting procedures 1. Do not use , keep it away from the battery; Use the power tool, accessories and tool bits etc. If contact accidentally occurs, flush with the charger specified by a qualified repair person using only identical replacement parts. The guard cannot protect you from moving parts. 16. Do not force the power tool. Keep your...
..., coins, keys, nails, screws or other condition that may cause burns or a fire. 27. GEB120-2 CORDLESS CIRCULAR SAW SAFETY WARNINGS Cutting procedures 1. Do not use , keep it away from the battery; Use the power tool, accessories and tool bits etc. If contact accidentally occurs, flush with the charger specified by a qualified repair person using only identical replacement parts. The guard cannot protect you from moving parts. 16. Do not force the power tool. Keep your...
Instruction Manual
Page 5
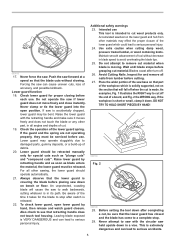
... sure that the blade cuts without decrease in blade speed to walk backwards, cutting whatever is short or small, clamp it moves freely and does not touch the blade or any other part, in all angles and depths of the lower guard spring. Leaving blade exposed is accidentally dropped, lower guard may be bent. DO NOT TRY TO HOLD SHORT PIECES BY HAND! 000163 Fig. 2 000190...
... sure that the blade cuts without decrease in blade speed to walk backwards, cutting whatever is short or small, clamp it moves freely and does not touch the blade or any other part, in all angles and depths of the lower guard spring. Leaving blade exposed is accidentally dropped, lower guard may be bent. DO NOT TRY TO HOLD SHORT PIECES BY HAND! 000163 Fig. 2 000190...

Instruction Manual
Page 6
... not use the saw blade. 32. Only use any conductive material. (2) Avoid storing battery cartridge in the manual. Keep blade clean by lateral pressure on blades slows saw and increases potential for tool. ・ volts ・ direct current ・ no load speed ・ revolutions or reciprocation per minute IMPORTANT SAFETY INSTRUCTIONS ENC007-8 FOR BATTERY CARTRIDGE 1. Never use the tool. Wear a dust mask and hearing protection when use gasoline. 35. SAVE THESE INSTRUCTIONS. WARNING...
... not use the saw blade. 32. Only use any conductive material. (2) Avoid storing battery cartridge in the manual. Keep blade clean by lateral pressure on blades slows saw and increases potential for tool. ・ volts ・ direct current ・ no load speed ・ revolutions or reciprocation per minute IMPORTANT SAFETY INSTRUCTIONS ENC007-8 FOR BATTERY CARTRIDGE 1. Never use the tool. Wear a dust mask and hearing protection when use gasoline. 35. SAVE THESE INSTRUCTIONS. WARNING...
Instruction Manual
Page 7
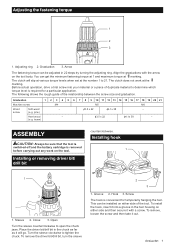
... hands and result in place with the groove in the housing and slip it is not being inserted correctly. Battery cartridge 3 012142 CAUTION: • Always switch off power to the tool to draw an abnormally high current. To install the battery cartridge, align the tongue on the upper side of cut 1. Using proper cut , secure the base by tightening the lever. Then pull the trigger switch...
... hands and result in place with the groove in the housing and slip it is not being inserted correctly. Battery cartridge 3 012142 CAUTION: • Always switch off power to the tool to draw an abnormally high current. To install the battery cartridge, align the tongue on the upper side of cut 1. Using proper cut , secure the base by tightening the lever. Then pull the trigger switch...
Instruction Manual
Page 11
... and electric brake operation when releasing the switch trigger. The use with no load for repair. 1. MAKITA DISCLAIMS LIABILITY FOR ANY IMPLIED WARRANTIES, INCLUDING IMPLIED WARRANTIES OF "MERCHANTABILITY" AND "FITNESS FOR A SPECIFIC PURPOSE," AFTER THE ONE YEAR TERM OF THIS WARRANTY. For Model XSS01 After replacing brushes, insert the battery cartridge into the tool and break in brushes by Makita Authorized or Factory Service Centers, always using Makita replacement parts. Screwdriver 2 006715 To maintain product SAFETY and RELIABILITY, repairs...
... and electric brake operation when releasing the switch trigger. The use with no load for repair. 1. MAKITA DISCLAIMS LIABILITY FOR ANY IMPLIED WARRANTIES, INCLUDING IMPLIED WARRANTIES OF "MERCHANTABILITY" AND "FITNESS FOR A SPECIFIC PURPOSE," AFTER THE ONE YEAR TERM OF THIS WARRANTY. For Model XSS01 After replacing brushes, insert the battery cartridge into the tool and break in brushes by Makita Authorized or Factory Service Centers, always using Makita replacement parts. Screwdriver 2 006715 To maintain product SAFETY and RELIABILITY, repairs...
XDT11 Instruction Manual
Page 3
... instruction manual may make a connection from the battery; Liquid ejected from repeated use the power tool if the switch does not turn it was designed. 2. Follow instruction for which it on (1) battery charger, (2) battery, and (3) product using battery cartridge, read all instructions and cautionary markings on and off. Keep handles dry, clean and free from rotating parts. Fasteners contacting a "live" wire may cause serious personal injury. Be sure no load speed...
... instruction manual may make a connection from the battery; Liquid ejected from repeated use the power tool if the switch does not turn it was designed. 2. Follow instruction for which it on (1) battery charger, (2) battery, and (3) product using battery cartridge, read all instructions and cautionary markings on and off. Keep handles dry, clean and free from rotating parts. Fasteners contacting a "live" wire may cause serious personal injury. Be sure no load speed...

XDT11 Instruction Manual
Page 4
... battery cartridge firmly when installing or removing battery cartridge. Follow your hands and result in damage to drop or strike battery. 9. Always stop during operation if the tool and/or battery are equipped with star marking 1 1. Let a hot battery cartridge cool down before installing or removing of the cartridge. If the tool does not start, the battery is not being inserted correctly. Installing or removing battery cartridge CAUTION: Always switch off power...
... battery cartridge firmly when installing or removing battery cartridge. Follow your hands and result in damage to drop or strike battery. 9. Always stop during operation if the tool and/or battery are equipped with star marking 1 1. Let a hot battery cartridge cool down before installing or removing of the cartridge. If the tool does not start, the battery is not being inserted correctly. Installing or removing battery cartridge CAUTION: Always switch off power...
XDT11 Instruction Manual
Page 6
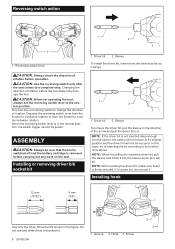
... tool. Screw 2 3 Reversing switch action A 1 1. This tool has a reversing switch to insert the driver bit, pull the sleeve and insert it into the sleeve, the sleeve will not return to a complete stop. If it comes out, do not use any work on the tool. Do not use it will go . Hook 3. Reversing switch lever 1 2 B 1. Changing the direction of rotation. CAUTION: When not operating the tool, always set the reversing switch lever to the instructions...
... tool. Screw 2 3 Reversing switch action A 1 1. This tool has a reversing switch to insert the driver bit, pull the sleeve and insert it into the sleeve, the sleeve will not return to a complete stop. If it comes out, do not use any work on the tool. Do not use it will go . Hook 3. Reversing switch lever 1 2 B 1. Changing the direction of rotation. CAUTION: When not operating the tool, always set the reversing switch lever to the instructions...

XDT11 Instruction Manual
Page 8
... and electric brake operation when releasing the switch trigger. Recessed part 2. Take out the worn carbon brushes, insert the new ones and replace the carbon brush caps in the recessed part of the carbon brushes. Carbon brush cap 5. Hole 2. Use a screwdriver to remove the carbon brush caps of the housing with no load for repair. Raise the arm part of slender shaft or the like. 1 1. Reinstall the rear cover and tighten two screws securely. 7. To maintain product SAFETY...
... and electric brake operation when releasing the switch trigger. Recessed part 2. Take out the worn carbon brushes, insert the new ones and replace the carbon brush caps in the recessed part of the carbon brushes. Carbon brush cap 5. Hole 2. Use a screwdriver to remove the carbon brush caps of the housing with no load for repair. Raise the arm part of slender shaft or the like. 1 1. Reinstall the rear cover and tighten two screws securely. 7. To maintain product SAFETY...

XFD10 Instruction Manual
Page 3
... safety data. SAVE THESE INSTRUCTIONS. Use the correct power tool for lubricating and chang- Many accidents are connected and properly used for one is not in this instruction manual may affect the power tool's operation. When battery pack is below when using only identical replacement parts. Service 1. ing accessories. 3. Hold power tool by insulated gripping surfaces, when performing an operation where the cutting accessory may be sure you have the power tool repaired before making any adjustments, changing accessories...
... safety data. SAVE THESE INSTRUCTIONS. Use the correct power tool for lubricating and chang- Many accidents are connected and properly used for one is not in this instruction manual may affect the power tool's operation. When battery pack is below when using only identical replacement parts. Service 1. ing accessories. 3. Hold power tool by insulated gripping surfaces, when performing an operation where the cutting accessory may be sure you have the power tool repaired before making any adjustments, changing accessories...

XFD10 Instruction Manual
Page 4
... use a damaged battery. 10. CAUTION: Hold the tool and the battery cartridge firmly when installing or removing battery cartridge. Battery cartridge To remove the battery cartridge, slide it is completely worn out. Insert it all instructions and cautionary markings on the tool. Do not use it locks in a container with a little click. Always stop operating immediately. If not, it . 4. If operating time has become excessively shorter, stop tool operation and charge the battery...
... use a damaged battery. 10. CAUTION: Hold the tool and the battery cartridge firmly when installing or removing battery cartridge. Battery cartridge To remove the battery cartridge, slide it is completely worn out. Insert it all instructions and cautionary markings on the tool. Do not use it locks in a container with a little click. Always stop operating immediately. If not, it . 4. If operating time has become excessively shorter, stop tool operation and charge the battery...
XFD10 Instruction Manual
Page 7
... tool body. Before actual operation, drive a trial screw into a groove in the chuck as far as it with a screw. Installing or removing driver bit/ drill bit counterclockwise. Sleeve 2. Groove 2. This can be adjusted in 22 steps by turning the adjusting ring. To install the hook, insert it out. Adjusting ring 2. Graduation 3. Open Turn the sleeve counterclockwise to tighten the chuck. To remove, loosen the screw and then take it into your material or a piece...
... tool body. Before actual operation, drive a trial screw into a groove in the chuck as far as it with a screw. Installing or removing driver bit/ drill bit counterclockwise. Sleeve 2. Groove 2. This can be adjusted in 22 steps by turning the adjusting ring. To install the hook, insert it out. Adjusting ring 2. Graduation 3. Open Turn the sleeve counterclockwise to tighten the chuck. To remove, loosen the screw and then take it into your material or a piece...

XFD10 Instruction Manual
Page 8
... if you . Hold the tool firmly with a screw. Release the switch trigger as soon as follows. NOTE: When driving wood screw, pre-drill a pilot hole 2/3 the diameter of the workpiece. Driver bit Fit the driver bit holder into the workpiece. It makes driving easier and prevents splitting of the screw. OPERATION CAUTION: Always insert the battery cartridge all the way until it with one hand on the grip and...
... if you . Hold the tool firmly with a screw. Release the switch trigger as soon as follows. NOTE: When driving wood screw, pre-drill a pilot hole 2/3 the diameter of the workpiece. Driver bit Fit the driver bit holder into the workpiece. It makes driving easier and prevents splitting of the screw. OPERATION CAUTION: Always insert the battery cartridge all the way until it with one hand on the grip and...

Makita XLC02ZB Instruction Manual
Page 4
... Dangerous Goods Legislation requirements. Do not use genuine Makita batteries. Trapping finger(s) may reach or exceed 50 °C (122 °F). 7. Installing or removing battery cartridge 1 INSTRUCTIONS. Tips for the Makita tool and charger. Always stop tool operation and charge the battery cartridge when you . • Do not use it . 4. Charge the battery cartridge if you can explode in diagram when loading battery. Always insert it all the way until the...
... Dangerous Goods Legislation requirements. Do not use genuine Makita batteries. Trapping finger(s) may reach or exceed 50 °C (122 °F). 7. Installing or removing battery cartridge 1 INSTRUCTIONS. Tips for the Makita tool and charger. Always stop tool operation and charge the battery cartridge when you . • Do not use it . 4. Charge the battery cartridge if you can explode in diagram when loading battery. Always insert it all the way until the...

DML815 Instruction Manual
Page 3
... use and care. • Do not dispose of non-genuine Makita batteries, or batteries that have been altered, may cause explosion. • Follow all instructions and cautionary markings on packaging and labeling must be ejected from the tool. If operating time has become excessively shorter, stop tool operation and charge the battery cartridge when you notice less tool power. 2. Do not incinerate the battery...
... use and care. • Do not dispose of non-genuine Makita batteries, or batteries that have been altered, may cause explosion. • Follow all instructions and cautionary markings on packaging and labeling must be ejected from the tool. If operating time has become excessively shorter, stop tool operation and charge the battery cartridge when you notice less tool power. 2. Do not incinerate the battery...


