
XPK01Z Instruction Manual
Page 3
... may create a risk of parts and any adjusting. 13. Keep your hand or against the body leaves it run for lubricating and changing accessories. 30. Power tool use and care 24. Any power tool that may affect the power tool's operation. Check for vibration or wobbling that...21. avoid contact. Hold the tool firmly with specifically designated battery packs. Keep hands away from oil and grease. Use the power tool, accessories and tool bits etc. Battery tool use and care 17. GEB064-2 CORDLESS PLANER SAFETY WARNINGS 1. Holding the work to possible loss of children ...
... may create a risk of parts and any adjusting. 13. Keep your hand or against the body leaves it run for lubricating and changing accessories. 30. Power tool use and care 24. Any power tool that may affect the power tool's operation. Check for vibration or wobbling that...21. avoid contact. Hold the tool firmly with specifically designated battery packs. Keep hands away from oil and grease. Use the power tool, accessories and tool bits etc. Battery tool use and care 17. GEB064-2 CORDLESS PLANER SAFETY WARNINGS 1. Holding the work to possible loss of children ...
XPK01Z Instruction Manual
Page 7
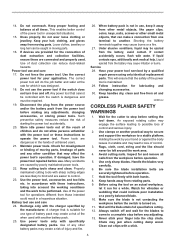
... screw in the heel of the gauge plate. The blade will result, causing poor planing action and, eventually, tool breakdown. 1 1. Installing conventional planer blade (optional accessory) To install the blades, first clean out all the installation bolts evenly and alternately with the inside edge of the adjusting plate flush with the...
... screw in the heel of the gauge plate. The blade will result, causing poor planing action and, eventually, tool breakdown. 1 1. Installing conventional planer blade (optional accessory) To install the blades, first clean out all the installation bolts evenly and alternately with the inside edge of the adjusting plate flush with the...
XPK01Z Instruction Manual
Page 8
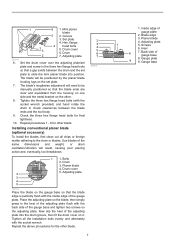
...the nozzle firmly as far as it will go to prevent it from the tool and pull the fastener out. NOTE: • If you connect a Makita vacuum cleaner to this side view cannot (B) show it, the edges of proper and improper settings. (A) Front base (Movable shoe) (B) Rear base (... uneven, unless the blade is set properly and securely. Fastener 1 2 011741 For tool without nozzle Remove the chip cover and install the nozzle (optional accessory). The nozzle is tapered. The blade must be performed. 8 Cause: One or both blades fails to have edge parallel to rear base line. 1. ...
...the nozzle firmly as far as it will go to prevent it from the tool and pull the fastener out. NOTE: • If you connect a Makita vacuum cleaner to this side view cannot (B) show it, the edges of proper and improper settings. (A) Front base (Movable shoe) (B) Rear base (... uneven, unless the blade is set properly and securely. Fastener 1 2 011741 For tool without nozzle Remove the chip cover and install the nozzle (optional accessory). The nozzle is tapered. The blade must be performed. 8 Cause: One or both blades fails to have edge parallel to rear base line. 1. ...
XPK01Z Instruction Manual
Page 9
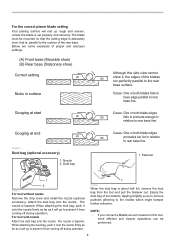
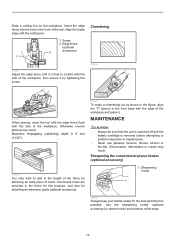
...on the switch handle when performing the tool. Blade edge 2. Before connecting the vacuum cleaner, remove the chip cover from the tool. Elbow (optional accessory) 1. To remove it, just pull it out. 2 011759 First, rest the tool front base flat upon the workpiece surface without the blades ... a hose of the vacuum cleaner to your tool. Elbow 2. For tool without nozzle When you wish to perform clean planing operation, connect a Makita vacuum cleaner to the nozzle as shown in the figures. Then connect a hose of the vacuum cleaner to perform cleaner work. The speed and ...
...on the switch handle when performing the tool. Blade edge 2. Before connecting the vacuum cleaner, remove the chip cover from the tool. Elbow (optional accessory) 1. To remove it, just pull it out. 2 011759 First, rest the tool front base flat upon the workpiece surface without the blades ... a hose of the vacuum cleaner to your tool. Elbow 2. For tool without nozzle When you wish to perform clean planing operation, connect a Makita vacuum cleaner to the nozzle as shown in the figures. Then connect a hose of the vacuum cleaner to perform cleaner work. The speed and ...
XPK01Z Instruction Manual
Page 10
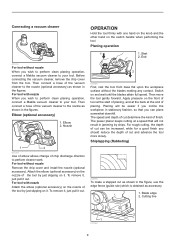
...front base with the edge of the workpiece and plane it by attaching an extra piece of the tool. Use the sharpening holder (optional accessory) to perform inspection or maintenance. • Never use gasoline, benzine, thinner, alcohol or the like. Sharpening holder 1 002588 Always keep... your blades sharp for attaching an extension guide (optional accessory). 011748 To make a chamfering cut as shown in the figure, align the "V" groove in contact with the side of the fence by tightening...
...front base with the edge of the workpiece and plane it by attaching an extra piece of the tool. Use the sharpening holder (optional accessory) to perform inspection or maintenance. • Never use gasoline, benzine, thinner, alcohol or the like. Sharpening holder 1 002588 Always keep... your blades sharp for attaching an extension guide (optional accessory). 011748 To make a chamfering cut as shown in the figure, align the "V" groove in contact with the side of the fence by tightening...
XPK01Z Instruction Manual
Page 11
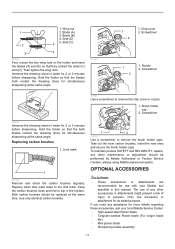
...SAFETY and RELIABILITY, repairs, any other accessories or attachments might present a risk of any assistance for more details regarding these accessories, ask your Makita tool specified in water for use with your local Makita Service Center. • High-speed ...any other maintenance or adjustment should be performed by Makita Authorized or Factory Service Centers, always using Makita replacement parts. 1. Side (D) 2 5 5. Screwdriver 1 2 1. Screwdriver 002590 Immerse the dressing stone in this manual. The use accessory or attachment for 2 or 3 minutes before ...
...SAFETY and RELIABILITY, repairs, any other accessories or attachments might present a risk of any assistance for more details regarding these accessories, ask your Makita tool specified in water for use with your local Makita Service Center. • High-speed ...any other maintenance or adjustment should be performed by Makita Authorized or Factory Service Centers, always using Makita replacement parts. 1. Side (D) 2 5 5. Screwdriver 1 2 1. Screwdriver 002590 Immerse the dressing stone in this manual. The use accessory or attachment for 2 or 3 minutes before ...
XPK01Z Instruction Manual
Page 12
... and charger NOTE: • Some items in the tool package as standard accessories. MAKITA LIMITED ONE YEAR WARRANTY Warranty Policy Every Makita tool is caused by others: repairs are required because of Makita's Factory or Authorized Service Centers. IN NO EVENT SHALL MAKITA BE LIABLE FOR ANY INDIRECT, INCIDENTAL OR CONSEQUENTIAL DAMAGES FROM THE SALE...
... and charger NOTE: • Some items in the tool package as standard accessories. MAKITA LIMITED ONE YEAR WARRANTY Warranty Policy Every Makita tool is caused by others: repairs are required because of Makita's Factory or Authorized Service Centers. IN NO EVENT SHALL MAKITA BE LIABLE FOR ANY INDIRECT, INCIDENTAL OR CONSEQUENTIAL DAMAGES FROM THE SALE...