Owners Manual
Page 3
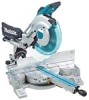
... starter keys. 8. Do not force tool or attachment to see that keys and adjusting wrenches are NOT safety glasses. 12. SECURE WORK. DISCONNECT TOOLS before plugging in moving parts. Laser Type (LS1216L only) Wavelength 655 nm, Maximum output 1mW (Laser Class II) Dimensions (L x W x H) 806 mm x 640 mm x ... ACCESSORIES. The use tool in damp or wet locations, or expose them to it on. 4. KNOW YOUR POWER TOOL. REMOVE ADJUSTING KEYS AND WRENCHES. Follow instructions for recommended accessories. DO NOT FORCE TOOL. Keep proper footing and balance at the rate for which...
... starter keys. 8. Do not force tool or attachment to see that keys and adjusting wrenches are NOT safety glasses. 12. SECURE WORK. DISCONNECT TOOLS before plugging in moving parts. Laser Type (LS1216L only) Wavelength 655 nm, Maximum output 1mW (Laser Class II) Dimensions (L x W x H) 806 mm x 640 mm x ... ACCESSORIES. The use tool in damp or wet locations, or expose them to it on. 4. KNOW YOUR POWER TOOL. REMOVE ADJUSTING KEYS AND WRENCHES. Follow instructions for recommended accessories. DO NOT FORCE TOOL. Keep proper footing and balance at the rate for which...

Owners Manual
Page 6
... BEAM. • AVOID EXPOSURE - Complies with 21CFR 1040.10 and 1040.11 AVOID EXPOSURE-Laser radiation is emitted from this instruction manual may cause serious personal injury. LASER RADIATION IS EMITTED FROM APERTURE. • USE OF CONTROLS OR ADJUSTMENTS OR PERFORMANCE OF PROCEDURES OTHER THAN THOSE SPECIFIED HEREIN MAY RESULT IN HAZARDOUS RADIATION...
... BEAM. • AVOID EXPOSURE - Complies with 21CFR 1040.10 and 1040.11 AVOID EXPOSURE-Laser radiation is emitted from this instruction manual may cause serious personal injury. LASER RADIATION IS EMITTED FROM APERTURE. • USE OF CONTROLS OR ADJUSTMENTS OR PERFORMANCE OF PROCEDURES OTHER THAN THOSE SPECIFIED HEREIN MAY RESULT IN HAZARDOUS RADIATION...
Owners Manual
Page 10
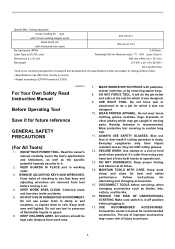
...the lower position (O) to either the left as far as follows. 1. Laser beam action For model LS1216L only 1. Align the cutting line on the right side of workpiece • Shift the laser line to the applications of cutting. NOTE: • Use wood facing ...Laser line is equipped with the laser line. Refer to quickly stop blade after switch trigger release, have tool serviced at a Makita service center. center for proper repairs BEFORE further usage. • NEVER tape down or defeat purpose and function of lock-off . Electric brake This tool is factory adjusted...
...the lower position (O) to either the left as far as follows. 1. Laser beam action For model LS1216L only 1. Align the cutting line on the right side of workpiece • Shift the laser line to the applications of cutting. NOTE: • Use wood facing ...Laser line is equipped with the laser line. Refer to quickly stop blade after switch trigger release, have tool serviced at a Makita service center. center for proper repairs BEFORE further usage. • NEVER tape down or defeat purpose and function of lock-off . Electric brake This tool is factory adjusted...
Owners Manual
Page 23
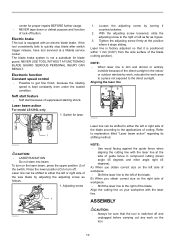
... only after performing 0° bevel angle adjustment. Make sure that they will point to 0°. 1. Workpiece 2. Laser line 1 WARNING: • As the tool is plugged when adjusting the position of laser line For model LS1216L only 1. Pointer 009527 1. Adjusting the position of laser line, take a full caution especially at switch action. Adjusting screw 3. If they do not point...
... only after performing 0° bevel angle adjustment. Make sure that they will point to 0°. 1. Workpiece 2. Laser line 1 WARNING: • As the tool is plugged when adjusting the position of laser line For model LS1216L only 1. Pointer 009527 1. Adjusting the position of laser line, take a full caution especially at switch action. Adjusting screw 3. If they do not point...
Owners Manual
Page 24
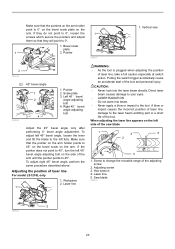
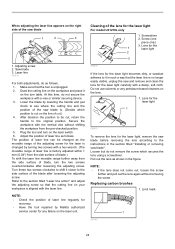
...surface of blade, turn the two screws counterclockwise after loosening the adjusting screw. Turn these two screws clockwise to shift it in the figure. Lens for the laser light For model LS1216L only 1. Lower the blade by Makita authorized service center for any petroleum-based cleaners on the turn... on the laser switch. 6. Refer to it closer to see where the cutting line and...
...surface of blade, turn the two screws counterclockwise after loosening the adjusting screw. Turn these two screws clockwise to shift it in the figure. Lens for the laser light For model LS1216L only 1. Lower the blade by Makita authorized service center for any petroleum-based cleaners on the turn... on the laser switch. 6. Refer to it closer to see where the cutting line and...
Flyer (English)
Page 2
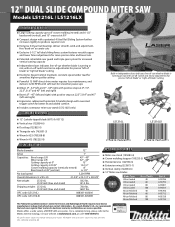
... Micro-Polished Micro-Polished Micro-Polished Micro-Polished No. As a result, Makita U.S.A., Inc. All specifications subject to change without prior notice. All models ... and right) with on-off switch and micro-adjustments for precise "left of blade" or "right of MITER SAW accessories. 12" DUAL SLIDE COMPOUND MITER SAW Models LS1216L / LS1216LX FEATURES & BENEFITS I Large cutting capacity... lower fence adjustments for more precise miter and bevel cuts I Patented retractable rear guard and triple gear system for increased vertical cutting capacity I Independent laser indicates line...
... Micro-Polished Micro-Polished Micro-Polished Micro-Polished No. As a result, Makita U.S.A., Inc. All specifications subject to change without prior notice. All models ... and right) with on-off switch and micro-adjustments for precise "left of blade" or "right of MITER SAW accessories. 12" DUAL SLIDE COMPOUND MITER SAW Models LS1216L / LS1216LX FEATURES & BENEFITS I Large cutting capacity... lower fence adjustments for more precise miter and bevel cuts I Patented retractable rear guard and triple gear system for increased vertical cutting capacity I Independent laser indicates line...


