Owners Manual
Page 1
Compound Miter Saw Equipped with Electric Blade Brake 255 mm (10") MODEL LS1040 DOUBLE INSULATION INSTRUCTION MANUAL WARNING: For your personal safety, READ and UNDERSTAND before using. SAVE THESE INSTRUCTIONS FOR FUTURE REFERENCE. www.makitatools.com
Compound Miter Saw Equipped with Electric Blade Brake 255 mm (10") MODEL LS1040 DOUBLE INSULATION INSTRUCTION MANUAL WARNING: For your personal safety, READ and UNDERSTAND before using. SAVE THESE INSTRUCTIONS FOR FUTURE REFERENCE. www.makitatools.com
Owners Manual
Page 4
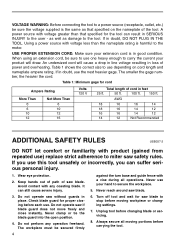
...user - If in place. Avoid contact with product (gained from repeated use depending on the nameplate of power and overheating. Do not operate saw safety rules. Do not perform any coasting blade. Turn off tool and wait for proper closing before carrying the tool. Unplug tool before moving...rating. USE PROPER EXTENSION CORD. Table 1: Minimum gage for the tool can result in doubt, DO NOT PLUG IN THE TOOL. Never reach around saw blade. VOLTAGE WARNING: Before connecting the tool to a power source (receptacle, outlet, etc.) be sure the voltage supplied is the same as ...
...user - If in place. Avoid contact with product (gained from repeated use depending on the nameplate of power and overheating. Do not operate saw safety rules. Do not perform any coasting blade. Turn off tool and wait for proper closing before carrying the tool. Unplug tool before moving...rating. USE PROPER EXTENSION CORD. Table 1: Minimum gage for the tool can result in doubt, DO NOT PLUG IN THE TOOL. Never reach around saw blade. VOLTAGE WARNING: Before connecting the tool to a power source (receptacle, outlet, etc.) be sure the voltage supplied is the same as ...
Owners Manual
Page 5
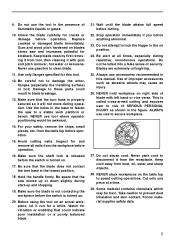
... surface) or bolt. ALWAYS use tool where operator positioning would be toxic. Check the blade carefully for kickback. Make sure that the saw and increases potential for cracks or damage before the switch is properly secured so it from the workpiece before the switch is called cross-armed... cutting and exposes user to lock the trigger in the base to fasten the saw to secure workpiece. 27. Use the holes in the on blades slows saw moves up or down slightly during repetitive, monotonous operations. Do not attempt to risk of blade with...
... surface) or bolt. ALWAYS use tool where operator positioning would be toxic. Check the blade carefully for kickback. Make sure that the saw and increases potential for cracks or damage before the switch is properly secured so it from the workpiece before the switch is called cross-armed... cutting and exposes user to lock the trigger in the base to fasten the saw to secure workpiece. 27. Use the holes in the on blades slows saw moves up or down slightly during repetitive, monotonous operations. Do not attempt to risk of blade with...
Owners Manual
Page 8
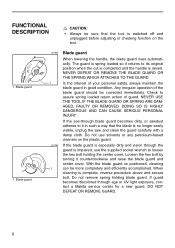
.... Do not remove spring holding the center cover. FUNCTIONAL DESCRIPTION CAUTION: • Always be sure that the blade is no longer easily visible, unplug the saw and clean the guard carefully with a damp cloth. NEVER USE THE TOOL IF THE BLADE GUARD OR SPRING ARE DAMAGED, FAULTY OR REMOVED. Loosen the... 1. Blade guard 001860 1 001782 1 Blade guard When lowering the handle, the blade guard rises automatically. If the see-through age or UV light exposure, contact a Makita service center for a new guard.
.... Do not remove spring holding the center cover. FUNCTIONAL DESCRIPTION CAUTION: • Always be sure that the blade is no longer easily visible, unplug the saw and clean the guard carefully with a damp cloth. NEVER USE THE TOOL IF THE BLADE GUARD OR SPRING ARE DAMAGED, FAULTY OR REMOVED. Loosen the... 1. Blade guard 001860 1 001782 1 Blade guard When lowering the handle, the blade guard rises automatically. If the see-through age or UV light exposure, contact a Makita service center for a new guard.
Owners Manual
Page 9
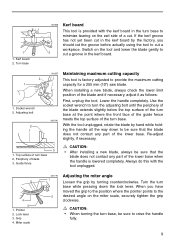
... board in the kerf board. 2 1 1. CAUTION: • When turning the turn base while pressing down to provide the maximum cutting capacity for a 255 mm (10") saw blade. Guide fence CAUTION: • After installing a new blade, always be sure that the blade does not contact any part of the lower base. Periphery...
... board in the kerf board. 2 1 1. CAUTION: • When turning the turn base while pressing down to provide the maximum cutting capacity for a 255 mm (10") saw blade. Guide fence CAUTION: • After installing a new blade, always be sure that the blade does not contact any part of the lower base. Periphery...
Owners Manual
Page 10
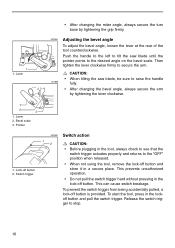
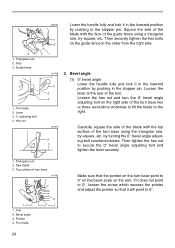
1 1. Push the handle to the left to tilt the saw blade, be sure to raise the handle 001865 fully. • After changing the bevel angle, always secure the arm by tightening the grip firmly. 001864 ... scale. Pointer 001862 Switch action 1 2 CAUTION: • Before plugging in a secure place. Release the switch trigger to secure the arm. CAUTION: • When tilting the saw blade until the pointer points to the "OFF" position when released. 1. Lever 2. This prevents unauthorized operation. • Do not pull the switch trigger hard without...
1 1. Push the handle to the left to tilt the saw blade, be sure to raise the handle 001865 fully. • After changing the bevel angle, always secure the arm by tightening the grip firmly. 001864 ... scale. Pointer 001862 Switch action 1 2 CAUTION: • Before plugging in a secure place. Release the switch trigger to secure the arm. CAUTION: • When tilting the saw blade until the pointer points to the "OFF" position when released. 1. Lever 2. This prevents unauthorized operation. • Do not pull the switch trigger hard without...
Owners Manual
Page 11
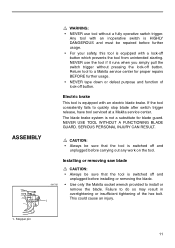
... TOOL WITHOUT A FUNCTIONING BLADE GUARD. Failure to quickly stop blade after switch trigger release, have tool serviced at a Makita service center. NEVER use tool without pressing the lock-off button. Installing or removing saw blade 001792 1 CAUTION: • Always be repaired before further usage. • For your safety, this tool is switched... is equipped with a lock-off button. Electric brake This tool is switched off and unplugged before installing or removing the blade. • Use only the Makita socket wrench provided to a Makita service center for blade guard.
... TOOL WITHOUT A FUNCTIONING BLADE GUARD. Failure to quickly stop blade after switch trigger release, have tool serviced at a Makita service center. NEVER use tool without pressing the lock-off button. Installing or removing saw blade 001792 1 CAUTION: • Always be repaired before further usage. • For your safety, this tool is switched... is equipped with a lock-off button. Electric brake This tool is switched off and unplugged before installing or removing the blade. • Use only the Makita socket wrench provided to a Makita service center for blade guard.
Owners Manual
Page 12
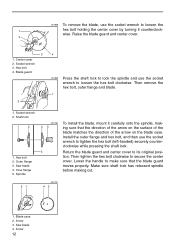
Center cover 2. Hex bolt 4. Socket wrench 2. Hex bolt 2. Outer flange 3. Saw blade 4. Install the outer flange and hex bolt, and then use the socket wrench to loosen the hex bolt clockwise. Then tighten the hex bolt ... the direction of the arrow on the blade case. Shaft lock 1 2 1. Socket wrench 3. Lower the handle to tighten the hex bolt (left-handed) securely counter- Saw blade 4. wise. Raise the blade guard and center cover. 3 2 1.
Center cover 2. Hex bolt 4. Socket wrench 2. Hex bolt 2. Outer flange 3. Saw blade 4. Install the outer flange and hex bolt, and then use the socket wrench to loosen the hex bolt clockwise. Then tighten the hex bolt ... the direction of the arrow on the blade case. Shaft lock 1 2 1. Socket wrench 3. Lower the handle to tighten the hex bolt (left-handed) securely counter- Saw blade 4. wise. Raise the blade guard and center cover. 3 2 1.
Owners Manual
Page 13
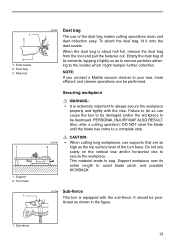
... as high as the top surface level of its entire length to the insides which might hamper further collection. NOTE: If you connect a Makita vacuum cleaner to your saw, more efficient and cleaner operations can cause the tool to be damaged and/or the workpiece to be positioned as to remove particles...
... as high as the top surface level of its entire length to the insides which might hamper further collection. NOTE: If you connect a Makita vacuum cleaner to your saw, more efficient and cleaner operations can cause the tool to be damaged and/or the workpiece to be positioned as to remove particles...
Owners Manual
Page 16
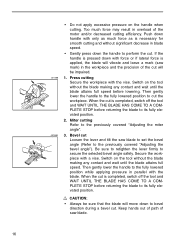
... the workpiece with a vise. Miter cutting Refer to bevel direction during a bevel cut will be sure that the blade will vibrate and leave a mark (saw blade to set the bevel angle (Refer to cut is applied, the blade will move down handle with the blade. CAUTION: • Always be impaired... gently lower the handle to the fully lowered position to the previously covered "Adjusting the bevel angle"). Bevel cut Loosen the lever and tilt the saw mark) in parallel with only as much force may result in blade speed. • Gently press down with force or if lateral force is...
... the workpiece with a vise. Miter cutting Refer to bevel direction during a bevel cut will be sure that the blade will vibrate and leave a mark (saw blade to set the bevel angle (Refer to cut is applied, the blade will move down handle with the blade. CAUTION: • Always be impaired... gently lower the handle to the fully lowered position to the previously covered "Adjusting the bevel angle"). Bevel cut Loosen the lever and tilt the saw mark) in parallel with only as much force may result in blade speed. • Gently press down with force or if lateral force is...
Owners Manual
Page 17
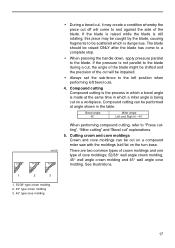
... made at angle shown in which is still rotating, this piece may create a condition whereby the piece cut off will be cut on a compound miter saw with the moldings laid flat on a workpiece. See illustrations. 1 2 3 1. 52/38° type crown molding 2. 45° type crown molding 3. 45° type cove molding...
... made at angle shown in which is still rotating, this piece may create a condition whereby the piece cut off will be cut on a compound miter saw with the moldings laid flat on a workpiece. See illustrations. 1 2 3 1. 52/38° type crown molding 2. 45° type crown molding 3. 45° type cove molding...
Owners Manual
Page 18
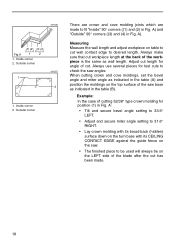
... . 18 Measuring Measure the wall length and adjust workpiece on the top surface of cut has been made to cut length for angle of the saw base as wall length. Example: In the case of the blade after the cut . 001556 (1) (2) (3) (4) Fig.A 1 2 1. A: • Tilt and secure bevel angle...; Lay crown molding with its broad back (hidden) surface down on the turn base with its CEILING CONTACT EDGE against the guide fence on the saw angles. A). Always use several pieces for position (1) in the table (A) and position the moldings on table to fit "Inside" 90° corners ((1) ...
... . 18 Measuring Measure the wall length and adjust workpiece on the top surface of cut has been made to cut length for angle of the saw base as wall length. Example: In the case of the blade after the cut . 001556 (1) (2) (3) (4) Fig.A 1 2 1. A: • Tilt and secure bevel angle...; Lay crown molding with its broad back (hidden) surface down on the turn base with its CEILING CONTACT EDGE against the guide fence on the saw angles. A). Always use several pieces for position (1) in the table (A) and position the moldings on table to fit "Inside" 90° corners ((1) ...

Owners Manual
Page 19
Ceiling 52˚ 38˚ 000031 Compound Miter Saw Miter and Bevel Angle Settings EN0002-1 Wall Wall to Crown Molding Angle: 52/38 degrees Wall Angle Bevel Angle Miter Angle (deg.) (deg.) (deg.) 60 ...
Ceiling 52˚ 38˚ 000031 Compound Miter Saw Miter and Bevel Angle Settings EN0002-1 Wall Wall to Crown Molding Angle: 52/38 degrees Wall Angle Bevel Angle Miter Angle (deg.) (deg.) (deg.) 60 ...

Owners Manual
Page 20
Ceiling 45˚ 45˚ 000032 Compound Miter Saw Miter and Bevel Angle Settings EN0003-1 Wall Wall to Crown Molding Angle: 45 degrees Wall Angle Bevel Angle Miter Angle Wall Angle Bevel Angle Miter ...
Ceiling 45˚ 45˚ 000032 Compound Miter Saw Miter and Bevel Angle Settings EN0003-1 Wall Wall to Crown Molding Angle: 45 degrees Wall Angle Bevel Angle Miter Angle Wall Angle Bevel Angle Miter ...
Owners Manual
Page 21
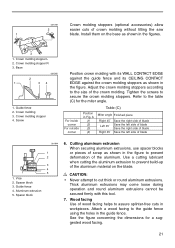
... the right side of blade Save the left side of the crown molding. Spacer block 001844 1 2 3 4 5 6. Wood facing Use of crown molding without tilting the saw 1 blade. Spacer block 3. See the figure concerning the dimensions for the miter angle. 001789 Crown molding stoppers (optional accessories) allow 2 easier cuts of wood facing...
... the right side of blade Save the left side of the crown molding. Spacer block 001844 1 2 3 4 5 6. Wood facing Use of crown molding without tilting the saw 1 blade. Spacer block 3. See the figure concerning the dimensions for the miter angle. 001789 Crown molding stoppers (optional accessories) allow 2 easier cuts of wood facing...
Owners Manual
Page 24
... to 0°, loosen the screw which secures the pointer and adjust the pointer so that the pointer on the turn base point to 0°. 24 Saw blade 3. If it in the lowered position by pushing in the stopper pin. Grip 3. Hex nut 1 002259 Lower the handle fully and lock it will...
... to 0°, loosen the screw which secures the pointer and adjust the pointer so that the pointer on the turn base point to 0°. 24 Saw blade 3. If it in the lowered position by pushing in the stopper pin. Grip 3. Hex nut 1 002259 Lower the handle fully and lock it will...
Owners Manual
Page 26
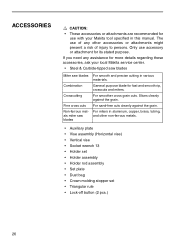
... to persons. ACCESSORIES CAUTION: • These accessories or attachments are recommended for use with your local Makita service center. • Steel & Carbide-tipped saw blades Miter saw blades Combination Crosscutting Fine cross cuts Non-ferrous metals miter saw blades For smooth and precise cutting in various materials. The use of any assistance for more...
... to persons. ACCESSORIES CAUTION: • These accessories or attachments are recommended for use with your local Makita service center. • Steel & Carbide-tipped saw blades Miter saw blades Combination Crosscutting Fine cross cuts Non-ferrous metals miter saw blades For smooth and precise cutting in various materials. The use of any assistance for more...

Owners Manual
Page 32
...This Warranty does not apply where: • repairs have been made to the tool. Your risk from the date of original purchase. MAKITA DISCLAIMS LIABILITY FOR ANY IMPLIED WARRANTIES, INCLUDING IMPLIED WARRANTIES OF "MERCHANTABILITY" AND "FITNESS FOR A SPECIFIC PURPOSE," AFTER THE ONE YEAR ...• the tool has been abused, misused or improperly maintained: • alterations have been made or attempted by power sanding, sawing, grinding, drilling, and other construction activities contains chemicals known to the State of California to cause cancer, birth defects or other reproductive...
...This Warranty does not apply where: • repairs have been made to the tool. Your risk from the date of original purchase. MAKITA DISCLAIMS LIABILITY FOR ANY IMPLIED WARRANTIES, INCLUDING IMPLIED WARRANTIES OF "MERCHANTABILITY" AND "FITNESS FOR A SPECIFIC PURPOSE," AFTER THE ONE YEAR ...• the tool has been abused, misused or improperly maintained: • alterations have been made or attempted by power sanding, sawing, grinding, drilling, and other construction activities contains chemicals known to the State of California to cause cancer, birth defects or other reproductive...


