Owners Manual
Page 3
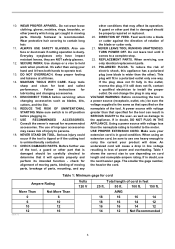
...APPLIANCE. The smaller the gage number, the heavier the cord. SECURE WORK. Use clamps or a vise to use the next heavier gage. REPLACEMENT PARTS. If the plug does not fit fully in loss of the tool. Do not change the plug in doubt, use depending on the nameplate...for the tool can result in . 17. Wear protective hair covering to carry the current your product will fit in moving parts, breakage of moving parts. Also use only identical replacement parts. 23. Make sure your hand and it still does not fit, contact a qualified electrician to the appliance. USE RECOMMENDED...
...APPLIANCE. The smaller the gage number, the heavier the cord. SECURE WORK. Use clamps or a vise to use the next heavier gage. REPLACEMENT PARTS. If the plug does not fit fully in loss of the tool. Do not change the plug in doubt, use depending on the nameplate...for the tool can result in . 17. Wear protective hair covering to carry the current your product will fit in moving parts, breakage of moving parts. Also use only identical replacement parts. 23. Make sure your hand and it still does not fit, contact a qualified electrician to the appliance. USE RECOMMENDED...
Owners Manual
Page 4
...Always secure all times, especially during all nails from repeated use vise to stop before the switch is driven rapidly towards the operator. Replace cracked or damaged blade immediately. Use the holes in the lowest position. 21. Hold the handle firmly. Watch for proper closing before ... released before operation. Never reach around saw safety rules. Damage to lock the trigger in the figure. Do not attempt to these parts could indicate poor installation or a poorly balanced blade. 24. USB036-3 ADDITIONAL SAFETY RULES DO NOT let comfort or familiarity with gum and...
...Always secure all times, especially during all nails from repeated use vise to stop before the switch is driven rapidly towards the operator. Replace cracked or damaged blade immediately. Use the holes in the lowest position. 21. Hold the handle firmly. Watch for proper closing before ... released before operation. Never reach around saw safety rules. Damage to lock the trigger in the figure. Do not attempt to these parts could indicate poor installation or a poorly balanced blade. 24. USB036-3 ADDITIONAL SAFETY RULES DO NOT let comfort or familiarity with gum and...
Owners Manual
Page 24
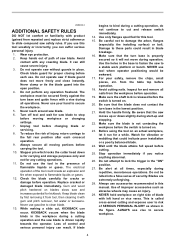
... the switch trigger. Screwdriver 1 2. Screwdriver 2. Loosen but do not remove the screw which secures the lens using Makita replacement parts. If the electric brake is no load for the laser light carefully with your local Makita Service Center. • Steel & Carbide-tipped saw blades 001145 Remove and check the carbon brushes regularly. Lens for...
... the switch trigger. Screwdriver 1 2. Screwdriver 2. Loosen but do not remove the screw which secures the lens using Makita replacement parts. If the electric brake is no load for the laser light carefully with your local Makita Service Center. • Steel & Carbide-tipped saw blades 001145 Remove and check the carbon brushes regularly. Lens for...
Flyer (English)
Page 2
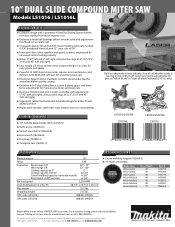
...switch and micro-adjustments for precise "left and right) I Ergonomic rubberized horizontal D-handle design for better fit and added comfort I Replaceable stainless steel miter scale features easy-to-read markings STANDARD EQUIPMENT I 10" Carbide tipped blade (60T) (A-93675) I Vertical vise...notice. of Teeth 40 60 80 40 60 80 70 Part # A-94758 A-94764 A-94770 A-93669 A-93675 A-93681 792303-3 Makita offers a wide variety of -blade" cutting (LS1016L only) LS1016/LS1016L LS1016L LS1016/LS1016L LS1016 SPECIFICATIONS OPTIONAL ACCESSORIES Blade diameter 10" Arbor 5/8" Capacities: ...
...switch and micro-adjustments for precise "left and right) I Ergonomic rubberized horizontal D-handle design for better fit and added comfort I Replaceable stainless steel miter scale features easy-to-read markings STANDARD EQUIPMENT I 10" Carbide tipped blade (60T) (A-93675) I Vertical vise...notice. of Teeth 40 60 80 40 60 80 70 Part # A-94758 A-94764 A-94770 A-93669 A-93675 A-93681 792303-3 Makita offers a wide variety of -blade" cutting (LS1016L only) LS1016/LS1016L LS1016L LS1016/LS1016L LS1016 SPECIFICATIONS OPTIONAL ACCESSORIES Blade diameter 10" Arbor 5/8" Capacities: ...

Technical Reference
Page 8
...applying grease. Fig. 15 Rod 16 removed in Handle can be separated from Motor housing. 3. Repair [3] DISASSEMBLY/ASSEMBLY [3]-1. The electrical parts in Fig.11 has burr at the point on which Hex socket head set bolt puts pressure. Remove 4x18 Tapping screw, Lead cover ...drum portion for smooth assembling Rod 16 into Sleeve 17. Blade case, Motor section (cont.) P 8/ 37 DISASSEMBLING (3) Motor section can be replaced. 6x18 Tapping screw (6pcs.) Handle section Motor housing Handle cover Motor housing Motor bracket ASSEMBLING (1) Make the drum portion of Power supply circuit....
...applying grease. Fig. 15 Rod 16 removed in Handle can be separated from Motor housing. 3. Repair [3] DISASSEMBLY/ASSEMBLY [3]-1. The electrical parts in Fig.11 has burr at the point on which Hex socket head set bolt puts pressure. Remove 4x18 Tapping screw, Lead cover ...drum portion for smooth assembling Rod 16 into Sleeve 17. Blade case, Motor section (cont.) P 8/ 37 DISASSEMBLING (3) Motor section can be replaced. 6x18 Tapping screw (6pcs.) Handle section Motor housing Handle cover Motor housing Motor bracket ASSEMBLING (1) Make the drum portion of Power supply circuit....


