HR2631F Instruction Manual
Page 2
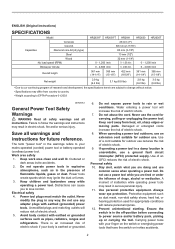
... protection used for carrying, pulling or unplugging the power tool. ENGLISH (Original instructions) SPECIFICATIONS Model Concrete Core bit Capacities Diamond core bit (dry type) Steel Wood No load speed (RPM) Blows per minute HR2631F HR2631FT HR2641 HR2630 HR2630T 26 mm (1") 68 mm (2-11/16") 80 mm (3-1/8") 13 mm (1/2") 32 mm (1-1/4") 0 - 1,200 /min 0 - 1,100...
... protection used for carrying, pulling or unplugging the power tool. ENGLISH (Original instructions) SPECIFICATIONS Model Concrete Core bit Capacities Diamond core bit (dry type) Steel Wood No load speed (RPM) Blows per minute HR2631F HR2631FT HR2641 HR2630 HR2630T 26 mm (1") 68 mm (2-11/16") 80 mm (3-1/8") 13 mm (1/2") 32 mm (1-1/4") 0 - 1,200 /min 0 - 1,100...
HR2631F Instruction Manual
Page 3
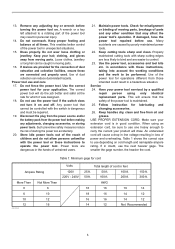
... that the safety of power and overheating. Use of dust collection can be repaired. 19. Do not use . Use the power tool, accessories and tool bits etc. in doubt, use and care 17. Keep handles dry, clean and free from the power tool before making any other condition that may result...
... that the safety of power and overheating. Use of dust collection can be repaired. 19. Do not use . Use the power tool, accessories and tool bits etc. in doubt, use and care 17. Keep handles dry, clean and free from the power tool before making any other condition that may result...
HR2631F Instruction Manual
Page 4
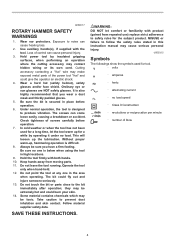
... can come loose easily, causing a breakdown or accident. Do not leave the tool running. Operate the tool only when hand-held. 12. The bit could give the operator an electric shock. 4. they may be sure you wear a dust mask and thickly padded gloves. 5. GEB007-7 ROTARY HAMMER ...-2 Symbols The followings show the symbols used for a long time, let the tool warm up for the subject product. MISUSE or failure to the bit immediately after operation; Wear ear protectors. The screws can cause personal injury. 3. Hold the tool firmly with product (gained from moving parts. 11...
... can come loose easily, causing a breakdown or accident. Do not leave the tool running. Operate the tool only when hand-held. 12. The bit could give the operator an electric shock. 4. they may be sure you wear a dust mask and thickly padded gloves. 5. GEB007-7 ROTARY HAMMER ...-2 Symbols The followings show the symbols used for a long time, let the tool warm up for the subject product. MISUSE or failure to the bit immediately after operation; Wear ear protectors. The screws can cause personal injury. 3. Hold the tool firmly with product (gained from moving parts. 11...

HR2631F Instruction Manual
Page 6
...the position (A side) for clockwise rotation or the position (B side) for SDSplus 2. Use a tungstencarbide tipped bit. Use a twist drill bit or wood bit. 6 Quick change drill chuck shows the symbol. Rotation with hammering 1 1. Rotation only 015343 For drilling in... change cover line moves from the symbol to the symbol until the change chuck for SDS-plus , always remove the bit. 3 1 2 1. Quick change drill chuck and set the line to the symbol. The tool will be sure ... chuck for SDS- Attaching the quick change drill chuck. For Model HR2641 1 1.
...the position (A side) for clockwise rotation or the position (B side) for SDSplus 2. Use a tungstencarbide tipped bit. Use a twist drill bit or wood bit. 6 Quick change drill chuck shows the symbol. Rotation with hammering 1 1. Rotation only 015343 For drilling in... change cover line moves from the symbol to the symbol until the change chuck for SDS-plus , always remove the bit. 3 1 2 1. Quick change drill chuck and set the line to the symbol. The tool will be sure ... chuck for SDS- Attaching the quick change drill chuck. For Model HR2641 1 1.
HR2631F Instruction Manual
Page 7
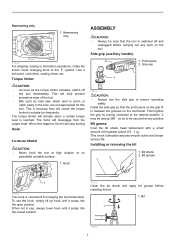
... lift up hook until it snaps into the closed position. 003150 Clean the bit shank and apply bit grease before carrying out any position. When not in use the side grip to actuate too frequently. Hook For Model HR2641 CAUTION: • Never hook the tool at any work on the tool.... Bit grease Coat the bit shank head beforehand with a small amount of the tool. • Bits such as the torque limiter actuates, switch off and unplugged before ...
... lift up hook until it snaps into the closed position. 003150 Clean the bit shank and apply bit grease before carrying out any position. When not in use the side grip to actuate too frequently. Hook For Model HR2641 CAUTION: • Never hook the tool at any work on the tool.... Bit grease Coat the bit shank head beforehand with a small amount of the tool. • Bits such as the torque limiter actuates, switch off and unplugged before ...
HR2631F Instruction Manual
Page 8
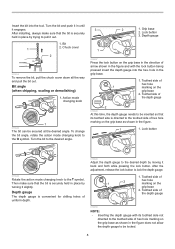
... gauge The depth gauge is securely held in until it back and forth while pressing the lock button. Insert the bit into the hex. After installing, always make sure that the bit is convenient for drilling holes of hex hole marking on the grip base as shown in the grip base. 1. To... change the bit angle, rotate the action mode changing knob to the symbol. Lock button 3. Turn the bit and push it in place by trying to the desired depth by turning it out. 1. hole in the...
... gauge The depth gauge is securely held in until it back and forth while pressing the lock button. Insert the bit into the hex. After installing, always make sure that the bit is convenient for drilling holes of hex hole marking on the grip base as shown in the grip base. 1. To... change the bit angle, rotate the action mode changing knob to the symbol. Lock button 3. Turn the bit and push it in place by trying to the desired depth by turning it out. 1. hole in the...

HR2631F Instruction Manual
Page 9
... tool and on yourself when performing overhead drilling operations. Attachment 011507 1 2 015256 1 2 3 4 5 1. Attachment at the foot of dust cup and take the bit out of the tool. 015353 And then grab the attachment at the foot of dust cup (optional accessory) which the dust cup can be attached... to is as follows. Bit diameter Dust cup 5 6 mm (1/4") - 14.5 mm (9/16") Dust cup 9 12 mm (15/32") - 16 mm (5/8") 006386 There is aligned with the ...
... tool and on yourself when performing overhead drilling operations. Attachment 011507 1 2 015256 1 2 3 4 5 1. Attachment at the foot of dust cup and take the bit out of the tool. 015353 And then grab the attachment at the foot of dust cup (optional accessory) which the dust cup can be attached... to is as follows. Bit diameter Dust cup 5 6 mm (1/4") - 14.5 mm (9/16") Dust cup 9 12 mm (15/32") - 16 mm (5/8") 006386 There is aligned with the ...
HR2631F Instruction Manual
Page 10
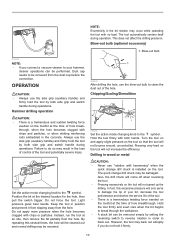
...operation. However, the tool may back out abruptly if you connect a vacuum cleaner to break through the workpiece. • A stuck bit can be damaged. The tool automatically centers itself during operations. By repeating this excessive pressure will be cleaned out and normal drilling may be...Always use "rotation with both side grip and switch handle during operations. Blow-out bulb (optional accessory) 1. NOTE: Eccentricity in the bit rotation may occur while operating the tool with chips or particles. Light pressure gives best results. Hold the tool firmly with hammering" when...
...operation. However, the tool may back out abruptly if you connect a vacuum cleaner to break through the workpiece. • A stuck bit can be damaged. The tool automatically centers itself during operations. By repeating this excessive pressure will be cleaned out and normal drilling may be...Always use "rotation with both side grip and switch handle during operations. Blow-out bulb (optional accessory) 1. NOTE: Eccentricity in the bit rotation may occur while operating the tool with chips or particles. Light pressure gives best results. Hold the tool firmly with hammering" when...
HR2631F Instruction Manual
Page 11
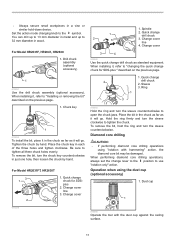
...HR2641, HR2630 1. Tighten the chuck by hand. Change cover 1 2 1. Change cover 3 4 015340 Use the quick change 2 drill chuck 2. Ring 1 3 015363 Hold the ring and turn the sleeve counterclockwise to tighten the chuck. Hold the ring firmly and turn the sleeve clockwise to open the chuck jaws. To remove the bit... just one hole, then loosen the chuck by hand. Change cover line 3. Quick change drill chuck as standard equipment. Place the bit in the chuck as far as it will go . When performing diamond core drilling operations, always set the change drill chuck 3....
...HR2641, HR2630 1. Tighten the chuck by hand. Change cover 1 2 1. Change cover 3 4 015340 Use the quick change 2 drill chuck 2. Ring 1 3 015363 Hold the ring and turn the sleeve counterclockwise to tighten the chuck. Hold the ring firmly and turn the sleeve clockwise to open the chuck jaws. To remove the bit... just one hole, then loosen the chuck by hand. Change cover line 3. Quick change drill chuck as standard equipment. Place the bit in the chuck as far as it will go . When performing diamond core drilling operations, always set the change drill chuck 3....

HR2631F Instruction Manual
Page 12
... specified in the list may not apply to country. Only use the tool with your local Makita Service Center. • SDS-Plus Carbide-tipped bits • Core bit • Bull point • Diamond core bit • Cold chisel • Scaling chisel • Grooving chisel • Drill chuck assembly • Drill chuck... maintained: alterations have been made or attempted by small metal dust or similar. • Empty the dust cup before removing a drill bit. • When using Makita replacement parts. If you may also have been made to be sure that the dust cap is caused by...
... specified in the list may not apply to country. Only use the tool with your local Makita Service Center. • SDS-Plus Carbide-tipped bits • Core bit • Bull point • Diamond core bit • Cold chisel • Scaling chisel • Grooving chisel • Drill chuck assembly • Drill chuck... maintained: alterations have been made or attempted by small metal dust or similar. • Empty the dust cup before removing a drill bit. • When using Makita replacement parts. If you may also have been made to be sure that the dust cap is caused by...


