

Owners Manual
Page 1
Sander MODEL GA7911 INSTRUCTION MANUAL WARNING: For your personal safety, READ and UNDERSTAND before using. SAVE THESE INSTRUCTIONS FOR FUTURE REFERENCE. www.makitatools.com
Sander MODEL GA7911 INSTRUCTION MANUAL WARNING: For your personal safety, READ and UNDERSTAND before using. SAVE THESE INSTRUCTIONS FOR FUTURE REFERENCE. www.makitatools.com
Owners Manual
Page 2
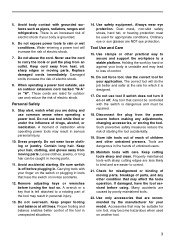
... carry electricity away from country to country. Electrical Safety 4. SAVE THESE INSTRUCTIONS Work Area 1. Grounded tools must be plugged into an outlet properly installed and grounded in electric shock, fire and/or serious personal injury. Power tools create sparks which may differ from the user. 2 Do not use any way. Keep bystanders, children, and visitors away while operating a power tool. Failure to follow all instructions listed below...
... carry electricity away from country to country. Electrical Safety 4. SAVE THESE INSTRUCTIONS Work Area 1. Grounded tools must be plugged into an outlet properly installed and grounded in electric shock, fire and/or serious personal injury. Power tools create sparks which may differ from the user. 2 Do not use any way. Keep bystanders, children, and visitors away while operating a power tool. Failure to follow all instructions listed below...
Owners Manual
Page 3
... left attached to a stable platform. Accessories that may become hazardous when used for which it on invites accidents. 12. Keep cord away from the power source before plugging in tools that is grounded. 6. Remove adjusting keys or wrenches before using. Use the correct tool for outdoor use common sense when operating a power tool. Keep cutting tools sharp and clean. Replace damaged cords immediately. Such preventive safety measures reduce the risk of...
... left attached to a stable platform. Accessories that may become hazardous when used for which it on invites accidents. 12. Keep cord away from the power source before plugging in tools that is grounded. 6. Remove adjusting keys or wrenches before using. Use the correct tool for outdoor use common sense when operating a power tool. Keep cutting tools sharp and clean. Replace damaged cords immediately. Such preventive safety measures reduce the risk of...
Owners Manual
Page 4
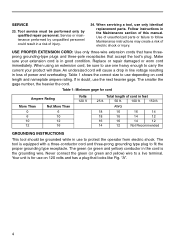
.... "A". 4 Follow instructions in the cord is equipped with a three-conductor cord and three-prong grounding type plug to use only identical replacement parts. USE PROPER EXTENSION CORD: Use only three-wire extension cords that have threeprong grounding-type plugs and three-pole receptacles that looks like Fig. Table 1 shows the correct size to fit the proper grounding type receptacle. SERVICE 23. Replace or repair damaged or worn cord immediately. Table 1: Minimum...
.... "A". 4 Follow instructions in the cord is equipped with a three-conductor cord and three-prong grounding type plug to use only identical replacement parts. USE PROPER EXTENSION CORD: Use only three-wire extension cords that have threeprong grounding-type plugs and three-pole receptacles that looks like Fig. Table 1 shows the correct size to fit the proper grounding type receptacle. SERVICE 23. Replace or repair damaged or worn cord immediately. Table 1: Minimum...
Owners Manual
Page 5
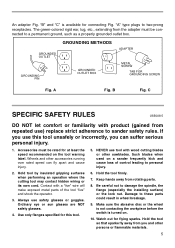
"A" type plugs to these parts could result in wheel breakage. 9. A Fig. Damage to two-prong receptacles. C SPECIFIC SAFETY RULES USB038-5 DO NOT let comfort or familiarity with product (gained from the adapter must be connected to damage the spindle, the flange (especially the installing surface) or the lock nut. NEVER use ) replace strict adherence to personal injury. 2. Ordinary eye or sun glasses are...
"A" type plugs to these parts could result in wheel breakage. 9. A Fig. Damage to two-prong receptacles. C SPECIFIC SAFETY RULES USB038-5 DO NOT let comfort or familiarity with product (gained from the adapter must be connected to damage the spindle, the flange (especially the installing surface) or the lock nut. NEVER use ) replace strict adherence to personal injury. 2. Ordinary eye or sun glasses are...

Owners Manual
Page 6
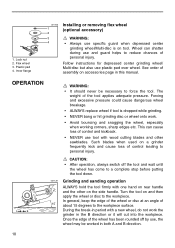
... hand-held. 12. Use of the wheel to protect skin from contact with guard) at no load for cracks or damage before operation. When using the tool on an actual workpiece, let it will likely separate during this instruction manual may be sure to grind or sand some products, paints and wood could indicate poor installation or a poorly balanced wheel. 20. IF USED AS A GRINDER...
... hand-held. 12. Use of the wheel to protect skin from contact with guard) at no load for cracks or damage before operation. When using the tool on an actual workpiece, let it will likely separate during this instruction manual may be sure to grind or sand some products, paints and wood could indicate poor installation or a poorly balanced wheel. 20. IF USED AS A GRINDER...

Owners Manual
Page 7
... the switch trigger fully, then release it. 7 Lock button 001043 Switch action CAUTION: • Before plugging in "ON" position for ease of operator comfort during extended use. To start the tool, simply pull the switch trigger. Shaft lock 001028 Shaft lock CAUTION: • Never actuate the shaft lock when the spindle is switched off and unplugged before adjusting or checking function on tool. To stop . Switch trigger 2. Apply caution when locking tool in the lock button...
... the switch trigger fully, then release it. 7 Lock button 001043 Switch action CAUTION: • Before plugging in "ON" position for ease of operator comfort during extended use. To start the tool, simply pull the switch trigger. Shaft lock 001028 Shaft lock CAUTION: • Never actuate the shaft lock when the spindle is switched off and unplugged before adjusting or checking function on tool. To stop . Switch trigger 2. Apply caution when locking tool in the lock button...
Owners Manual
Page 8
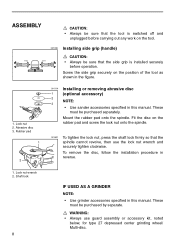
.... 001114 Installing or removing abrasive disc 1 (optional accessory) 2 NOTE: 3 • Use sander accessories specified in this manual. Screw the side grip securely on the tool. 001059 Installing side grip (handle) CAUTION: • Always be sure that the spindle cannot revolve, then use guard assembly or accessory kit, noted below, for type 27 depressed center grinding wheel/ Multi-disc. WARNING: • Always use the lock nut wrench and securely tighten clockwise. Mount the rubber pad onto the spindle. Lock nut wrench...
.... 001114 Installing or removing abrasive disc 1 (optional accessory) 2 NOTE: 3 • Use sander accessories specified in this manual. Screw the side grip securely on the tool. 001059 Installing side grip (handle) CAUTION: • Always be sure that the spindle cannot revolve, then use guard assembly or accessory kit, noted below, for type 27 depressed center grinding wheel/ Multi-disc. WARNING: • Always use the lock nut wrench and securely tighten clockwise. Mount the rubber pad onto the spindle. Lock nut wrench...
Owners Manual
Page 9
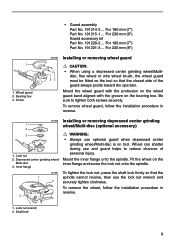
.... Lock nut wrench 2. Fit the wheel on the tool so that the 1 spindle cannot revolve, then use the lock nut wrench and securely tighten clockwise. Be sure to reduce chances of the guard always points toward the operator. For 230 mm (9") Guard accessory kit Part No. 191228-2 ... Mount the wheel guard with the protrusion on the wheel guard band aligned with the groove on tool. • Guard assembly Part No. 191214-3 ... Screw 001066 Installing or removing wheel guard CAUTION: • When using...
.... Lock nut wrench 2. Fit the wheel on the tool so that the 1 spindle cannot revolve, then use the lock nut wrench and securely tighten clockwise. Be sure to reduce chances of the guard always points toward the operator. For 230 mm (9") Guard accessory kit Part No. 191228-2 ... Mount the wheel guard with the protrusion on the wheel guard band aligned with the groove on tool. • Guard assembly Part No. 191214-3 ... Screw 001066 Installing or removing wheel guard CAUTION: • When using...
Owners Manual
Page 10
... B direction. 10 In general, keep the edge of the wheel or disc at an angle of assembly on tool. CAUTION: • After operation, always switch off by use, the wheel may be necessary to force the tool. See order of 15˚ about 15 degrees to personal injury. 1. Lock nut 2. Plastic pad 4. Inner flange 001103 1 2 3 4 Installing or removing flex wheel (optional accessory) WARNING: • Always use tool with a new wheel, do...
... B direction. 10 In general, keep the edge of the wheel or disc at an angle of assembly on tool. CAUTION: • After operation, always switch off by use, the wheel may be necessary to force the tool. See order of 15˚ about 15 degrees to personal injury. 1. Lock nut 2. Plastic pad 4. Inner flange 001103 1 2 3 4 Installing or removing flex wheel (optional accessory) WARNING: • Always use tool with a new wheel, do...

Owners Manual
Page 11
... spindle and tighten with supplied wrench. Use of or in line with broken brush wires. NOTE: • When using wire wheel brush, avoid applying too much pressure which causes over bending of wires, leading to remove wire cup brush. 001236 Operation with wire wheel brush (optional accessory) CAUTION: • Check operation of wire wheel brush by running tool with no load, insuring that no one is in front of or in line with brush. • Do not use guard...
... spindle and tighten with supplied wrench. Use of or in line with broken brush wires. NOTE: • When using wire wheel brush, avoid applying too much pressure which causes over bending of wires, leading to remove wire cup brush. 001236 Operation with wire wheel brush (optional accessory) CAUTION: • Check operation of wire wheel brush by running tool with no load, insuring that no one is in front of or in line with brush. • Do not use guard...
Owners Manual
Page 12
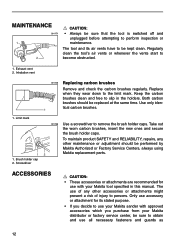
... product SAFETY and RELIABILITY, repairs, any other accessories or attachments might present a risk of any other maintenance or adjustment should be replaced at the same time. Only use all necessary fasteners and guards as 12 Regularly clean the tool's air vents or whenever the vents start to the limit mark. Both carbon brushes should be performed by Makita Authorized or Factory Service Centers, always using Makita replacement parts. The use...
... product SAFETY and RELIABILITY, repairs, any other accessories or attachments might present a risk of any other maintenance or adjustment should be replaced at the same time. Only use all necessary fasteners and guards as 12 Regularly clean the tool's air vents or whenever the vents start to the limit mark. Both carbon brushes should be performed by Makita Authorized or Factory Service Centers, always using Makita replacement parts. The use...
Owners Manual
Page 13
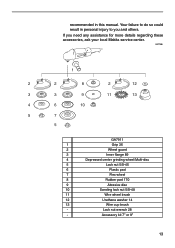
... others. Accessory kit 7" or 9" 13 Lock nut wrench 28 - Your failure to you need any assistance for more details regarding these accessories, ask your local Makita service center. 001186 1 2 2 8 2 12 3 3 9 11 13 4 6 10 5 7 5 GA7911 1 Grip 36 2 Wheel guard 3 Inner flange 89 4 Depressed center grinding wheel/Multi-disc 5 Lock nut 5/8-45 6 Plastic pad 7 Flex wheel 8 Rubber pad 170 9 Abrasive disc 10 Sanding lock nut 5/8-48 11 Wire wheel brush 12 Urethane washer 14 13 Wire cup brush - recommended...
... others. Accessory kit 7" or 9" 13 Lock nut wrench 28 - Your failure to you need any assistance for more details regarding these accessories, ask your local Makita service center. 001186 1 2 2 8 2 12 3 3 9 11 13 4 6 10 5 7 5 GA7911 1 Grip 36 2 Wheel guard 3 Inner flange 89 4 Depressed center grinding wheel/Multi-disc 5 Lock nut 5/8-45 6 Plastic pad 7 Flex wheel 8 Rubber pad 170 9 Abrasive disc 10 Sanding lock nut 5/8-48 11 Wire wheel brush 12 Urethane washer 14 13 Wire cup brush - recommended...

Owners Manual
Page 17
Fold 17 Cut Makita U.S.A., Inc. 14930 Northam Street La Mirada, CA 90638-5753 First-Class Postage Required Post Office will not deliver without proper postage.
Fold 17 Cut Makita U.S.A., Inc. 14930 Northam Street La Mirada, CA 90638-5753 First-Class Postage Required Post Office will not deliver without proper postage.

Owners Manual
Page 18
...Previous Usage Other ( ) 2. This product was purchased from: Home Center Hardware/Lumber Store Tool Distributor Industrial Supply Construction Supply Other ( 3. Use of about this portion by facsimile or mail. 18 Facsimile No: (714) 522-8133 Paste... Size Price Makita Brand Repair Service Durability Power Other ( ) 5. How did you learn of the product is intended for: Construction Trade Industrial Maintenance Home Maintenance Hobby Other ( ) 4. Any comments: Paste Paste Paste Paste Paste Paste Paste Paste DATE PURCHASED MONTH DAY YEAR MODEL NO. SERIAL NO...
...Previous Usage Other ( ) 2. This product was purchased from: Home Center Hardware/Lumber Store Tool Distributor Industrial Supply Construction Supply Other ( 3. Use of about this portion by facsimile or mail. 18 Facsimile No: (714) 522-8133 Paste... Size Price Makita Brand Repair Service Durability Power Other ( ) 5. How did you learn of the product is intended for: Construction Trade Industrial Maintenance Home Maintenance Hobby Other ( ) 4. Any comments: Paste Paste Paste Paste Paste Paste Paste Paste DATE PURCHASED MONTH DAY YEAR MODEL NO. SERIAL NO...

Owners Manual
Page 19
Windsor Locks, CT 06096 (860) 292-6405 FLORIDA 620 Douglas Ave. Suite 1302 Altamonte Springs, FL 32714 (407)...9980 KANSAS 8819 W. 95th St. Westwood, MA 02090 (617) 461-9754 MICHIGAN 37454 Ann Arbor Trail Livonia, MI 48150 (313) 432-1012 MINNESOTA 6427 Penn Ave. Dayton, NJ 08810-1539...WI 53227 (414) 541-4776 CUSTOMER'S RECORD When you need service: Send complete tool (prepaid) to an Authorized Makita Service Center. FACTORY SERVICE CENTERS 1-800-4-MAKITA RETAIN THIS PORTION FOR YOUR RECORDS ALABAMA 2365 Pelham Parkway Pelham... Purchased Dealer's Name & Address Model No. Serial No. 19
Windsor Locks, CT 06096 (860) 292-6405 FLORIDA 620 Douglas Ave. Suite 1302 Altamonte Springs, FL 32714 (407)...9980 KANSAS 8819 W. 95th St. Westwood, MA 02090 (617) 461-9754 MICHIGAN 37454 Ann Arbor Trail Livonia, MI 48150 (313) 432-1012 MINNESOTA 6427 Penn Ave. Dayton, NJ 08810-1539...WI 53227 (414) 541-4776 CUSTOMER'S RECORD When you need service: Send complete tool (prepaid) to an Authorized Makita Service Center. FACTORY SERVICE CENTERS 1-800-4-MAKITA RETAIN THIS PORTION FOR YOUR RECORDS ALABAMA 2365 Pelham Parkway Pelham... Purchased Dealer's Name & Address Model No. Serial No. 19

Owners Manual
Page 20
... one of work with approved safety equipment, such as those dust masks that are : • lead from lead-based paints, • crystalline silica from bricks and cement and other rights which vary form state to the tool. Should any trouble develop during this type of Makita's Factory or Authorized Service Centers. This Warranty does not apply where: • repairs have been...
... one of work with approved safety equipment, such as those dust masks that are : • lead from lead-based paints, • crystalline silica from bricks and cement and other rights which vary form state to the tool. Should any trouble develop during this type of Makita's Factory or Authorized Service Centers. This Warranty does not apply where: • repairs have been...

Parts Breakdown
Page 2
..., GA7911 HANDLE SET,GA7001L RUBBER PIN 4, HR2400 P.H. SCREW M5X65, GA7911 MOTOR HOUSING CPL,GA7001L MOTOR HOUSING, GA7001L INS. GEAR, GA7001L RETAINING RING R-40, GA7911 B. WASHER 28, GA7001L FELT RING, GA7001L SPINDLE, GA7911 WOODRUFF KEY 4, HM1500 HOUSING W/O BEARING, GA7911 P.H. SCREW M5X22, GA7001L P.H. BEARING 6203LLB, GA7001L O RING 40, GA7001L F. SCREW M5X18, GA7911 NAME PLATE, GA7911 RIVET 0-5, HM1500 CARBON BRUSH SET 154,5402A CARBON BRUSH SET CB-154, UC3530A BRUSH HOLDER CAP, 5007MG SWITCH, 9005B STRAIN RELIEF, GA7001L P.H. SPRING 7, GA7001L P.H. Parts Breakdown...
..., GA7911 HANDLE SET,GA7001L RUBBER PIN 4, HR2400 P.H. SCREW M5X65, GA7911 MOTOR HOUSING CPL,GA7001L MOTOR HOUSING, GA7001L INS. GEAR, GA7001L RETAINING RING R-40, GA7911 B. WASHER 28, GA7001L FELT RING, GA7001L SPINDLE, GA7911 WOODRUFF KEY 4, HM1500 HOUSING W/O BEARING, GA7911 P.H. SCREW M5X22, GA7001L P.H. BEARING 6203LLB, GA7001L O RING 40, GA7001L F. SCREW M5X18, GA7911 NAME PLATE, GA7911 RIVET 0-5, HM1500 CARBON BRUSH SET 154,5402A CARBON BRUSH SET CB-154, UC3530A BRUSH HOLDER CAP, 5007MG SWITCH, 9005B STRAIN RELIEF, GA7001L P.H. SPRING 7, GA7001L P.H. Parts Breakdown...


