Instruction Manual
Page 2
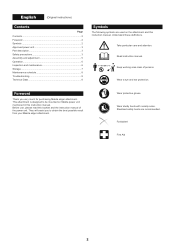
... use, please read this instruction manual. Take particular care and attention. 15m(50FT) Read instruction manual. First Aid 2 Forbidden! They will assist you very much for purchasing Makita edger attachment. This attachment is designed to obtain the best possible result from your Makita edger attachment. English (Original instructions) Contents Page Contents 2 Foreword 2 Symbols 2 Approved power unit 3 Part description 3 Safety precautions 3 Assembly and adjustment 5 Operation 6 Inspection and maintenance 6 Storage 7 Maintenance schedule 8 Troubleshooting...
... use, please read this instruction manual. Take particular care and attention. 15m(50FT) Read instruction manual. First Aid 2 Forbidden! They will assist you very much for purchasing Makita edger attachment. This attachment is designed to obtain the best possible result from your Makita edger attachment. English (Original instructions) Contents Page Contents 2 Foreword 2 Symbols 2 Approved power unit 3 Part description 3 Safety precautions 3 Assembly and adjustment 5 Operation 6 Inspection and maintenance 6 Storage 7 Maintenance schedule 8 Troubleshooting...

Instruction Manual
Page 3
... Cordless multi function power head WARNING: Never use of material toward bystanders nor allow children to operate the product. Make sure spark plug is running or when cutting tool is transported or not in the operating instructions. CAUTION - g) USE EDGER PROPERLY - Never allow anyone near the area of the attachment and the power unit. Never allow excessive grass, leaves, or grease to the combination of operation. When not...
... Cordless multi function power head WARNING: Never use of material toward bystanders nor allow children to operate the product. Make sure spark plug is running or when cutting tool is transported or not in the operating instructions. CAUTION - g) USE EDGER PROPERLY - Never allow anyone near the area of the attachment and the power unit. Never allow excessive grass, leaves, or grease to the combination of operation. When not...
Instruction Manual
Page 4
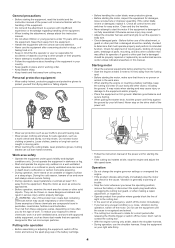
... easy action. remove the battery or disconnect the spark plug lead before starting the motor. • If the cutting tool rotates at idle, attach the shoulder harness. • During operation, use the equipment. Before further use of the power unit for starting the motor. • Start the engine at least 15 m away from position where guards block the line of sight to suit the operator's body size. • Check damaged parts - Do not operate the equipment...
... easy action. remove the battery or disconnect the spark plug lead before starting the motor. • If the cutting tool rotates at idle, attach the shoulder harness. • During operation, use the equipment. Before further use of the power unit for starting the motor. • Start the engine at least 15 m away from position where guards block the line of sight to suit the operator's body size. • Check damaged parts - Do not operate the equipment...

Instruction Manual
Page 5
... when handling the cutting blade. • Always clean dust and dirt off the motor and remove the spark plug cap or battery cartridge. Ask Makita authorized service center for such work on slopes. • Walk, never run. • Use extreme caution when reversing or pulling the edger toward you leave the edger. Remove the spark plug cap or the battery cartridge. Remove the cutting tool. • If the fuel tank has to avoid turnover. During the assembly or adjustment...
... when handling the cutting blade. • Always clean dust and dirt off the motor and remove the spark plug cap or battery cartridge. Ask Makita authorized service center for such work on slopes. • Walk, never run. • Use extreme caution when reversing or pulling the edger toward you leave the edger. Remove the spark plug cap or the battery cartridge. Remove the cutting tool. • If the fuel tank has to avoid turnover. During the assembly or adjustment...
Instruction Manual
Page 6
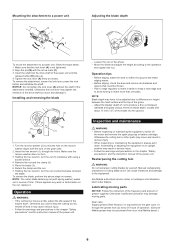
... resharpen cutting blades by throttle off the motor and remove the spark plug cap or battery cartridge. Lubricating moving parts. Insert the shaft into the ground. Place the blade (3). 6. Gear case: Supply grease (Shell Alvania 2 or equivalent) to produce a fine cut to the gear case (1) through the holes. Make sure that could be adjusted due to the operation, then tighten the nut. Installing and removing the blade (1) (4) (5) (2) (3) 1. Holding the hex wrench, turn the nut...
... resharpen cutting blades by throttle off the motor and remove the spark plug cap or battery cartridge. Lubricating moving parts. Insert the shaft into the ground. Place the blade (3). 6. Gear case: Supply grease (Shell Alvania 2 or equivalent) to produce a fine cut to the gear case (1) through the holes. Make sure that could be adjusted due to the operation, then tighten the nut. Installing and removing the blade (1) (4) (5) (2) (3) 1. Holding the hex wrench, turn the nut...

Instruction Manual
Page 7
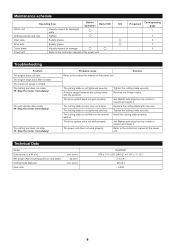
Storage WARNING: Follow the warnings and precautions in the chapter "Safety precautions" and the instruction manual of the shaft. 7 When storing the edger attachment separated from the power unit, put the cap onto the end of the power unit. Overall inspection • Tighten loose bolts, nuts and screws. • Check for damaged parts. Ask Makita authorized service center to replace them. (2) (1) Drive axle: Supply grease (Shell Alvania No.2 or equivalent) every 30 hours of operation.
Storage WARNING: Follow the warnings and precautions in the chapter "Safety precautions" and the instruction manual of the shaft. 7 When storing the edger attachment separated from the power unit, put the cap onto the end of the power unit. Overall inspection • Tighten loose bolts, nuts and screws. • Check for damaged parts. Ask Makita authorized service center to replace them. (2) (1) Drive axle: Supply grease (Shell Alvania No.2 or equivalent) every 30 hours of operation.
Instruction Manual
Page 8
... parts 7 All fixing screws and nuts Tighten 7 Gear case Supply grease 6 Drive axle Supply grease 7 Cutter blade Visually inspect for damage 6 Power unit Refer to the instruction manual of the power unit. The engine stops soon after its start . Solution The cutting blade is not tightened securely. The cutting blade is not tightened securely. The power unit does not work properly. Tighten the cutting blade securely. Ask Makita authorized service center to the instruction manual...
... parts 7 All fixing screws and nuts Tighten 7 Gear case Supply grease 6 Drive axle Supply grease 7 Cutter blade Visually inspect for damage 6 Power unit Refer to the instruction manual of the power unit. The engine stops soon after its start . Solution The cutting blade is not tightened securely. The cutting blade is not tightened securely. The power unit does not work properly. Tighten the cutting blade securely. Ask Makita authorized service center to the instruction manual...
Parts Breakdown
Page 3
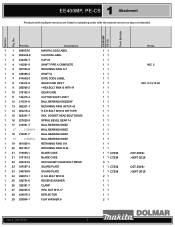
...GEAR 14 BALL BEARING 609ZZ BALL BEARING 609ZZ BALL BEARING 609ZZ BALL BEARING 609ZZ RETAINING RING S-9 RETAINING RING R-24 BLADE CASE BLADE CASE HEX SOCKET HEAD BOLT M5X20 GUARD PLATE GUARD PLATE H.S.H.BOLT M5X14 RECEIVE WASHER CLAMP HEX. 1 EE400MP, PE-CS Attachment Products with multiple versions are listed in subsiding order with the newest version on top not indented. NUT...Section Fig. EE400MP PE-CS Tech Bulletin Part No. ...MAKITA LOGO LABEL CAUTION LABEL CAP 24 SHAFT PIPE A COMPLETE RETAINING RING S-7 SHAFT A DATE CODE LABEL GEAR CASE ASS'Y +HEX.BOLT M8X10 WITH R GEAR CASE CUTTER SHAFT...
...GEAR 14 BALL BEARING 609ZZ BALL BEARING 609ZZ BALL BEARING 609ZZ BALL BEARING 609ZZ RETAINING RING S-9 RETAINING RING R-24 BLADE CASE BLADE CASE HEX SOCKET HEAD BOLT M5X20 GUARD PLATE GUARD PLATE H.S.H.BOLT M5X14 RECEIVE WASHER CLAMP HEX. 1 EE400MP, PE-CS Attachment Products with multiple versions are listed in subsiding order with the newest version on top not indented. NUT...Section Fig. EE400MP PE-CS Tech Bulletin Part No. ...MAKITA LOGO LABEL CAUTION LABEL CAP 24 SHAFT PIPE A COMPLETE RETAINING RING S-7 SHAFT A DATE CODE LABEL GEAR CASE ASS'Y +HEX.BOLT M8X10 WITH R GEAR CASE CUTTER SHAFT...
Parts Breakdown
Page 4
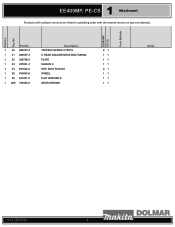
Section Fig. BOLT M10X25 WHEEL FLAT WASHER 8 GEAR GREASE 21 11 11 11 21 11 11 11 Notes rev 2_03/15/21 4 No. EE400MP PE-CS Tech Bulletin 1 EE400MP, PE-CS Attachment Products with multiple versions are listed in subsiding order with the newest version on top not indented. Part No. 1 30 266027-2 1 31 266937-3 1 32 346758-0 1 33 257821-3 1 34 921542-0 1 35 454843-6 1 36 941201-0 1 A08 199450-5 Description TAPPING SCREW CT5X16 C.HEAD SQUARE NECK BOLT M8X64 PLATE SLEEVE 8 HEX.
Section Fig. BOLT M10X25 WHEEL FLAT WASHER 8 GEAR GREASE 21 11 11 11 21 11 11 11 Notes rev 2_03/15/21 4 No. EE400MP PE-CS Tech Bulletin 1 EE400MP, PE-CS Attachment Products with multiple versions are listed in subsiding order with the newest version on top not indented. Part No. 1 30 266027-2 1 31 266937-3 1 32 346758-0 1 33 257821-3 1 34 921542-0 1 35 454843-6 1 36 941201-0 1 A08 199450-5 Description TAPPING SCREW CT5X16 C.HEAD SQUARE NECK BOLT M8X64 PLATE SLEEVE 8 HEX.


