Owners Manual
Page 2
... while operating a power tool. Do not expose power tools to change without notice. • Note: Specifications may ignite the dust or fumes. 3. Do not use reduces the risk of electric shock if your finger on the switch or plugging in power tools that have the switch on . Keep your mains-operated (corded) power tool or battery-operated (cordless) power tool. Read all instructions listed below refers to country. The term "power tool" in all times. Keep work area...
... while operating a power tool. Do not expose power tools to change without notice. • Note: Specifications may ignite the dust or fumes. 3. Do not use reduces the risk of electric shock if your finger on the switch or plugging in power tools that have the switch on . Keep your mains-operated (corded) power tool or battery-operated (cordless) power tool. Read all instructions listed below refers to country. The term "power tool" in all times. Keep work area...

Owners Manual
Page 3
... untrained users. 20. Use the power tool, accessories and tool bits etc. they may create a risk of fire when used with the charger specified by insulated gripping surfaces when performing an operation where the cutting tool may cause burns or a fire. 27. Power tool use ) replace strict adherence to jig saw safety rules. Hold power tools by the manufacturer. Maintain power tools. Shorting the battery terminals together may contact hidden wiring or its own cord...
... untrained users. 20. Use the power tool, accessories and tool bits etc. they may create a risk of fire when used with the charger specified by insulated gripping surfaces when performing an operation where the cutting tool may cause burns or a fire. 27. Power tool use ) replace strict adherence to jig saw safety rules. Hold power tools by the manufacturer. Maintain power tools. Shorting the battery terminals together may contact hidden wiring or its own cord...
Owners Manual
Page 4
... other metal objects such as nails, coins, etc. (3) Do not expose battery cartridge to follow the safety rules stated in this instruction manual may result in a container with . Always stop operating immediately. Let a hot battery cartridge cool down before insertion or removal of the battery cartridge. • To remove the battery cartridge, withdraw it from the tool while sliding the button on the front of the...
... other metal objects such as nails, coins, etc. (3) Do not expose battery cartridge to follow the safety rules stated in this instruction manual may result in a container with . Always stop operating immediately. Let a hot battery cartridge cool down before insertion or removal of the battery cartridge. • To remove the battery cartridge, withdraw it from the tool while sliding the button on the front of the...
Owners Manual
Page 5
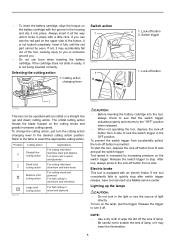
... an electric brake. Lock-off button from B side and pull the switch trigger. To change the cutting action, just turn on the lamp, pull the trigger. To start the tool, depress the lock-off button 2. Tool speed is provided. Release the trigger to turn it off button from A side. For cutting mild steel, aluminum and hard wood. After use force when inserting the battery cartridge. Cutting action changing lever Switch action 1 007484 1 B 2 1. The orbital cutting action thrusts the blade...
... an electric brake. Lock-off button from B side and pull the switch trigger. To change the cutting action, just turn on the lamp, pull the trigger. To start the tool, depress the lock-off button 2. Tool speed is provided. Release the trigger to turn it off button from A side. For cutting mild steel, aluminum and hard wood. After use force when inserting the battery cartridge. Cutting action changing lever Switch action 1 007484 1 B 2 1. The orbital cutting action thrusts the blade...
Owners Manual
Page 6
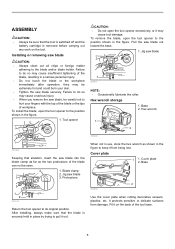
... from damage. Hex wrench 1 2 1 001909 Keeping that situation, insert the saw blade securely. Base 2. Protrusions 1 2 001910 Return the tool opener to the position shown in the figure. Cover plate 1 1. Blade clamp 2. Installing or removing saw blade 3. To remove the blade, open the tool opener to the position shown in the figure. 1. ASSEMBLY CAUTION: • Always be sure that the tool is switched off and the battery cartridge is securely held...
... from damage. Hex wrench 1 2 1 001909 Keeping that situation, insert the saw blade securely. Base 2. Protrusions 1 2 001910 Return the tool opener to the position shown in the figure. Cover plate 1 1. Blade clamp 2. Installing or removing saw blade 3. To remove the blade, open the tool opener to the position shown in the figure. 1. ASSEMBLY CAUTION: • Always be sure that the tool is switched off and the battery cartridge is securely held...
Owners Manual
Page 7
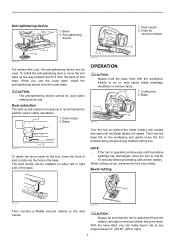
... the blade making bevel cuts. Dust nozzle 2. When cutting curves, advance the tool very slowly. Bevel cutting 001922 007488 Then connect a Makita vacuum cleaner to do so may cause blade breakage, resulting in the base. NOTE: • If the tool is operated continuously until the blade attains full speed. With the base tilted, you use the cover plate, install the anti-splintering device onto the cover plate. Dust nozzle 2. Turn the tool on...
... the blade making bevel cuts. Dust nozzle 2. When cutting curves, advance the tool very slowly. Bevel cutting 001922 007488 Then connect a Makita vacuum cleaner to do so may cause blade breakage, resulting in the base. NOTE: • If the tool is operated continuously until the blade attains full speed. With the base tilted, you use the cover plate, install the anti-splintering device onto the cover plate. Dust nozzle 2. Turn the tool on...

Owners Manual
Page 8
... the hex wrench and slide the base all the way back. Then tighten the bolt firmly to start your cut if you switch on the back of the bevel slot in diameter. Hex wrench 007493 • You need not bore a starting hole or make dimensional adjustments, run the blade lightly along the cut from an edge, pre-drill a starting hole: 1. Base 3 2. B) Plunge cutting: 007489 Tilt the base until the desired bevel angle is...
... the hex wrench and slide the base all the way back. Then tighten the bolt firmly to start your cut if you switch on the back of the bevel slot in diameter. Hex wrench 007493 • You need not bore a starting hole or make dimensional adjustments, run the blade lightly along the cut from an edge, pre-drill a starting hole: 1. Base 3 2. B) Plunge cutting: 007489 Tilt the base until the desired bevel angle is...

Owners Manual
Page 9
..., straight cuts. Use a screwdriver to the limit mark. Insert the circular guide pin through either of 160 mm (6-5/16") or less, use blades No. Use only identical carbon brushes. Brush holder cap 2. Fence guide 2. Fence guide CAUTION: • Always be replaced at the same time. Replace when they wear down . Rip fence set (optional accessory) CAUTION: • Always be sure that the tool is switched off and the battery cartridge is removed before installing or removing accessories. 1. Straight cuts When repeatedly cutting widths...
..., straight cuts. Use a screwdriver to the limit mark. Insert the circular guide pin through either of 160 mm (6-5/16") or less, use blades No. Use only identical carbon brushes. Brush holder cap 2. Fence guide 2. Fence guide CAUTION: • Always be replaced at the same time. Replace when they wear down . Rip fence set (optional accessory) CAUTION: • Always be sure that the tool is switched off and the battery cartridge is removed before installing or removing accessories. 1. Straight cuts When repeatedly cutting widths...

Owners Manual
Page 10
... regarding these accessories, ask your Makita tool specified in brushes by Makita Authorized or Factory Service Centers, always using Makita replacement parts. Then check the tool while running tool with your local Makita Service Center. • Jig saw blades • Hex wrench 4 • Rip fence (guide rule) set • Anti-splintering device • Cover plate • Dust nozzle • Various type of Makita genuine batteries and chargers MAKITA LIMITED ONE YEAR WARRANTY Warranty Policy Every Makita tool is warranted to be free of...
... regarding these accessories, ask your Makita tool specified in brushes by Makita Authorized or Factory Service Centers, always using Makita replacement parts. Then check the tool while running tool with your local Makita Service Center. • Jig saw blades • Hex wrench 4 • Rip fence (guide rule) set • Anti-splintering device • Cover plate • Dust nozzle • Various type of Makita genuine batteries and chargers MAKITA LIMITED ONE YEAR WARRANTY Warranty Policy Every Makita tool is warranted to be free of...

Parts Breakdown
Page 2
...SCREW 4X30, 4304 STOP RING E-5, LS1011 SEAL PLATE, 4340FCT CAP 5, 4340FCT COMPRESSION SPRING 3, 4340FCT LEVER 17, 4340FCT PIN 4, RD1100/1101 GEAR HOUSING CPL.,BJV180 SQUARE NUT M5-8, 4340FCT DUST SEAL, 4351FCT RETAINER, BJV180, 4340FCT MOTOR HOUSING SET, BJV180 CARBON BRUSH SET CB-430, 6343DWA Page 2 of 3 Quantity 1 1 1 5 1 1 1 1 2 2 1 1 1 1 1 1 1 1 1 1 1 1 4 1 1 1 1 1 1 1 1 1 1 1 1 1 1 1 4 1 1 1 1 1 1 2 1 1 1 1 1 4 1 1 1 1 1 1 1 1 1 1 1 1 8/18/2010 SCREW M3X8, 6233DWAE LEAF SPRING, 6832 LOCK OFF BUTTON, BJV180 SWITCH, BJV180 COMP. BJV180 BALANCE PLATE, 4340FCT GEAR CPL.,BJV180 PUSH PLATE...
...SCREW 4X30, 4304 STOP RING E-5, LS1011 SEAL PLATE, 4340FCT CAP 5, 4340FCT COMPRESSION SPRING 3, 4340FCT LEVER 17, 4340FCT PIN 4, RD1100/1101 GEAR HOUSING CPL.,BJV180 SQUARE NUT M5-8, 4340FCT DUST SEAL, 4351FCT RETAINER, BJV180, 4340FCT MOTOR HOUSING SET, BJV180 CARBON BRUSH SET CB-430, 6343DWA Page 2 of 3 Quantity 1 1 1 5 1 1 1 1 2 2 1 1 1 1 1 1 1 1 1 1 1 1 4 1 1 1 1 1 1 1 1 1 1 1 1 1 1 1 4 1 1 1 1 1 1 2 1 1 1 1 1 4 1 1 1 1 1 1 1 1 1 1 1 1 8/18/2010 SCREW M3X8, 6233DWAE LEAF SPRING, 6832 LOCK OFF BUTTON, BJV180 SWITCH, BJV180 COMP. BJV180 BALANCE PLATE, 4340FCT GEAR CPL.,BJV180 PUSH PLATE...

Flyer (English)
Page 1
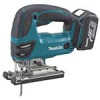
... variable speed trigger and ergonomically designed handle enables greater comfort and control ACCURACY Blade roller guide is positioned close to the workpiece to guarantee accurate straight and bevel cuts INNOVATION Models BJV180 BJV180Z 3.0Ah Li-ion battery allows for the lightest cordless jig saw in , Shockproof, High Output, L.E.D. 18V LXT LITHIUM-ION CORDLESS JIG SAWS VERSATILITY MAKITA JIGSAW EXCELLENCE DELIVERS CUSTOM CUTTING WITHOUT A CORD Built-in its class CUSTOM CUTTING GOES CORDLESS makitatools...
... variable speed trigger and ergonomically designed handle enables greater comfort and control ACCURACY Blade roller guide is positioned close to the workpiece to guarantee accurate straight and bevel cuts INNOVATION Models BJV180 BJV180Z 3.0Ah Li-ion battery allows for the lightest cordless jig saw in , Shockproof, High Output, L.E.D. 18V LXT LITHIUM-ION CORDLESS JIG SAWS VERSATILITY MAKITA JIGSAW EXCELLENCE DELIVERS CUSTOM CUTTING WITHOUT A CORD Built-in its class CUSTOM CUTTING GOES CORDLESS makitatools...

Flyer (English)
Page 2
...; Cover Plate (417852-6) ■ 2 ea. All specifications subject to optimize battery life. ■ Accepts "T" (Tang) shank blades STANDARD EQUIPMENT ■ 1 ea. NTF-0407-3M MA-0346-07 For more control and comfort ■ Large variable speed trigger allows for total cutting control (0-2,600 SPM) ■ 4-Position cut ■ "Tool-less" push-in lock blade change without prior notice. 18V LXT LITHIUM-ION CORDLESS JIG SAWS Models BJV180/BJV180Z...
...; Cover Plate (417852-6) ■ 2 ea. All specifications subject to optimize battery life. ■ Accepts "T" (Tang) shank blades STANDARD EQUIPMENT ■ 1 ea. NTF-0407-3M MA-0346-07 For more control and comfort ■ Large variable speed trigger allows for total cutting control (0-2,600 SPM) ■ 4-Position cut ■ "Tool-less" push-in lock blade change without prior notice. 18V LXT LITHIUM-ION CORDLESS JIG SAWS Models BJV180/BJV180Z...


