Owners Manual
Page 4
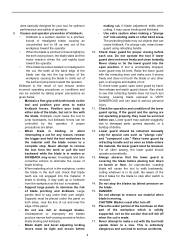
... guard closure. If tool is in the cut . Also check to see that will cause the tool to serious accidents. 4 Leaving blade exposed is moving. Raise lower guard by the operator, if proper precautions are not operating properly, they must be controlled by retracting handle... walls or other sawing, the lower guard should be serviced before each use . Raise the lower guard with both sides, near the edge of blade pinching and kickback. Unsharpened or improperly set blades produce narrow kerf causing excessive friction, blade binding and kickback. • Blade depth and bevel ...
... guard closure. If tool is in the cut . Also check to see that will cause the tool to serious accidents. 4 Leaving blade exposed is moving. Raise lower guard by the operator, if proper precautions are not operating properly, they must be controlled by retracting handle... walls or other sawing, the lower guard should be serviced before each use . Raise the lower guard with both sides, near the edge of blade pinching and kickback. Unsharpened or improperly set blades produce narrow kerf causing excessive friction, blade binding and kickback. • Blade depth and bevel ...
Owners Manual
Page 7
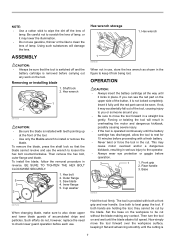
... use . Rear handle 3. Base 3 007531 1 4 007529 When changing blade, make sure to also clean upper and lower blade guards of the tool. • Use only the Makita wrench to install or remove the blade. The tool is provided with a fresh battery. • Never twist ...are holding the tool, they cannot be cut . Now simply move the tool forward in reverse. Saw blade 3 4. Removing or installing blade 1. Inner flange 5. Then remove the hex bolt, outer flange and blade. Shaft lock 2. Such efforts do not, however, replace the need to check lower guard operation...
... use . Rear handle 3. Base 3 007531 1 4 007529 When changing blade, make sure to also clean upper and lower blade guards of the tool. • Use only the Makita wrench to install or remove the blade. The tool is provided with a fresh battery. • Never twist ...are holding the tool, they cannot be cut . Now simply move the tool forward in reverse. Saw blade 3 4. Removing or installing blade 1. Inner flange 5. Then remove the hex bolt, outer flange and blade. Shaft lock 2. Such efforts do not, however, replace the need to check lower guard operation...
Parts Breakdown
Page 3
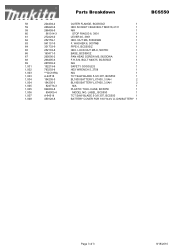
WASHER 6, 5007NB 1 PIPE 6, BCS550/Z 1 HEX. NUT M6, 5036DWB 1 F. LABEL, BCS550 1 TCT SAW BLADE 5-3/8 30T, BCS550 1 BATTERY COVER FOR 18V/14.4V LI-ION BATTERY 1 BCS550 Page 3 of 3 8/18/2010 LOCK NUT M5-8, 5007FK 1 BASE, BCS550/Z 1 PAN HEAD SCREW M5, 5620DWA 1 F.H.S.N. BOLT M6X75, BCS550/Z 1 N/A 1 SAFETY GOGGLES 1 HEX WRENCH 5, 2708 1 N/A 1 TCT SAW BLADE 5-3/8 30T, BCS550 1 BL1830 BATTERY,LXT400, 3.0AH 2 BL1830 BATTERY,LXT400, 3.0AH 2 N/A 1 PLASTIC...
WASHER 6, 5007NB 1 PIPE 6, BCS550/Z 1 HEX. NUT M6, 5036DWB 1 F. LABEL, BCS550 1 TCT SAW BLADE 5-3/8 30T, BCS550 1 BATTERY COVER FOR 18V/14.4V LI-ION BATTERY 1 BCS550 Page 3 of 3 8/18/2010 LOCK NUT M5-8, 5007FK 1 BASE, BCS550/Z 1 PAN HEAD SCREW M5, 5620DWA 1 F.H.S.N. BOLT M6X75, BCS550/Z 1 N/A 1 SAFETY GOGGLES 1 HEX WRENCH 5, 2708 1 N/A 1 TCT SAW BLADE 5-3/8 30T, BCS550 1 BL1830 BATTERY,LXT400, 3.0AH 2 BL1830 BATTERY,LXT400, 3.0AH 2 N/A 1 PLASTIC...


