
Portable AC owners manual
Page 1
OWNER'S MANUAL MODEL: P-08NPE P-12NPE P-14NPE For any service needs, call 1-855-368-8606
OWNER'S MANUAL MODEL: P-08NPE P-12NPE P-14NPE For any service needs, call 1-855-368-8606
Portable AC owners manual
Page 3
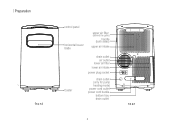
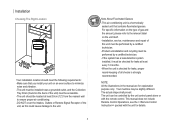
Preparation front control panel horizontal louver blade upper air filter (behind the grille) handle (both sides) upper air intake Caster drain outlet air outlet lower air filter lower air intake power plug socket drain outlet (only for pump heating mode) power cord outlet power cord buckle bottom tray drain outlet 2 rear
Preparation front control panel horizontal louver blade upper air filter (behind the grille) handle (both sides) upper air intake Caster drain outlet air outlet lower air filter lower air intake power plug socket drain outlet (only for pump heating mode) power cord outlet power cord buckle bottom tray drain outlet 2 rear
Portable AC owners manual
Page 4
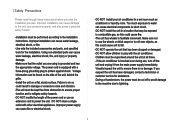
... surface. Improper power supply can cause electrical components to short circuit. -DO NOT install the unit in damage or excessive noise and vibration. -The unit must be kept free from the main power supply immediately. Voltage information can cause damage to the unit, your air conditioner in a wet room such as this could result in a location that the outlet you start the installation process. Visually inspect...
... surface. Improper power supply can cause electrical components to short circuit. -DO NOT install the unit in damage or excessive noise and vibration. -The unit must be kept free from the main power supply immediately. Voltage information can cause damage to the unit, your air conditioner in a wet room such as this could result in a location that the outlet you start the installation process. Visually inspect...
Portable AC owners manual
Page 5
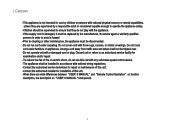
... not use this unit with any solid-state speed control device. -The appliance shall be installed in accordance with national wiring regulations. -Contact the authorised service technician for repair or maintenance of this unit. -Contact the authorised installer for examination and/or repair. -To reduce the risk of fire or electric shock, do not play with the appliance. -If the supply cord is...
... not use this unit with any solid-state speed control device. -The appliance shall be installed in accordance with national wiring regulations. -Contact the authorised service technician for repair or maintenance of this unit. -Contact the authorised installer for examination and/or repair. -To reduce the risk of fire or electric shock, do not play with the appliance. -If the supply cord is...
Portable AC owners manual
Page 6
... the unit itself. -Installation, service, maintenance and repair of this unit must be performed by a certified technician. -Product uninstallation and recycling must be performed by the unit control panel alone or with the unit for details. NOTE: All the illustrations in the manual are for leaks, proper record-keeping of the unit, as this could cause damage to ensure proper air conditioning. -DO NOT cover...
... the unit itself. -Installation, service, maintenance and repair of this unit must be performed by a certified technician. -Product uninstallation and recycling must be performed by the unit control panel alone or with the unit for details. NOTE: All the illustrations in the manual are for leaks, proper record-keeping of the unit, as this could cause damage to ensure proper air conditioning. -DO NOT cover...
Portable AC owners manual
Page 7
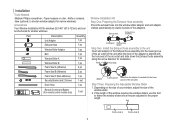
...) 1 pc Security Bracket and 2 Screws 1 set Drain Hose 1 pc LED SHORT CUT TIMER ON TIMER OFF Remote Control and Battery (For remote control models only) 1 set TEMP Window Installation Kit Step One: Preparing the Exhaust Hose assembly Press the exhaust hose into the lower groove of the window slider. 2. Bolt Window slider A Window slider B 6 Depending on the size of your window, adjust the size of the air outlet. Exhaust hose Exhaust hose assembly Unit adaptor Window slider adaptor Step Two: Install the Exhaust hose assembly to...
...) 1 pc Security Bracket and 2 Screws 1 set Drain Hose 1 pc LED SHORT CUT TIMER ON TIMER OFF Remote Control and Battery (For remote control models only) 1 set TEMP Window Installation Kit Step One: Preparing the Exhaust Hose assembly Press the exhaust hose into the lower groove of the window slider. 2. Bolt Window slider A Window slider B 6 Depending on the size of your window, adjust the size of the air outlet. Exhaust hose Exhaust hose assembly Unit adaptor Window slider adaptor Step Two: Install the Exhaust hose assembly to...
Portable AC owners manual
Page 8
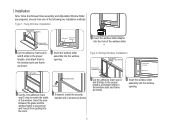
... the window. Installation Note: Once the Exhaust Hose assembly and Adjustable Window Slider are prepared, choose from getting into the room. Type 1: Hung Window Installation Foam seal B (Adhesive type-shorter) Foam seal A (Adhesive type) Window slider A Window slider B (if required) Insert the window slider adaptor into the hole of the window slider. Type 2: Sliding Window Installation Foam seal B (Adhesive type-shorter) Foam seal A (Adhesive type) Window slider B (if required) Window slider A Security Bracket 2 Screws...
... the window. Installation Note: Once the Exhaust Hose assembly and Adjustable Window Slider are prepared, choose from getting into the room. Type 1: Hung Window Installation Foam seal B (Adhesive type-shorter) Foam seal A (Adhesive type) Window slider A Window slider B (if required) Insert the window slider adaptor into the hole of the window slider. Type 2: Sliding Window Installation Foam seal B (Adhesive type-shorter) Foam seal A (Adhesive type) Window slider B (if required) Window slider A Security Bracket 2 Screws...

Portable AC owners manual
Page 9
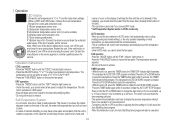
... or bend the hose. Installation Foam seal C (Non-adhesive type) Security Bracket Note: While operating in this manual are for the exhaust system works properly. Having the exhaust hose overextended can cause radiant heat into the hole of 19.69inch) in the range of the window slider. Insert the foam seal between the glass and the window frame to match the window height. Your air conditioner may be...
... or bend the hose. Installation Foam seal C (Non-adhesive type) Security Bracket Note: While operating in this manual are for the exhaust system works properly. Having the exhaust hose overextended can cause radiant heat into the hole of 19.69inch) in the range of the window slider. Insert the foam seal between the glass and the window frame to match the window height. Your air conditioner may be...

Portable AC owners manual
Page 10
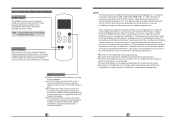
.... Timer button Used to initiate the AUTO ON start time and AUTO OFF stop the louver at the same time for 3 seconds. Each time you press the button, a mode is a reminder to clean the Air Filter for 3 seconds to cancel the reminder. Operation Swing button(optional) (Applicable to the models with the + & - When the operation is capable of operation, the filter indicator light illuminates. Fan Control the fan speed. To convert from AUTO, COOL, DRY...
.... Timer button Used to initiate the AUTO ON start time and AUTO OFF stop the louver at the same time for 3 seconds. Each time you press the button, a mode is a reminder to clean the Air Filter for 3 seconds to cancel the reminder. Operation Swing button(optional) (Applicable to the models with the + & - When the operation is capable of operation, the filter indicator light illuminates. Fan Control the fan speed. To convert from AUTO, COOL, DRY...
Portable AC owners manual
Page 11
... malfunctions occurs, turn off the unit, and check for the best dehumidifying effect. -Do not put the duct to display the previous temperature setting if there is used only if you choose DRY mode. * Self Evaporation System works in COOL mode only AUTO operation -When you may have selected and the room temperature. -The air conditioner will beep 8 times, switch to window. DRY operation -Press the "MODE" button until the unit is drained) if this...
... malfunctions occurs, turn off the unit, and check for the best dehumidifying effect. -Do not put the duct to display the previous temperature setting if there is used only if you choose DRY mode. * Self Evaporation System works in COOL mode only AUTO operation -When you may have selected and the room temperature. -The air conditioner will beep 8 times, switch to window. DRY operation -Press the "MODE" button until the unit is drained) if this...

Portable AC owners manual
Page 12
... the Auto swing feature. At this is ON, the louver opens fully. -Press the SWING button on the panel or remote control to prevent leakage before it will then increase (cooling) or decrease (heating) by another 1°C/1°F after 3 minutes. AIR FLOW DIRECTION ADJUSTMENT The louver can be adjusted manually only) : -When the Power is normal). Water drainage -During dehumidifying modes, remove the upper drain plug from the remote control...
... the Auto swing feature. At this is ON, the louver opens fully. -Press the SWING button on the panel or remote control to prevent leakage before it will then increase (cooling) or decrease (heating) by another 1°C/1°F after 3 minutes. AIR FLOW DIRECTION ADJUSTMENT The louver can be adjusted manually only) : -When the Power is normal). Water drainage -During dehumidifying modes, remove the upper drain plug from the remote control...

Portable AC owners manual
Page 13
... in a warm room to dry it and prevent mold. -Turn off the appliance and unplug it. -Clean the air filter according to the instructions in a cool, dark place. Clean the Air Filter Upper filter (take out) Be sure to animal hair. 12 lower filter A (take out) Clean the Unit Clean the unit using a damp, lint-free cloth and mild detergent. A damaged power cord must be drained immediately after P1 error occurs, and...
... in a warm room to dry it and prevent mold. -Turn off the appliance and unplug it. -Clean the air filter according to the instructions in a cool, dark place. Clean the Air Filter Upper filter (take out) Be sure to animal hair. 12 lower filter A (take out) Clean the Unit Clean the unit using a damp, lint-free cloth and mild detergent. A damaged power cord must be drained immediately after P1 error occurs, and...
Portable AC owners manual
Page 14
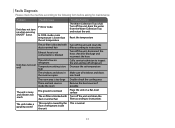
... refrigerant Decrease the set temperature Troubleshooting The Water Collection Tray is normal flow of refrigerant inside the unit 13 Turn off the unit, disconnect the hose, check for maintenance: Problem Possible Cause Unit does not turn on when pressing ON/OFF button P1 Error Code In COOL mode: room temperature is lower than the set temperature Make sure all windows and doors are closed The room area is too large There are open Turn off the unit and clean...
... refrigerant Decrease the set temperature Troubleshooting The Water Collection Tray is normal flow of refrigerant inside the unit 13 Turn off the unit, disconnect the hose, check for maintenance: Problem Possible Cause Unit does not turn on when pressing ON/OFF button P1 Error Code In COOL mode: room temperature is lower than the set temperature Make sure all windows and doors are closed The room area is too large There are open Turn off the unit and clean...
Portable AC remote manual
Page 1
Please read this owner's manual carefully before using your air conditioner. For any service needs, call 1-855-368-8606 Thank you for purchasing our air conditioner. VERY SMART are used under license from Koninklijke Philips N.V. AIR CONDITIONER REMOTE CONTROL MANUAL MAGNAVOX and SMART. and are registered trademarks of Koninklijke Philips N.V.
Please read this owner's manual carefully before using your air conditioner. For any service needs, call 1-855-368-8606 Thank you for purchasing our air conditioner. VERY SMART are used under license from Koninklijke Philips N.V. AIR CONDITIONER REMOTE CONTROL MANUAL MAGNAVOX and SMART. and are registered trademarks of Koninklijke Philips N.V.

Portable AC remote manual
Page 3
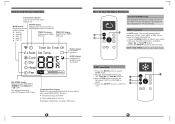
... Functions for instructions) TIMER OFF Sets timer to turn unit off . The unit will beep when remote signal is 62°F. Inserting and Replacing Batteries Your air conditioning unit comes with the symbols inside the battery compartment. 3. FAN SPEED Selects fan speeds in the remote control before use your favorite pre-settings. Dif oyonuotdloena,vt eplbaanttoenrieussiinngththeeredmevoictee control for proper disposal of batteries as follows: AUTO COOL DRY HEAT FAN NOTE Please do not select HEAT mode if the...
... Functions for instructions) TIMER OFF Sets timer to turn unit off . The unit will beep when remote signal is 62°F. Inserting and Replacing Batteries Your air conditioning unit comes with the symbols inside the battery compartment. 3. FAN SPEED Selects fan speeds in the remote control before use your favorite pre-settings. Dif oyonuotdloena,vt eplbaanttoenrieussiinngththeeredmevoictee control for proper disposal of batteries as follows: AUTO COOL DRY HEAT FAN NOTE Please do not select HEAT mode if the...
Portable AC remote manual
Page 4
... temperature using the Temp or Temp button. 3. Press the MODE button to start the 3 ON/OFF MODE FAN TEMP SHORT CUT TIMER ON TIMER OFF unit. AUTO operation 3 2 In AUTO mode, the unit will automatically ON/OFF SHORT CUT select the COOL, FAN, HEAT or DRY mode 1 MODE TIMER ON TEMP FAN TIMER OFF based on , and disappears when it is turned off TIMER ON display Displays when TIMER ON is set TIMER OFF display Displays when TIMER OFF is set Battery display Low battery detection SLEEP display Displays when SLEEP function is activated FAN SPEED display Displays...
... temperature using the Temp or Temp button. 3. Press the MODE button to start the 3 ON/OFF MODE FAN TEMP SHORT CUT TIMER ON TIMER OFF unit. AUTO operation 3 2 In AUTO mode, the unit will automatically ON/OFF SHORT CUT select the COOL, FAN, HEAT or DRY mode 1 MODE TIMER ON TEMP FAN TIMER OFF based on , and disappears when it is turned off TIMER ON display Displays when TIMER ON is set TIMER OFF display Displays when TIMER OFF is set Battery display Low battery detection SLEEP display Displays when SLEEP function is activated FAN SPEED display Displays...

Portable AC remote manual
Page 5
... SHORT CUT 2 4. Set your desired temperature using the Temp or Temp button. 3. Press the FAN button to select FAN mode. 2. Press FAN button to select DRY mode. 2. Press the MODE button to select the fan speed: AUTO, LOW, MED or HIGH. 3. Press the ON/OFF button to start the 3 unit. 1 NOTE: You mode. Press the MODE button to start the unit. 1 MODE TIMER ON 3 TEMP FAN TIMER OFF NpeOrTfoErm: Aasncoeutodfoyoorutreumnpit,esraHtuErAeTdfruonpcsti,othne may be changed in conjunction with other heating appliance. In such...
... SHORT CUT 2 4. Set your desired temperature using the Temp or Temp button. 3. Press the FAN button to select FAN mode. 2. Press FAN button to select DRY mode. 2. Press the MODE button to select the fan speed: AUTO, LOW, MED or HIGH. 3. Press the ON/OFF button to start the 3 unit. 1 NOTE: You mode. Press the MODE button to start the unit. 1 MODE TIMER ON 3 TEMP FAN TIMER OFF NpeOrTfoErm: Aasncoeutodfoyoorutreumnpit,esraHtuErAeTdfruonpcsti,othne may be changed in conjunction with other heating appliance. In such...

Portable AC remote manual
Page 6
... remote control will appear on the display. By default, the last time period that you to turn on the screen, and the unit will increase in 30 minute increments with each press. TIMER OFF function The TIMER OFF function allows you set and an "h" (indicating hours) will then return to the temperature display. 1 2 x5 TIMER ON TIMER ON 3 4 1 sec 2 sec ON/OFF MODE FAN SLEEP TEMP...
... remote control will appear on the display. By default, the last time period that you to turn on the screen, and the unit will increase in 30 minute increments with each press. TIMER OFF function The TIMER OFF function allows you set and an "h" (indicating hours) will then return to the temperature display. 1 2 x5 TIMER ON TIMER ON 3 4 1 sec 2 sec ON/OFF MODE FAN SLEEP TEMP...
Portable AC remote manual
Page 7
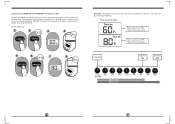
... current time is set for both functions refer to hours after 6 hours, operate for 2 hours, then automatically turn off (see the figure below) Your remote display Timer on automatically at 9:00 PM. Do the following: 1 2 X12 3 4 sec TIMER ON TIMER ON 5 6 X16 7 TIMER OFF TIMER OFF ON/OFF MODE TEMP SCHUOTRT TIMER ON 8 sec ON/OFF MODE TEMP SCHUOTRT TIMER ON Example: Setting the unit to turn on after...
... current time is set for both functions refer to hours after 6 hours, operate for 2 hours, then automatically turn off (see the figure below) Your remote display Timer on automatically at 9:00 PM. Do the following: 1 2 X12 3 4 sec TIMER ON TIMER ON 5 6 X16 7 TIMER OFF TIMER OFF ON/OFF MODE TEMP SCHUOTRT TIMER ON 8 sec ON/OFF MODE TEMP SCHUOTRT TIMER ON Example: Setting the unit to turn on after...
Portable AC remote manual
Page 8
... button when remote control is connected. These limits are designed to the previous settings including operating mode, setting temperature, fan speed level and sleep feature (if activated). This function can be activated via remote control. If keep pushing more than 2 seconds, the louver auto swing feature is not available in a particular installation. If pushing more than 2 seconds, the system will not occur in FAN or DRY mode...
... button when remote control is connected. These limits are designed to the previous settings including operating mode, setting temperature, fan speed level and sleep feature (if activated). This function can be activated via remote control. If keep pushing more than 2 seconds, the louver auto swing feature is not available in a particular installation. If pushing more than 2 seconds, the system will not occur in FAN or DRY mode...


