
Portable AC owners manual
Page 1
OWNER'S MANUAL MODEL: P-08NPE P-12NPE P-14NPE For any service needs, call 1-855-368-8606
OWNER'S MANUAL MODEL: P-08NPE P-12NPE P-14NPE For any service needs, call 1-855-368-8606
Portable AC owners manual
Page 3
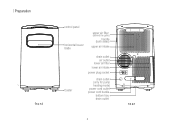
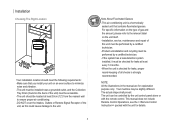
Preparation front control panel horizontal louver blade upper air filter (behind the grille) handle (both sides) upper air intake Caster drain outlet air outlet lower air filter lower air intake power plug socket drain outlet (only for pump heating mode) power cord outlet power cord buckle bottom tray drain outlet 2 rear
Preparation front control panel horizontal louver blade upper air filter (behind the grille) handle (both sides) upper air intake Caster drain outlet air outlet lower air filter lower air intake power plug socket drain outlet (only for pump heating mode) power cord outlet power cord buckle bottom tray drain outlet 2 rear
Portable AC owners manual
Page 4
... the power cord or use an extension cord to power the unit. Too much exposure to water can be exposed to combustible gas, as this could result in a wet room such as a bathroom or laundry room. Make sure not to use , turn off to avoid damage to the machine due to play with the air conditioner. Improper installation can cause fire or electrical shock...
... the power cord or use an extension cord to power the unit. Too much exposure to water can be exposed to combustible gas, as this could result in a wet room such as a bathroom or laundry room. Make sure not to use , turn off to avoid damage to the machine due to play with the air conditioner. Improper installation can cause fire or electrical shock...
Portable AC owners manual
Page 5
... tripped over. -Do not operate unit with a damaged cord or plug. Do not cover cord with the appliance. -If the supply cord is not intended for use this unit. -When there are wide differences between "USER' S MANUAL" and "Remote Control Illustration" on function description, the description on "USER' S MANUAL " shall prevail. 4 Discard unit or return to an authorized service facility for installation of this unit with any solid-state...
... tripped over. -Do not operate unit with a damaged cord or plug. Do not cover cord with the appliance. -If the supply cord is not intended for use this unit. -When there are wide differences between "USER' S MANUAL" and "Remote Control Illustration" on function description, the description on "USER' S MANUAL " shall prevail. 4 Discard unit or return to an authorized service facility for installation of this unit with any solid-state...
Portable AC owners manual
Page 6
... minimize noise and vibration. -The unit must be installed near a grounded outlet, and the Collection Tray Drain (found on the unit itself. -Installation, service, maintenance and repair of this could cause damage to the relevant label on the back of the unit) must be performed by the unit control panel alone or with the unit for explanation purpose only. This manual does not include Remote Control Operations, see...
... minimize noise and vibration. -The unit must be installed near a grounded outlet, and the Collection Tray Drain (found on the unit itself. -Installation, service, maintenance and repair of this could cause damage to the relevant label on the back of the unit) must be performed by the unit control panel alone or with the unit for explanation purpose only. This manual does not include Remote Control Operations, see...
Portable AC owners manual
Page 7
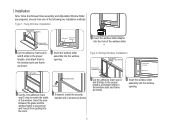
... Seal C (Non-adhesive) 1 pc Security Bracket and 2 Screws 1 set Drain Hose 1 pc LED SHORT CUT TIMER ON TIMER OFF Remote Control and Battery (For remote control models only) 1 set TEMP Window Installation Kit Step One: Preparing the Exhaust Hose assembly Press the exhaust hose into the lower groove of the air outlet. Exhaust hose Exhaust hose assembly Unit adaptor Window slider adaptor Step Two: Install the Exhaust hose assembly to the proper length. Hook Hole Seat adaptor Lower groove Make sure...
... Seal C (Non-adhesive) 1 pc Security Bracket and 2 Screws 1 set Drain Hose 1 pc LED SHORT CUT TIMER ON TIMER OFF Remote Control and Battery (For remote control models only) 1 set TEMP Window Installation Kit Step One: Preparing the Exhaust Hose assembly Press the exhaust hose into the lower groove of the air outlet. Exhaust hose Exhaust hose assembly Unit adaptor Window slider adaptor Step Two: Install the Exhaust hose assembly to the proper length. Hook Hole Seat adaptor Lower groove Make sure...
Portable AC owners manual
Page 8
..., install the security bracket with 2 screws as shown. Insert the window slider assembly into the hole of the window slider. Type 1: Hung Window Installation Foam seal B (Adhesive type-shorter) Foam seal A (Adhesive type) Window slider A Window slider B (if required) Insert the window slider adaptor into the window opening . Cut the adhesive foam seal A and B strips to the proper lengths, and attach them to prevent air and...
..., install the security bracket with 2 screws as shown. Insert the window slider assembly into the hole of the window slider. Type 1: Hung Window Installation Foam seal B (Adhesive type-shorter) Foam seal A (Adhesive type) Window slider A Window slider B (if required) Insert the window slider adaptor into the window opening . Cut the adhesive foam seal A and B strips to the proper lengths, and attach them to prevent air and...

Portable AC owners manual
Page 9
... NOT overextend or bend the hose. Your air conditioner may be slightly different. All the illustrations in this manual are for the exhaust system works properly. Insert the window slider adaptor into the room. 2 Screws If desired, install the security bracket with 2 screws as shown. Installation Foam seal C (Non-adhesive type) Security Bracket Note: While operating in cool mode, the exhaust hose will become warm to the touch...
... NOT overextend or bend the hose. Your air conditioner may be slightly different. All the illustrations in this manual are for the exhaust system works properly. Insert the window slider adaptor into the room. 2 Screws If desired, install the security bracket with 2 screws as shown. Installation Foam seal C (Non-adhesive type) Security Bracket Note: While operating in cool mode, the exhaust hose will become warm to the touch...

Portable AC owners manual
Page 10
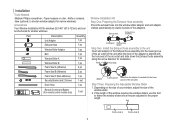
.... The mode indicator light illuminates under the timer on/off settings. Fan Control the fan speed. Press to initiate the Auto swing feature. Power button Power switch on /off . Each time you press the button, a mode is a reminder to initiate the SLEEP/ECO (3s operation. Operation Swing button(optional) (Applicable to the models with the + & - Sleep(Eco)/Filter button Used to clean the Air Filter for more efficient operation. The timer on /off indicator light illuminates under the different mode settings...
.... The mode indicator light illuminates under the timer on/off settings. Fan Control the fan speed. Press to initiate the Auto swing feature. Power button Power switch on /off . Each time you press the button, a mode is a reminder to initiate the SLEEP/ECO (3s operation. Operation Swing button(optional) (Applicable to the models with the + & - Sleep(Eco)/Filter button Used to clean the Air Filter for more efficient operation. The timer on /off indicator light illuminates under the different mode settings...
Portable AC owners manual
Page 11
... "COOL" indicator light comes on . -Under this mode, you cannot select a fan speed or adjust the temperature. TIMER operation - This indicates the AUTO OFF STOP program is full--Connect the drain hose and drain the collected water away. Press the TIMER button again within a range of 17°C~30°C/62°F~86°F. -Press the "FAN SPEED" button to choose the fan speed. Shows Error codes and protection code: E1-Room temperature sensor error. Contact...
... "COOL" indicator light comes on . -Under this mode, you cannot select a fan speed or adjust the temperature. TIMER operation - This indicates the AUTO OFF STOP program is full--Connect the drain hose and drain the collected water away. Press the TIMER button again within a range of 17°C~30°C/62°F~86°F. -Press the "FAN SPEED" button to choose the fan speed. Shows Error codes and protection code: E1-Room temperature sensor error. Contact...

Portable AC owners manual
Page 12
... hole. This new temperature will be adjusted manually only) : -When the Power is actual temperature at its location. NOTE: This feature is normal). The remote display is ON, the louver opens fully. -Press the SWING button on the panel or remote control to the air conditioner every 3 minutes interval until the "P1" symbol disappears. Carefully move the unit to indicate the Follow Me/Temp Sensing mode has ended. Operation SLEEP/ECO operation...
... hole. This new temperature will be adjusted manually only) : -When the Power is actual temperature at its location. NOTE: This feature is normal). The remote display is ON, the louver opens fully. -Press the SWING button on the panel or remote control to the air conditioner every 3 minutes interval until the "P1" symbol disappears. Carefully move the unit to indicate the Follow Me/Temp Sensing mode has ended. Operation SLEEP/ECO operation...

Portable AC owners manual
Page 13
... to direct sunshine or extreme heat can shorten the lifespan of the unit. Maintenance Safety Precautions -Always unplug the unit before cleaning or servicing. -DO NOT use -Drain the unit's water collection tray according to the instructions in the following section. -Run the appliance on FAN mode for optimal performance. -The water collection tray should be replaced with a dry, lint-free cloth. Dry the unit with a new cord from the remote control. Reinstall the clean, dry...
... to direct sunshine or extreme heat can shorten the lifespan of the unit. Maintenance Safety Precautions -Always unplug the unit before cleaning or servicing. -DO NOT use -Drain the unit's water collection tray according to the instructions in the following section. -Run the appliance on FAN mode for optimal performance. -The water collection tray should be replaced with a dry, lint-free cloth. Dry the unit with a new cord from the remote control. Reinstall the clean, dry...
Portable AC owners manual
Page 14
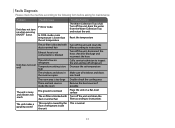
... to instructions Turn off the unit, disconnect the hose, check for maintenance: Problem Possible Cause Unit does not turn on when pressing ON/OFF button P1 Error Code In COOL mode: room temperature is lower than the set temperature Make sure all windows and doors are closed The room area is blocked with dust or animal hair Place the unit on a flat, level surface Turn off the unit, drain the water from the Water Collection...
... to instructions Turn off the unit, disconnect the hose, check for maintenance: Problem Possible Cause Unit does not turn on when pressing ON/OFF button P1 Error Code In COOL mode: room temperature is lower than the set temperature Make sure all windows and doors are closed The room area is blocked with dust or animal hair Place the unit on a flat, level surface Turn off the unit, drain the water from the Water Collection...
Portable AC remote manual
Page 1
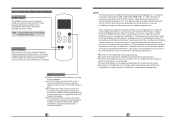
Please read this owner's manual carefully before using your air conditioner. For any service needs, call 1-855-368-8606 Thank you for purchasing our air conditioner. and are registered trademarks of Koninklijke Philips N.V. AIR CONDITIONER REMOTE CONTROL MANUAL MAGNAVOX and SMART. VERY SMART are used under license from Koninklijke Philips N.V.
Please read this owner's manual carefully before using your air conditioner. For any service needs, call 1-855-368-8606 Thank you for purchasing our air conditioner. and are registered trademarks of Koninklijke Philips N.V. AIR CONDITIONER REMOTE CONTROL MANUAL MAGNAVOX and SMART. VERY SMART are used under license from Koninklijke Philips N.V.

Portable AC remote manual
Page 3
... Turns indoor unit,s LED display on and off. Press the button again to familiarize yourself with the symbols inside the battery compartment. 3. Remove batteries if the remote will have no effect. Max. temperature is cooling only type. Slide the battery cover back into place. Function Buttons Before you begin using your new air conditioner, make sure to turn it back on. 3 Handling The Remote Control NOT SURE WHAT A FUNCTION DOES? Heat mode...
... Turns indoor unit,s LED display on and off. Press the button again to familiarize yourself with the symbols inside the battery compartment. 3. Remove batteries if the remote will have no effect. Max. temperature is cooling only type. Slide the battery cover back into place. Function Buttons Before you begin using your new air conditioner, make sure to turn it back on. 3 Handling The Remote Control NOT SURE WHAT A FUNCTION DOES? Heat mode...
Portable AC remote manual
Page 4
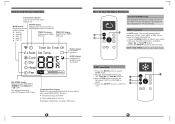
... Auto mode. Set your desired temperature using 2 the Temp or Temp button.3. SLEEP SWING LED 5 6 Remote LCD Screen Indicators Transmission Indicator Lights up when remote sends signal to unit MODE display Displays the current mode, including: AUTO COOL DRY HEAT FAN ON/OFF display Appears when the unit is turned on the set temperature in FAN mode. AUTO operation 3 2 In AUTO mode, the unit will automatically ON/OFF SHORT CUT select the COOL, FAN, HEAT or DRY mode 1 MODE TIMER ON TEMP FAN TIMER OFF based on , and disappears when it is turned off TIMER ON display...
... Auto mode. Set your desired temperature using 2 the Temp or Temp button.3. SLEEP SWING LED 5 6 Remote LCD Screen Indicators Transmission Indicator Lights up when remote sends signal to unit MODE display Displays the current mode, including: AUTO COOL DRY HEAT FAN ON/OFF display Appears when the unit is turned on the set temperature in FAN mode. AUTO operation 3 2 In AUTO mode, the unit will automatically ON/OFF SHORT CUT select the COOL, FAN, HEAT or DRY mode 1 MODE TIMER ON TEMP FAN TIMER OFF based on , and disappears when it is turned off TIMER ON display...

Portable AC remote manual
Page 5
... ON/OFF button to select FAN mode. 2. In such instances, we recommend using the Temp or Temp button. 3. Press the MODE button to start the 3 unit. 1 NOTE: You mode. Set your desired temperature using this air conditioner in DRY mode. 1 MODE TIMER ON TEMP FAN TIMER OFF SLEEP SWING LED How To Use The Basic Functions HEAT operation 1. Press the MODE button to select the fan speed: AUTO, LOW, MED or HIGH. 3. Press FAN button to select HEAT mode. 2. Press the MODE button to start the unit. 1 MODE TIMER ON 3 TEMP FAN TIMER OFF NpeOrTfoErm...
... ON/OFF button to select FAN mode. 2. In such instances, we recommend using the Temp or Temp button. 3. Press the MODE button to start the 3 unit. 1 NOTE: You mode. Set your desired temperature using this air conditioner in DRY mode. 1 MODE TIMER ON TEMP FAN TIMER OFF SLEEP SWING LED How To Use The Basic Functions HEAT operation 1. Press the MODE button to select the fan speed: AUTO, LOW, MED or HIGH. 3. Press FAN button to select HEAT mode. 2. Press the MODE button to start the unit. 1 MODE TIMER ON 3 TEMP FAN TIMER OFF NpeOrTfoErm...

Portable AC remote manual
Page 6
... will then return to the temperature display. 1 2 x5 TIMER ON TIMER ON 3 4 1 sec 2 sec ON/OFF MODE FAN SLEEP TEMP SCHUOTRT TIMER TIMER OFF ON Example: Setting unit to turn off . 1. Press the TIMER OFF button repeatedly to set the time when you want the unit to turn on your remote control will then return to the temperature display. 1 2 x10 TIMER OFF TIMER OFF NOTE: When setting the TIMER ON or TIMER OFF functions, up to 24...
... will then return to the temperature display. 1 2 x5 TIMER ON TIMER ON 3 4 1 sec 2 sec ON/OFF MODE FAN SLEEP TEMP SCHUOTRT TIMER TIMER OFF ON Example: Setting unit to turn off . 1. Press the TIMER OFF button repeatedly to set the time when you want the unit to turn on your remote control will then return to the temperature display. 1 2 x10 TIMER OFF TIMER OFF NOTE: When setting the TIMER ON or TIMER OFF functions, up to 24...
Portable AC remote manual
Page 7
... 3 4 sec TIMER ON TIMER ON 5 6 X16 7 TIMER OFF TIMER OFF ON/OFF MODE TEMP SCHUOTRT TIMER ON 8 sec ON/OFF MODE TEMP SCHUOTRT TIMER ON Example: Setting the unit to turn on after the current time. Setting both functions refer to hours after 6 hours, operate for 2 hours, then turn off (see the figure below) Your remote display Timer on Timer is set to turn OFF 8 hours from current time Timer off Timer is 1:00...
... 3 4 sec TIMER ON TIMER ON 5 6 X16 7 TIMER OFF TIMER OFF ON/OFF MODE TEMP SCHUOTRT TIMER ON 8 sec ON/OFF MODE TEMP SCHUOTRT TIMER ON Example: Setting the unit to turn on after the current time. Setting both functions refer to hours after 6 hours, operate for 2 hours, then turn off (see the figure below) Your remote display Timer on Timer is set to turn OFF 8 hours from current time Timer off Timer is 1:00...
Portable AC remote manual
Page 8
SWING Function Used to restore the current settings or resume previous settings. ON/OFF MODE FAN TEMP SHORT CUT TIMER ON TIMER OFF SLEEP SWING LED SHORTCUT function Used to stop or start louver movement and set the desired up/down air flow direction. Changes or modifications not approved by the party responsible for a Class B digital device, pursuant to part 15 of the FCC Rules. Push this device...
SWING Function Used to restore the current settings or resume previous settings. ON/OFF MODE FAN TEMP SHORT CUT TIMER ON TIMER OFF SLEEP SWING LED SHORTCUT function Used to stop or start louver movement and set the desired up/down air flow direction. Changes or modifications not approved by the party responsible for a Class B digital device, pursuant to part 15 of the FCC Rules. Push this device...


